Table of Contents
- Introduction
- Understanding Adaptive Cards
- Use Case: Reward and Recognition Program
- Demo
- Step-by-Step Guide to Building the Rewards and Recognition Copilot
- Step 1: Setting Up Your Environment
- Step 2: Preparing Your Data in Dataverse
- Step 3: Creating the Copilot in Copilot Studio
- Step 4: Enable Generative Selection of Topics
- Step 5: Create Topics
- Step 6: Adding the Office 365 Mail Connector
- Step 7: Querying Dataverse
- Step 8: Adding Conditions and Adaptive Cards
- Step 9: Publishing to Teams
- Step 10: Testing the Copilot
- Conclusion
Introduction
Enhancing user experience is key to boosting engagement and productivity. Adaptive Cards provide a versatile and dynamic way to present rich content in a structured format. When integrated with Copilot and Office 365 connectors, they can significantly enrich the user experience. This blog post explores how to leverage Adaptive Cards within Copilot to create a seamless and engaging Rewards and Recognition Program for your organization.
Understanding Adaptive Cards
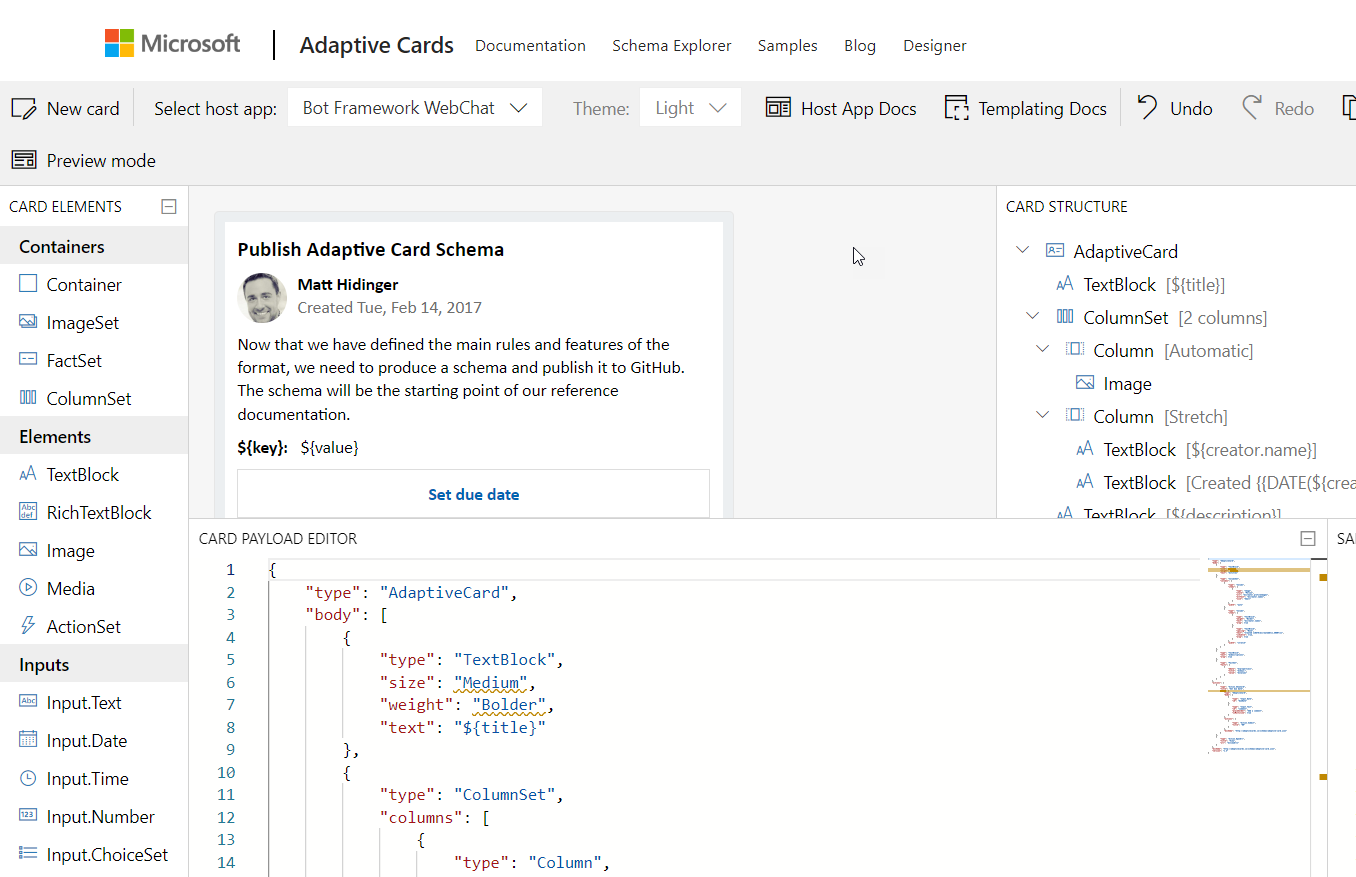
Adaptive Cards are a platform-agnostic way to present and interact with information in a consistent and visually appealing manner. They are JSON-based and can be rendered natively in a host application like Microsoft Teams, Outlook, or any other application that supports Adaptive Cards. We can leverage adaptive cards in Copilots as well to enable richer conversations with a better user experience. The detailed schema explorer that documents the usage of various adaptive card elements is present here. We can also give a try at building the adaptive cards using the online designer available here.
Use Case: Reward and Recognition Program
Let’s delve into a practical scenario: implementing a Reward and Recognition Program where employees can select and order a reward based on their eligibility. We’ll explore how to integrate Adaptive Cards with Copilot and utilize Office 365 and Dataverse actions to build an end-to-end bot without the use of Power Automate.
Overview of the Process
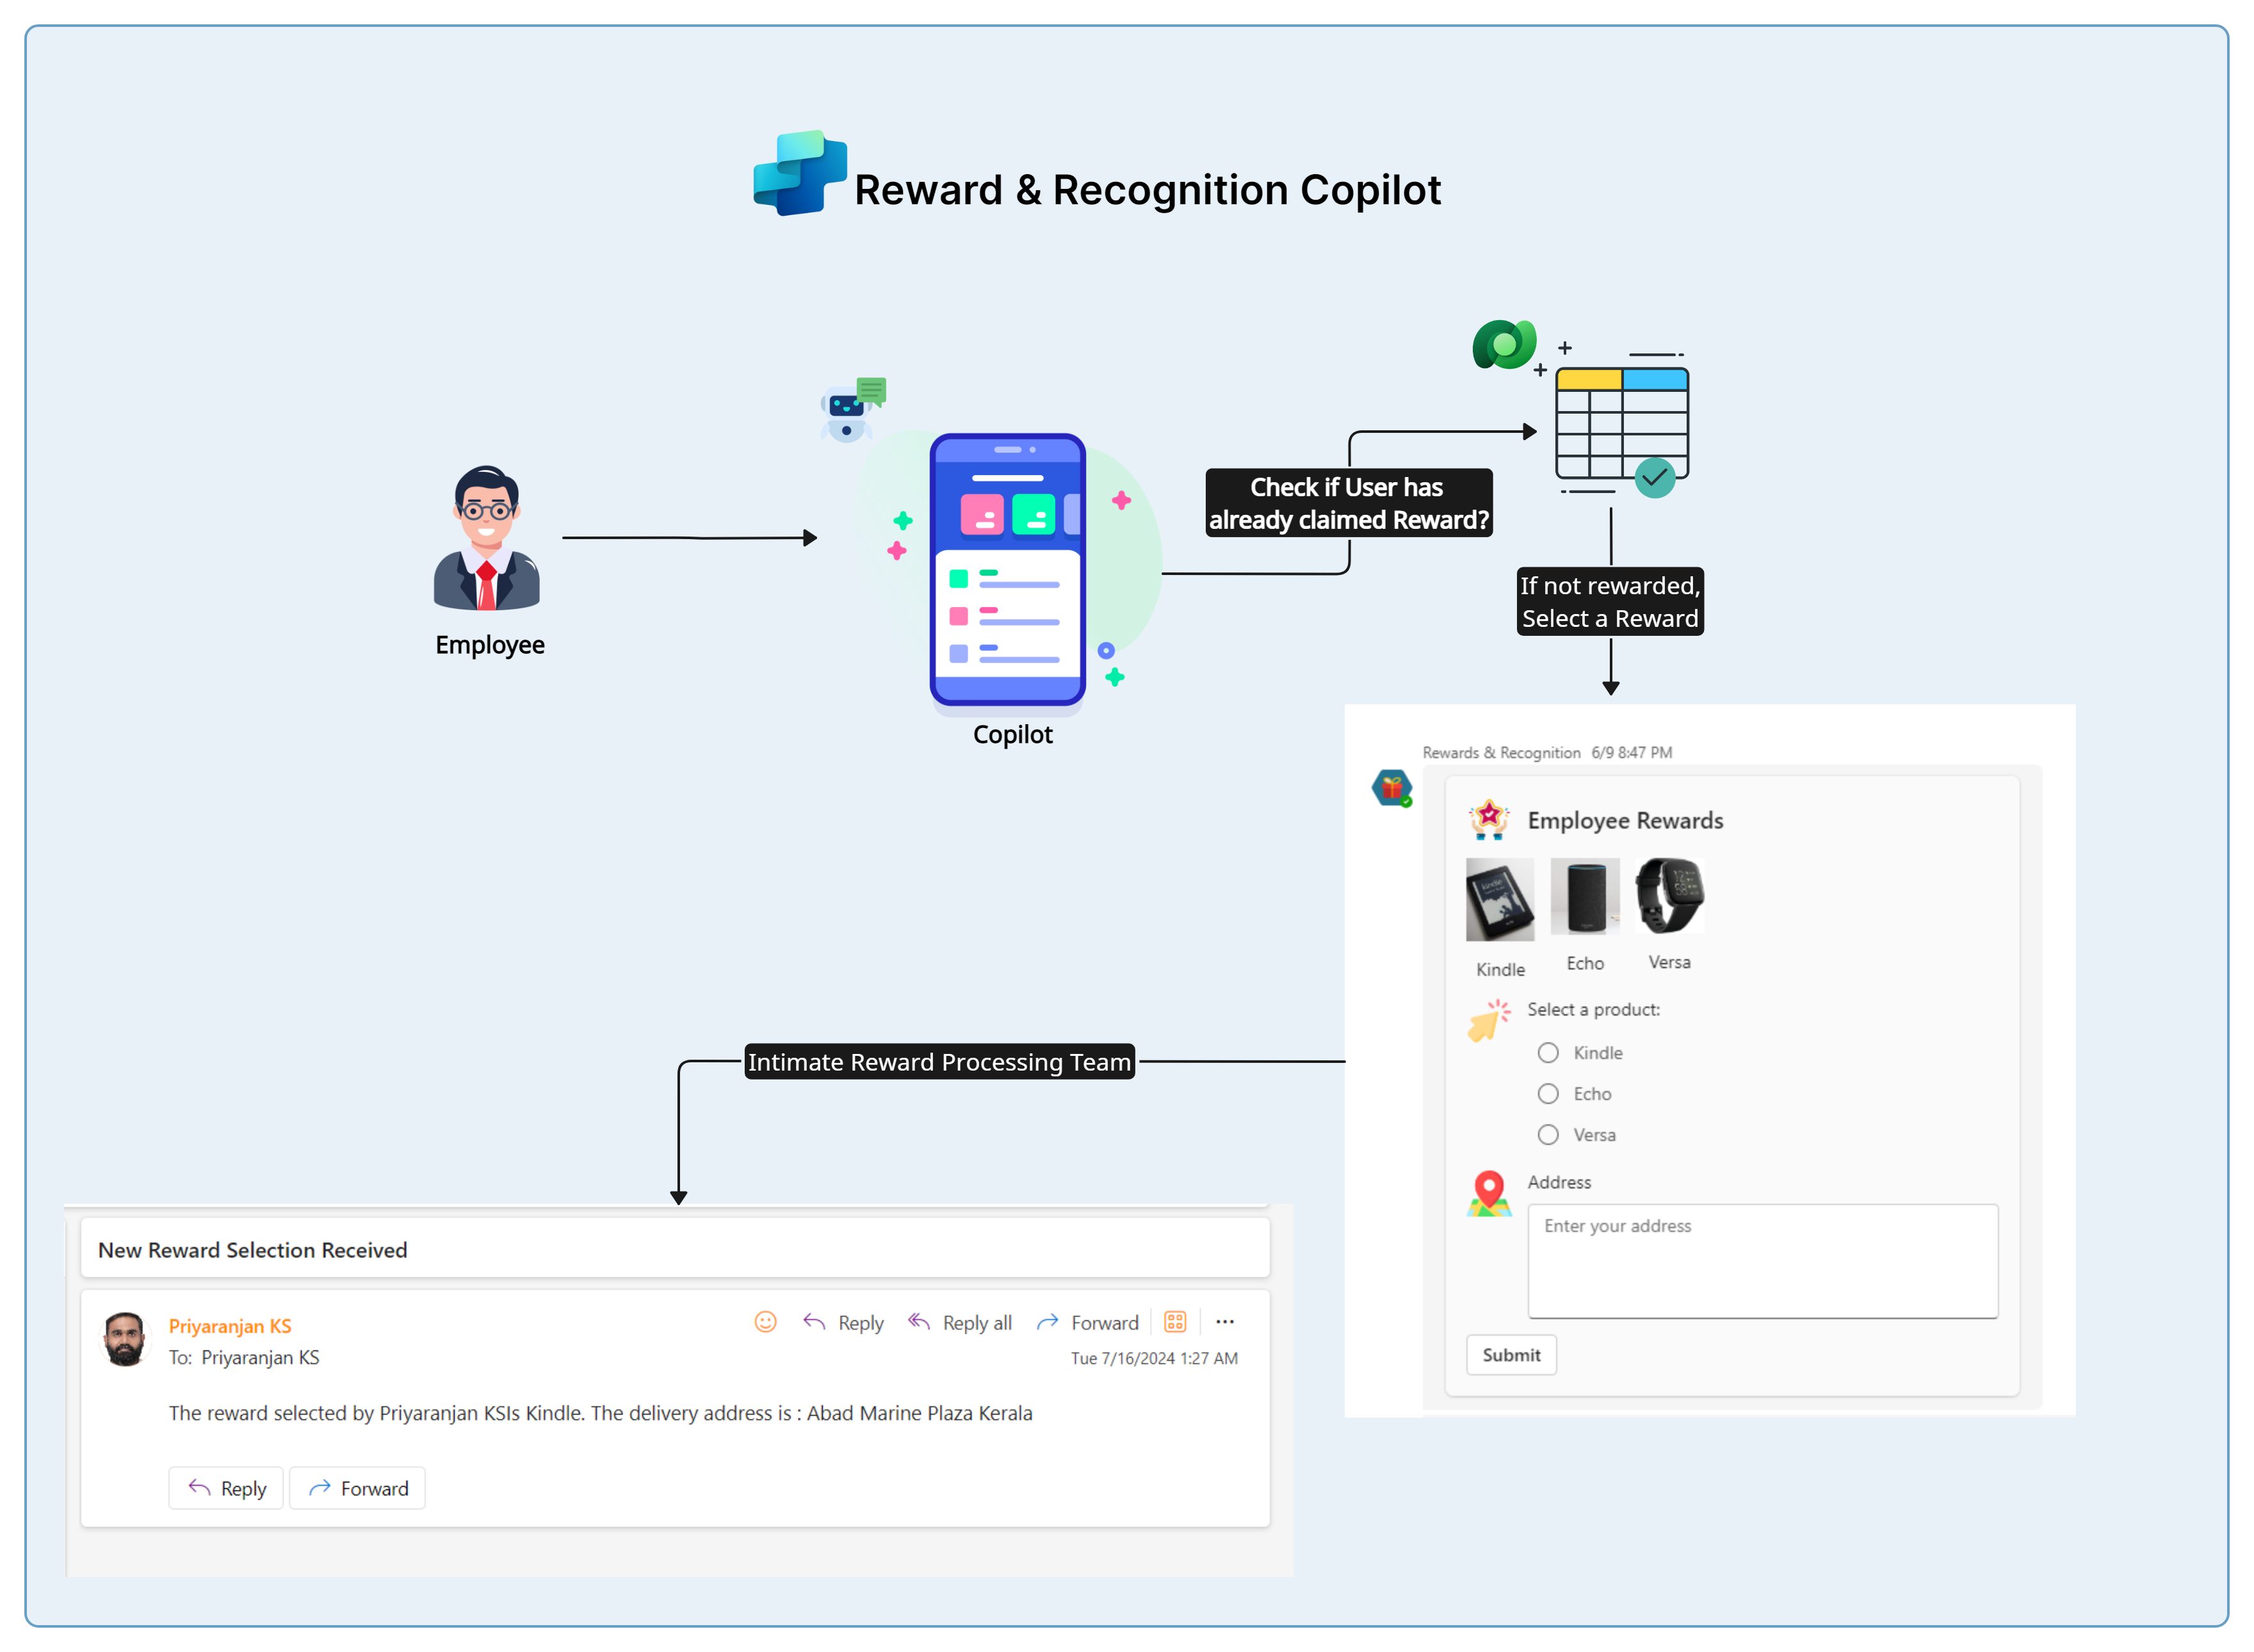
Lets take a look at the overall process that we are implementing with Copilot and Connector Actions
- Use the Office 365 mail connector to get the current user’s email ID.
- Query the Dataverse table using connector action to check if the user has already claimed a reward.
- If the user has not claimed a reward, provide an Adaptive Card for selecting a product and entering the shipping address.
- Send the user’s selection and address via email using the Office 365 mail connector actionto the concerned team to process the order.
Demo
Watch the demo video below to see how the Rewards and Recognition Copilot leveraging adaptive cards works.
Step-by-Step Guide to Building the Rewards and Recognition Copilot
Step 1: Setting Up Your Environment
Before you start creating the copilot, ensure you have the following prerequisites:
- Microsoft Copilot Studio access.
- Dataverse environment with your enterprise data.
Step 2: Preparing Your Data in Dataverse
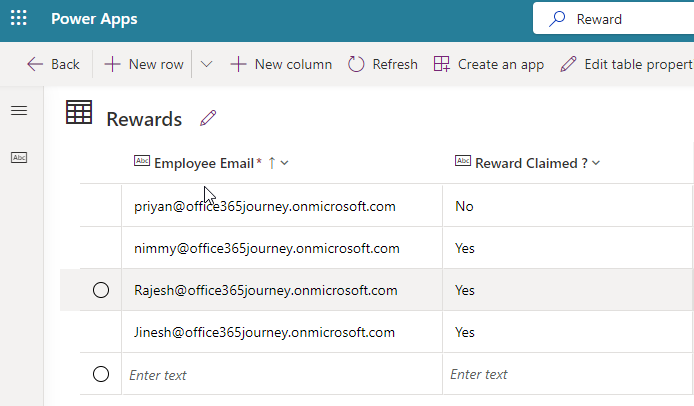
Ensure your Dataverse instance contains all necessary information regarding who has already claimed the reward. We have created the table “Rewards” with the below columns. The table contains a record for each employee and the “Reward Claimed?” field will be used to keep track of whether he/she has claimed the reward.
Step 3: Creating the Copilot in Copilot Studio
-
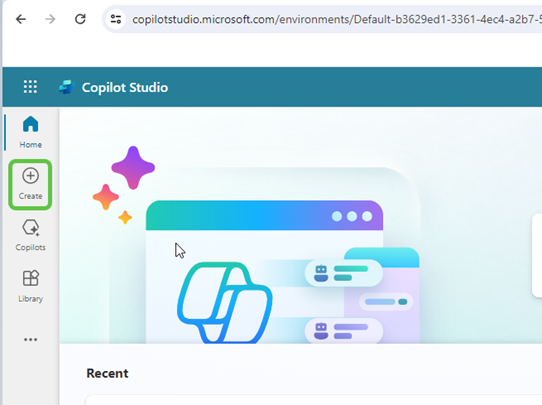
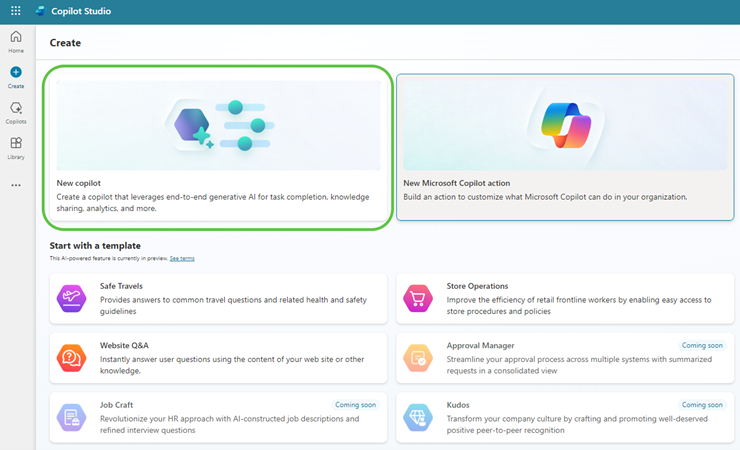
Head over to Copilot Studio and click on Create.
-
Select New copilot to create a blank copilot from scratch.
-
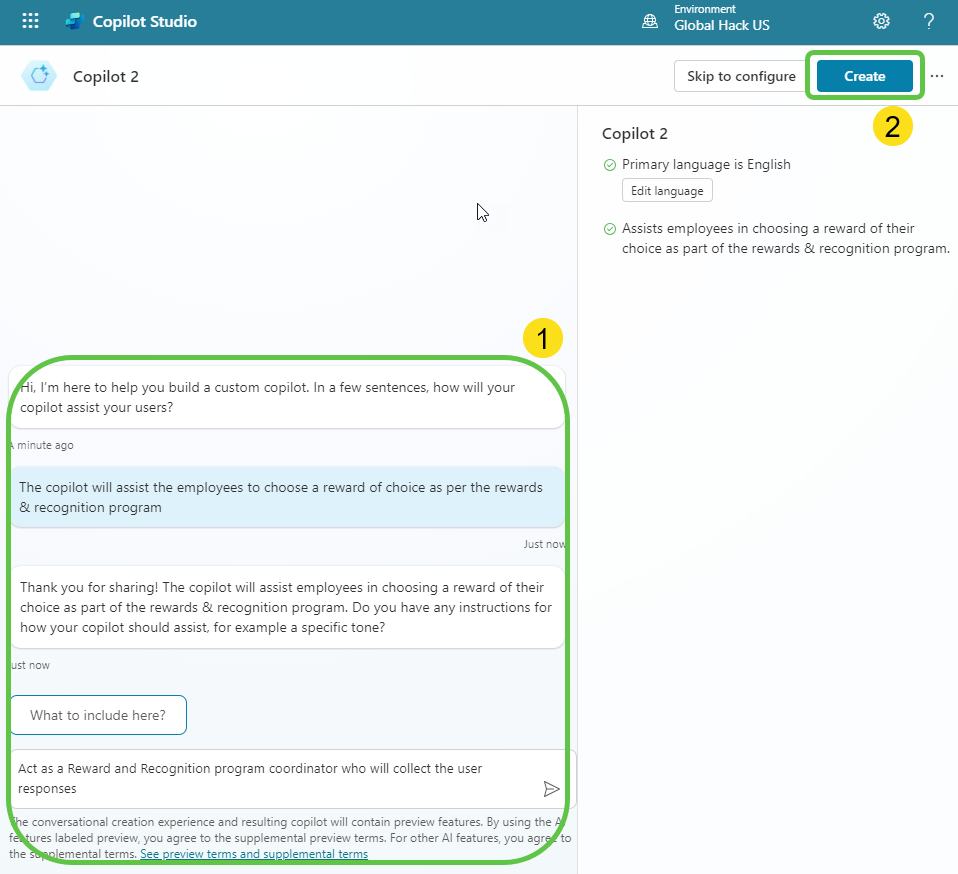
Describe the copilot functionality and provide any specific instructions. Click on Create to provision the copilot.
Step 4: Enable Generative Selection of Topics
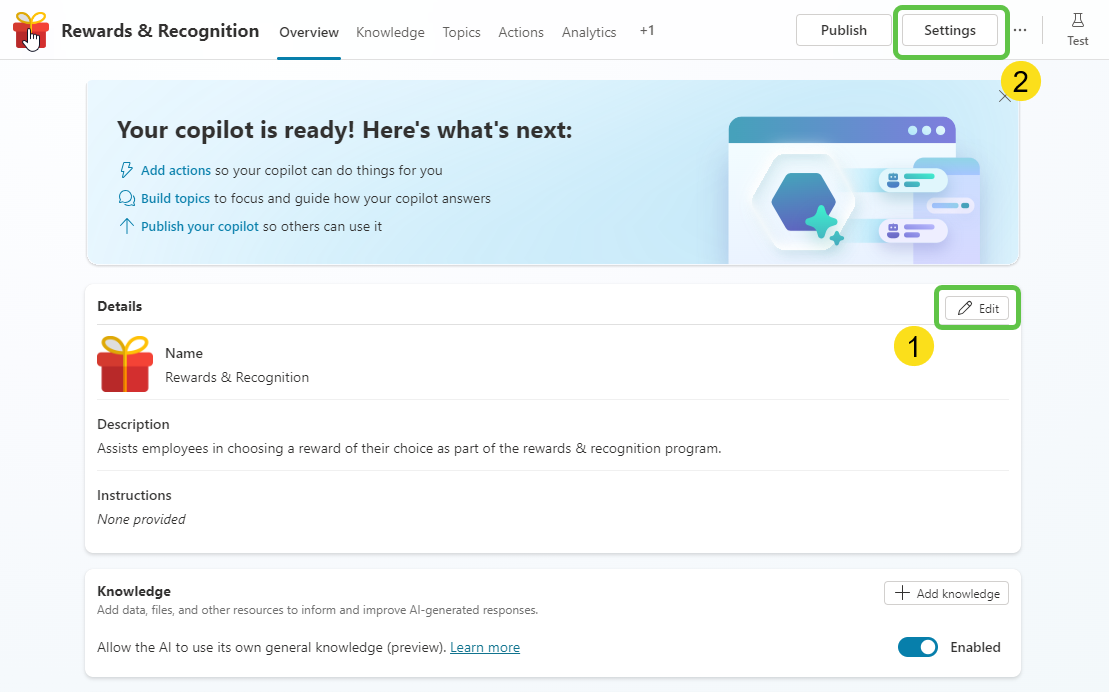
- Click on Edit, then edit the copilot details like name, icon, and description.
-
Click on Settings to enable the Generative selection of topics so that topics will be auto-selected based on user conversation.
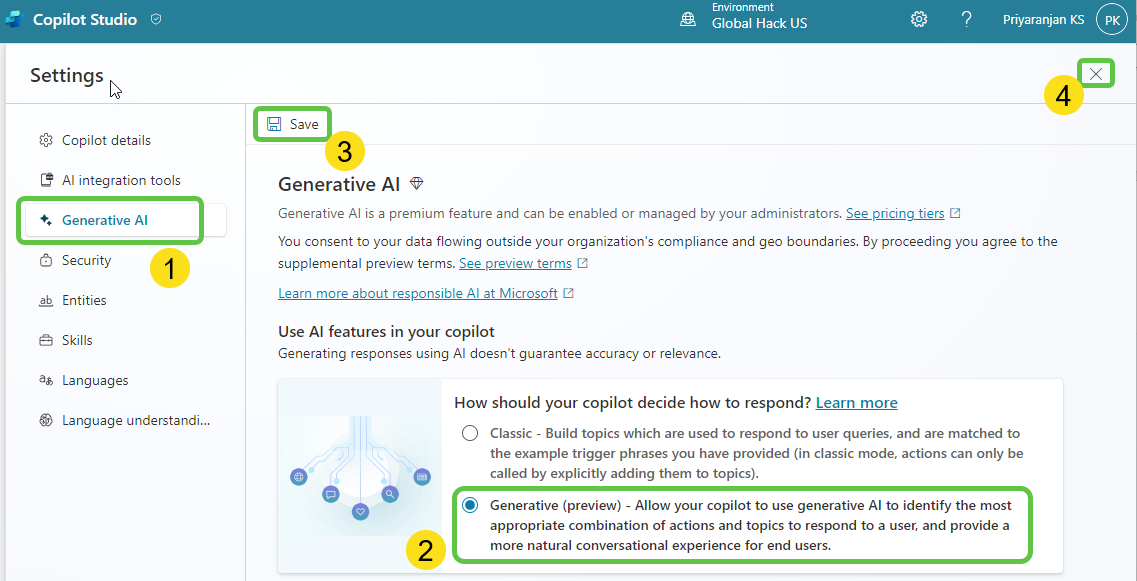
- To enable the automatic detection of topics from user interaction:
- Click on Generative AI.
- Select Generative(preview).
- Click on Save to update the settings.
- Click on the Close icon to go back to the home page of this custom copilot.
Step 5: Create Topics
-
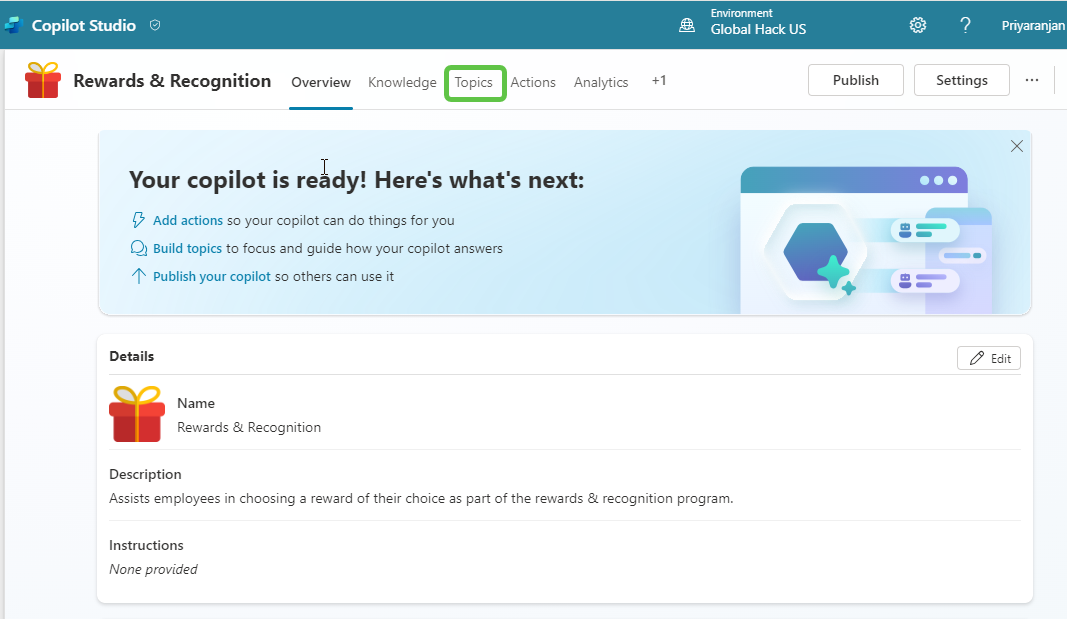
Click on Topics from the navigation menu.
-
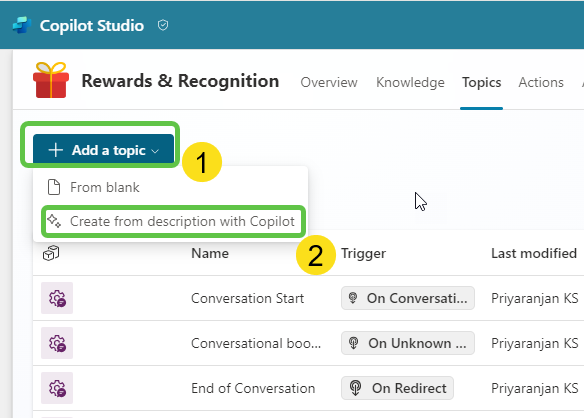
To add the topic, click on Add a Topic and select Create from description with Copilot.
-
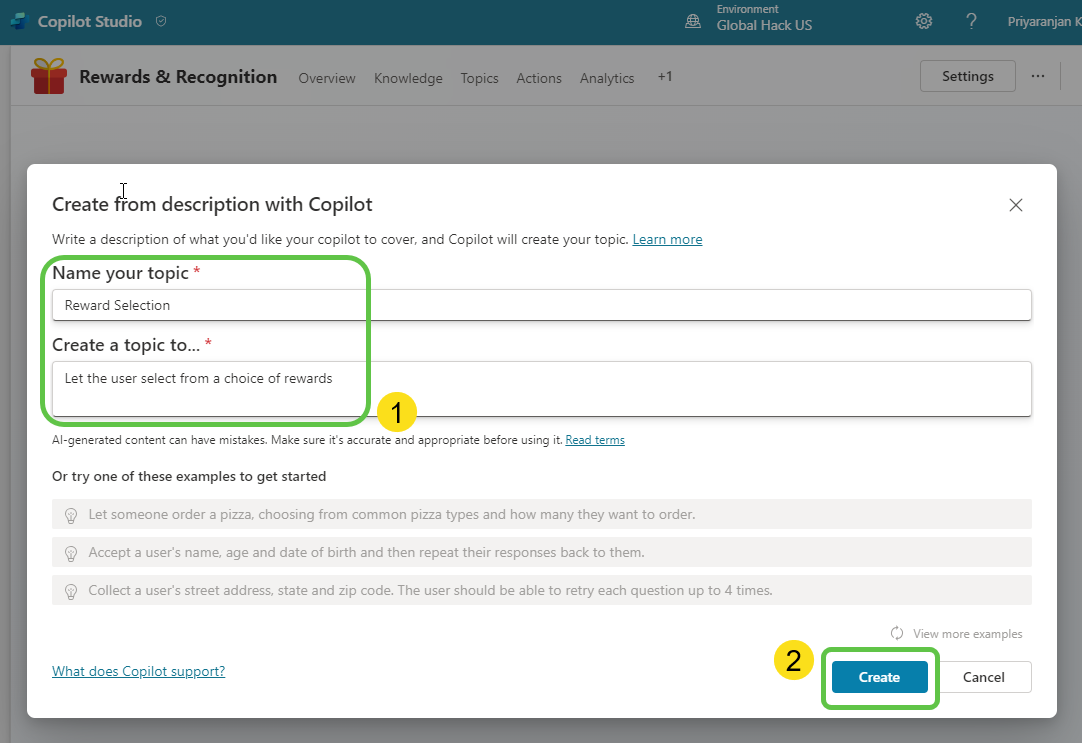
Provide the topic description details and click on Create.
-
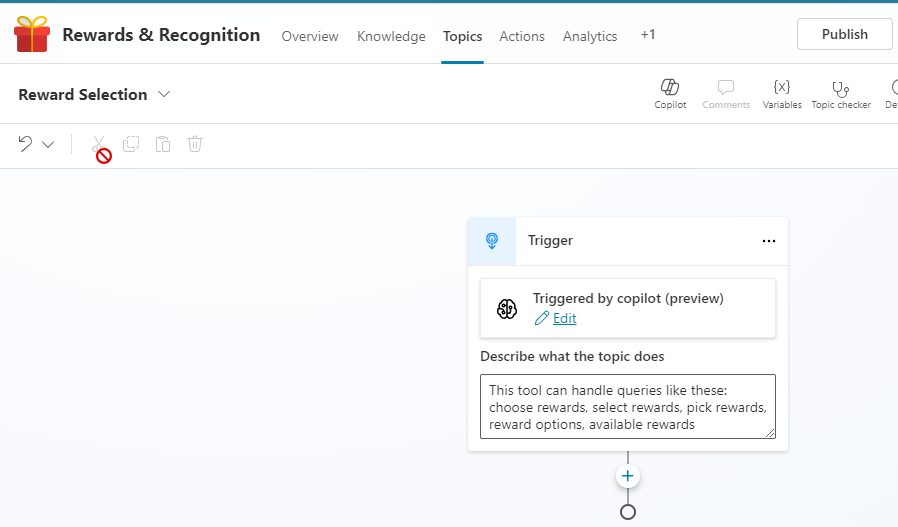
This will provision the topic skeleton based on the provided description.
Step 6: Adding the Office 365 Mail Connector
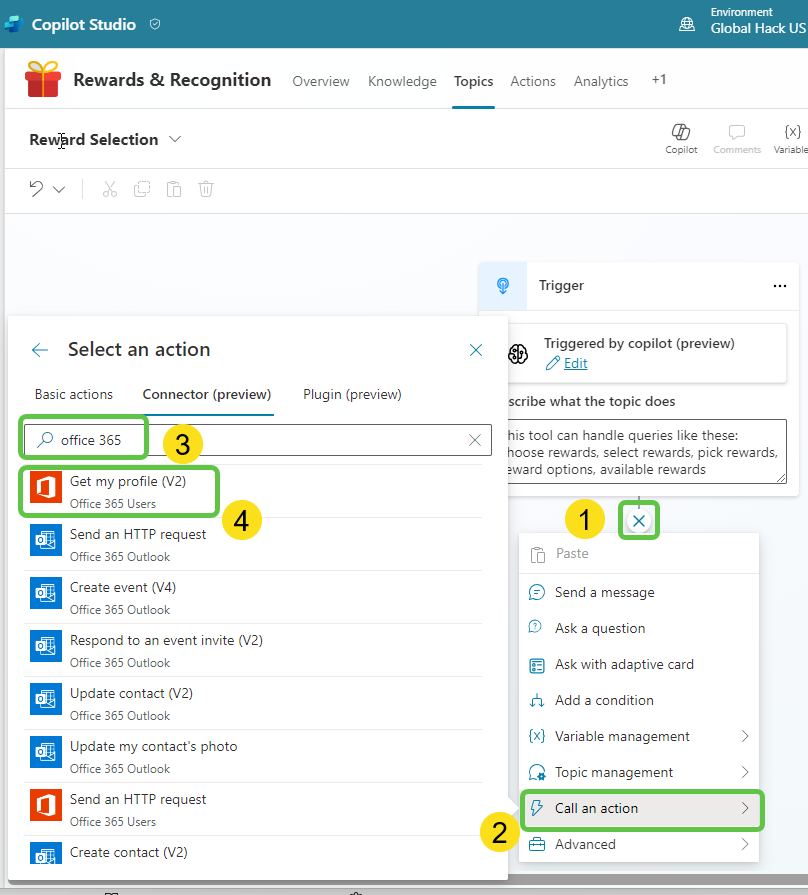
- Click on the + sign to add a new node.
- Select Call an action.
- Search for Office 365 in the search bar.
-
Select Get my profile (V2).
-
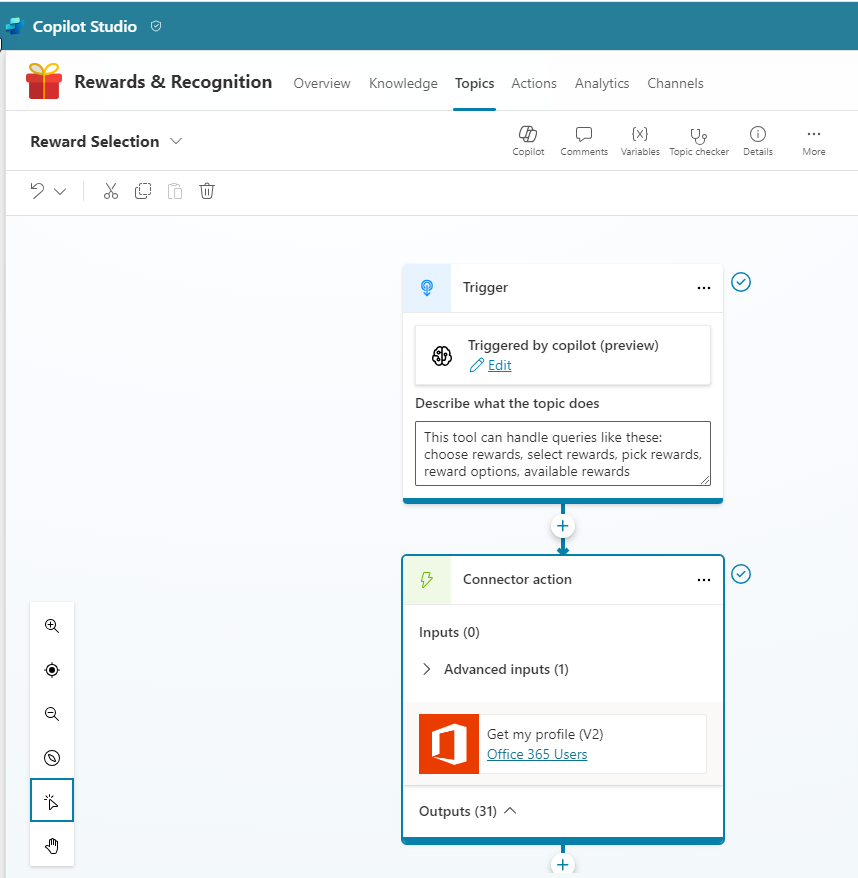
The Office 365 mail connector is now added from the Connector tab, which will help fetch the current user’s email.
Step 7: Querying Dataverse
Using the current user’s email, lets try to check if the user has already claimed the reward by querying the dataverse table.
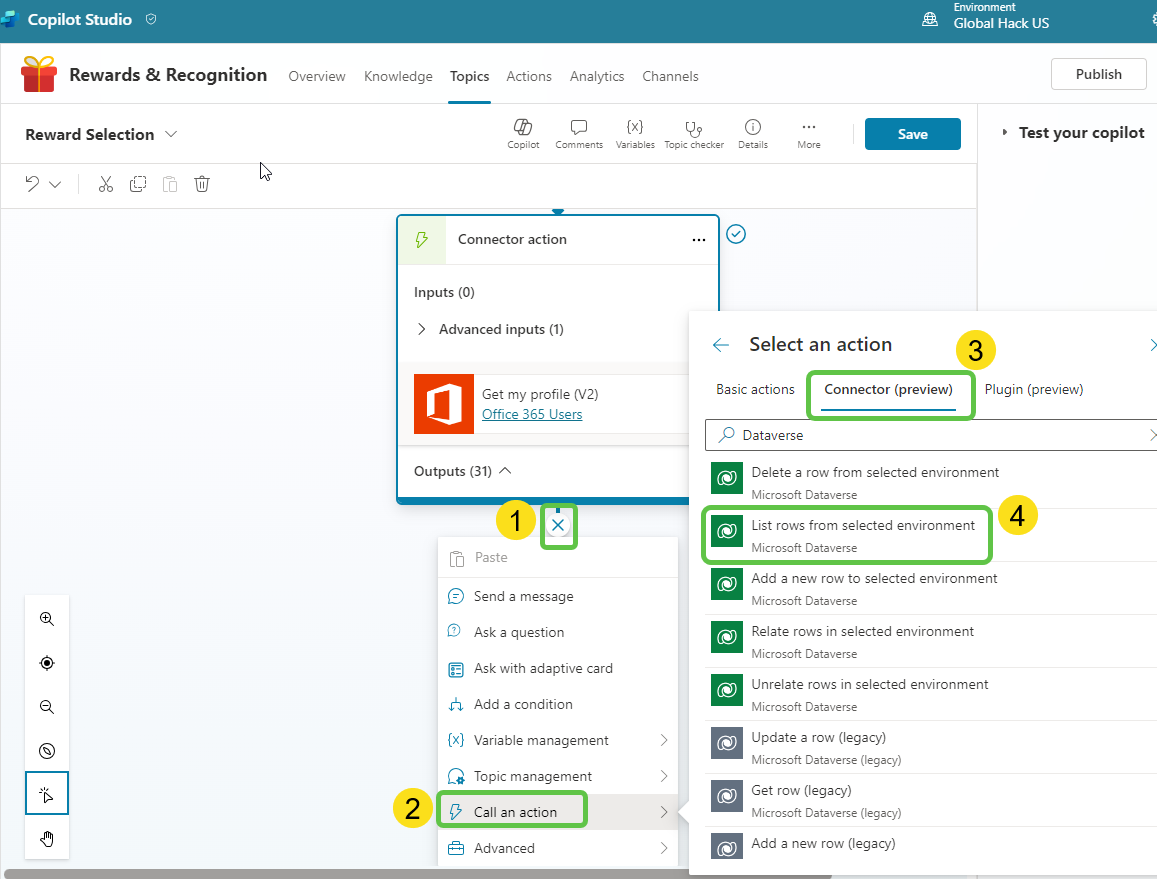
- Click on the + Sign to add a new conversation node.
- Select Call an action.
- Click on the Connector tab and search for Dataverse.
-
Select the action List rows from selected environment.
-
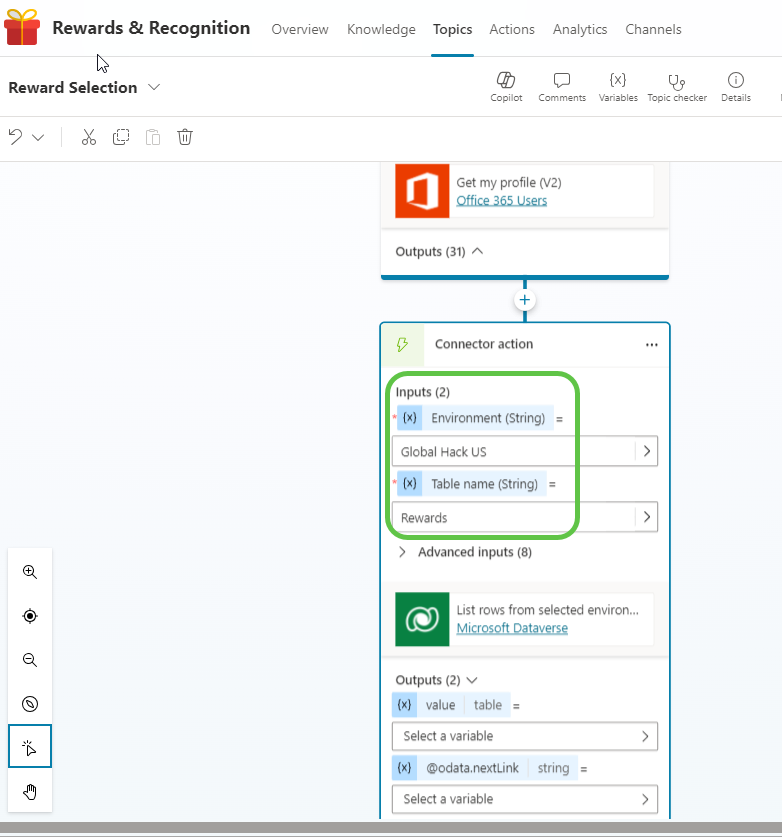
Configure the inputs by specifying the environment and the table name from which to pick the records.
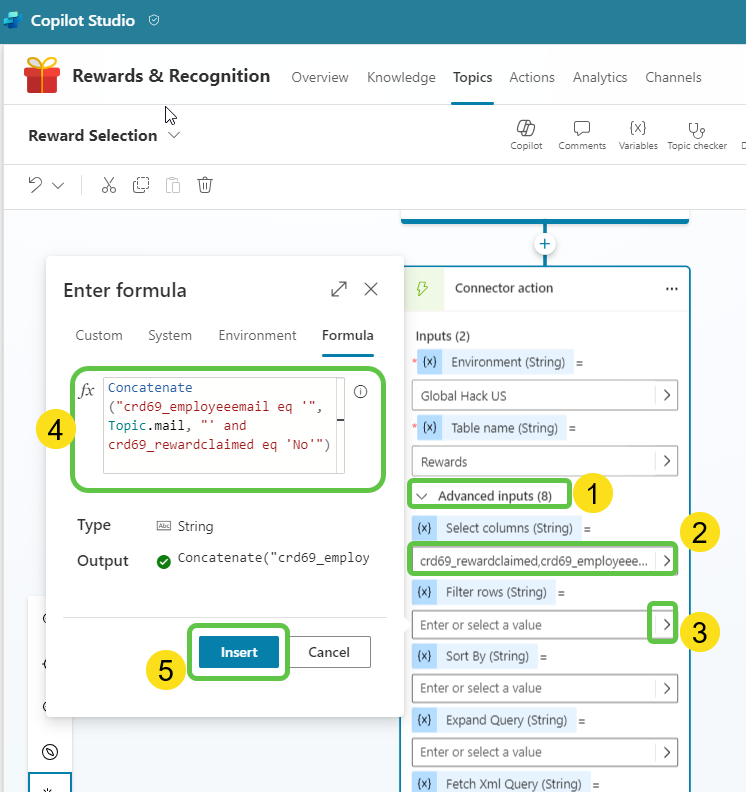
- Configure the Advanced inputs section to filter the rows and get only the necessary data:
- Click on Advanced inputs.
- Mention the internal name of the Dataverse table’s field.
- Click on the right arrow to expand the filter columns field.
- Specify the OData filter query to fetch the records that match the condition (email ID = current user’s email and Reward claimed field = “No”).
- Click on Insert to add the filter query to the action.
Setting Variables
-
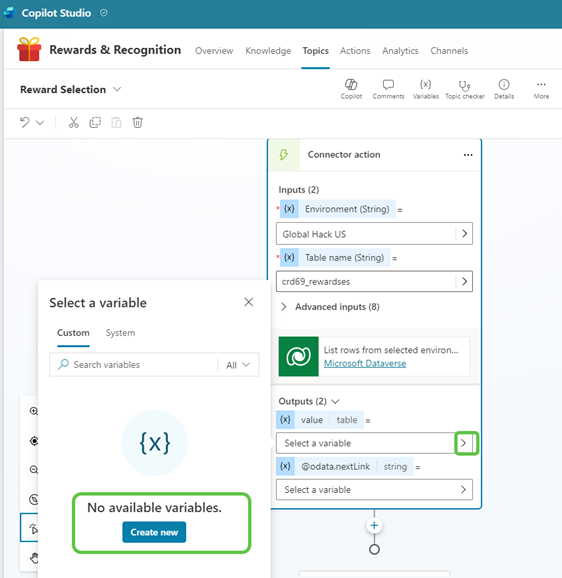
Assign the output of the Dataverse action to a variable by clicking on Create new.
-
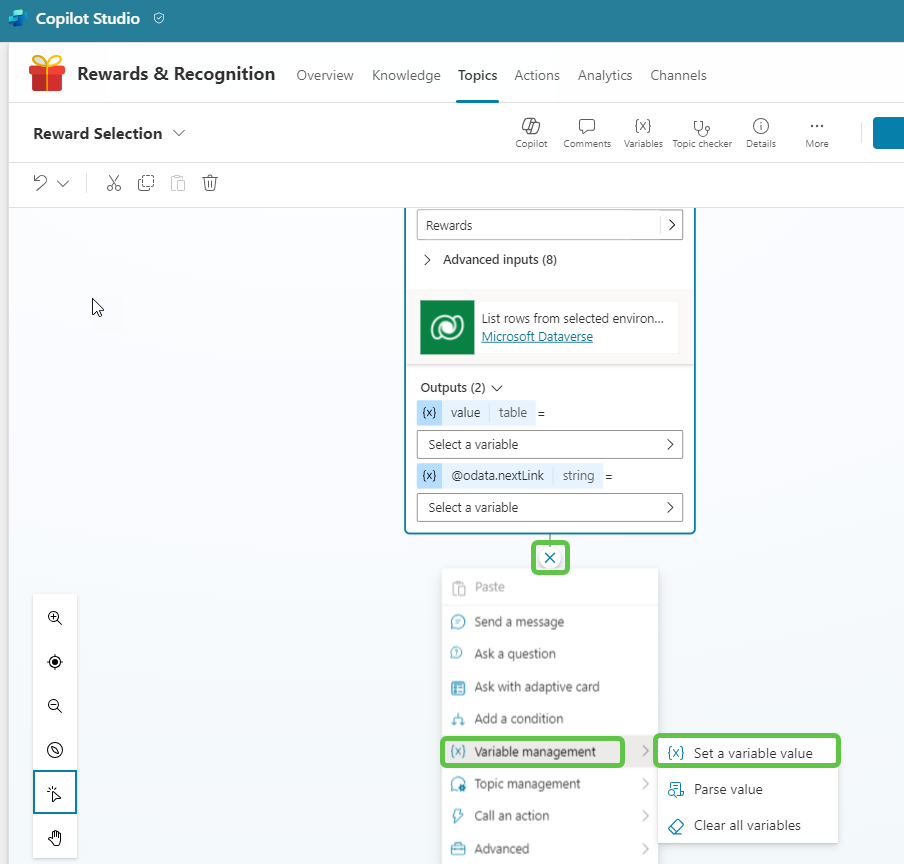
Get the number of rows returned from the Dataverse table into a variable by selecting Set a variable value from the variable management option.
-
In the Set variable value node, select Create a new variable and name it as
varRecordCount.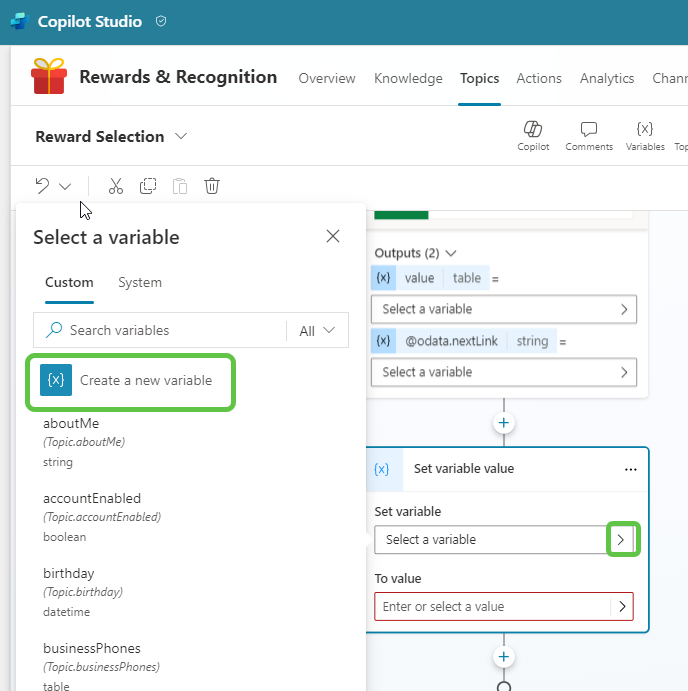
-
Use the
CountRows(Topic.varOutput)expression in the Formula tab to get the table row count value into the variablevarRecordCount.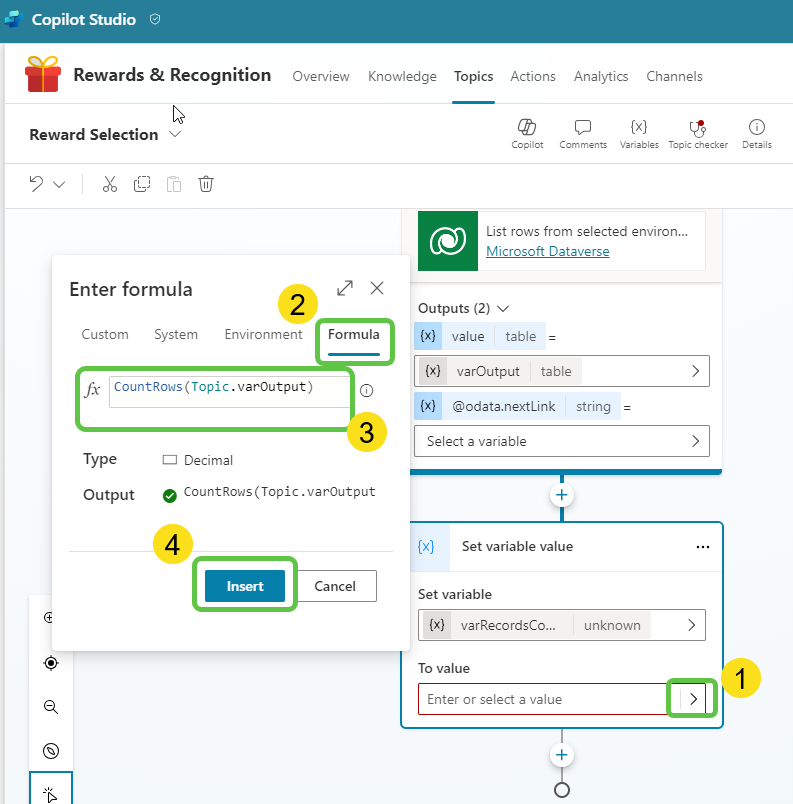
Step 8: Adding Conditions and Adaptive Cards
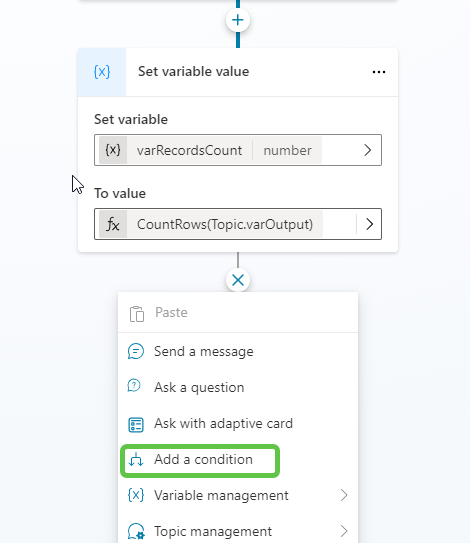
-
Add a condition to check if the current user is eligible for reward selection. If the record count is greater than 0, it means the reward was not claimed previously.
-
In the condition, check if
varRecordCountis greater than 0. If so, add an adaptive card that gives the user the option to choose a reward. Otherwise, show a message that the reward has already been claimed.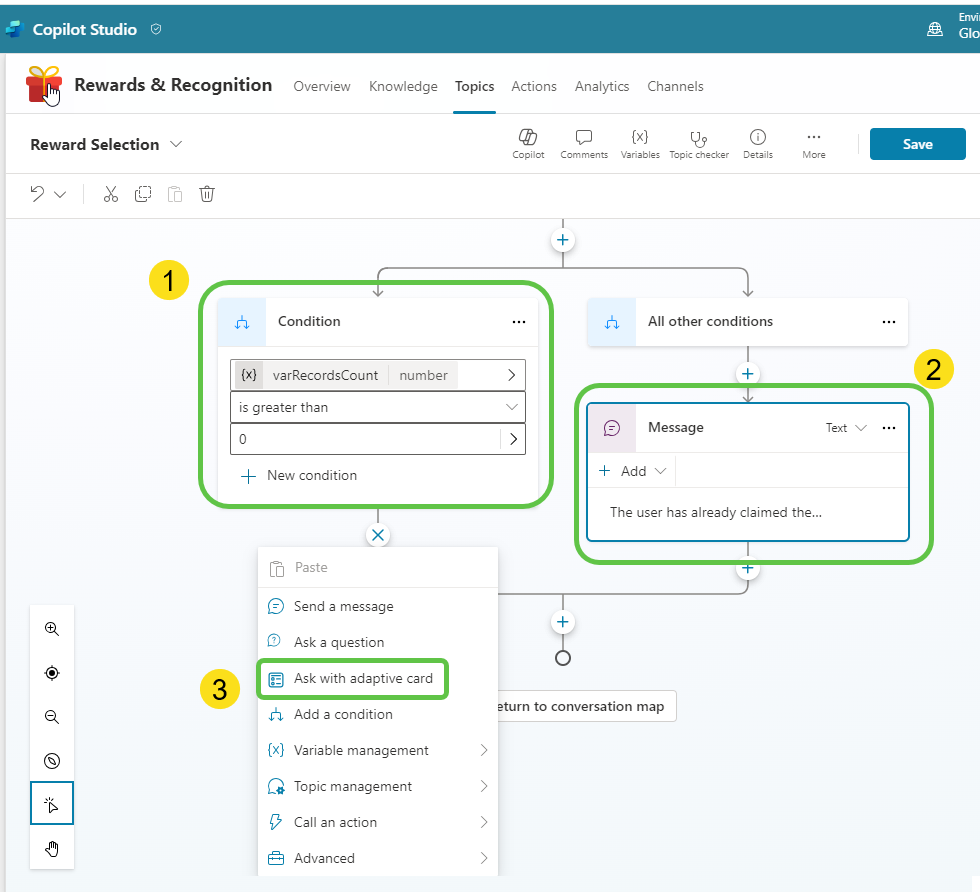
-
Lets add the adaptive card JSON :
{
  "$schema": "http://adaptivecards.io/schemas/adaptive-card.json",
  "type": "AdaptiveCard",
  "version": "1.3",
  "body": [
    {
      "type": "ColumnSet",
      "columns": [
        {
          "type": "Column",
          "width": "auto",
          "items": [
            {
              "type": "Image",
              "url": "https://adaptivecardsbot.blob.core.windows.net/imagestore/reward.png",
              "size": "Small",
              "altText": "Company Logo"
            }
          ]
        },
        {
          "type": "Column",
          "width": "stretch",
          "items": [
            {
              "type": "TextBlock",
              "text": "Employee Rewards",
              "weight": "Bolder",
              "size": "Large",
              "horizontalAlignment": "Left"
            }
          ],
          "verticalContentAlignment": "Center"
        }
      ],
      "spacing": "Medium"
    },
    {
      "type": "ColumnSet",
      "columns": [
        {
          "type": "Column",
          "width": "auto",
          "items": [
            {
              "type": "Image",
              "url": "https://adaptivecardsbot.blob.core.windows.net/imagestore/Kindle.PNG",
              "altText": "Kindle",
              "size": "Medium"
            },
            {
              "type": "TextBlock",
              "text": "Kindle",
              "horizontalAlignment": "Center"
            }
          ]
        },
        {
          "type": "Column",
          "width": "auto",
          "items": [
            {
              "type": "Image",
              "url": "https://adaptivecardsbot.blob.core.windows.net/imagestore/Amazon Echo.PNG",
              "altText": "Echo",
              "size": "Medium"
            },
            {
              "type": "TextBlock",
              "text": "Echo",
              "horizontalAlignment": "Center"
            }
          ]
        },
        {
          "type": "Column",
          "width": "auto",
          "items": [
            {
              "type": "Image",
              "url": "https://adaptivecardsbot.blob.core.windows.net/imagestore/Fitbit.PNG",
              "altText": "Versa",
              "size": "Medium"
            },
            {
              "type": "TextBlock",
              "text": "Versa",
              "horizontalAlignment": "Center"
            }
          ]
        }
      ]
    },
    {
      "type": "ColumnSet",
      "columns": [
        {
          "type": "Column",
          "width": "auto",
          "items": [
            {
              "type": "Image",
              "url": "https://adaptivecardsbot.blob.core.windows.net/imagestore/click.png",
              "altText": "Select Product",
              "size": "Small"
            }
          ]
        },
        {
          "type": "Column",
          "width": "stretch",
          "items": [
            {
              "type": "Input.ChoiceSet",
              "id": "productChoice",
              "label": "Select a product:",
              "choices": [
                {
                  "title": "Kindle",
                  "value": "Kindle"
                },
                {
                  "title": "Echo",
                  "value": "Echo"
                },
                {
                  "title": "Versa",
                  "value": "Versa"
                }
              ],
              "style": "expanded"
            }
          ],
          "verticalContentAlignment": "Center"
        }
      ]
    },
    {
      "type": "ColumnSet",
      "columns": [
        {
          "type": "Column",
          "width": "auto",
          "items": [
            {
              "type": "Image",
              "url": "https://adaptivecardsbot.blob.core.windows.net/imagestore/address.png",
              "altText": "Address",
              "size": "Small"
            }
          ]
        },
        {
          "type": "Column",
          "width": "stretch",
          "items": [
            {
              "type": "Input.Text",
              "id": "address",
              "placeholder": "Enter your address",
              "label": "Address",
              "isMultiline": true
            }
          ],
          "verticalContentAlignment": "Center"
        }
      ]
    }
  ],
  "actions": [
    {
      "type": "Action.Submit",
      "title": "Submit"
    }
  ]
}
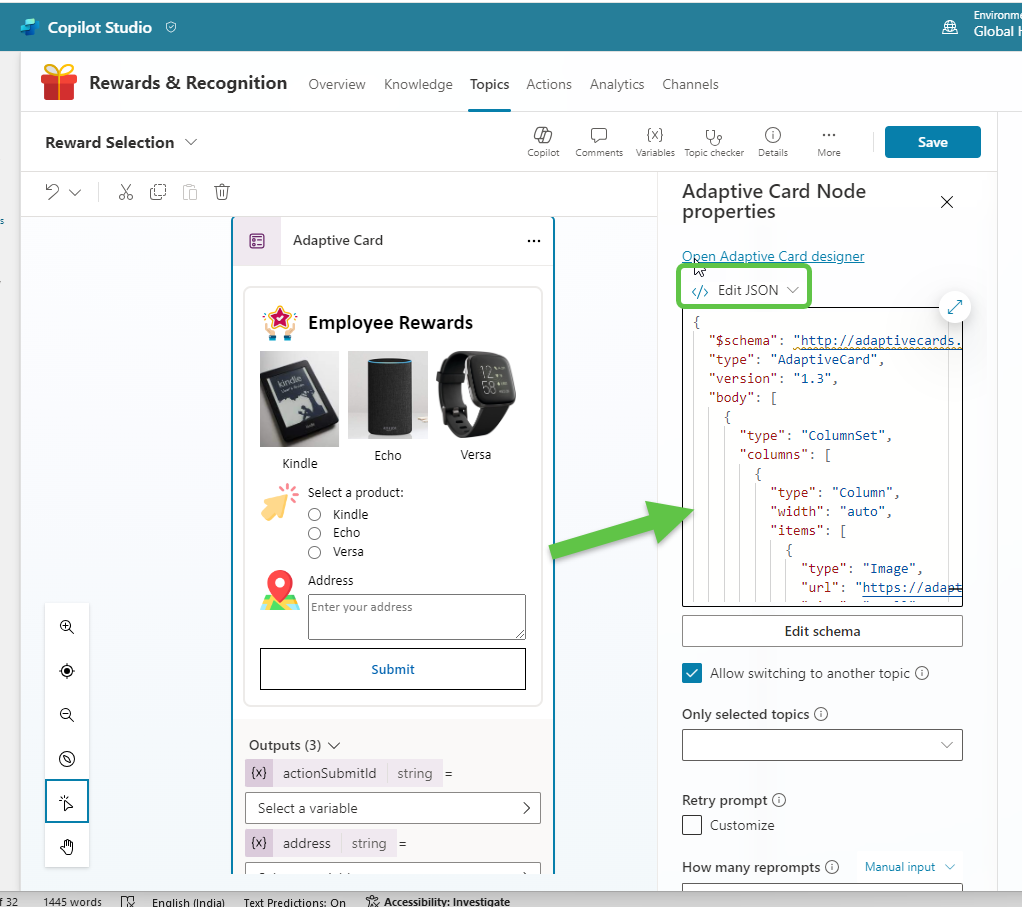
Click on the adaptive card and paste the above JSON in the Edit JSON pane.
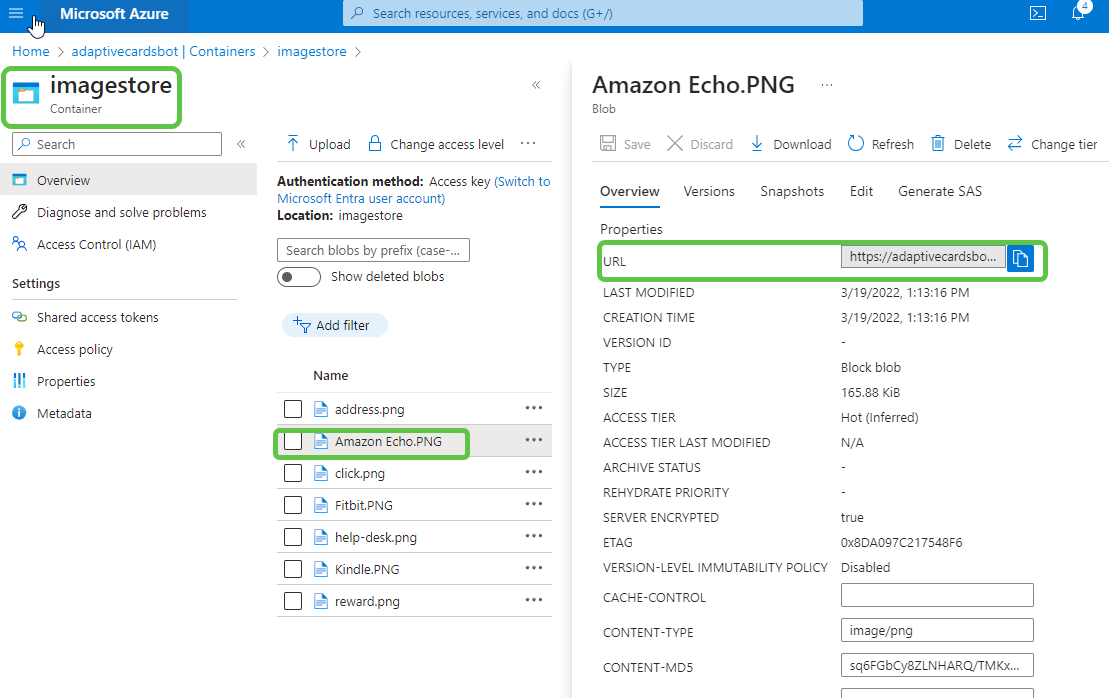
- To use images in the adaptive card:
- Create a Storage Account.
- Within the Containers, create a new container.
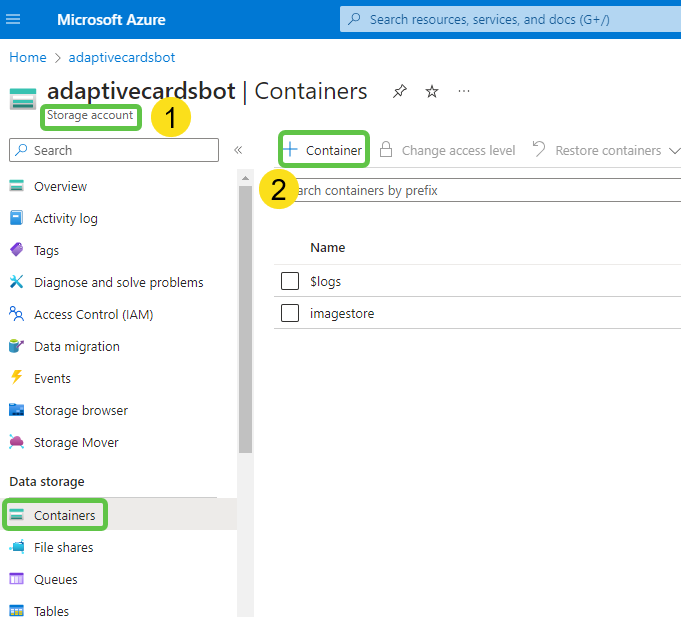
- Upload the images and refer to the image URL in the adaptive card.
-
The adaptive card now asks the user to select the reward and shipment address, saved in the variables
productChoiceandaddress, respectively.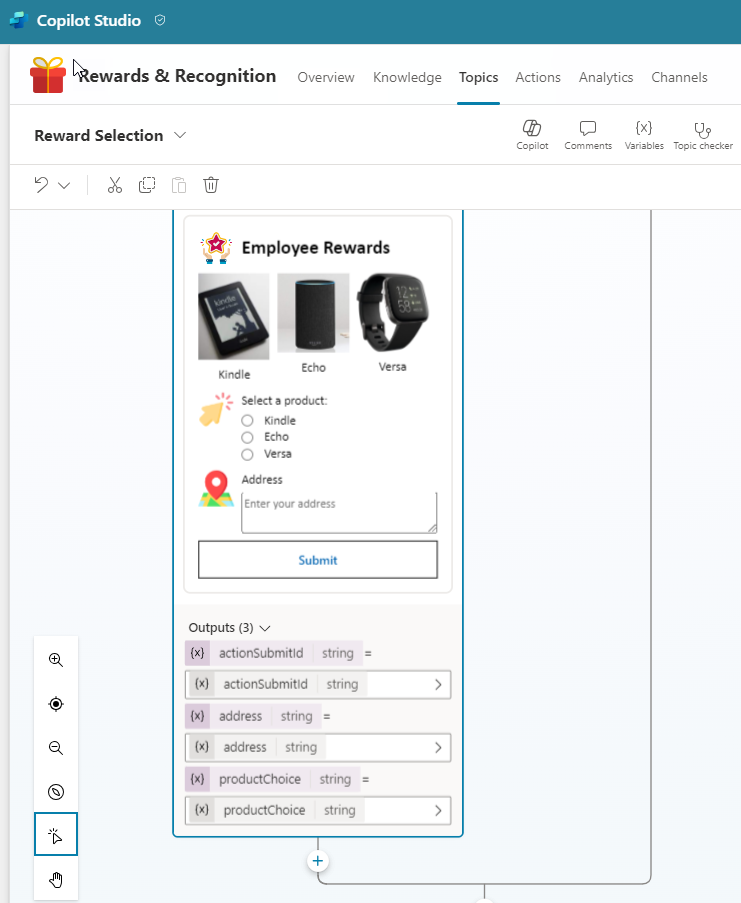
Sending Confirmation and Follow-Up Actions
-
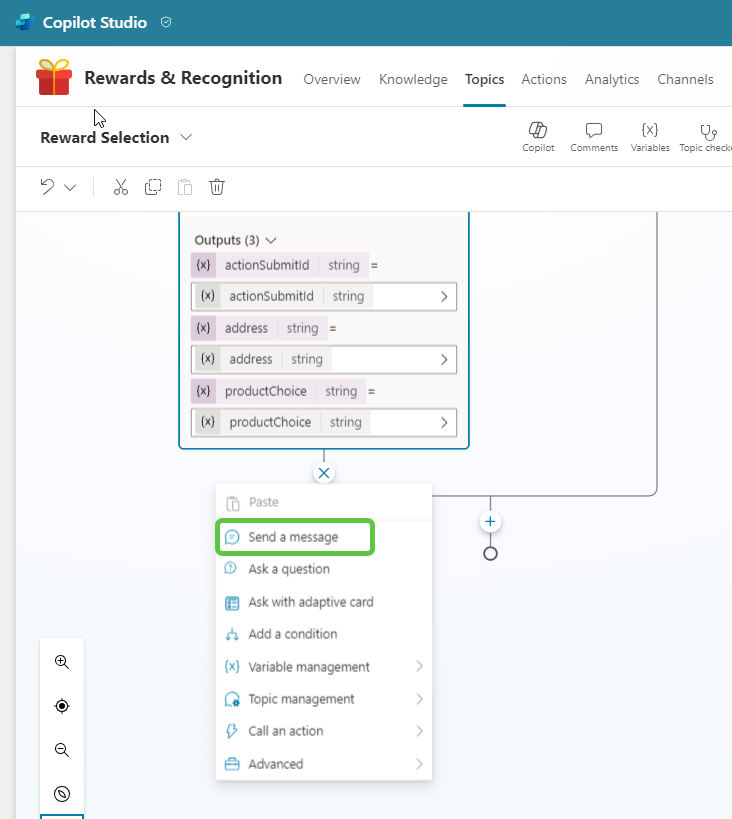
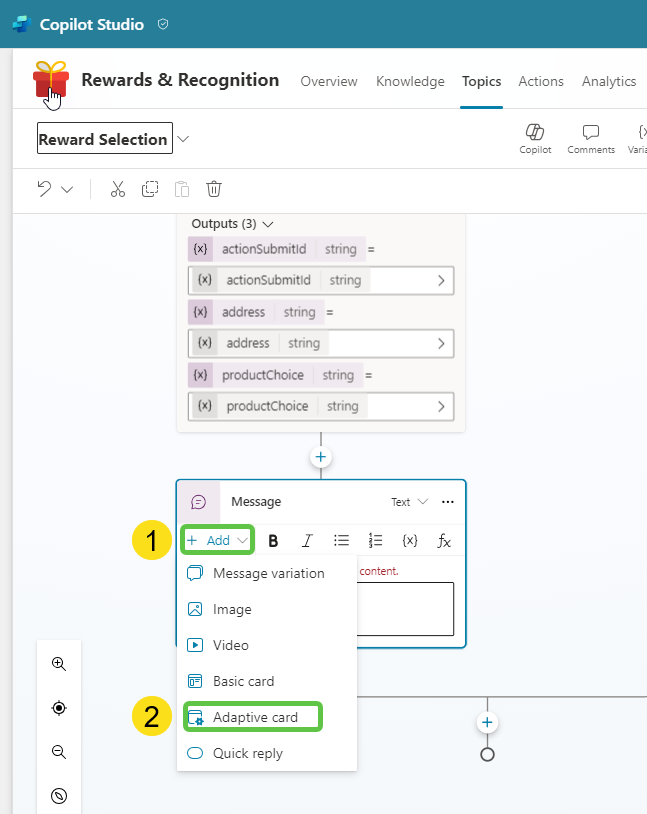
Show a confirmation message back to the user as another adaptive card. Click on Send a message.
-
In the message node, click on Add and select Adaptive Card.
-
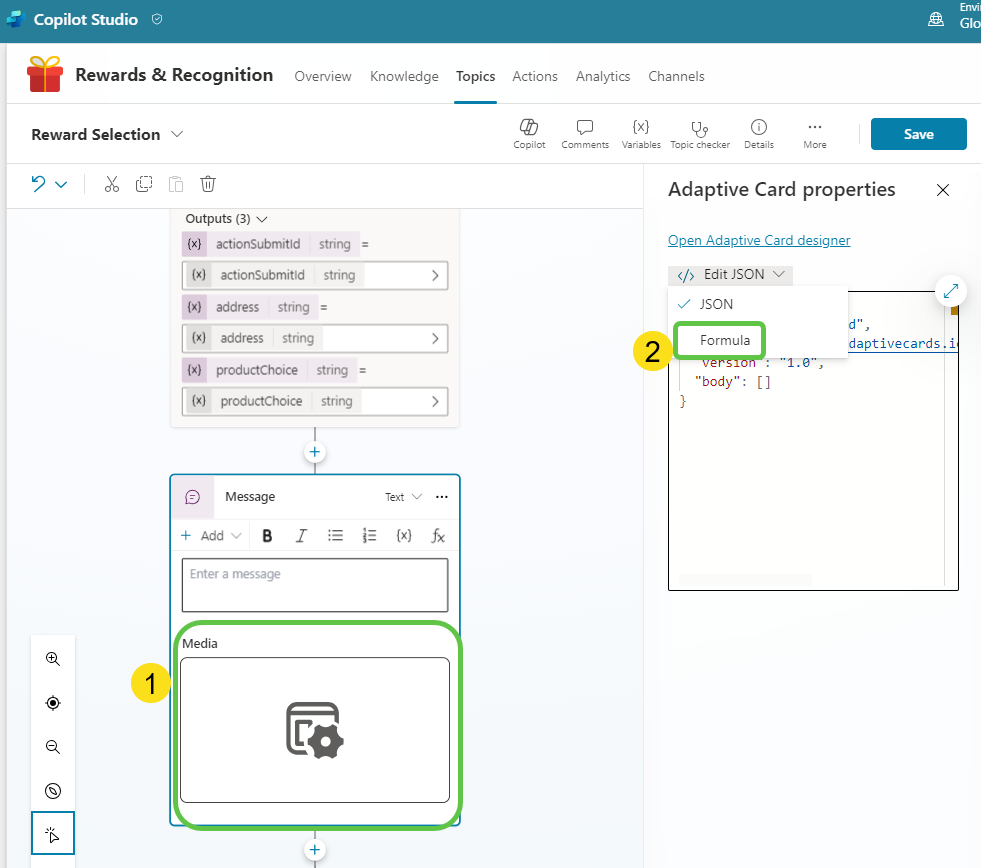
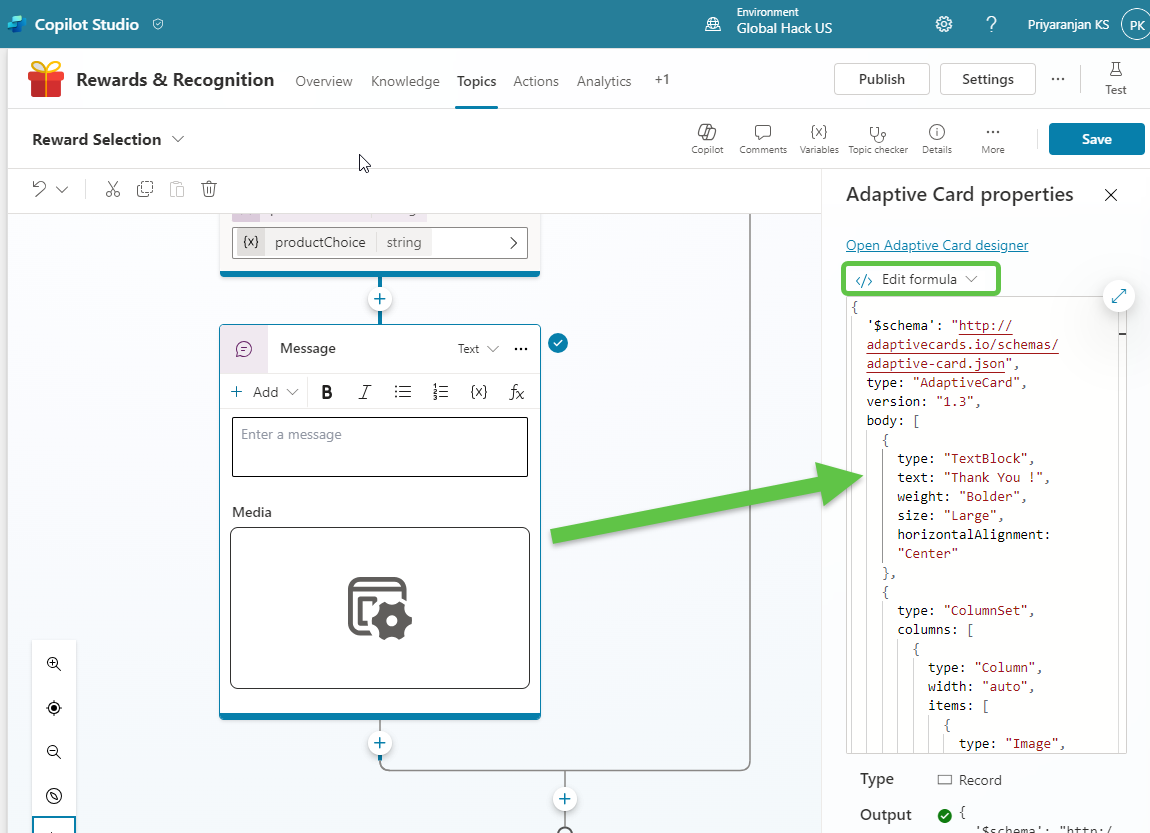
Configure the card by selecting it and clicking on Formula. Use the Edit formula option to add the confirmation message back to the user.
-
The formula schema used is :
{
  '$schema': "http://adaptivecards.io/schemas/adaptive-card.json",
  type: "AdaptiveCard",
  version: "1.4",
  body: [
    {
      type: "TextBlock",
      text: "Thank You !",
      weight: "Bolder",
      size: "Large",
      wrap: true
    },
    {
      type: "ColumnSet",
      columns: [
        {
          type: "Column",
          width: "auto",
          items: [
            {
              type: "Image",
              url: "https://adaptivecardsbot.blob.core.windows.net/imagestore/approval.png",
              size: "Medium",
              altText: "Thank You Image"
            }
          ]
        },
        {
          type: "Column",
          width: "stretch",
          items: [
            {
              type: "TextBlock",
              text: "Your response has been recorded and we will ship the reward to the mentioned address at the earliest.",
              wrap: true
            }
          ]
        }
      ]
    }
  ],
  msteams: {
    width: "Full"
  }
}
Thus we have updated the Adaptive Card formula to show a confirmation message back to the user
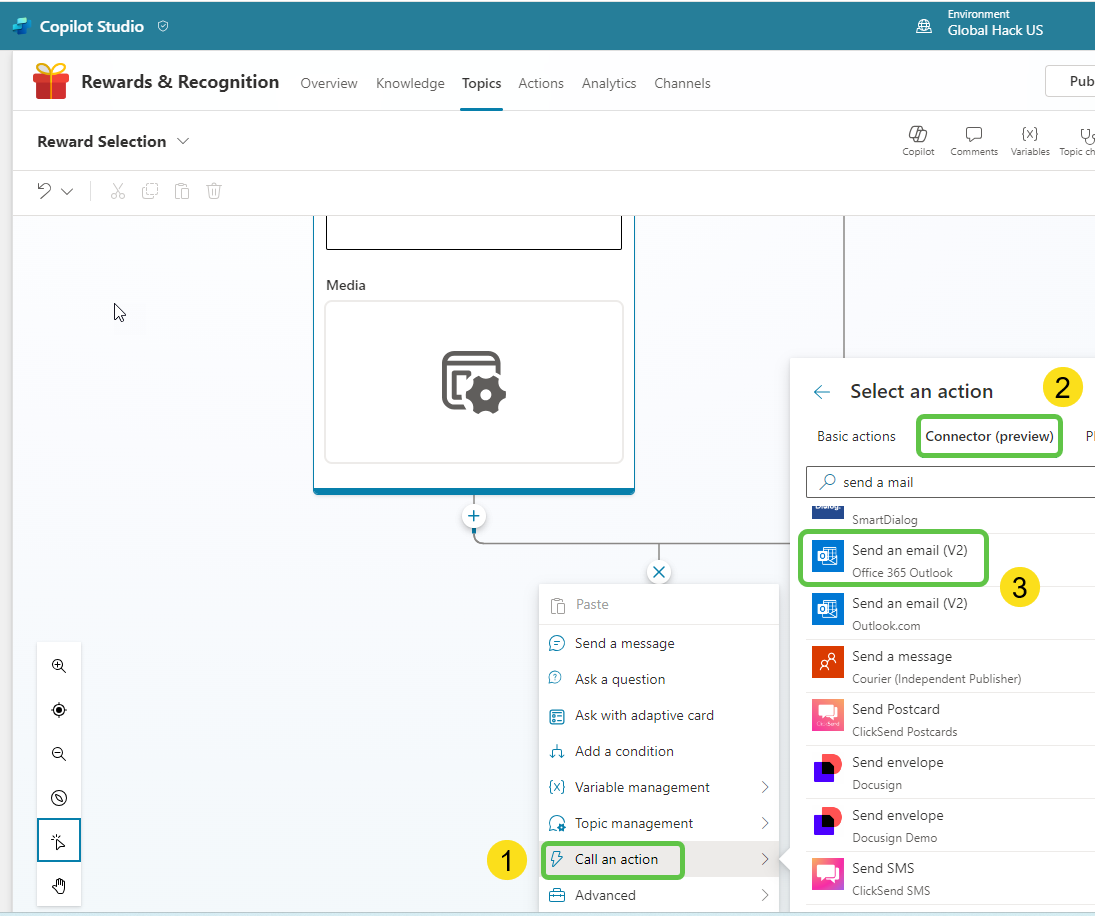
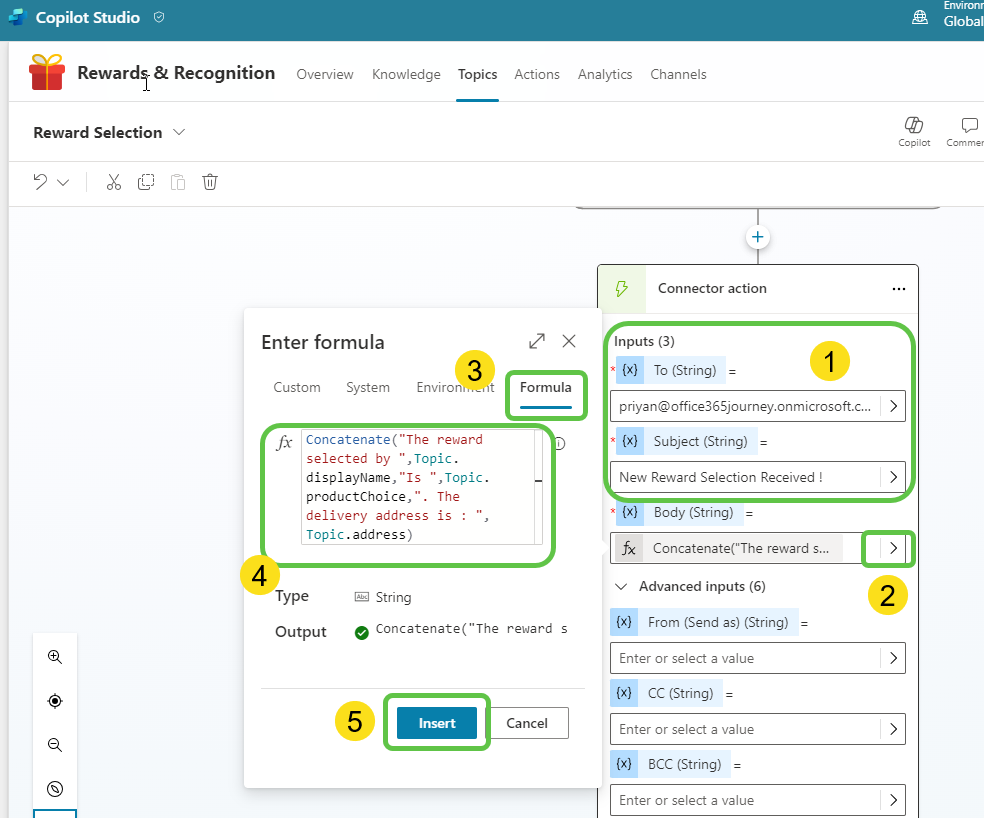
- As the final step , Send a mail to the concerned team with the user selections:
- Select Call an action -> Connector -> Send an email (V2).
- We can configure the connector by :
- Configure the Office 365 connector by mentioning the To and Subject fields.
- Click on the right arrow of the Body to update the mail content.
- Select the Formula tab.
- Add the below formula:
Concatenate("The reward selected by ", Topic.displayName, " is ", Topic.productChoice, ". The delivery address is: ", Topic.address) - Click on Insert.
Step 9: Publishing to Teams
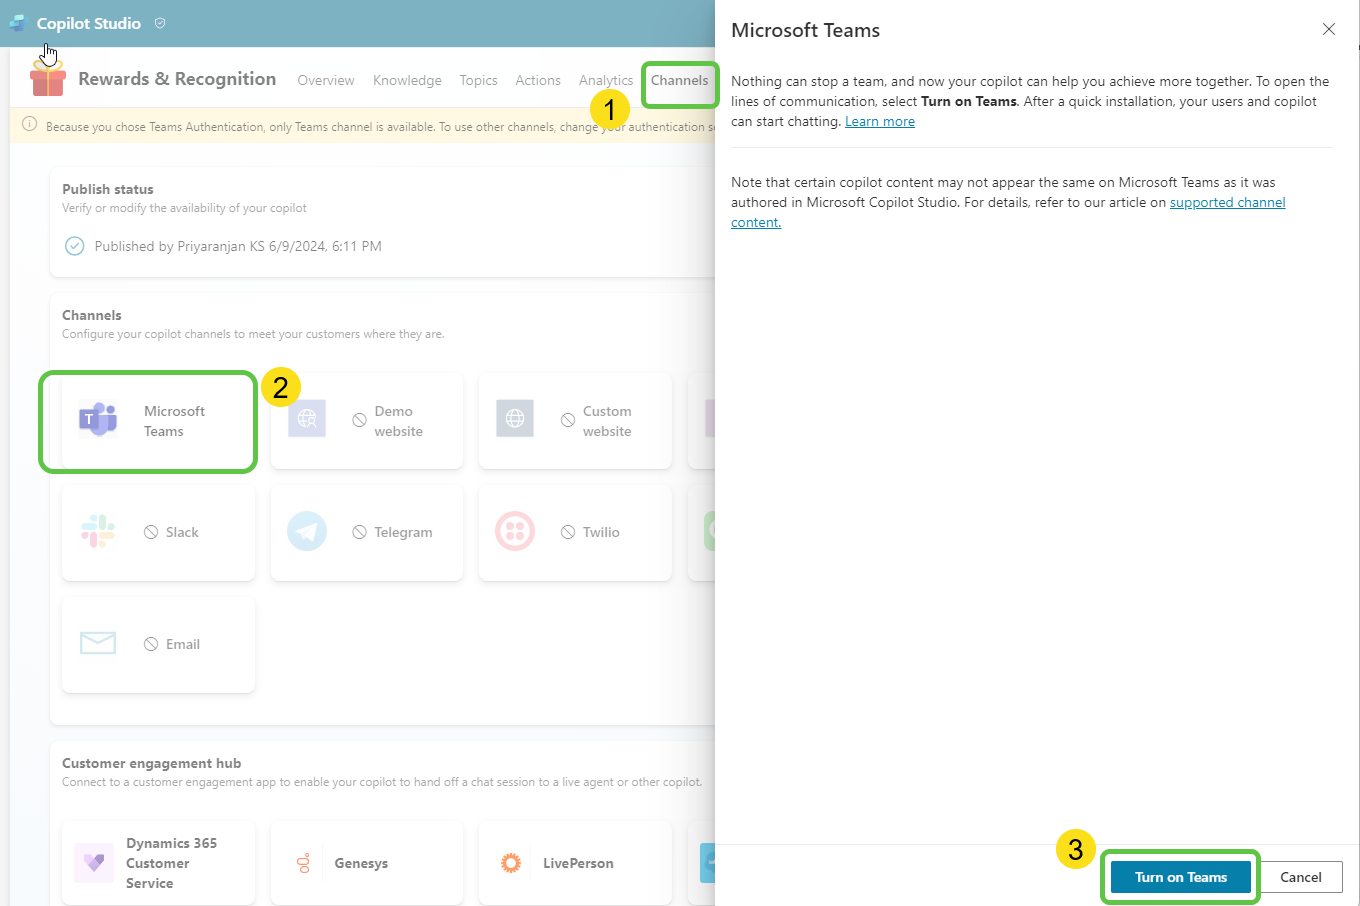
- To complete the integration, deploy the copilot to Microsoft Teams after publishing it:
- Select Channels.
- Click on Microsoft Teams.
- Select Turn On Teams.
-
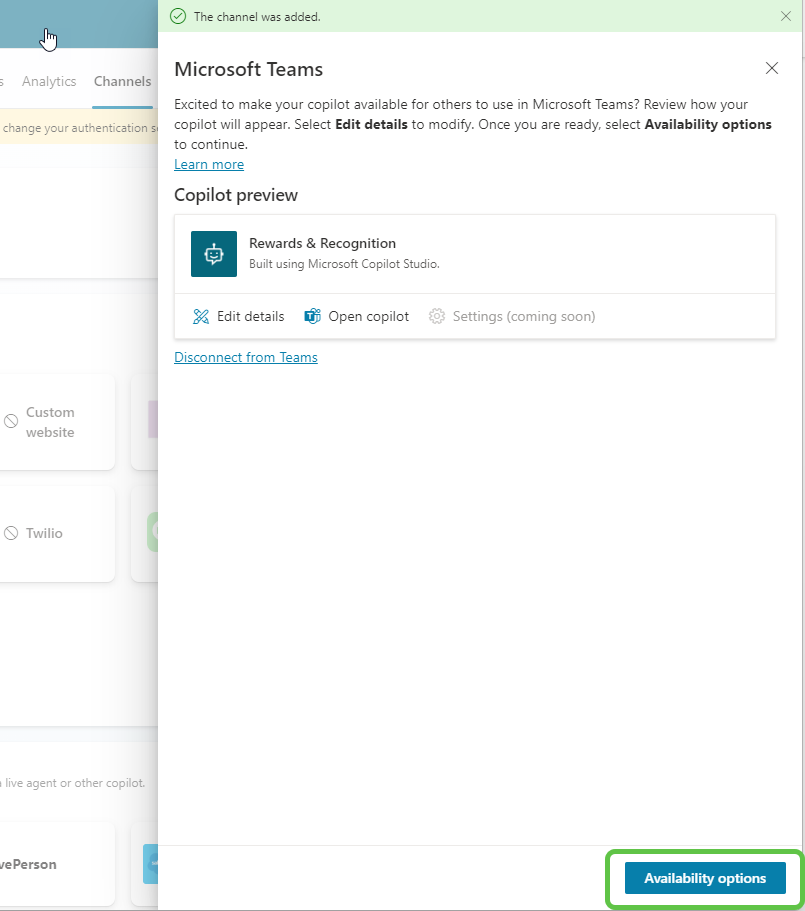
The Teams channel is now added. Click on Availability options.
-
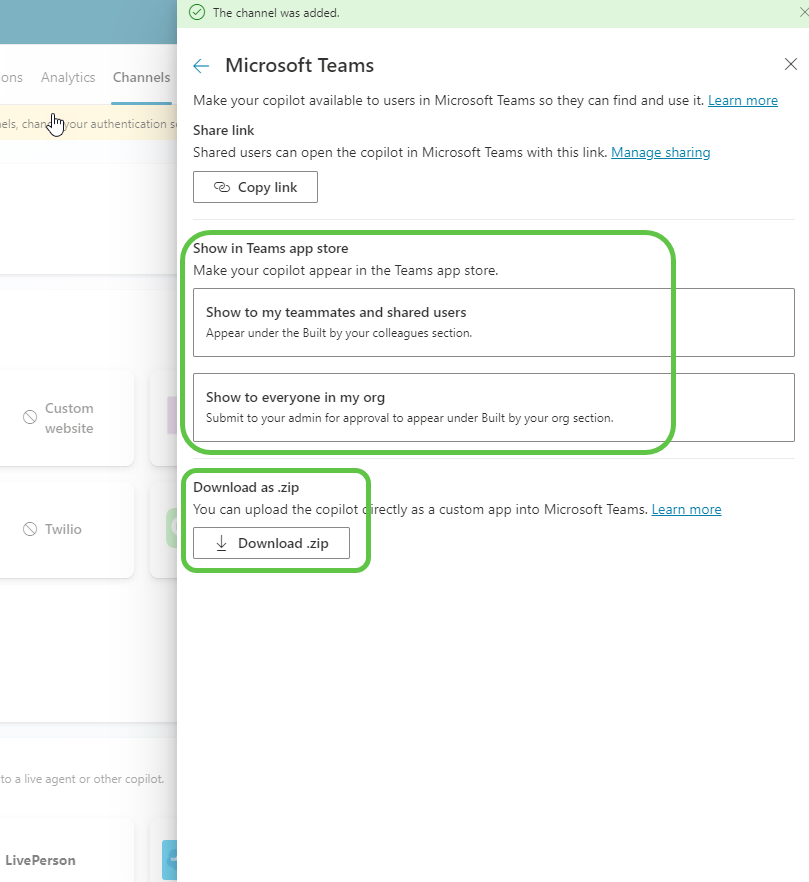
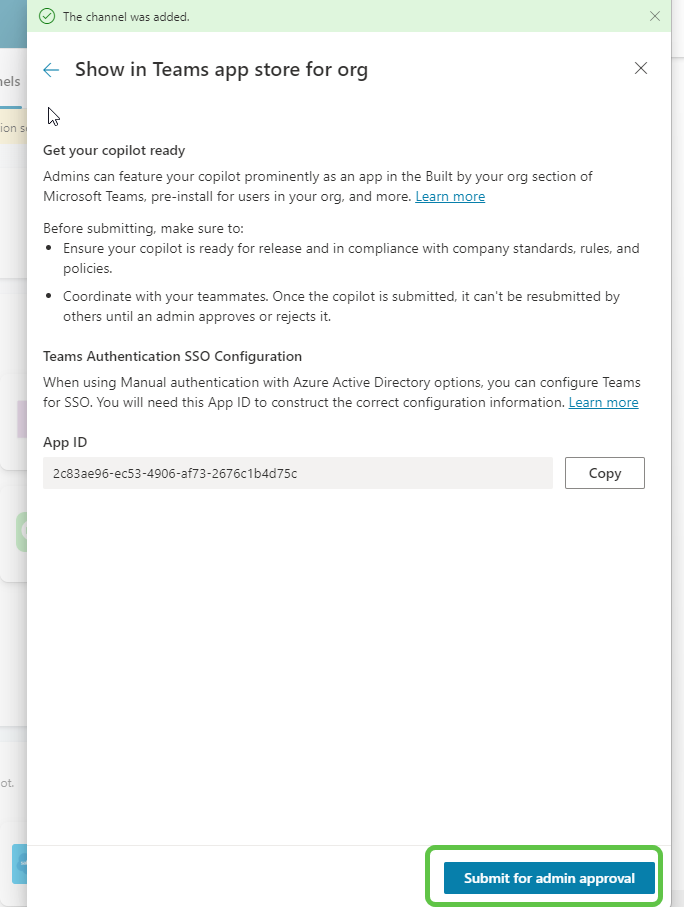
You can either make this available in the Teams app store for everyone to use or download the zip and upload the package to Teams as a custom app. For this example, select Show to everyone in my org. This will send the app for admin approval.
-
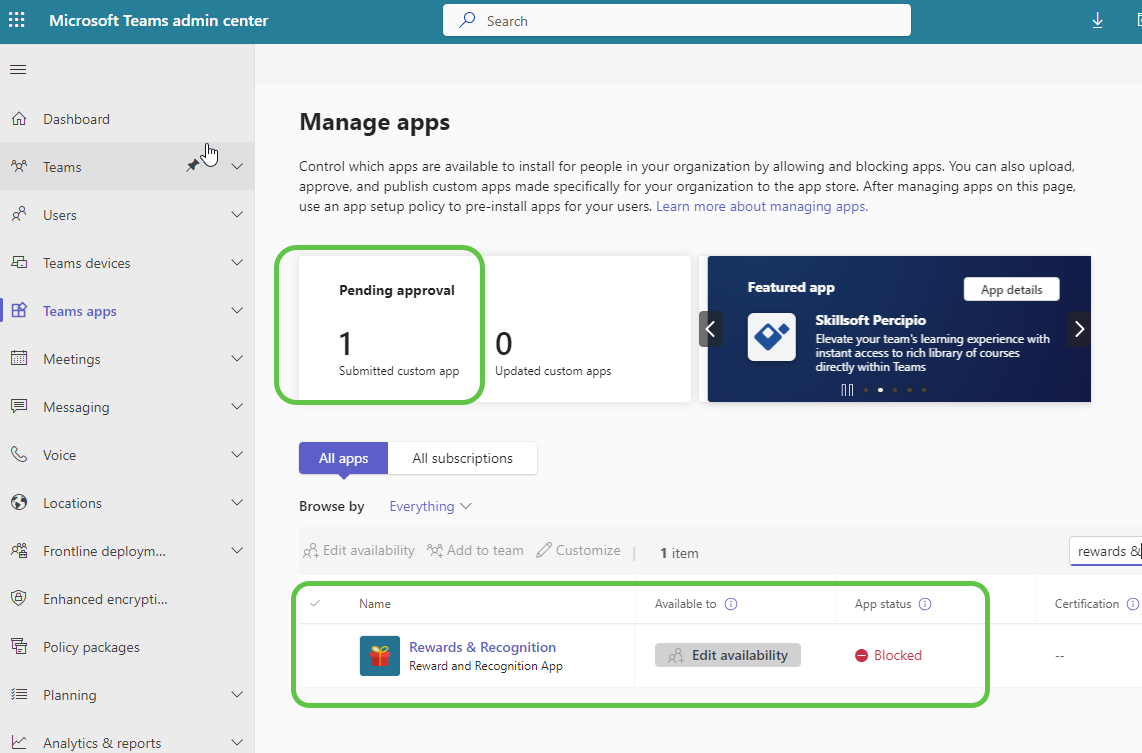
Head to the Teams admin center to approve and publish the app.
-
The app will now be available for organizational use.
Step 10: Testing the Copilot
-
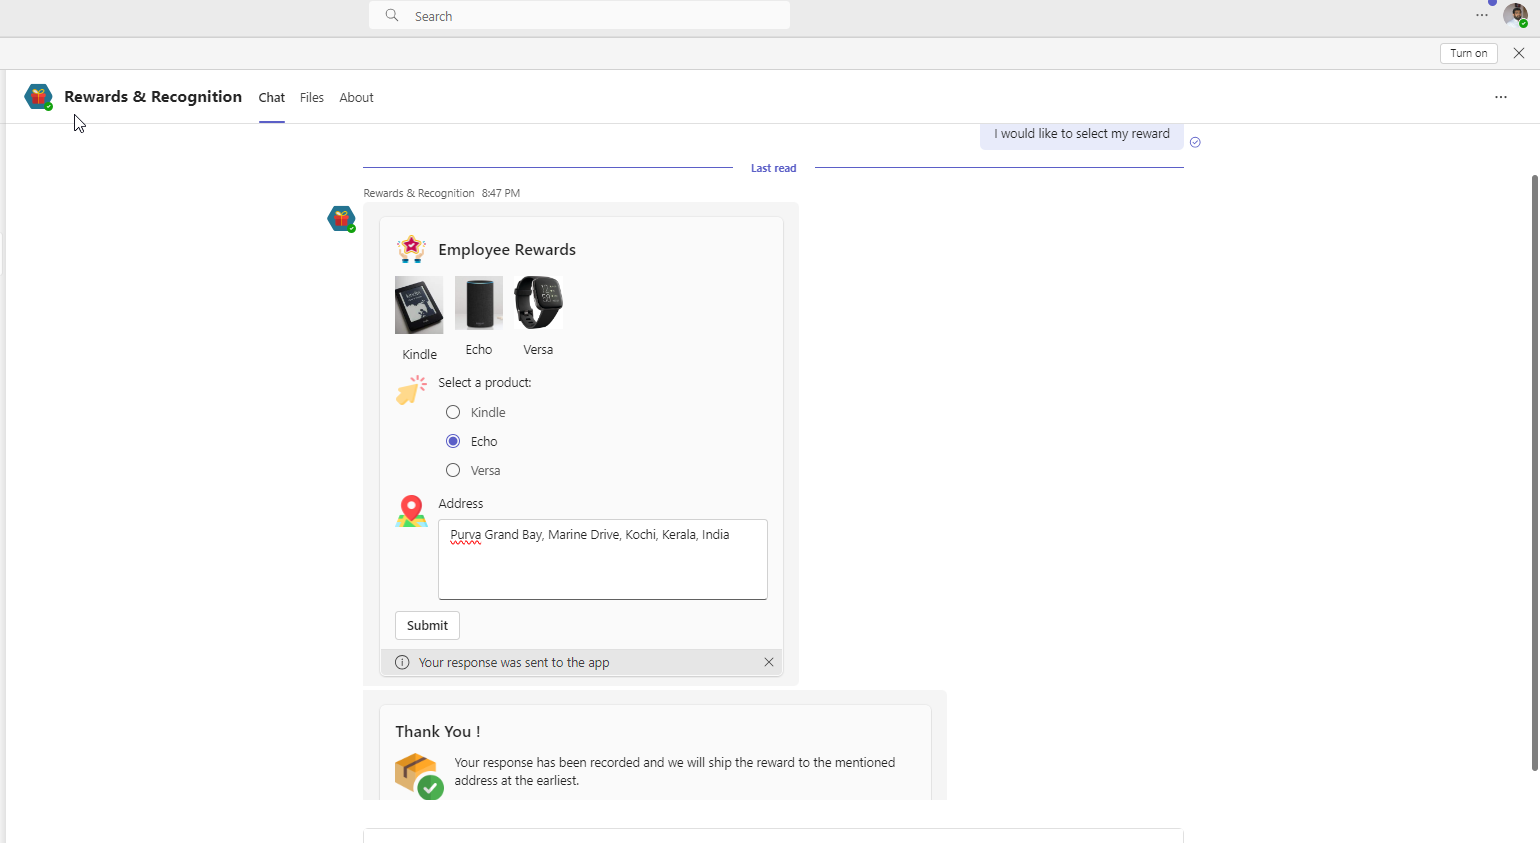
Test the copilot by initiating a conversation. The copilot checks Dataverse and finds that the user is claiming the reward for the first time, showing the adaptive card options to select the reward and shipment address.
-
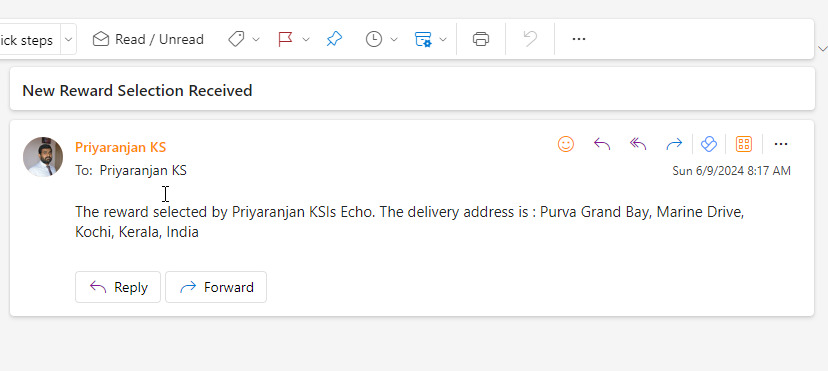
Upon submission, the copilot provides a success confirmation message and sends the follow-up action mail to the concerned team to start the reward dispatch.
Conclusion
Integrating Adaptive Cards with Copilot and Office 365 connectors offers a powerful way to enhance user interactions and streamline processes. By following the steps outlined in this blog, you can create a seamless and engaging Reward and Recognition Program that not only improves user experience but also boosts productivity within your organization.


