Table of Contents
- Introduction
- Process Flow
- Demo
- Steps to Create the Invoice Anomaly Detection System
- Create the Dataverse Table
- Creating the Copilot in Copilot Studio
- Enable Generative Selection of Topics
- Create Topics
- Test the Copilot
- Conclusion
Introduction
Keeping invoices accurate is crucial to avoid financial mistakes. This blog will show you how to build an Invoice Anomaly Detection system using Copilot Studio. You’ll learn how to input invoice details using an Adaptive Card and compare them with previous month’s data stored in Dataverse. The system will automatically check for any irregularities using AI prompt actions, helping you ensure accuracy and streamline your invoice process.
Process Flow
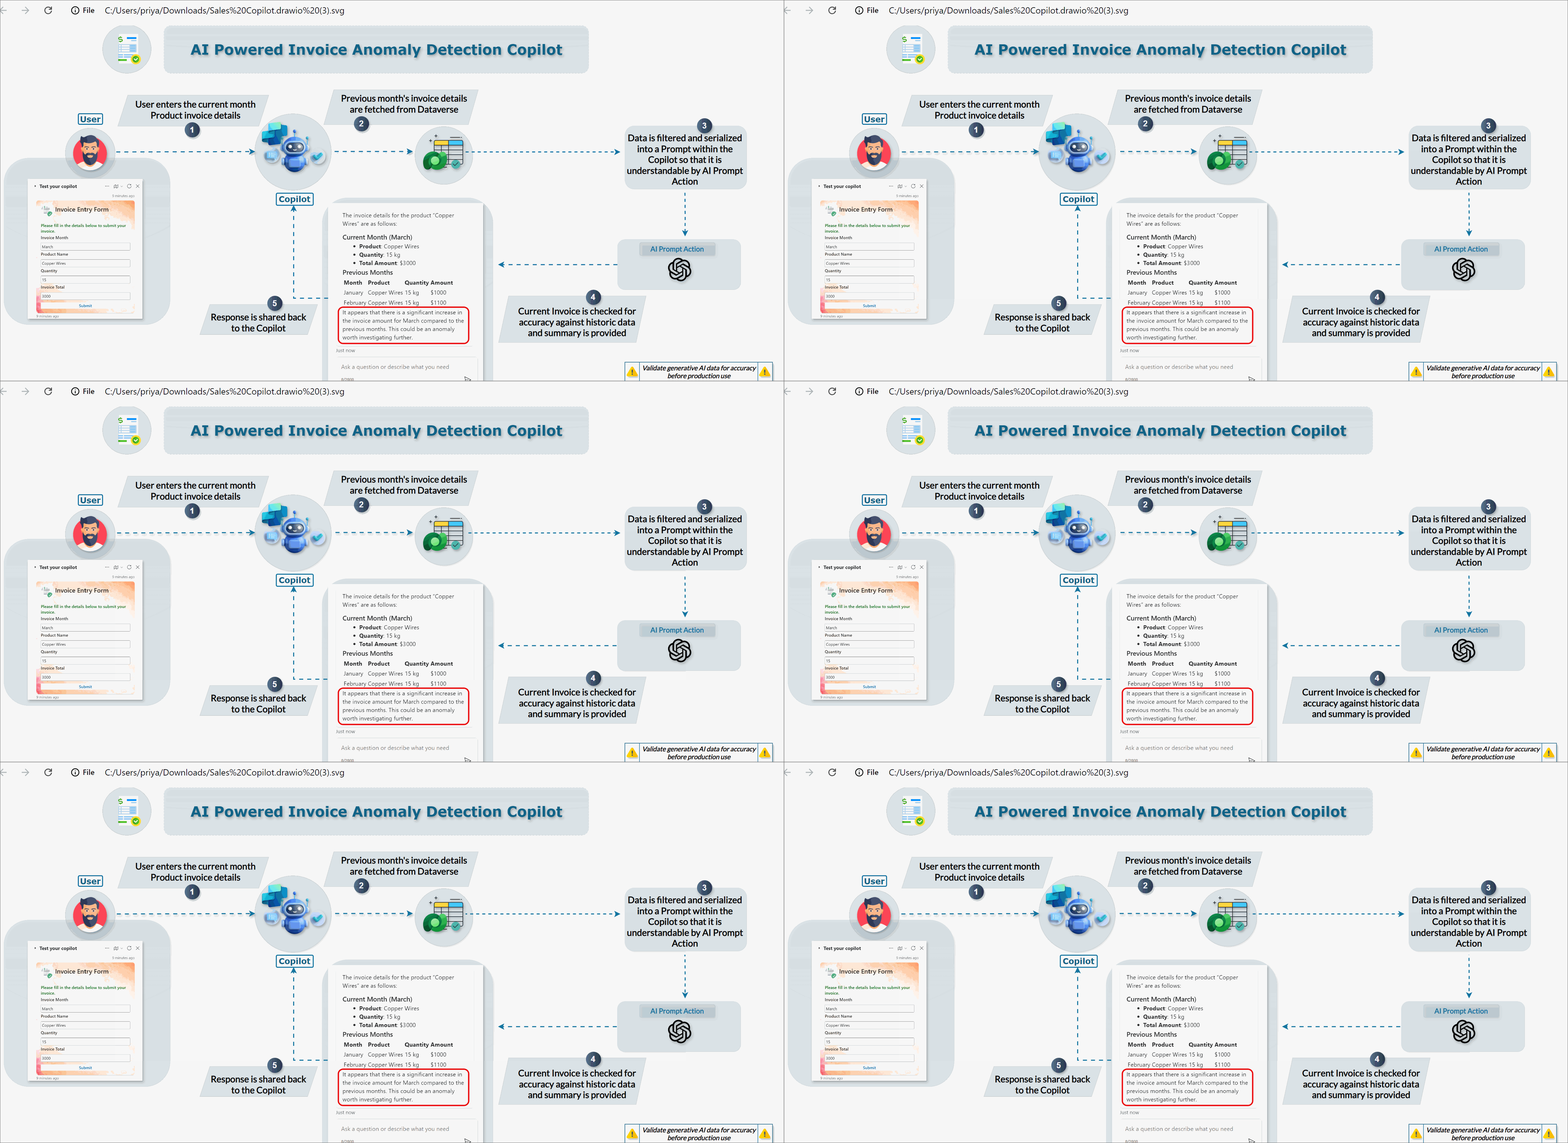
Invoice Anomaly Detection System involves several key steps to ensure accurate and efficient anomaly detection. Here’s an overview of the process:
- Data Storage: Invoice details are stored in Dataverse, allowing us to easily access and compare previous month’s data.
- Copilot Setup: Using Copilot Studio, we build a bot that captures the current month’s invoice details through an Adaptive Card and stores them as variables.
- Data Retrieval: The system fetches invoice data from Dataverse and formats it for comparison.
- Anomaly Detection: By leveraging AI prompt actions, the bot compares the current month’s invoice details with the historical data. If discrepancies are detected, the bot highlights them for review.
- Results Display: Finally, the system presents the analysis results in a user-friendly format, allowing you to take any necessary actions to maintain financial accuracy.
Demo
Watch the demo video below to see how the Invoice Anomaly Detection System works.
Steps to Create the Invoice Anomaly Detection System
Create the Dataverse Table
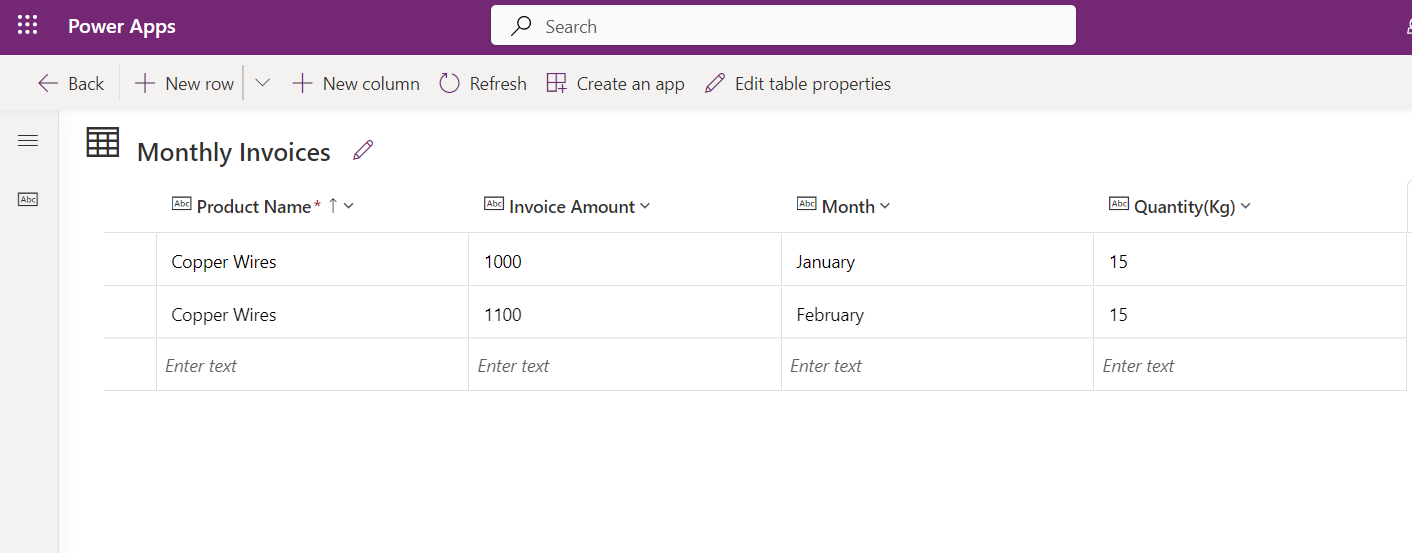
We will be storing the invoice details in the Dataverse table, which will contain the previous month’s invoices that we will be using to spot any irregularities. The table will contain the following columns:
- Product Name
- Invoice Amount
- Month
- Quantity
Creating the Copilot in Copilot Studio
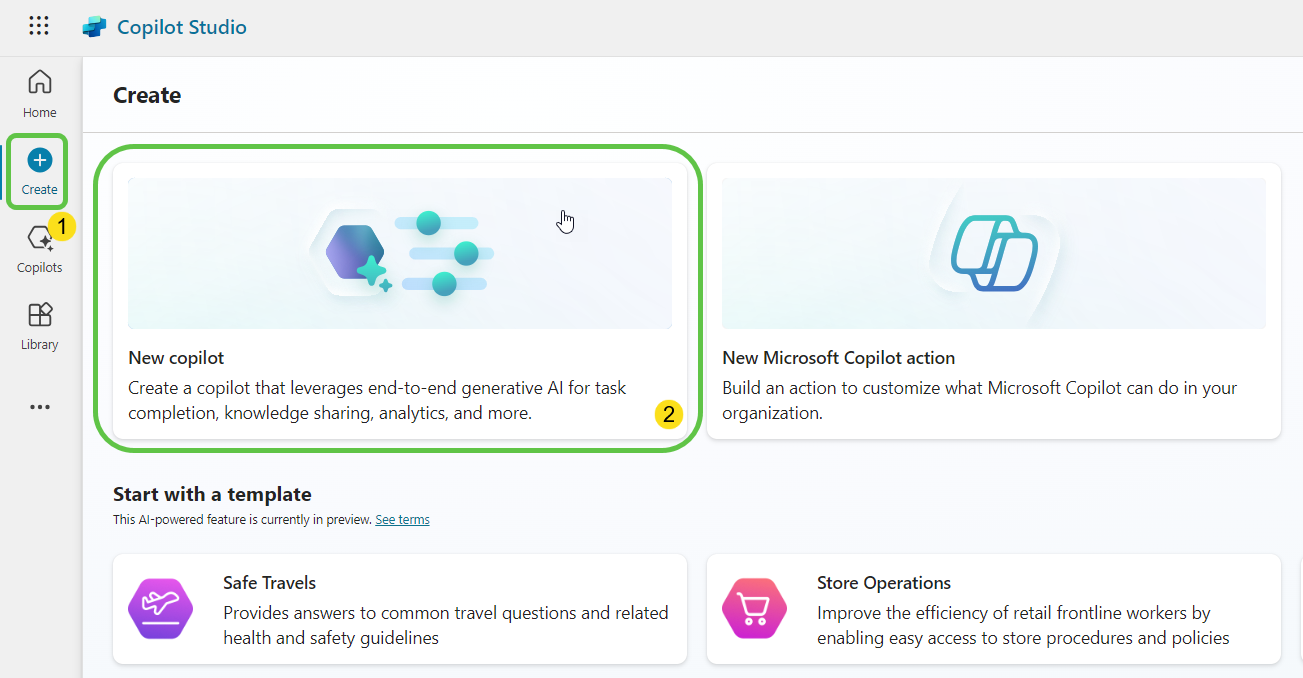
Step 1: Head over to Copilot Studio and click on Create. This will provide the option to create a copilot based on an existing template or create a blank copilot from scratch. Let’s select New Copilot.
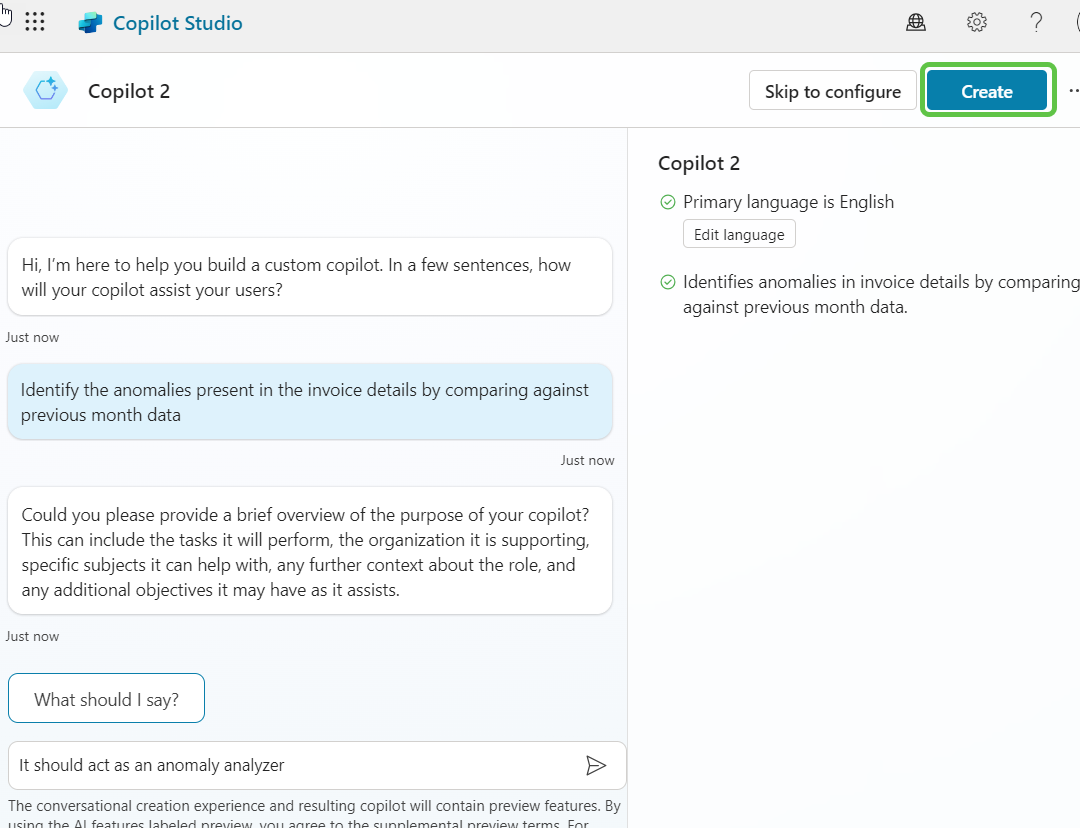
Step 2: You will now see a page where you can:
- Describe the copilot functionality and provide any specific instructions.
- Click on Create to provision the copilot.
Enable Generative Selection of Topics
Now that the copilot is created, we can configure it further.
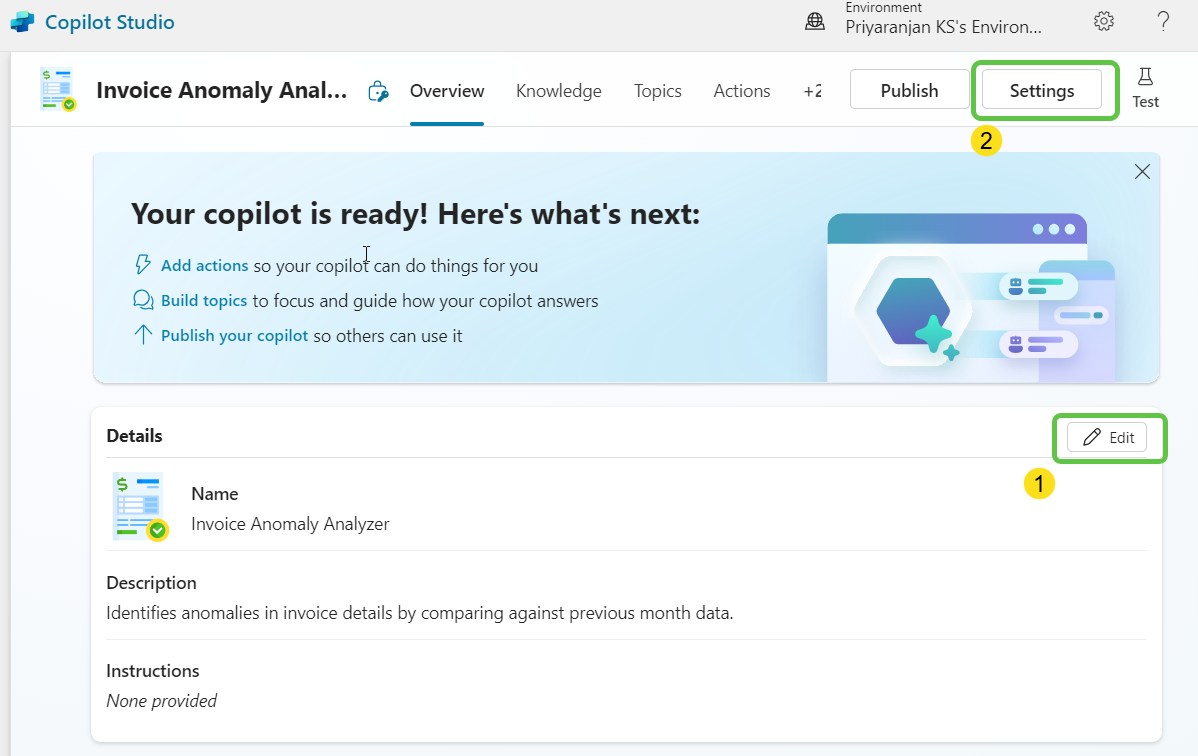
Step 1: Click on Edit to modify details like the copilot’s name, icon, and description.
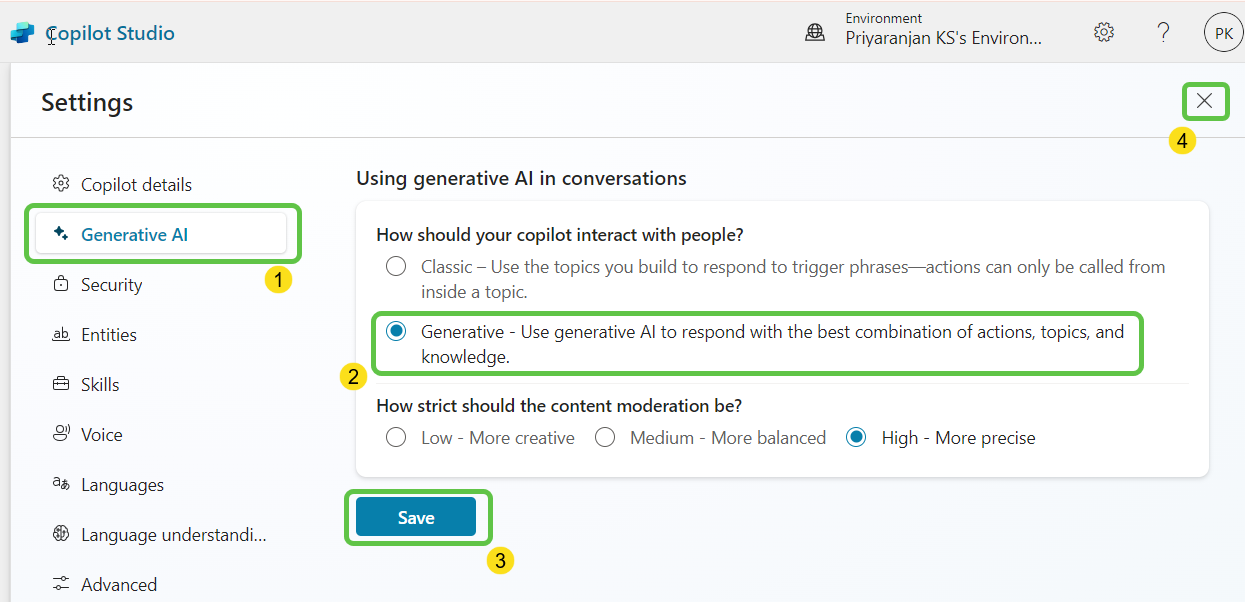
Step 2: Click on Settings and enable the Generative selection of topics, which allows topics to be automatically selected based on user conversations. This leads to a smoother user experience.
To enable the automatic detection of topics from user interaction:
- Click on Generative AI.
- Select Generative (preview).
- Click on Save to update the settings.
- Click the close icon to return to the home page of this custom copilot.
Create Topics
Let’s create topics that will automatically redirect the conversation flow based on the questions posed by users.
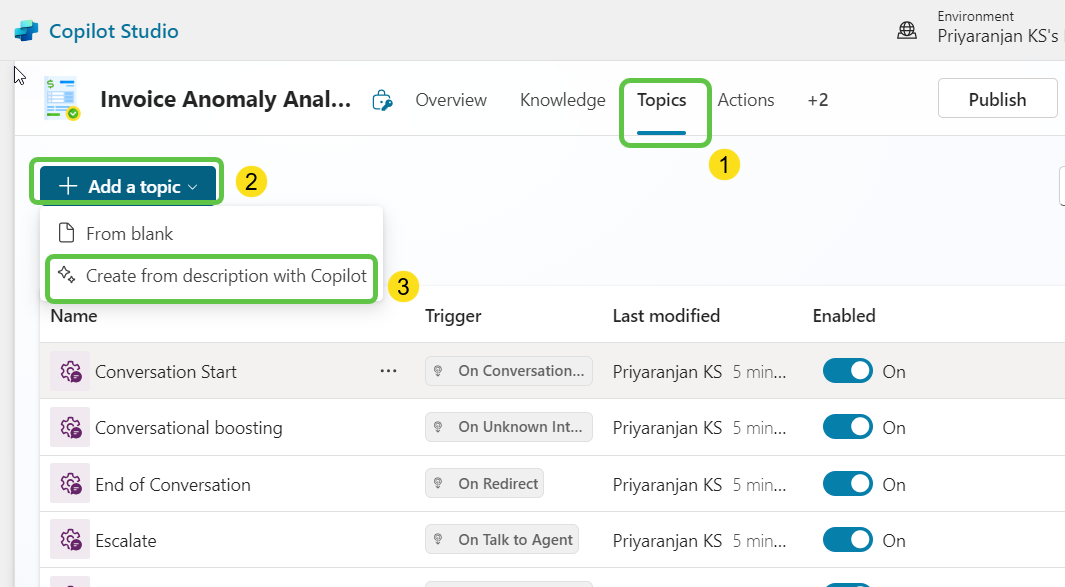
Step 1: Click on Topics from the navigation menu.
To add a topic:
- Either create a blank topic or use Copilot to generate a topic with prepopulated conversation nodes based on the description you provide.
- Click on Add a Topic.
- Select Create from description with Copilot.
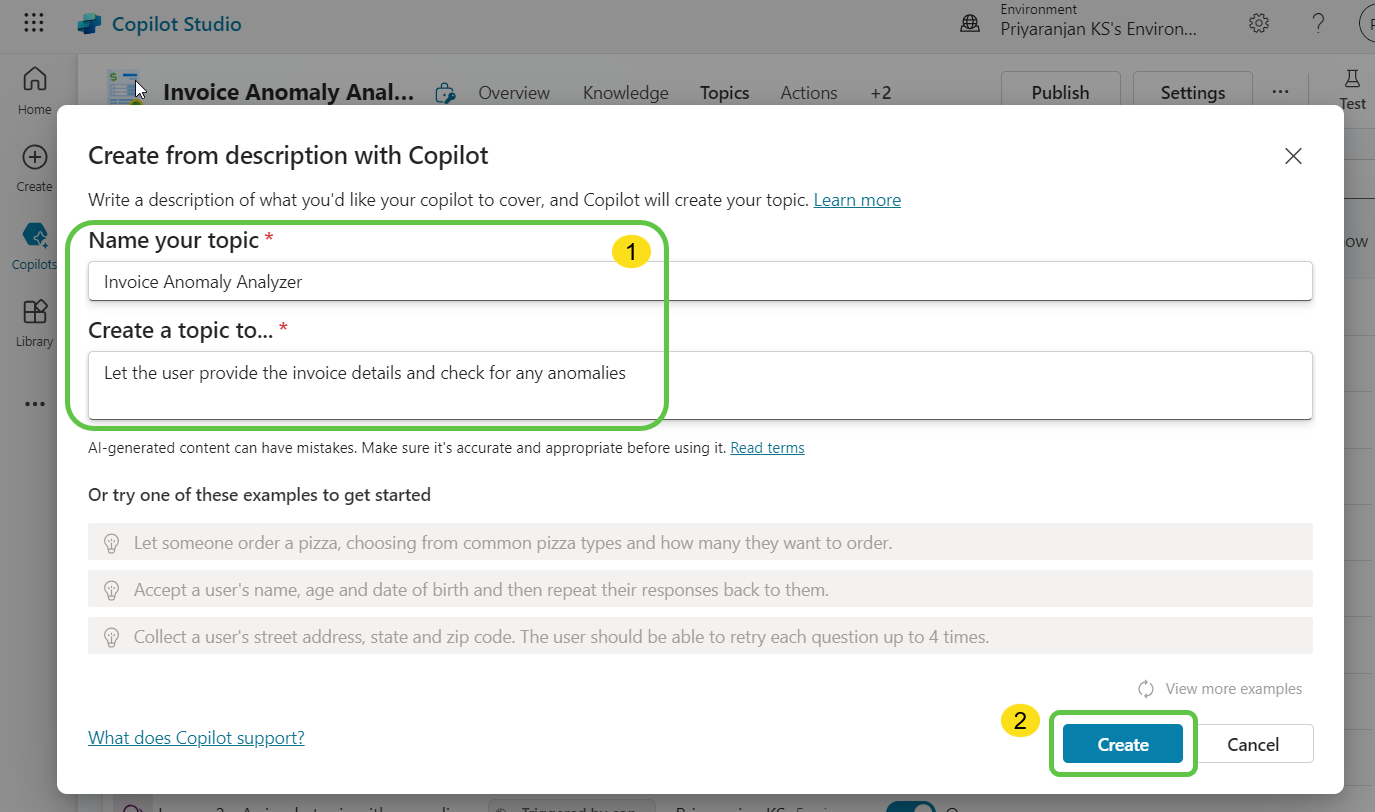
In the pop-up, provide the necessary topic description and then Click on Create. This will provision the topic skeleton.
Now that the basic topic is created with an automatic trigger, we can add more conversation nodes. Let’s add an Adaptive Card so users can input invoice details.
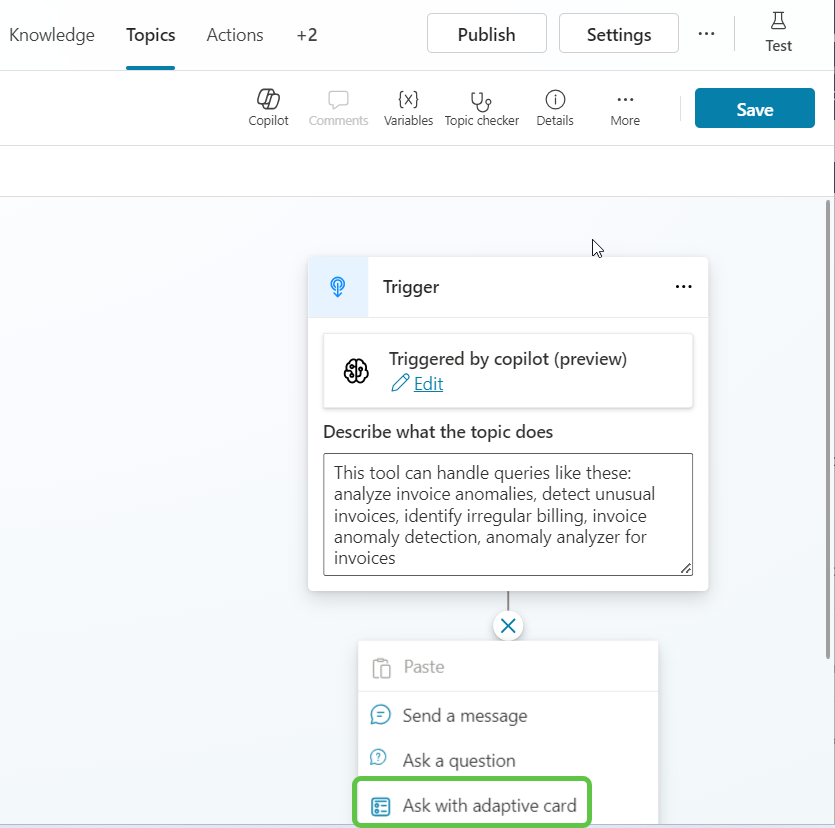
We will add the JSON schema for the adaptive card in the Node properties:
{
    "$schema": "http://adaptivecards.io/schemas/adaptive-card.json",
    "type": "AdaptiveCard",
    "version": "1.4",
    "body": [
        {
            "type": "ColumnSet",
            "columns": [
                {
                    "type": "Column",
                    "width": "auto",
                    "items": [
                        {
                            "type": "Image",
                            "url": "https://adaptivecardsbot.blob.core.windows.net/imagestore/InvoiceProcess.png",
                            "size": "Small",
                            "style": "Person"
                        }
                    ]
                },
                {
                    "type": "Column",
                    "width": "stretch",
                    "items": [
                        {
                            "type": "TextBlock",
                            "text": "Invoice Entry Form",
                            "weight": "Bolder",
                            "size": "Large",
                            "wrap": true
                        }
                    ]
                }
            ]
        },
        {
            "type": "TextBlock",
            "text": "Please fill in the details below to submit your invoice.",
            "wrap": true,
            "weight": "Bolder",
            "color": "Good",
            "spacing": "Medium"
        },
        {
            "type": "TextBlock",
            "text": "Invoice Month",
            "weight": "Bolder",
            "wrap": true,
            "spacing": "Small"
        },
        {
            "type": "Input.Text",
            "id": "invoiceMonth",
            "placeholder": "Enter Invoice Month (e.g., January)"
        },
        {
            "type": "TextBlock",
            "text": "Product Name",
            "weight": "Bolder",
            "wrap": true,
            "spacing": "Small"
        },
        {
            "type": "Input.Text",
            "id": "productName",
            "placeholder": "Enter Product Name"
        },
        {
            "type": "TextBlock",
            "text": "Quantity",
            "weight": "Bolder",
            "wrap": true,
            "spacing": "Small"
        },
        {
            "type": "Input.Number",
            "id": "quantity",
            "placeholder": "Enter Quantity"
        },
        {
            "type": "TextBlock",
            "text": "Invoice Total",
            "weight": "Bolder",
            "wrap": true,
            "spacing": "Small"
        },
        {
            "type": "Input.Number",
            "id": "invoiceTotal",
            "placeholder": "Enter Invoice Total"
        }
    ],
    "actions": [
        {
            "type": "Action.Submit",
            "title": "Submit"
        }
    ],
    "style": "default",
    "backgroundImage": {
        "url": "https://adaptivecardsbot.blob.core.windows.net/imagestore/background.jpg"
    }
}
The user-entered values in the adaptive card will be available as output variables.
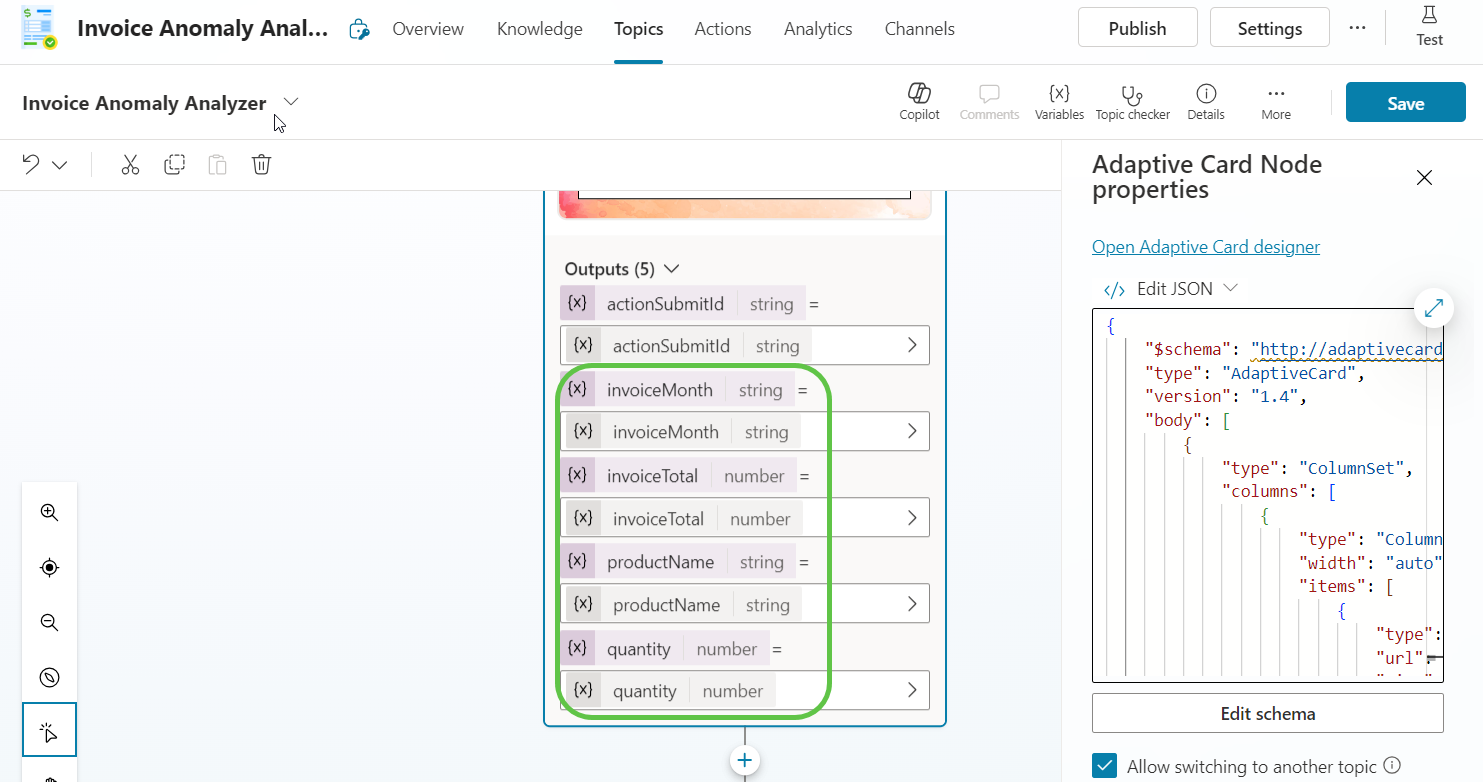
Step 3: Add a variable using Power Fx to concatenate user input into the format: ProductName: Month: InvoiceTotal (Quantity kg).
For example:
Copper Wires: March: 1900 (15 kg)
We will add the below expression to the variable varCurrentMonthInvoiceDetails:
Concat(Topic.varFormattedTable, Product & ": " & Month & ":" & Amount & " (" & Quantity & " kg)", ", ")
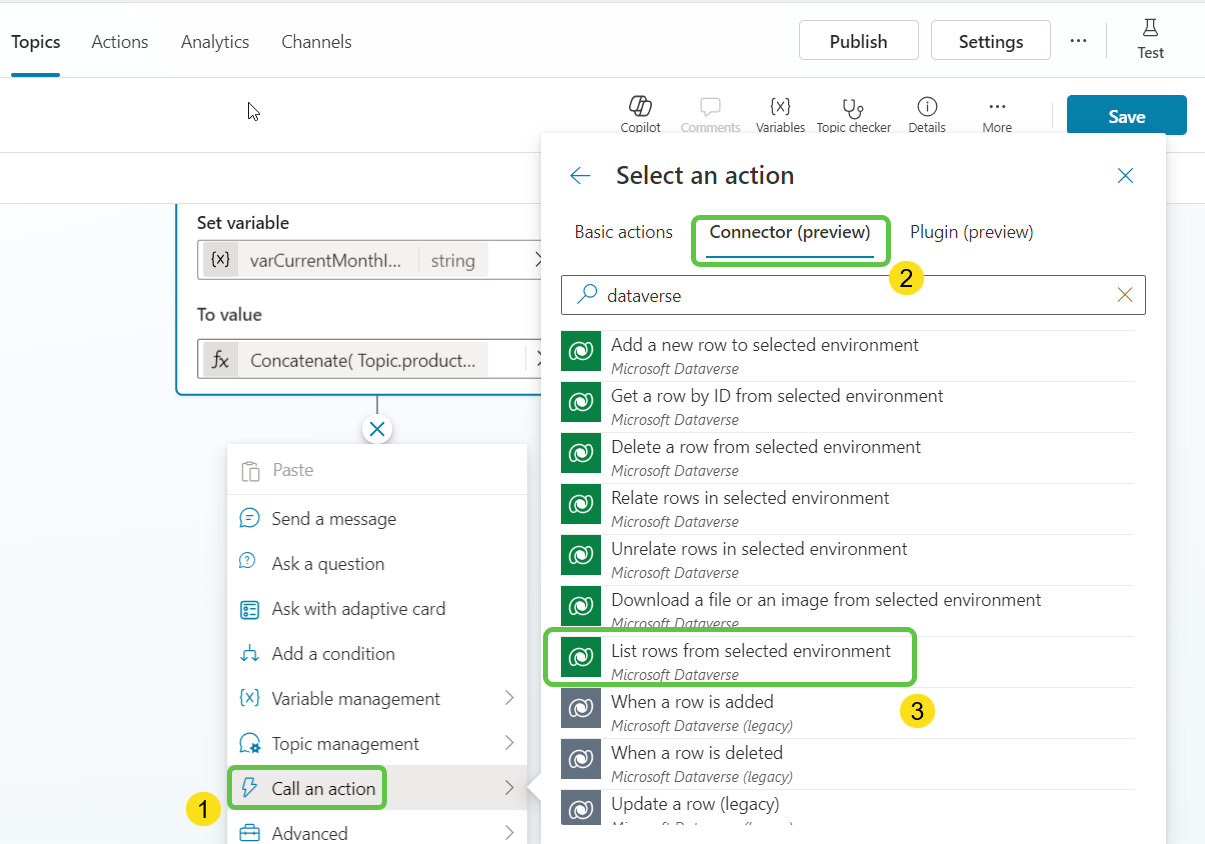
Step 4: Now, add the Dataverse connector action to fetch the previous month’s invoice details from the Monthly Invoices table.
To do this:
- Select Call an action.
- From the connector tab, search for Dataverse.
- Select List rows from the selected environment.
Configure the connector by:
- Mentioning the Environment and table name.
- Click on Advanced Inputs to filter the columns returned.
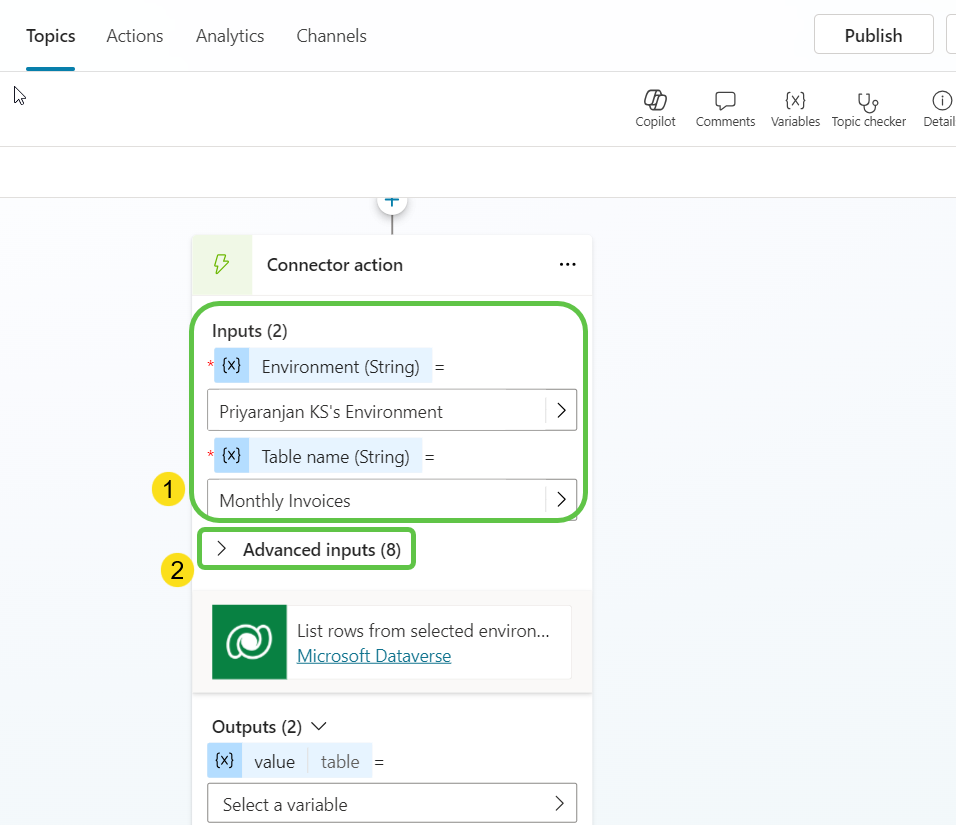
Add the necessary logical names for Product Name, Month, Quantity, and Invoice Amount to the Select columns field.
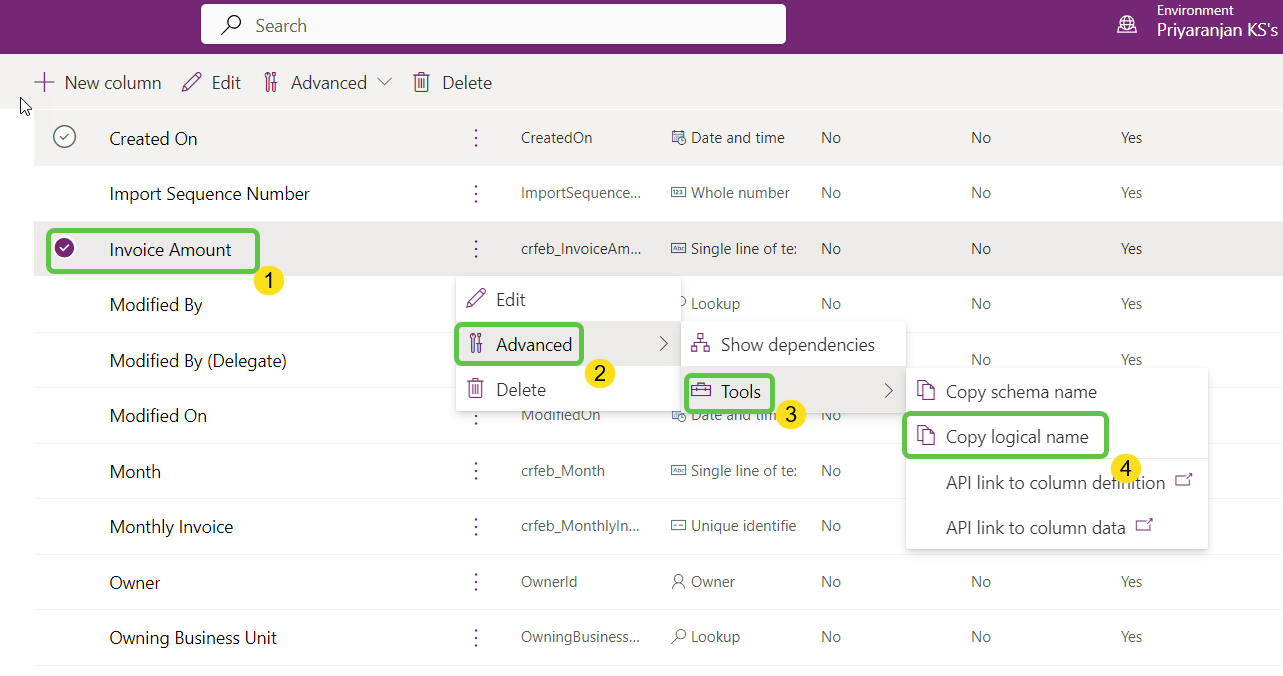
Step 5: Add an output variable varInvoiceTable to store the Dataverse returned data in a table format.
 Since there are system columns in the data, we’ll filter it using the following format:
[
{"Amount":"1000","Month":"January","Product":"Copper Wires","Quantity":"15"},
{"Amount":"1100","Month":"February","Product":"Copper Wires","Quantity":"15"}
]
We will store the filtered table in a new variable varFormattedTable using the below Power Fx expression:
ForAll(
    Topic.varInvoiceTable,
    {
        Product: ThisRecord.crfeb_productname,
        Month: ThisRecord.crfeb_month,
        Amount: ThisRecord.crfeb_invoiceamount,
        Quantity: ThisRecord.crfeb_quantitykg
    }
)
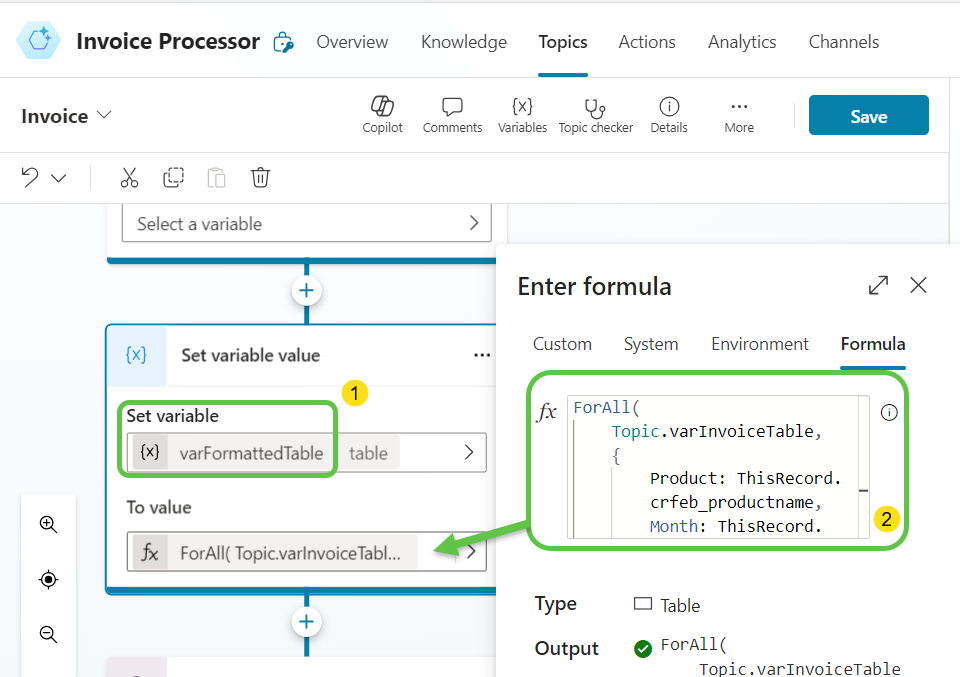
Step 6: Serialize the table data for the AI prompt action, as it cannot accept tables directly. Use the below format:
Eg: Copper Wires: January: 1000 (15 kg), Copper Wires: February: 1100 (15 kg)
Store the serialized data in a variable varSerializedInvoiceDetails and concatenate the table data using the below expression.
Concat(Topic.varFormattedTable, Product & ": " & Month & ":" & Amount & " (" & Quantity & " kg)", ", ")
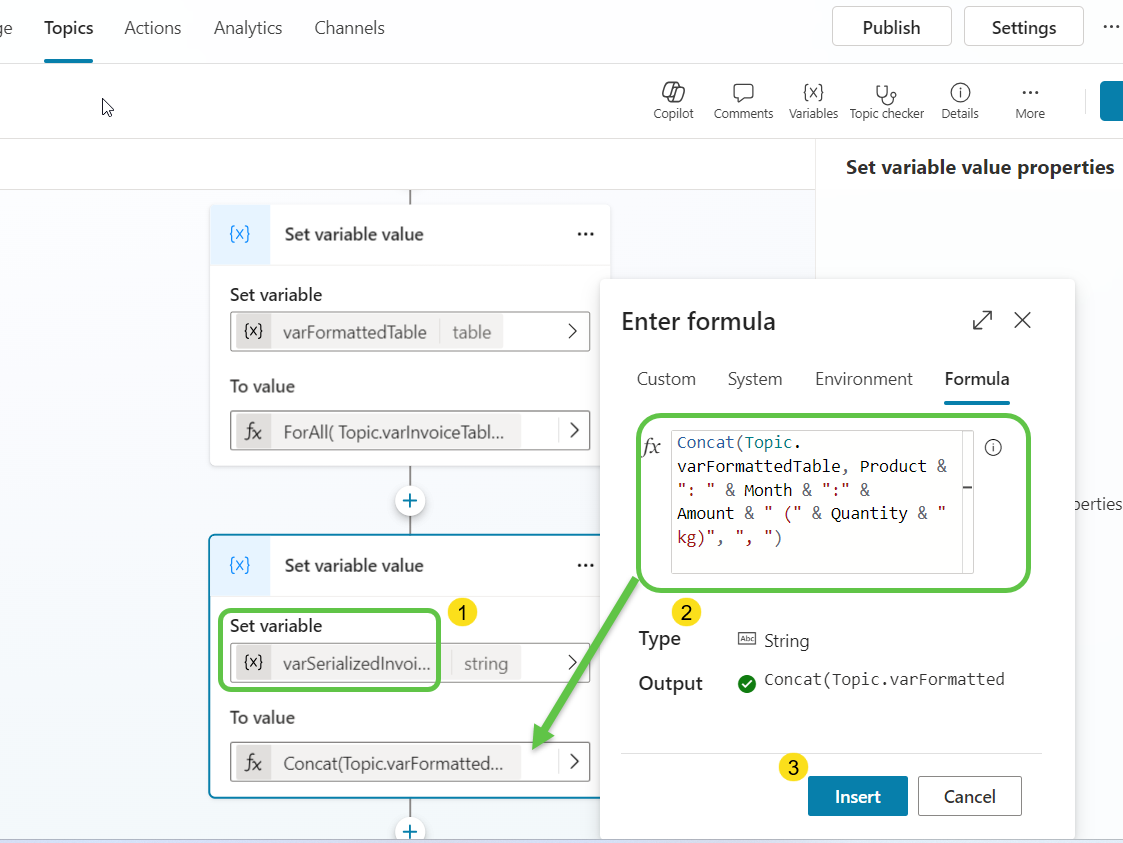
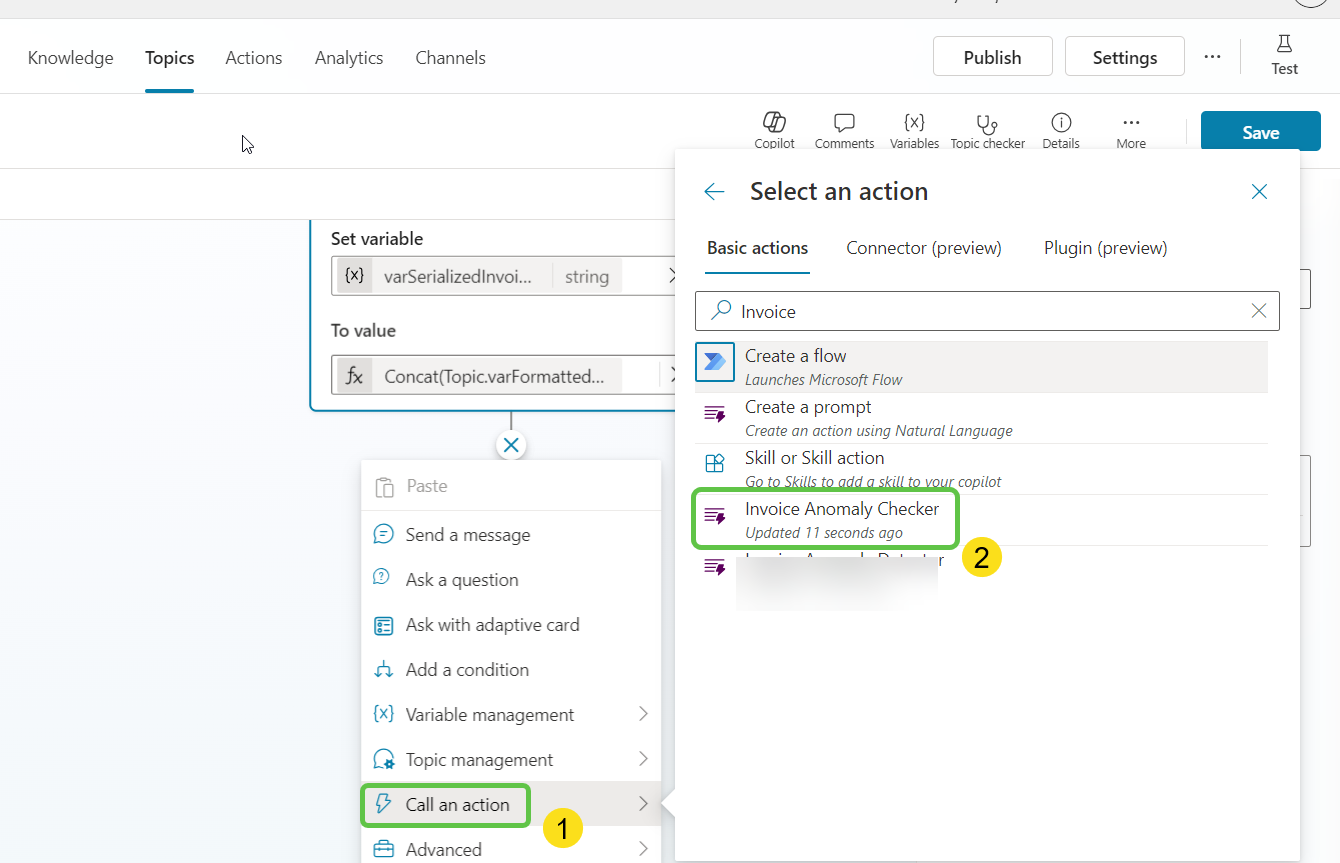
Step 7: Add an AI Prompt action by selecting Call an action, and from the Basic actions tab, select Create a prompt.
 This opens a pop-up where you can:
- Enter a name for the prompt.
- Create variables for Current Month Invoice and Previous Month Details.
- Add dynamic variables to the prompt using the Insert button.
- Click on Save custom prompt to make it available in the Copilot designer.
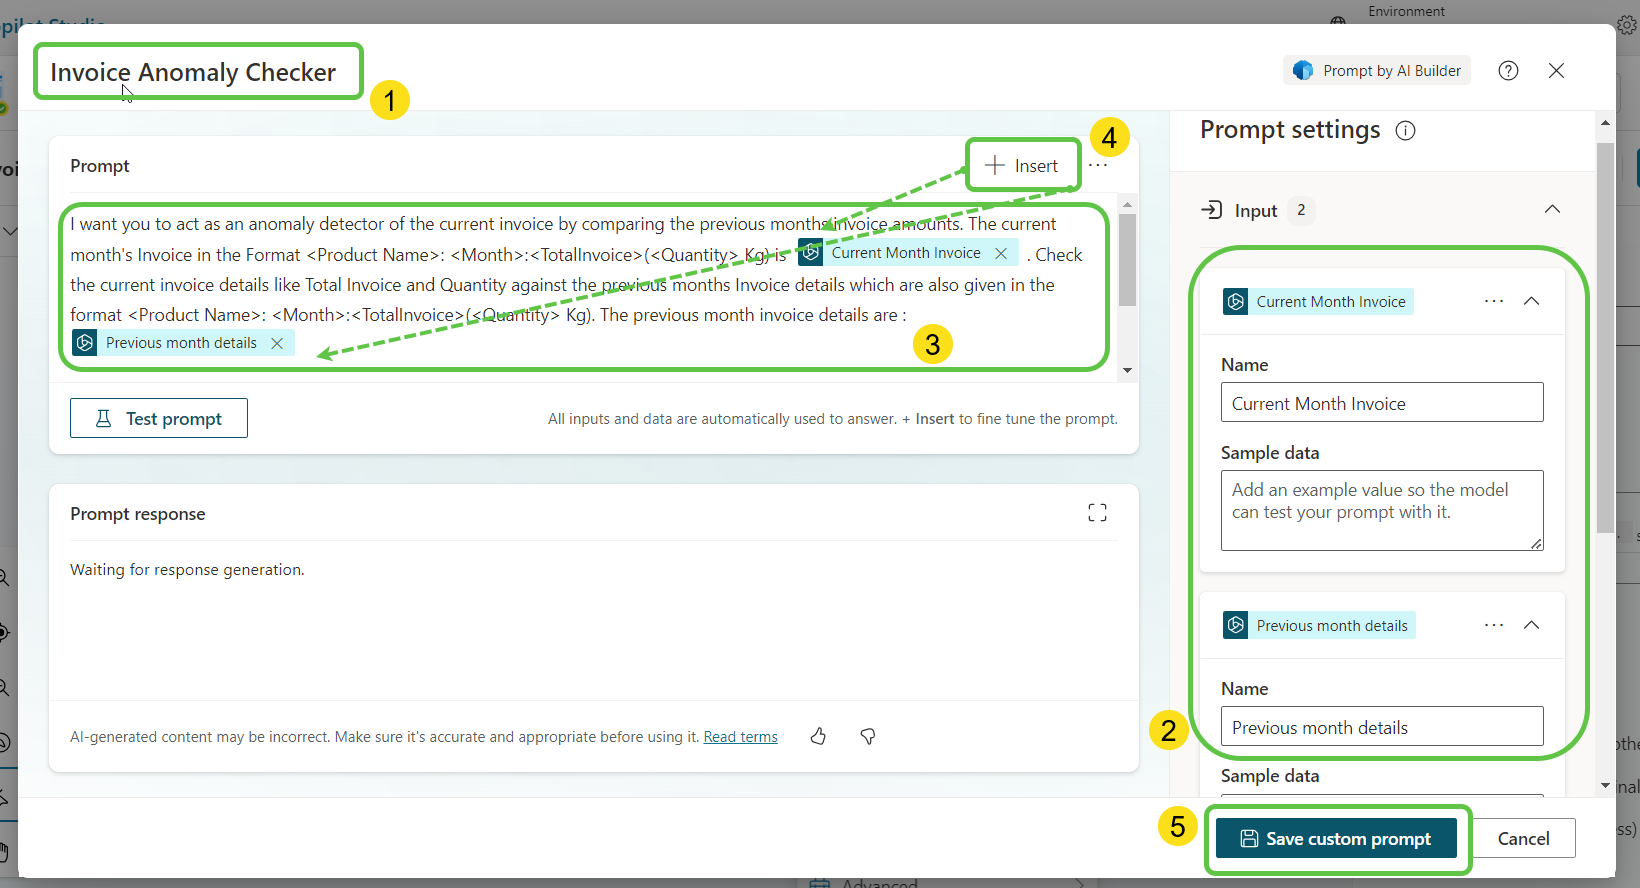
Step 8: Add the prompt by selecting Call an action, and from the Basic actions tab, choose the Invoice Anomaly Checker prompt.
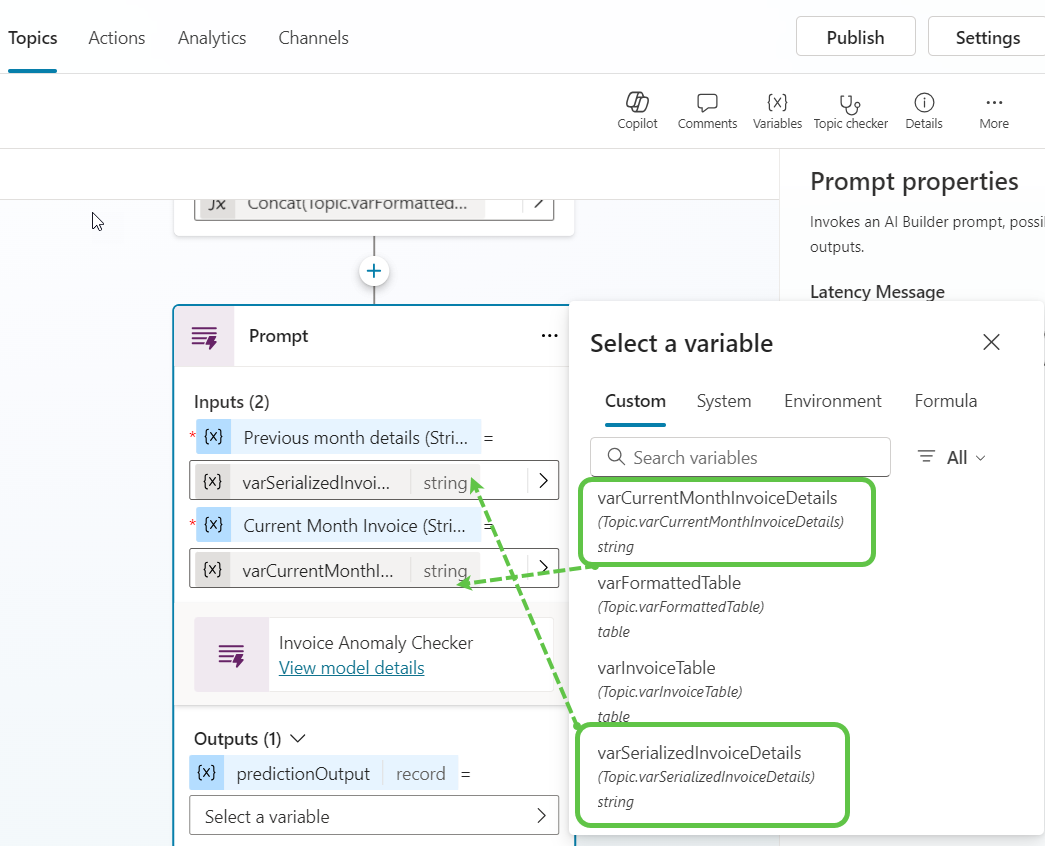
Configure the prompt by adding the previously created variables:
- varSerializedInvoiceDetails: Previous month’s data.
- varCurrentMonthInvoiceDetails: Current user input.
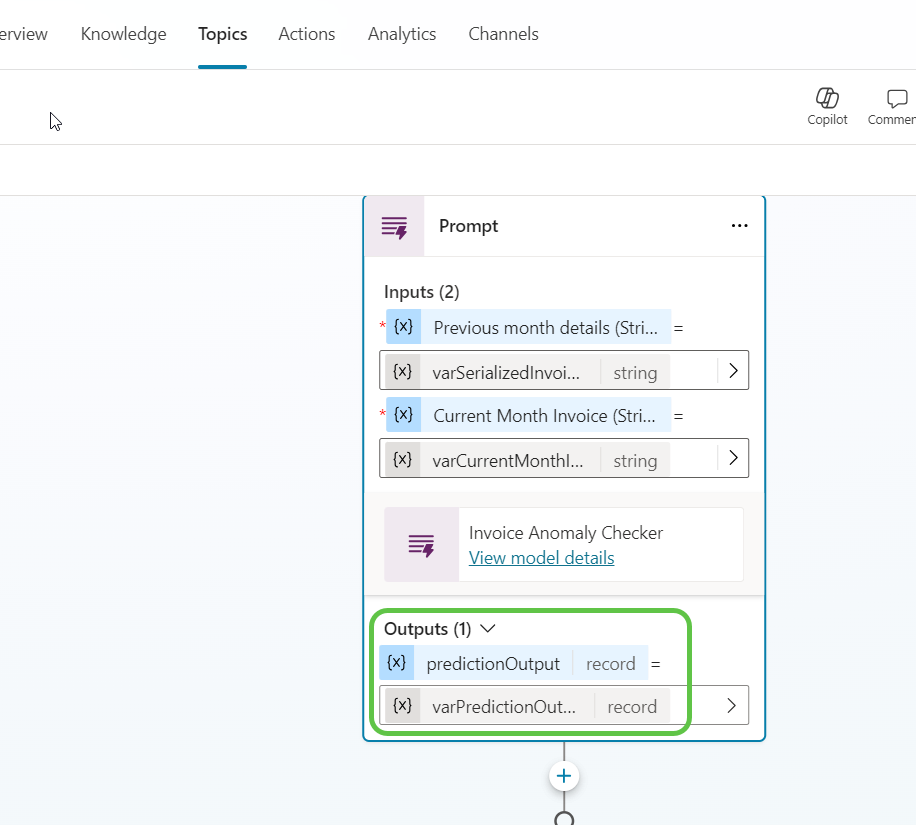
We will store the AI-prompt output in varPredictionOutput.
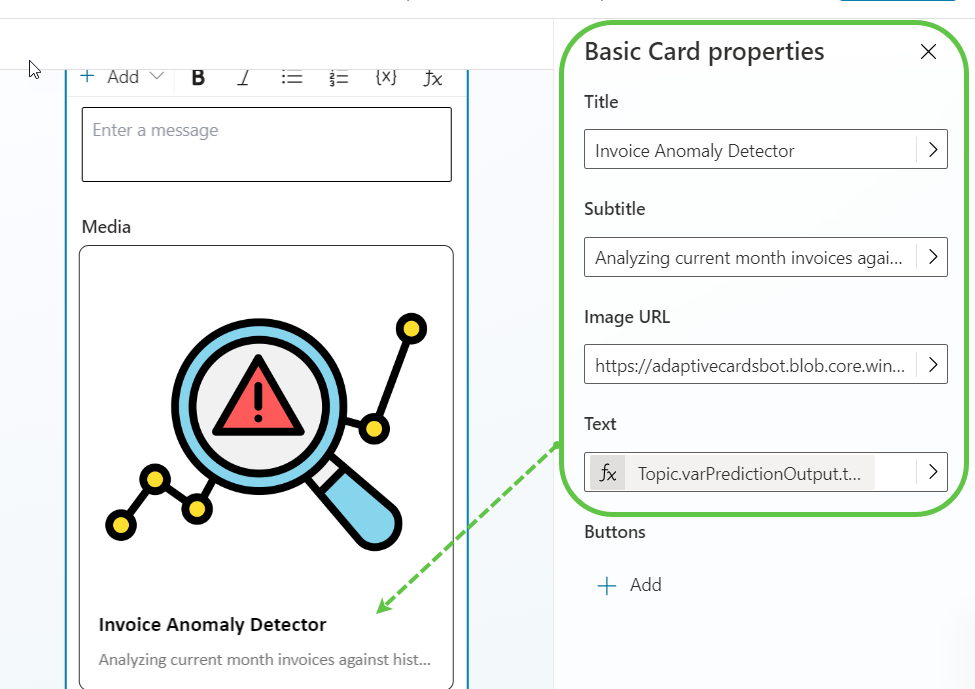
Step 9: Finally, add a basic card and populate it with details from the varPredictionOutput.
The text property will contain the AI-generated output, which we will display in the Adaptive Card.
Test the Copilot
Let’s test the copilot by specifying invoice details for the month of March using the Adaptive Card.
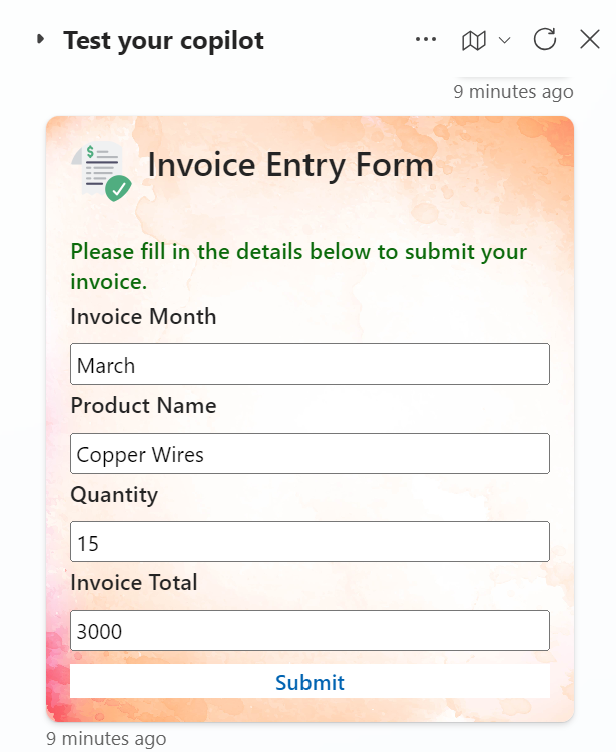
Upon submission, previous month’s invoice details are fetched from Dataverse, and using the AI Prompt action, the copilot identifies any potential variations in the invoice and shares them back with the user.
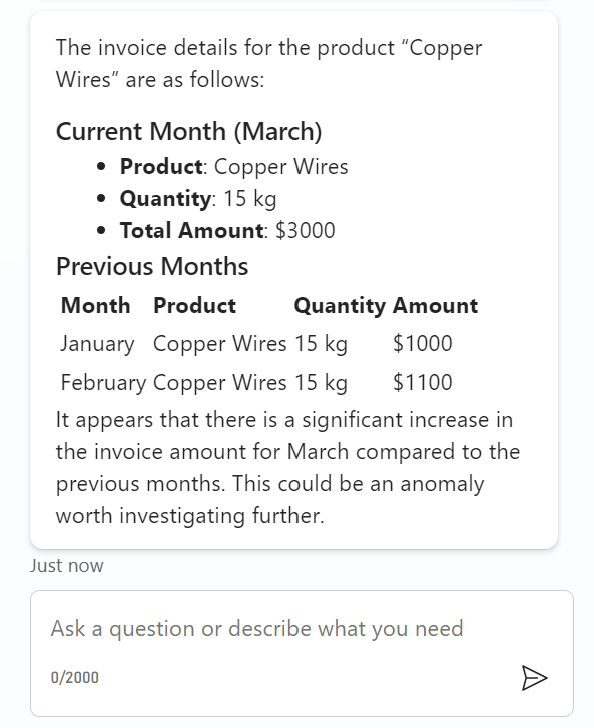
Conclusion
In this blog, we successfully built an Invoice Anomaly Detection system using Copilot Studio. By leveraging Adaptive Cards for user inputs, Dataverse for storing historical data, and AI prompt actions for detecting anomalies, we created a seamless and accurate invoice-checking process. This helps in identifying potential mistakes and ensures better financial accuracy. The same approach can be extended to various other data anomaly detection scenarios, streamlining business processes efficiently.


