Table of Contents
- Introduction
- Demo
- Prerequisites
- Step-by-Step Implementation
- Step 1: Download the Power Apps Documentation
- Step 2: Create an Azure AI Search Instance
- Step 3: Add Blob Storage and Create an Indexer
- Step 4: Create Azure OpenAI Instance
- Step 5: Integrate Copilot with Azure OpenAI Instance
- Step 6: Publish the Bot
- Alternate Approach : Power Apps Documentation as Local Datasource
- High Level Data Source Comparison : Azure AI Search vs SharePoint Vs Local File
- Conclusion
Introduction
Connecting data through Azure OpenAI Service within Microsoft Copilot Studio enables your Copilots to utilize Azure resources effectively via the Generative Answers node. Leveraging the robust capabilities of Azure AI Search and Azure OpenAI, these copilots can deliver responses that are both contextually relevant and compliant with your organization’s guidelines. In this blog we will see how to create a Power Apps FAQ copilot utilizing the official Microsoft PowerApps documentation PDF and leveraging the Azure AI Search and Azure Open AI.
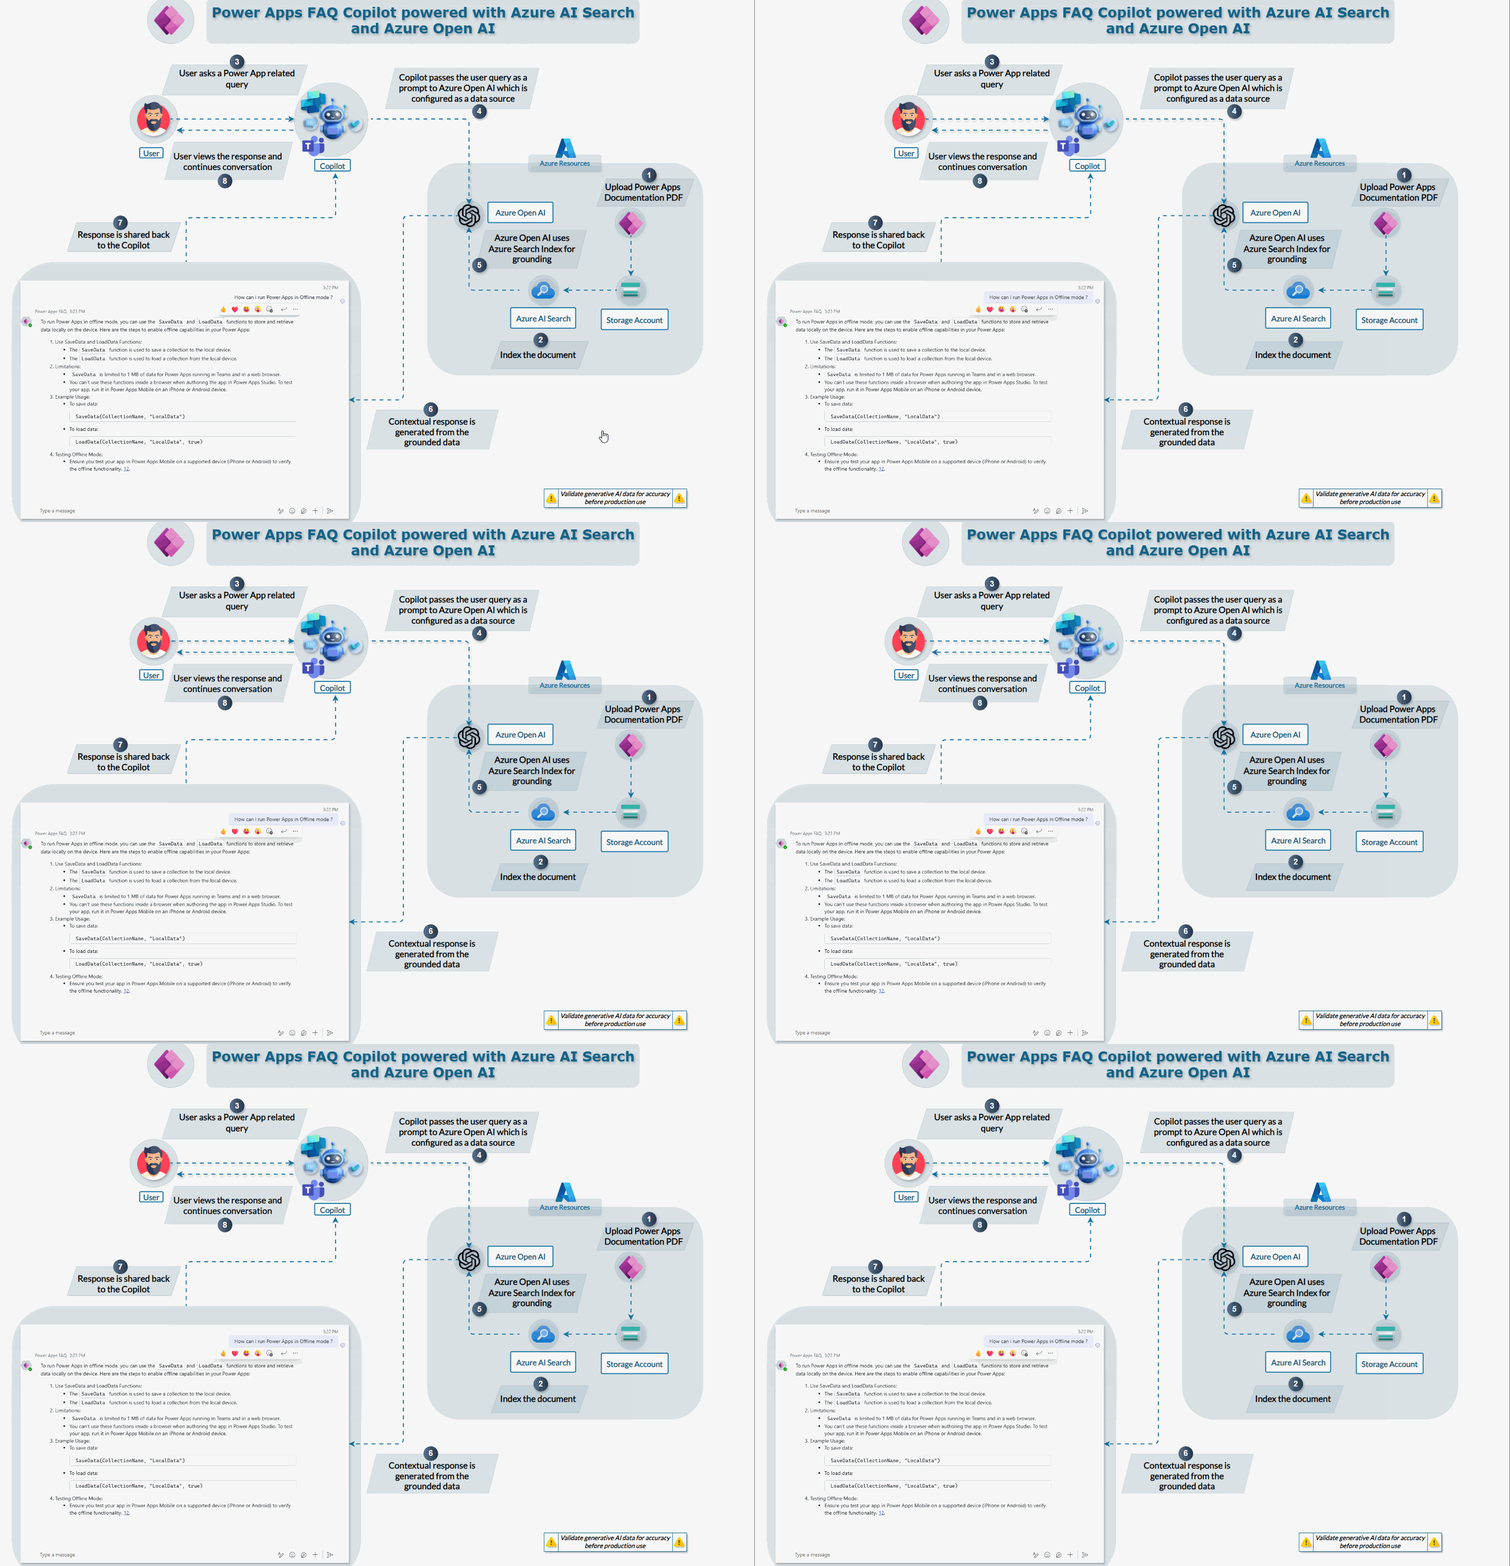
Process Flow Explanation
The overall process flow that we will see in this explanation is as follows :
- Power Apps Documentation : PDF is uploaded to Azure Storage account
- Index the Document : Azure AI Search indexes the document for easy retrieval
- User Interaction: A user initiates a query related to Power Apps via the Copilot interface.
- Copilot Processing: The Copilot captures the user’s query and passes it as a prompt to the Azure OpenAI, which is configured as a datasource.
- Grounding : Azure OpenAI processes the query using its generative capabilities, accessing the indexed Power Apps documentation stored in Azure AI Search.
- User Display: The Copilot displays the contextual response to the user, providing accurate and detailed answers to their Power Apps-related queries.
This integration allows users to get precise answers to their queries by leveraging the power of Azure’s AI services, making it a valuable tool for enhancing productivity and knowledge access.
Demo
Watch the demo video below to see how the Power Apps FAQ Copilot works.
Prerequisites
If you are intending to implement, ensure you have the following:
- An active Azure subscription.
- Access to Microsoft Copilot Studio.
- Power Apps Documentation PDF from Microsoft Learn site.
Step-by-Step Implementation
Step 1: Download the Power Apps Documentation
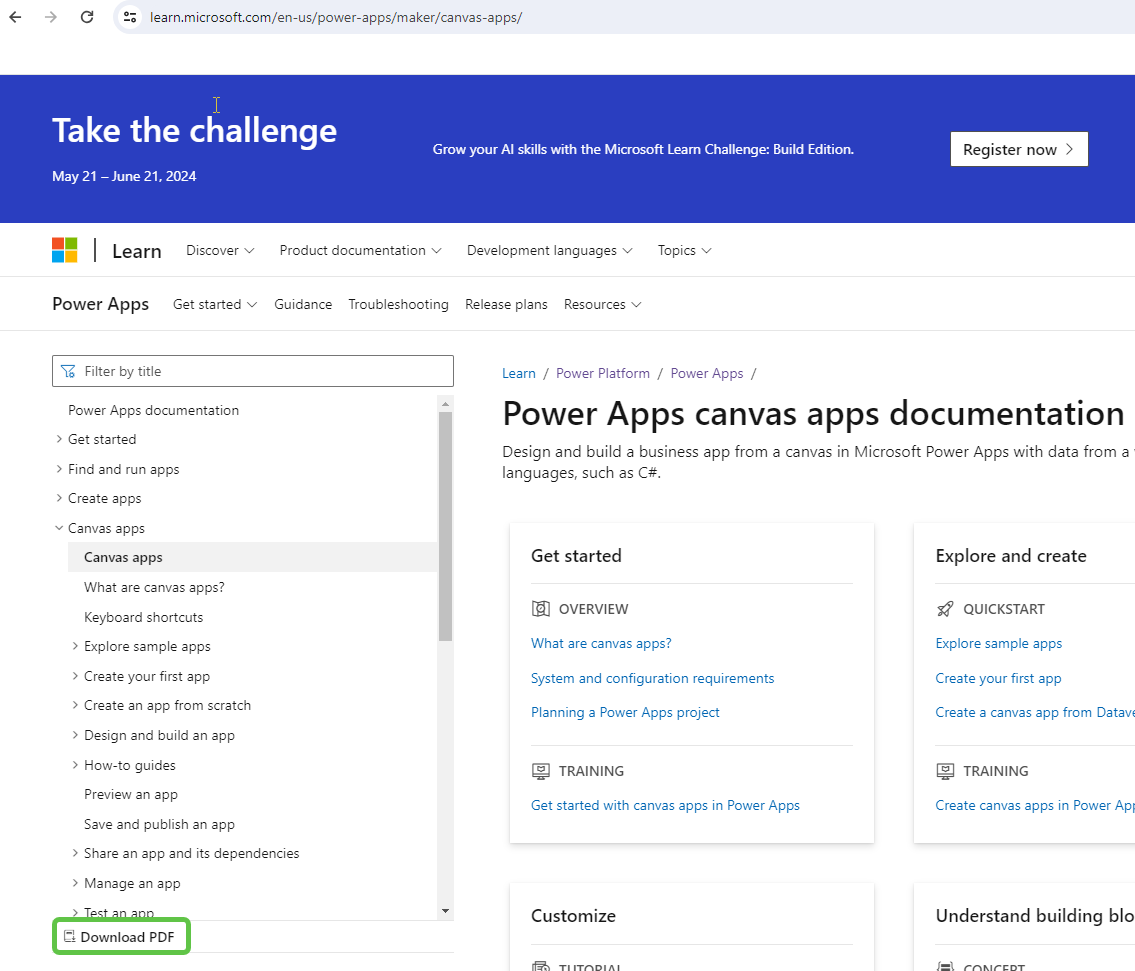
Head over to the Power Apps Documentation and download the PDF. We will index it using the Azure search service and use it to generate contextual answers to user queries around Power Apps.
Step 2: Create an Azure AI Search Instance
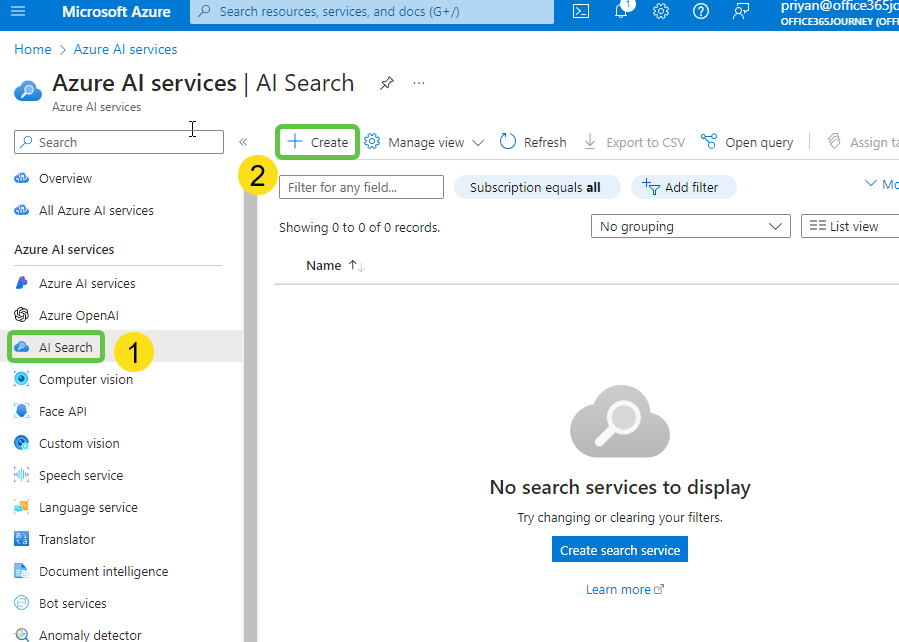
- Navigate to the Azure Portal: Log in to the Azure portal, search for “AI Search,” and select the service.

- Create a New Search Service: Click on Create to start setting up a new search service.
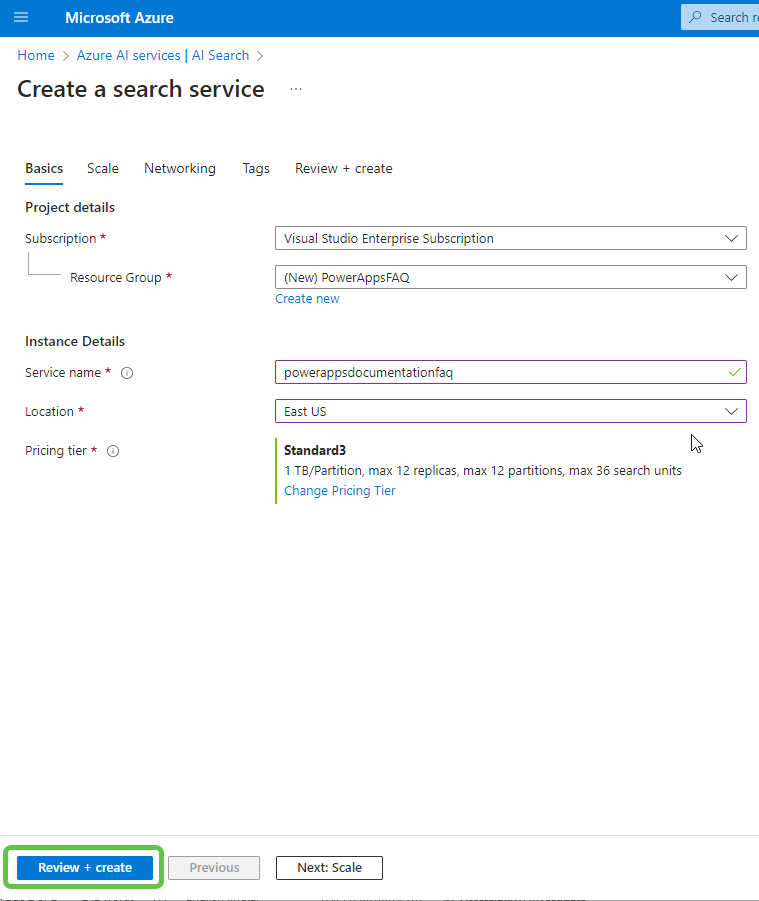
- Fill in the necessary details like resource group, service name, location, and pricing tier. Once you’ve filled in the details, review your configurations and click Create.
- After a while, the search instance will be provisioned and available for use.
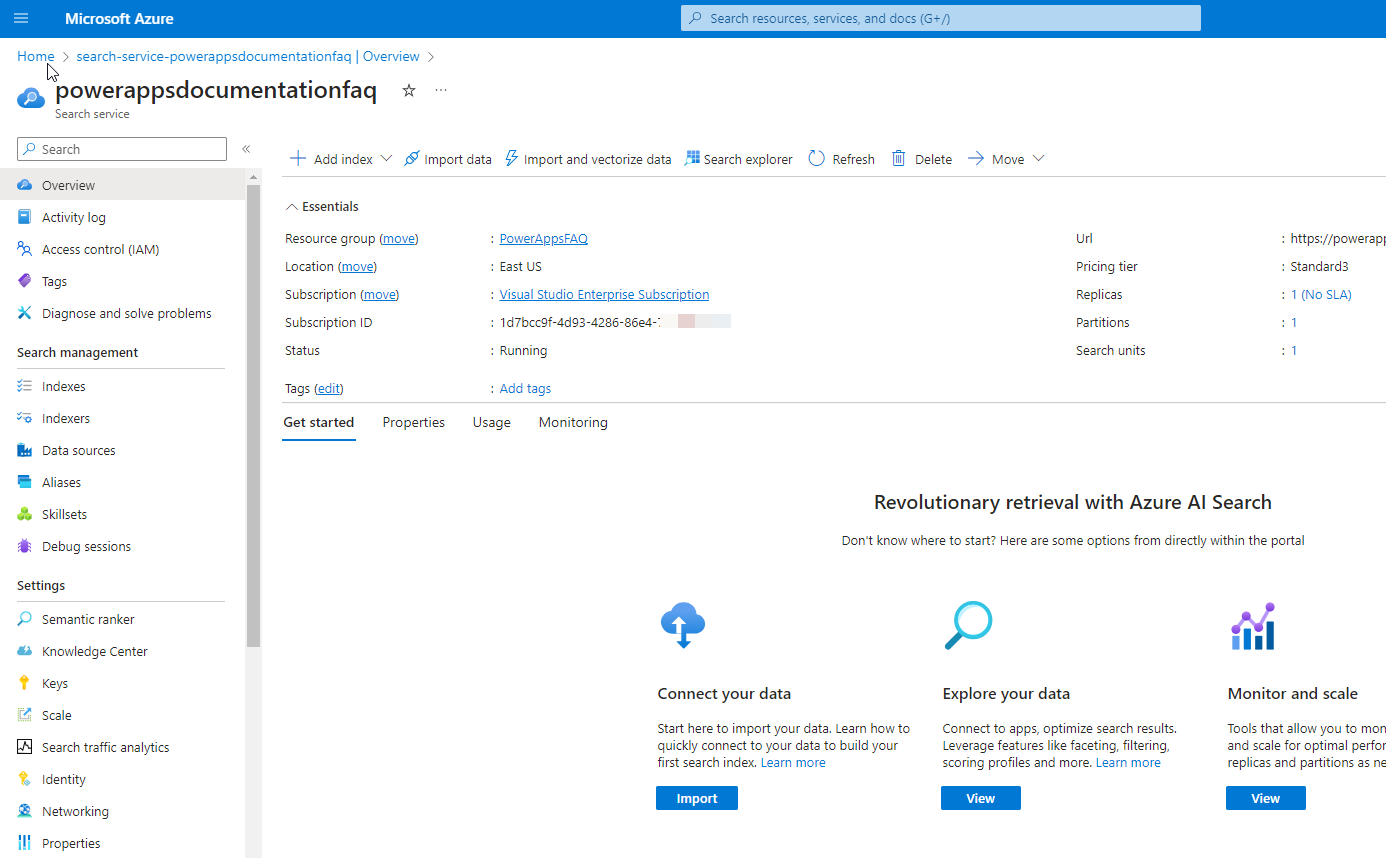
Step 3: Add Blob Storage and Create an Indexer
- Set Up Azure Blob Storage: Navigate to the Storage Accounts in the Azure portal and click on Create to add a new storage account.
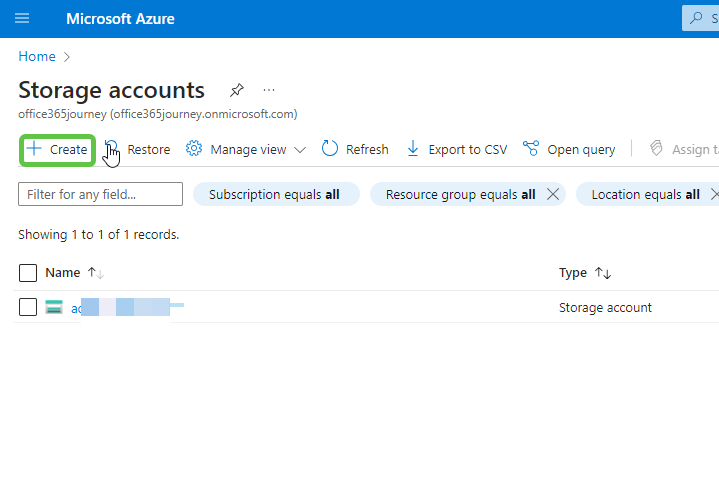
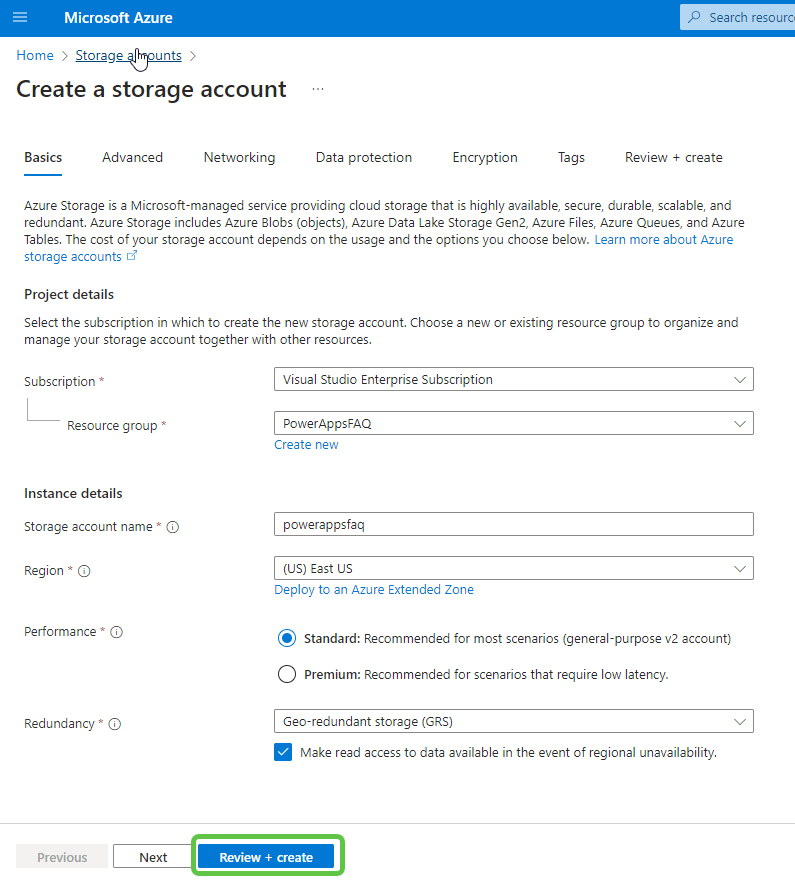
- Fill in the necessary details like resource group, storage account name, region, and performance. Click on Create to provision the storage account.
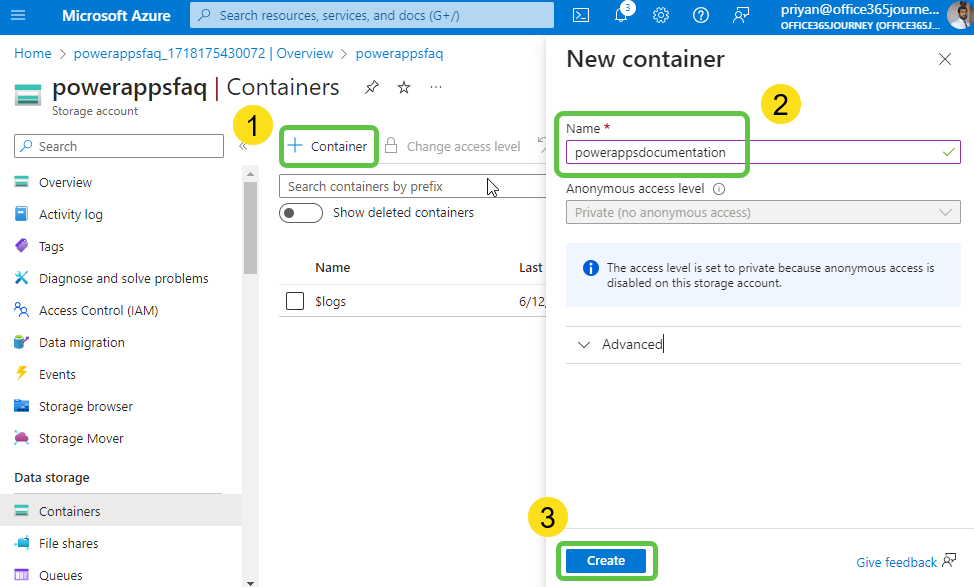
- Once the storage account is created, head over to this resource and click on Container to create a new container to store the Power Apps PDF.
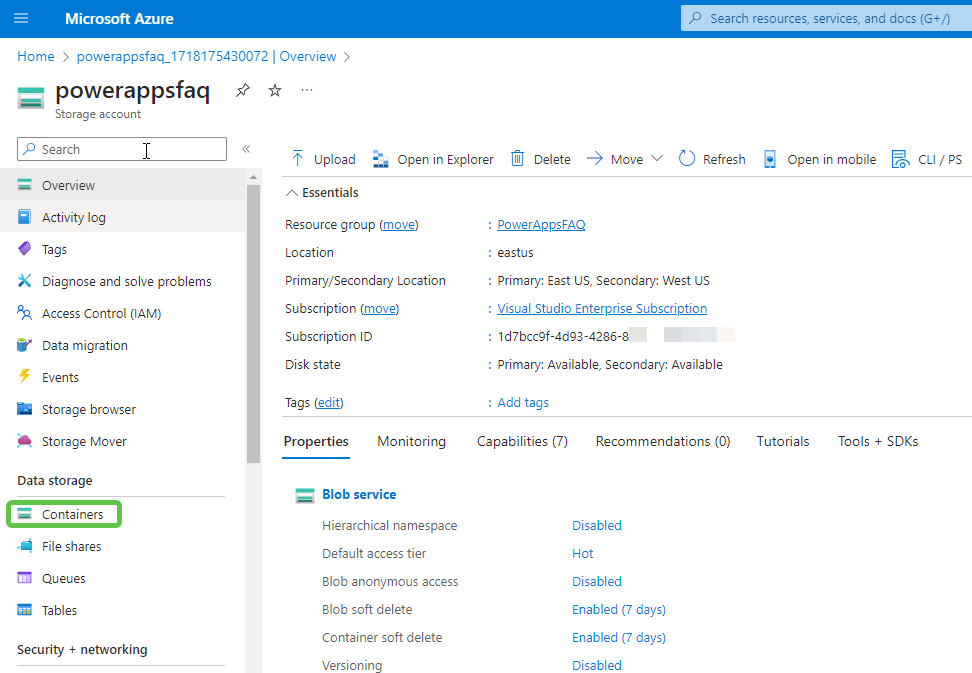
- Click on Container, specify the container name, and click on Create to add the new container to the storage account.
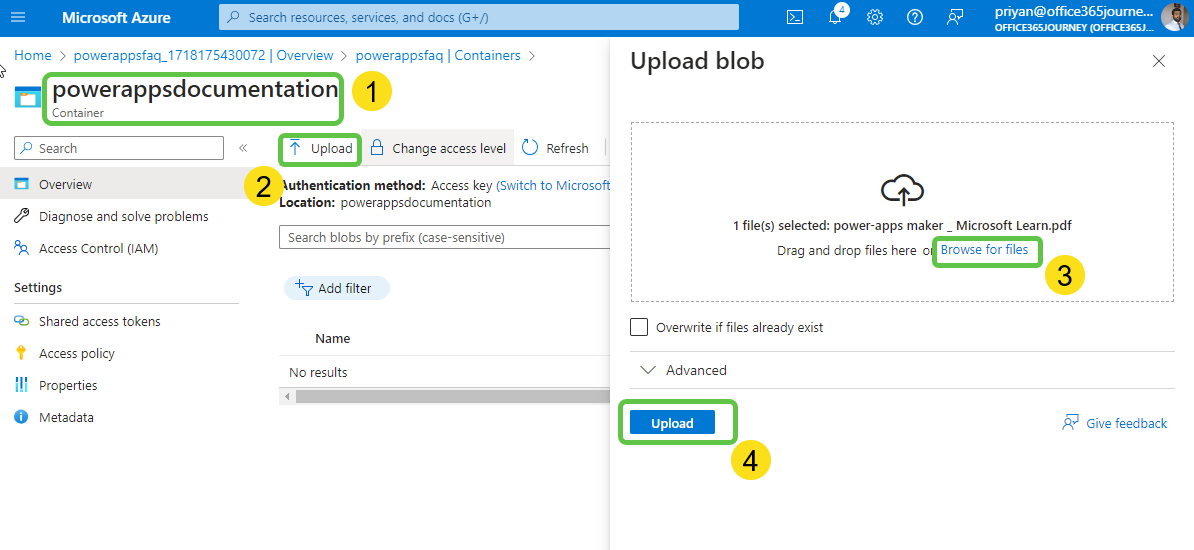
- Inside the container, click on Browse for files to add the Power Apps documentation PDF downloaded earlier. Click on Upload.
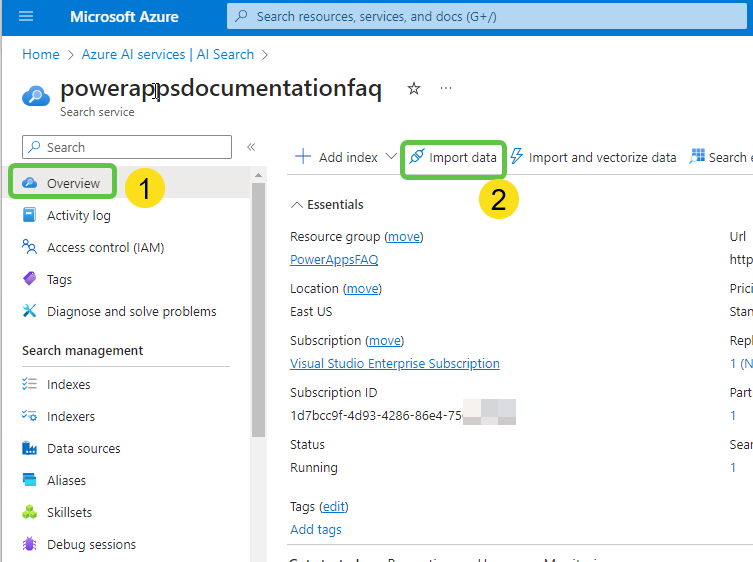
- Navigate back to the Azure search instance that we created to index this PDF document. From the AI Search Overview page, click on Import data.
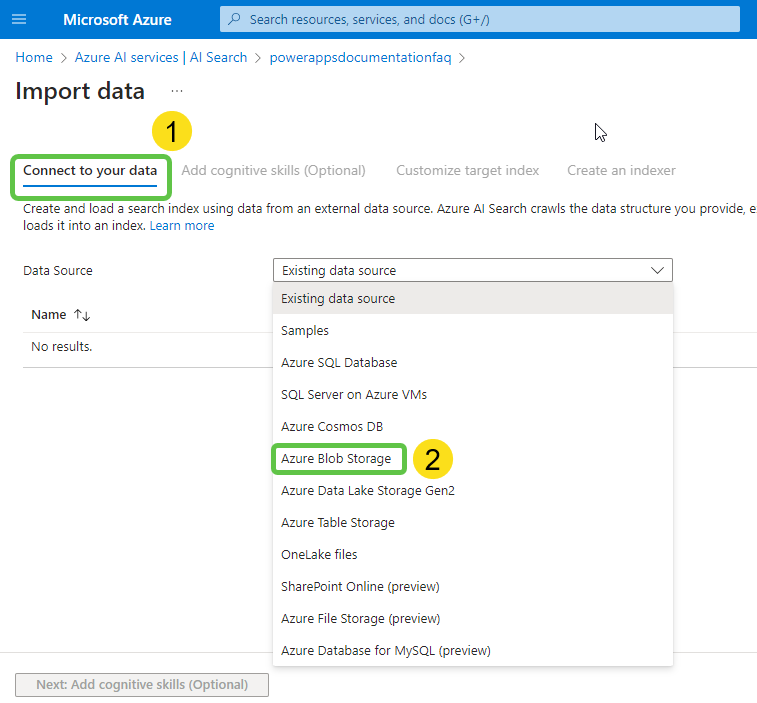
- In the Connect your data tab, select Azure Blob Storage.
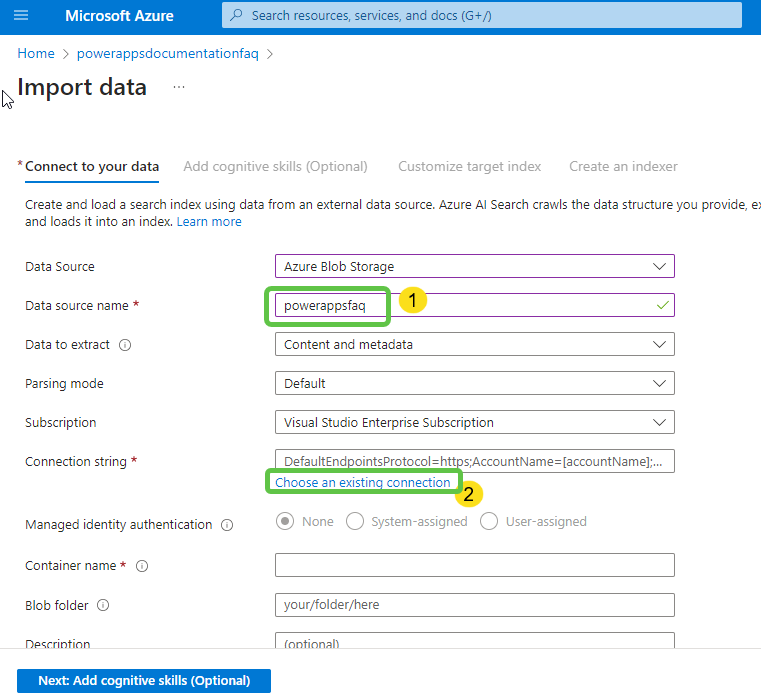
- Specify a name for the datasource and click on Choose an existing connection to connect to the container within the storage account.
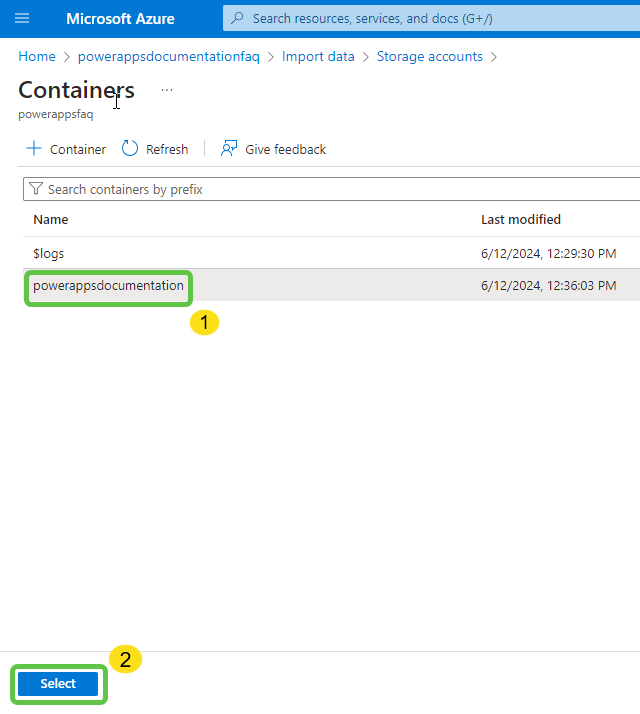
- Select the appropriate container and click on Select.
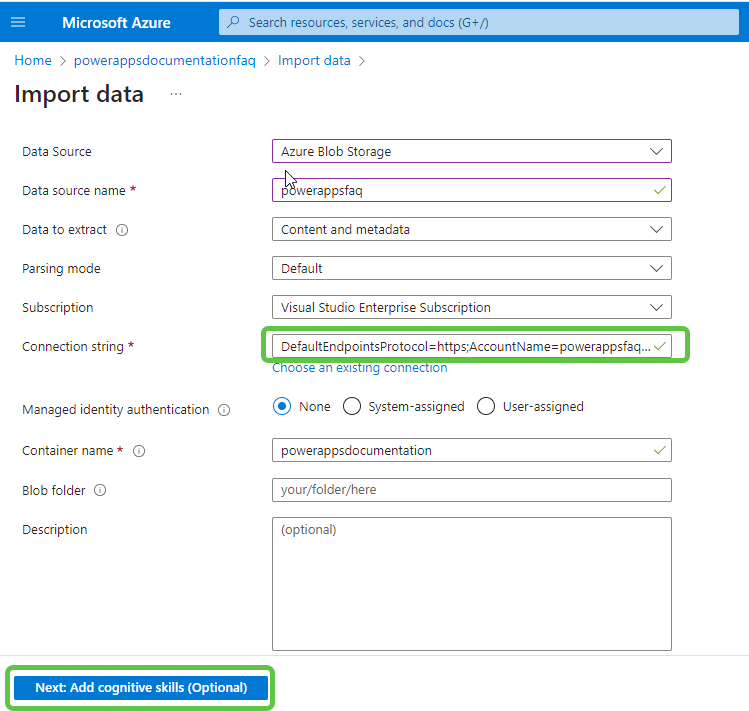
- The connection string is automatically added for this container. Click on Next: Add Cognitive Skills. This is optional and will be skipped for now.
- Ensure the content field of the indexer is marked as Retrievable and Searchable. Click on Create an Indexer to create the index.
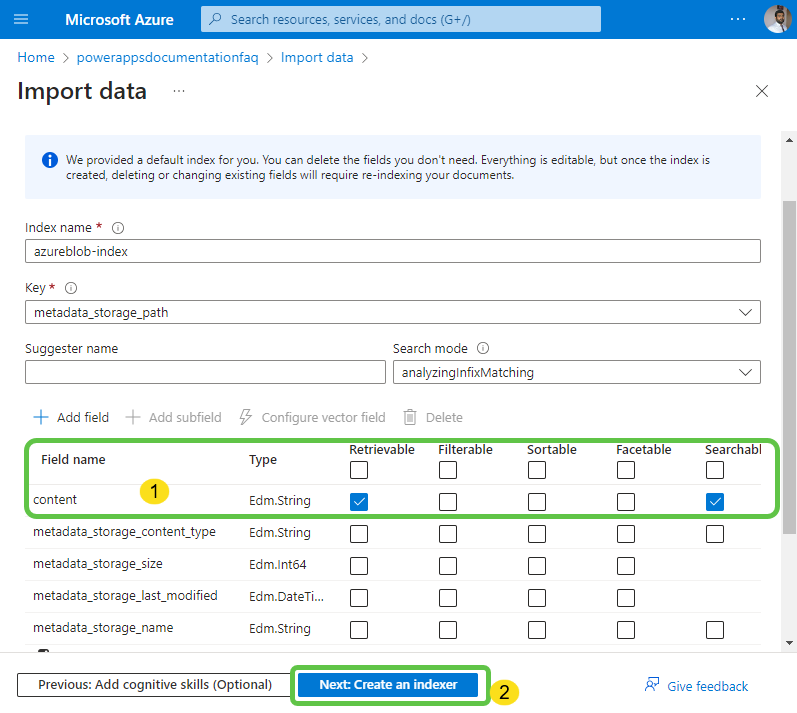
- The indexer is now created, and we can connect this to Azure OpenAI for generative features.
Step 4: Create Azure OpenAI Instance
- Navigate to Azure OpenAI: Head over to Azure, search for Azure OpenAI, and select the service.

- Click on Create.
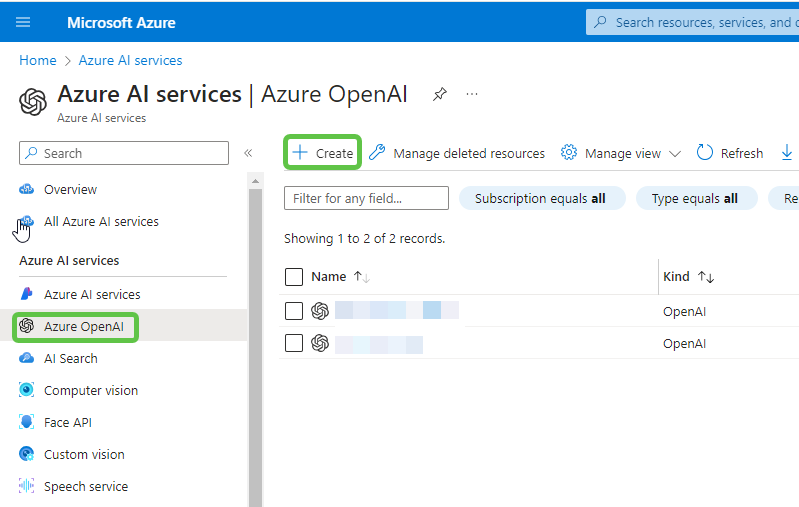
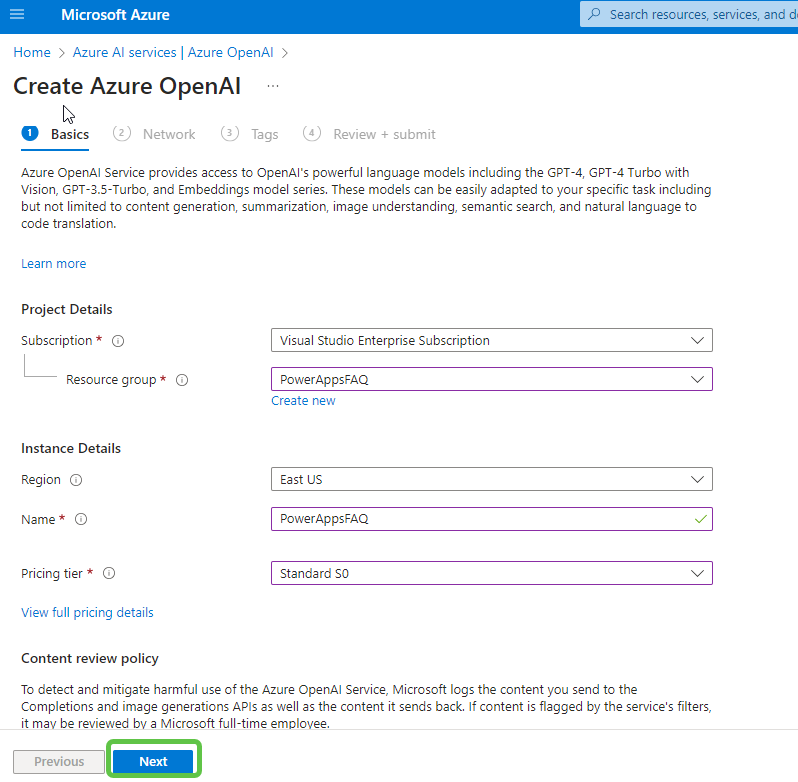
- Specify the values for Resource Group, Name, and Pricing tier. Click on Next for network-specific configurations. Finally, click on Create on the review page.
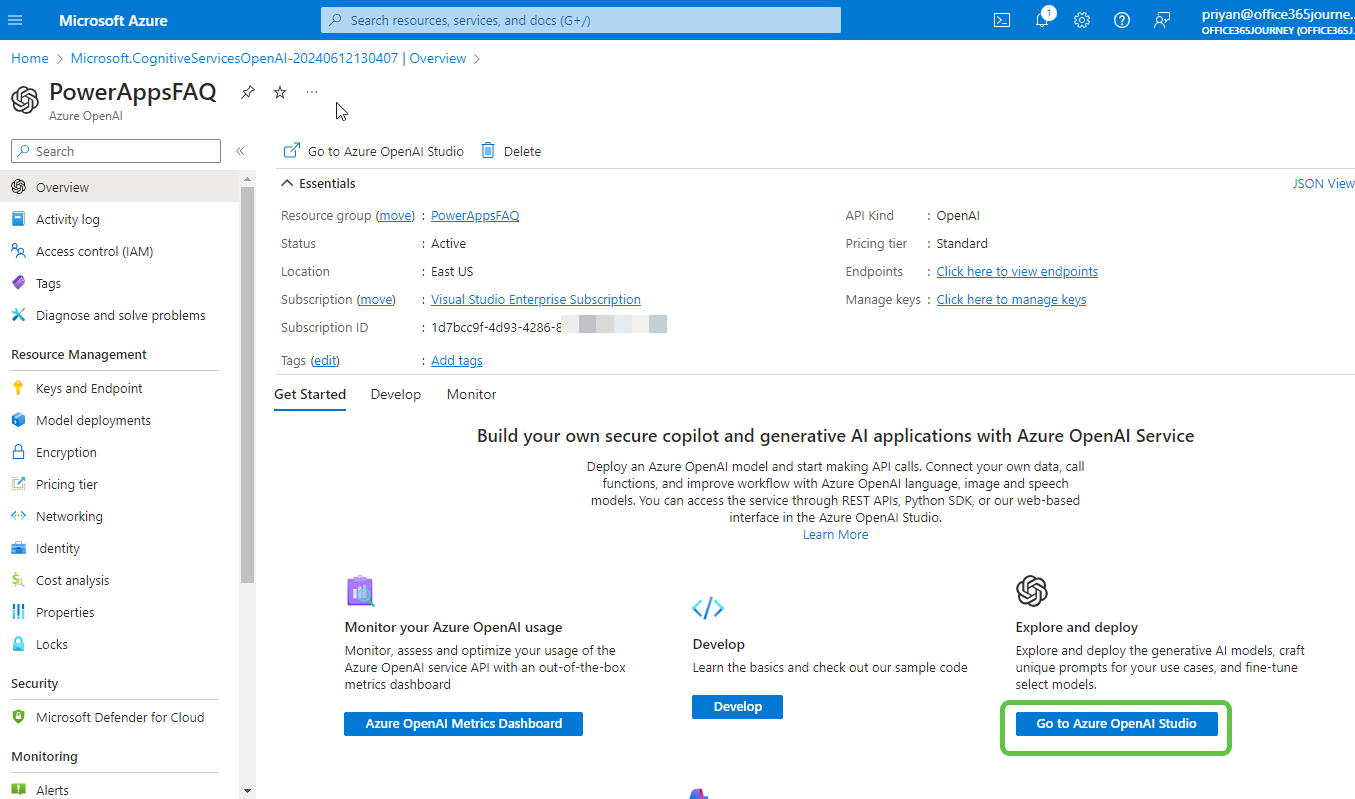
- The Azure OpenAI Instance is now created. Click on Go to Azure OpenAI Studio where we can configure and connect the OpenAI Instance with the Azure Search indexer.
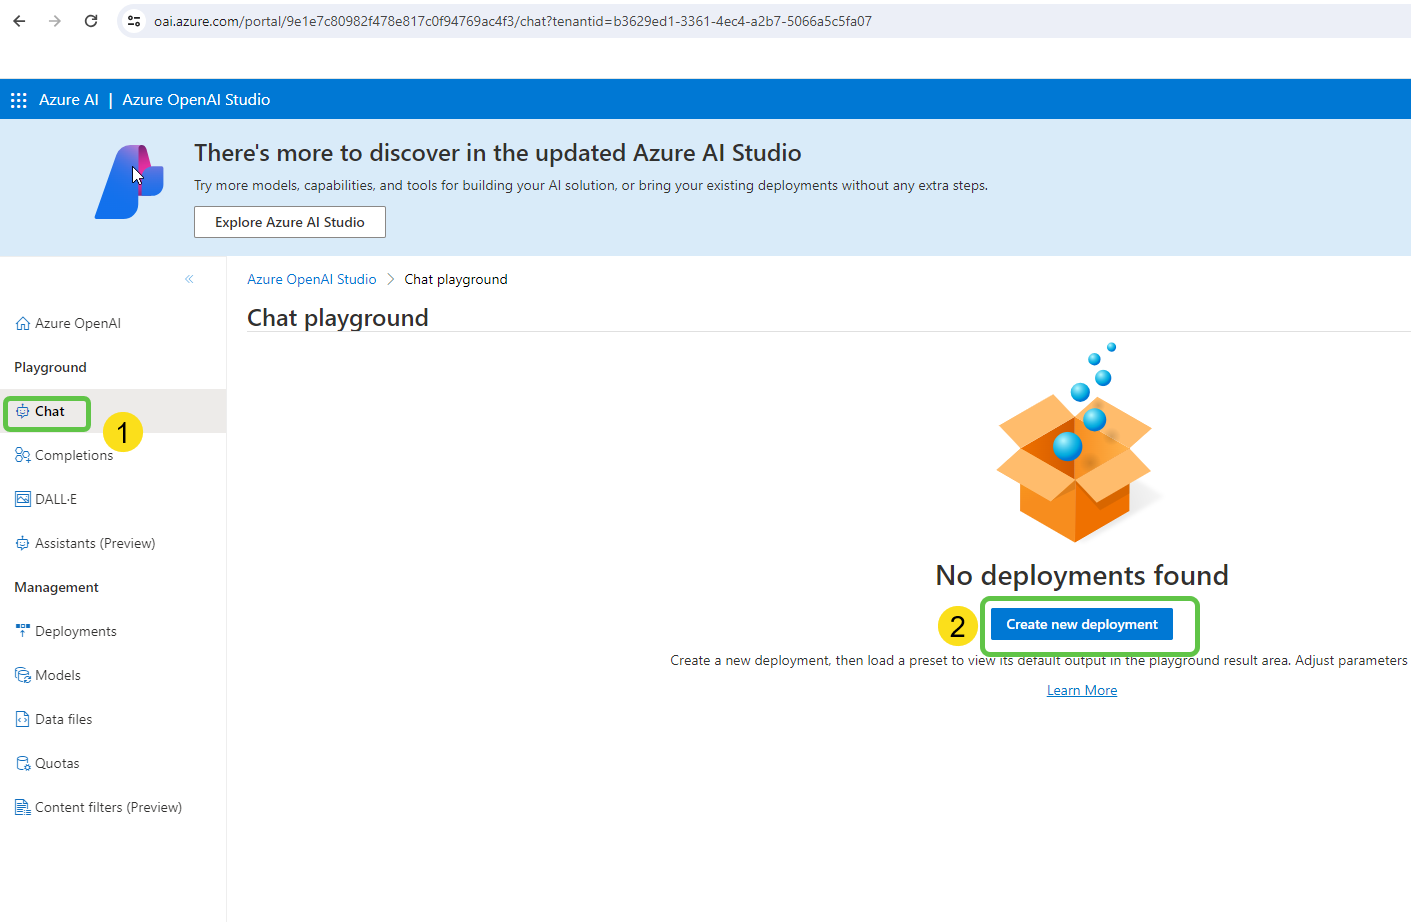
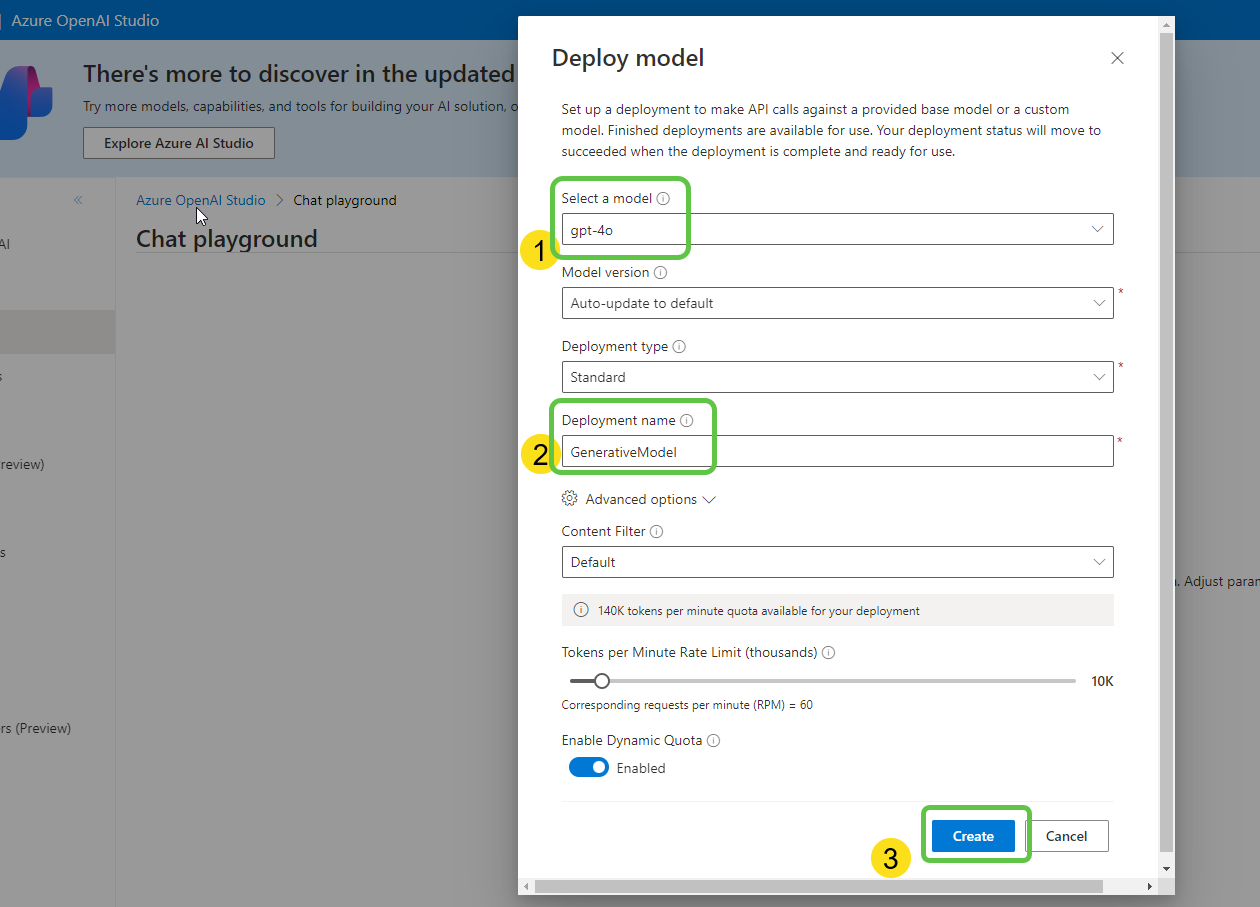
- In Azure OpenAI Studio, create a model deployment. From the Chat section, click on Create new deployment.
- Specify the model type (e.g., gpt-4), mention the name, and click on Create.
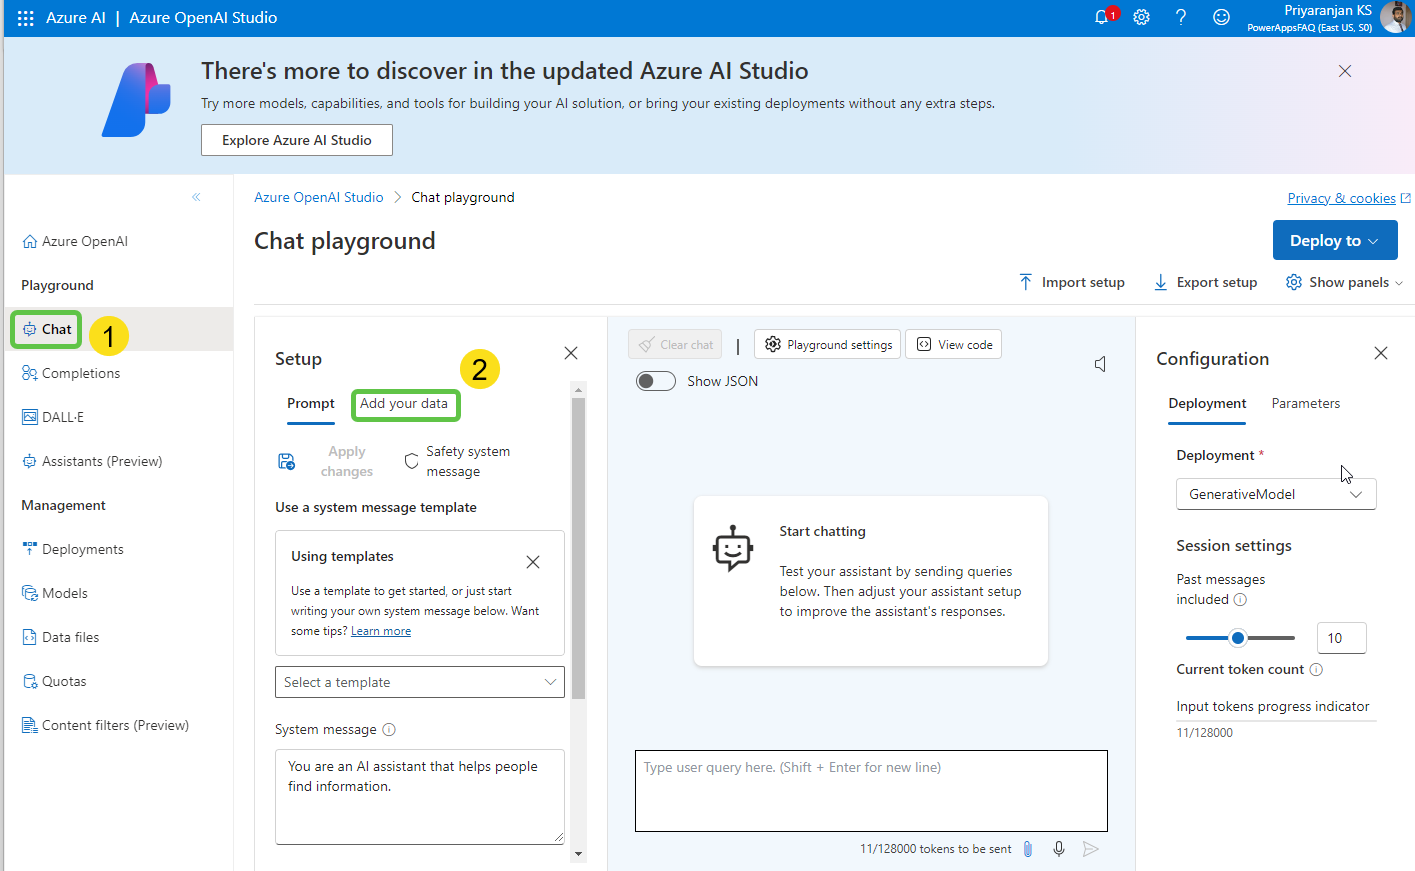
- The model is deployed. In the chat playground, click on Add your data to connect to the search index.
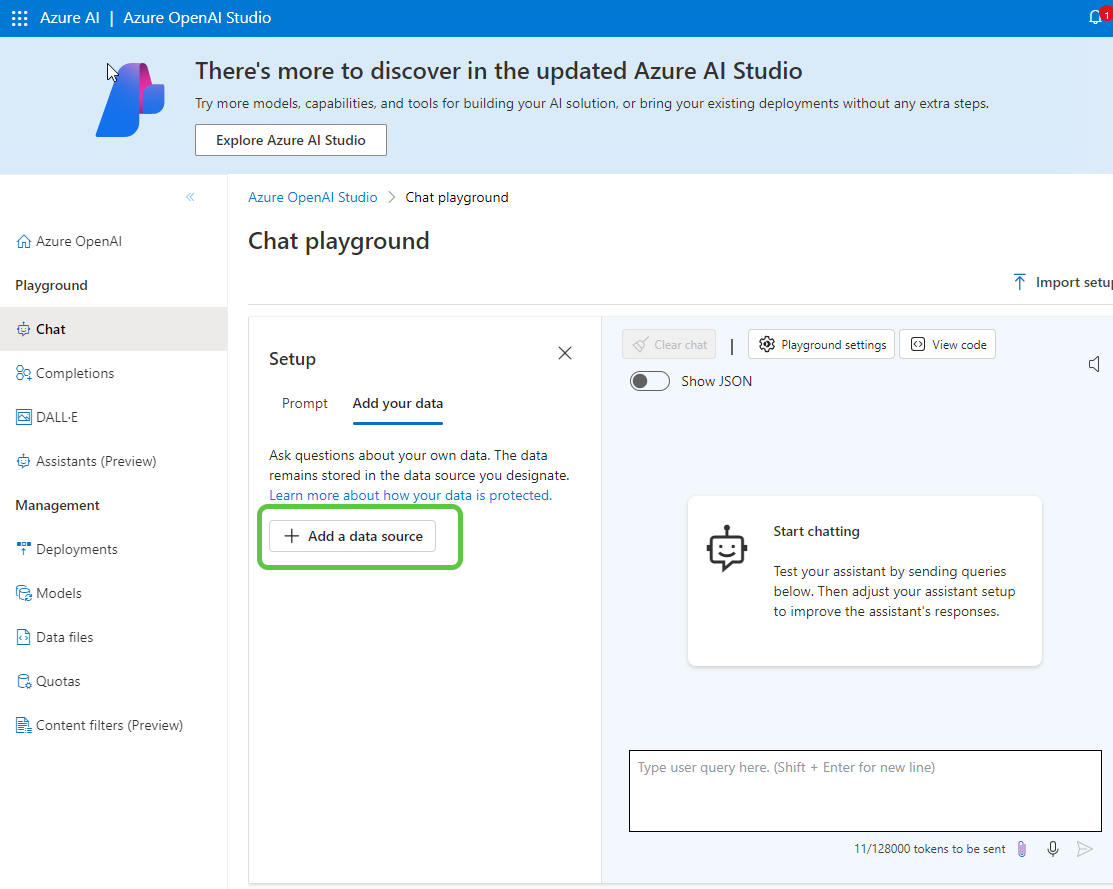
- Select the data source.
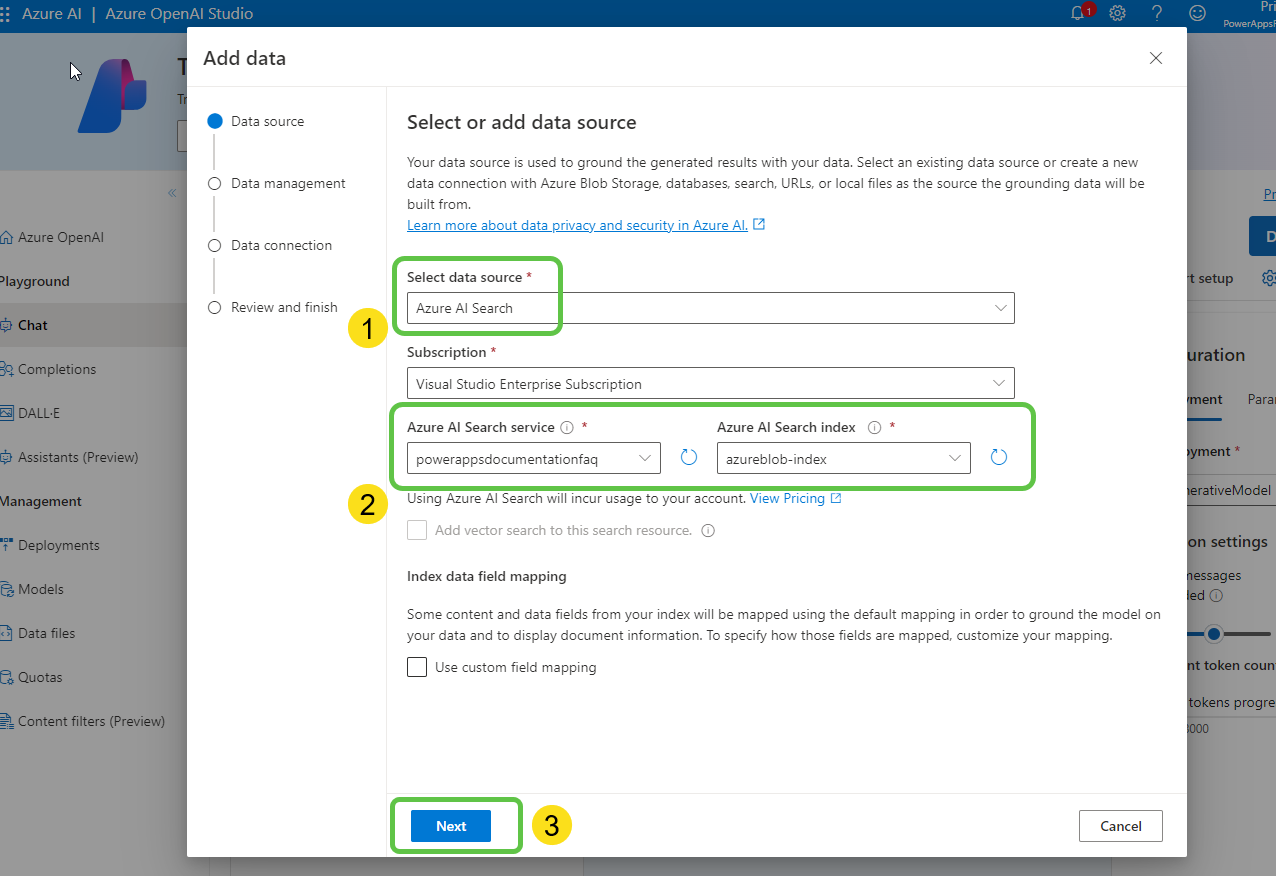
- In the opened pop-up:
- Select the data source as Azure AI Search.
- Mention the Search Instance and Search Index created earlier.
- Click on Next.
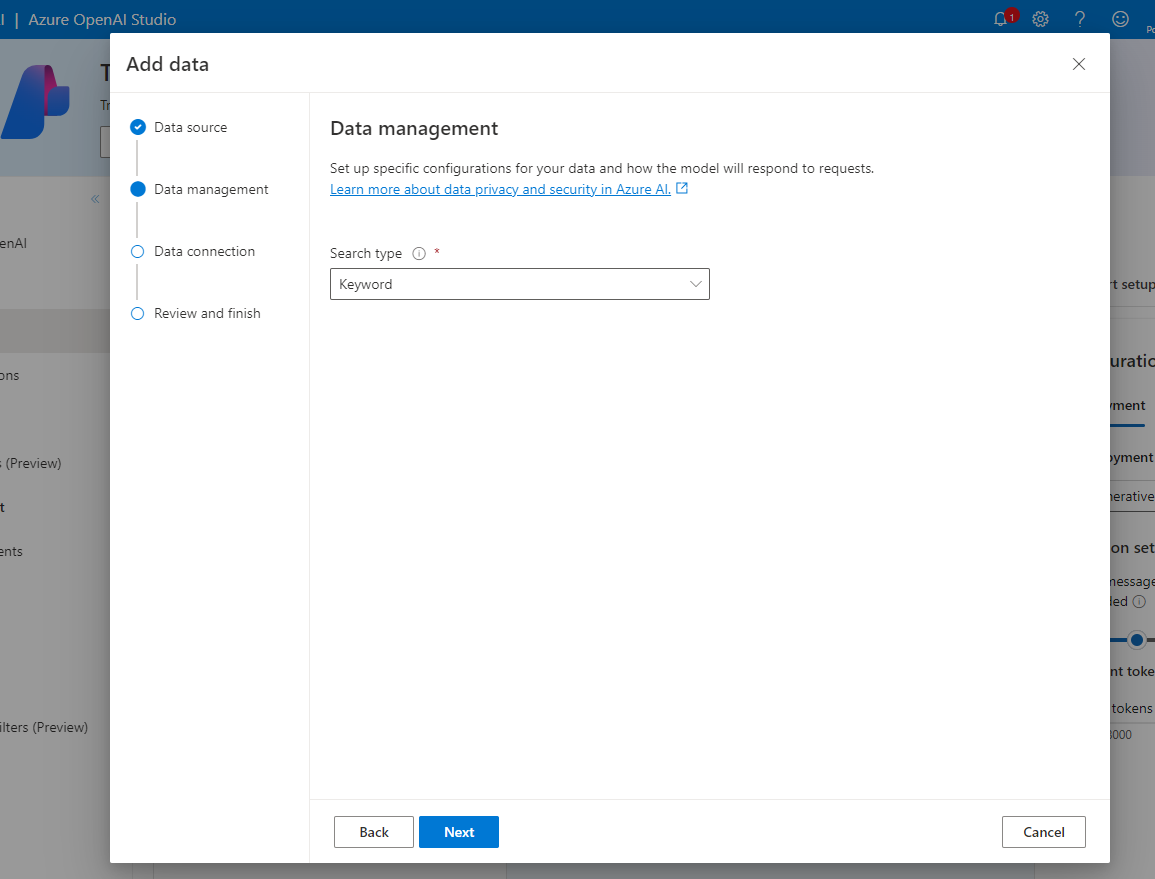
- In the Data Management section, enable Keyword search. Semantic search is also an option that can be configured.
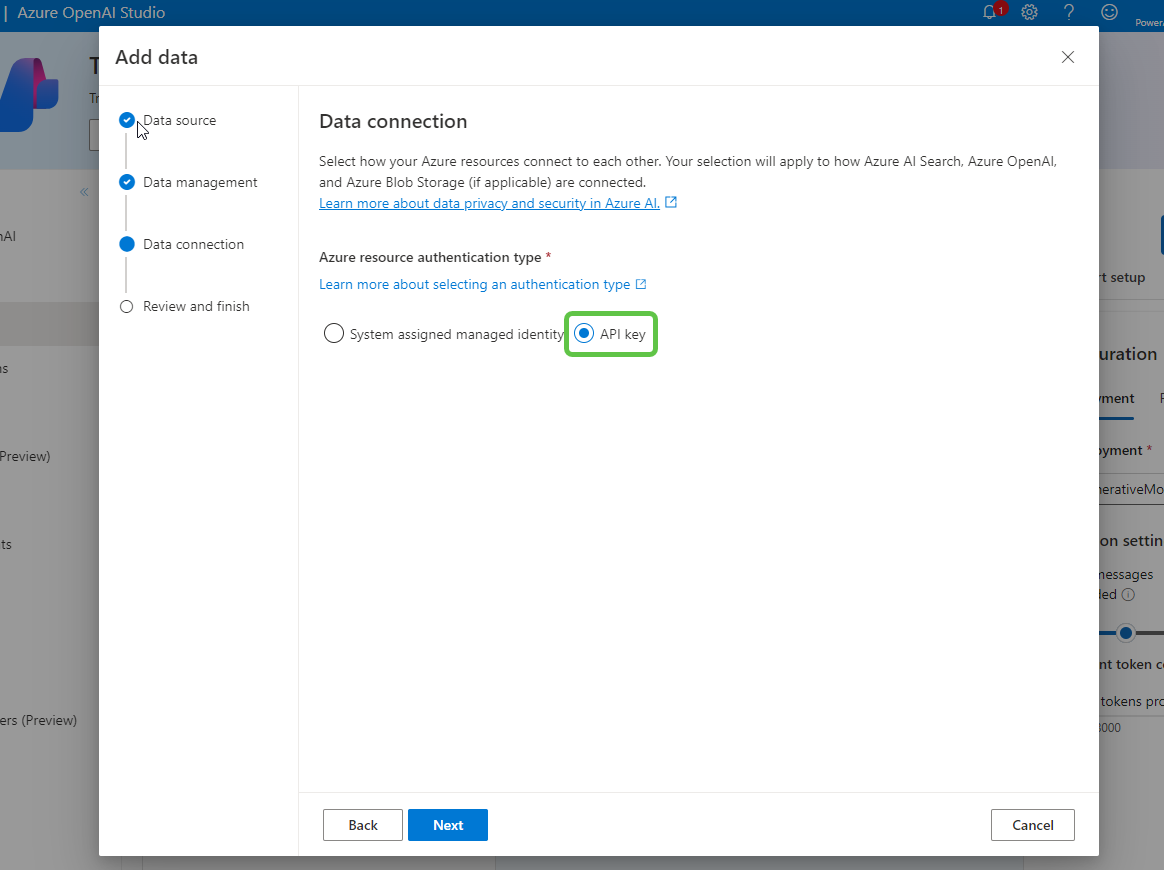
- Select API Key as the Azure resource authentication type. Click on Next.
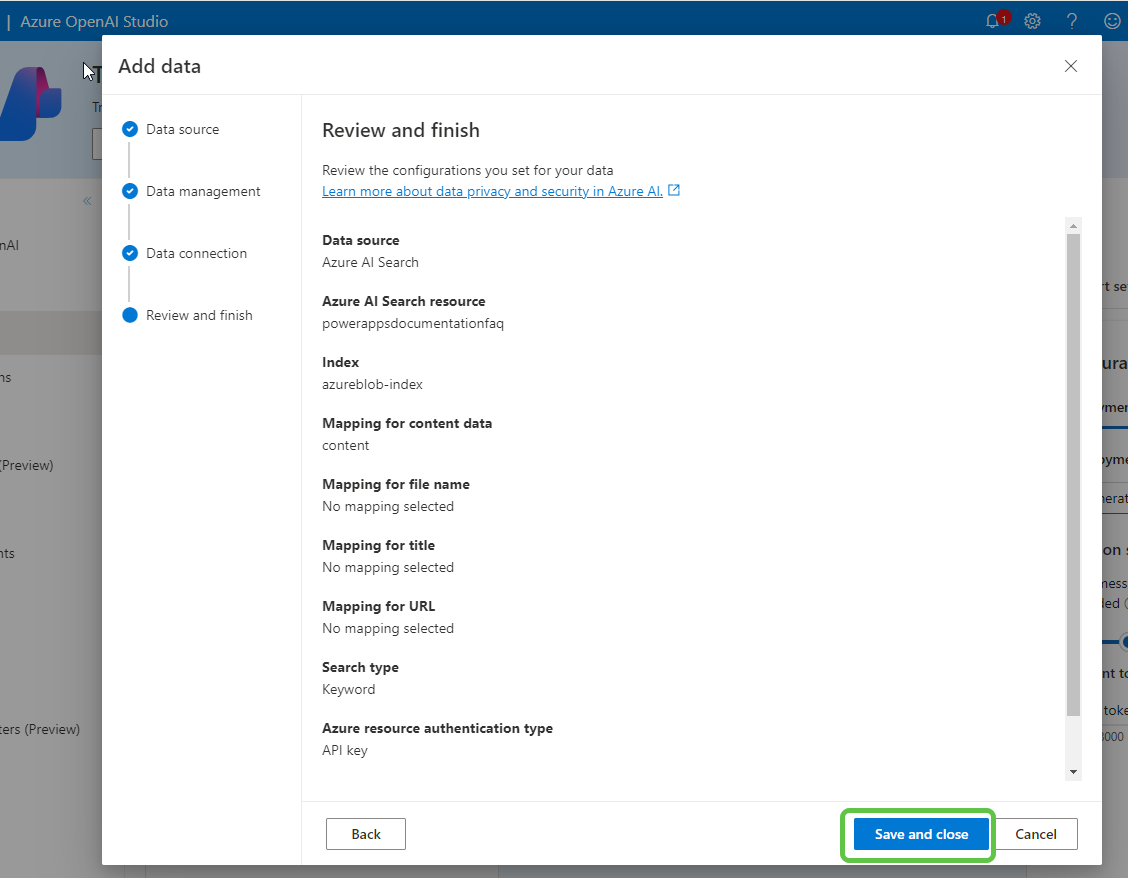
- Finally, click on Save and close to finalize the data source setup.
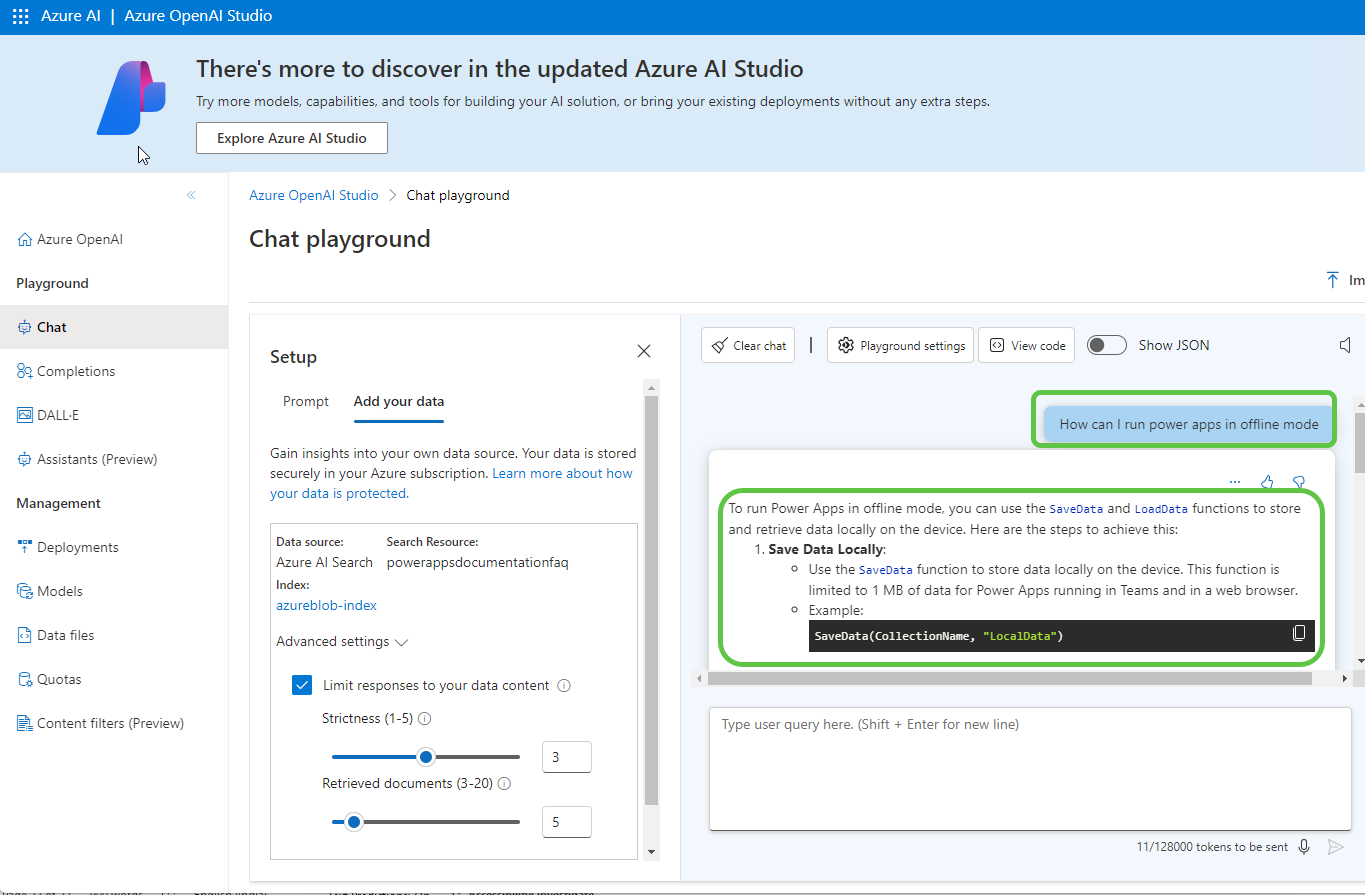
- Test the Azure OpenAI playground, which has its data source as Azure AI Search. For example, ask about Power Apps offline functionality, and it will fetch detailed contextual answers from the Azure AI search index.
Step 5: Integrate Copilot with Azure OpenAI Instance
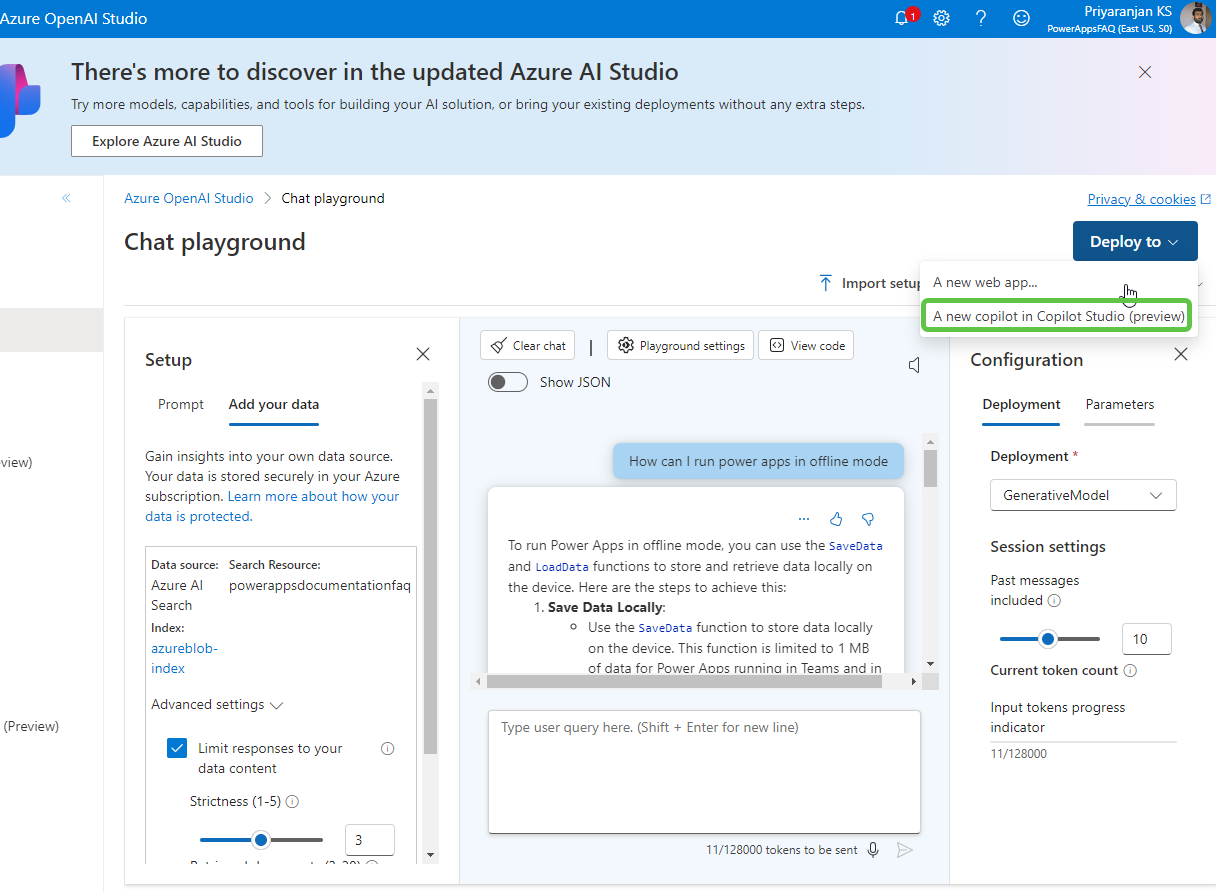
- Deploy to Copilot Studio: Click on Deploy to and select A new copilot in Copilot Studio.
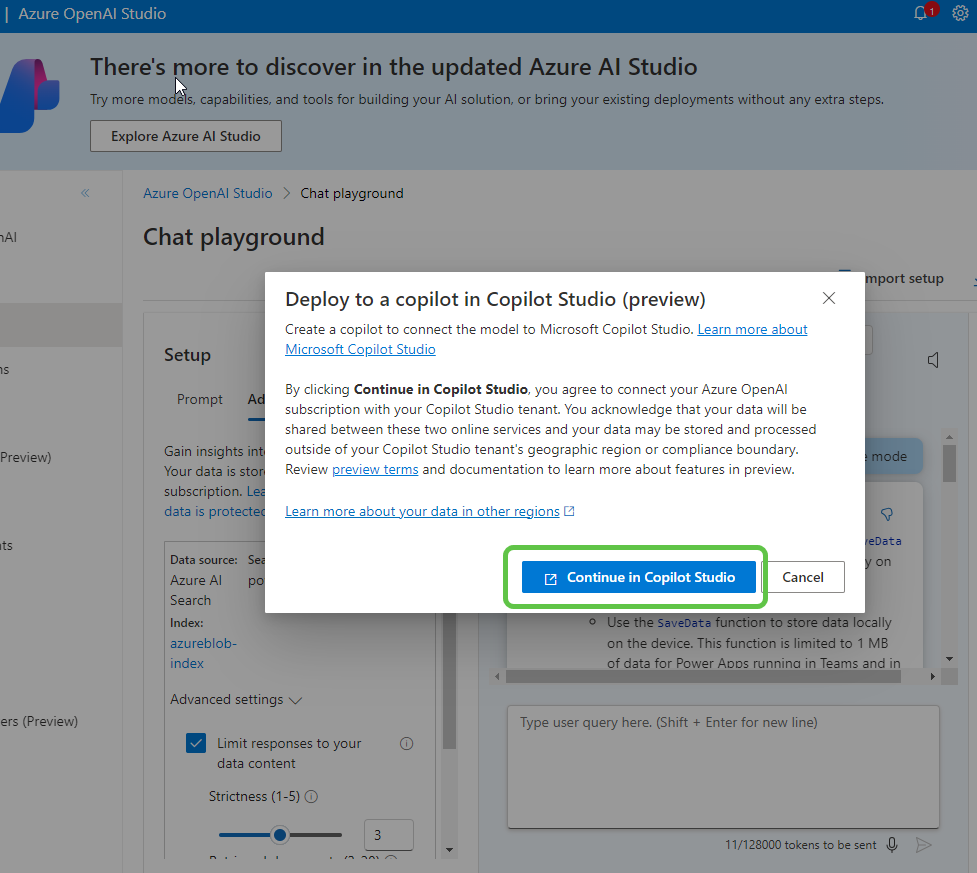
- Select Continue in Copilot Studio, which will take us to Copilot Studio to continue with the copilot creation.
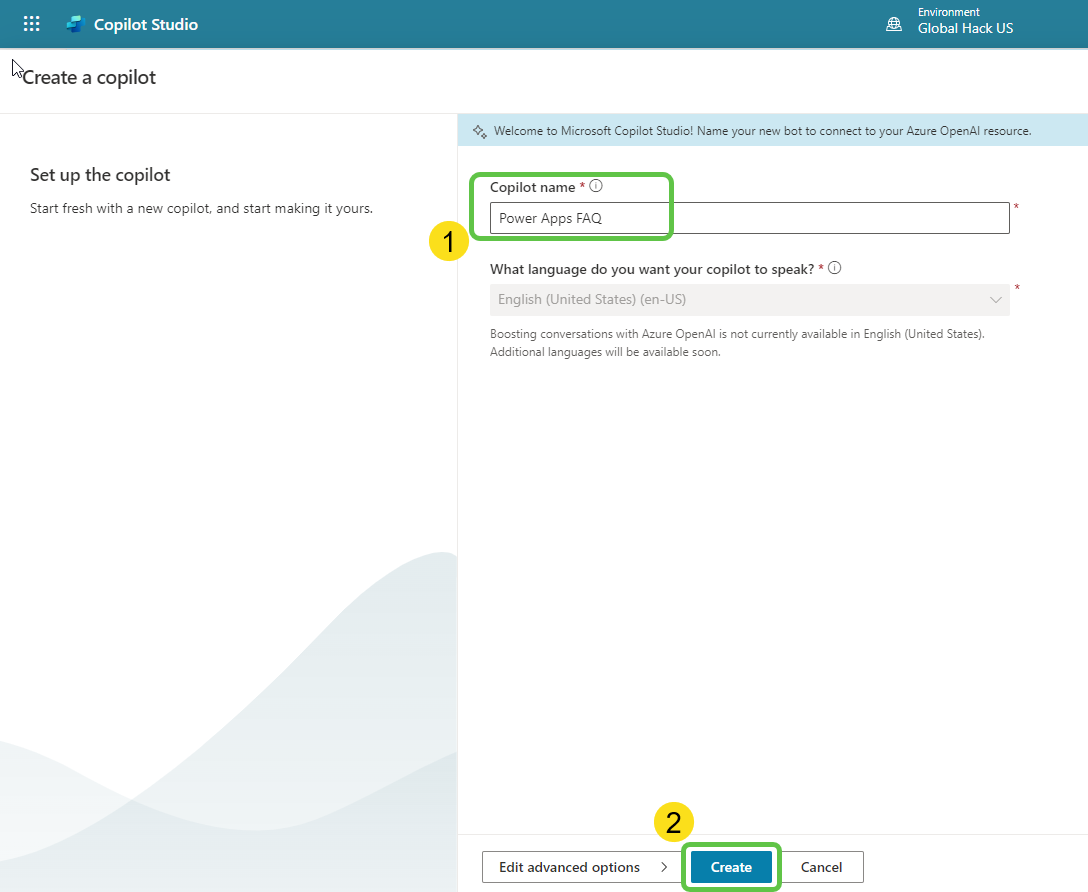
- Specify the copilot name and click on Create.
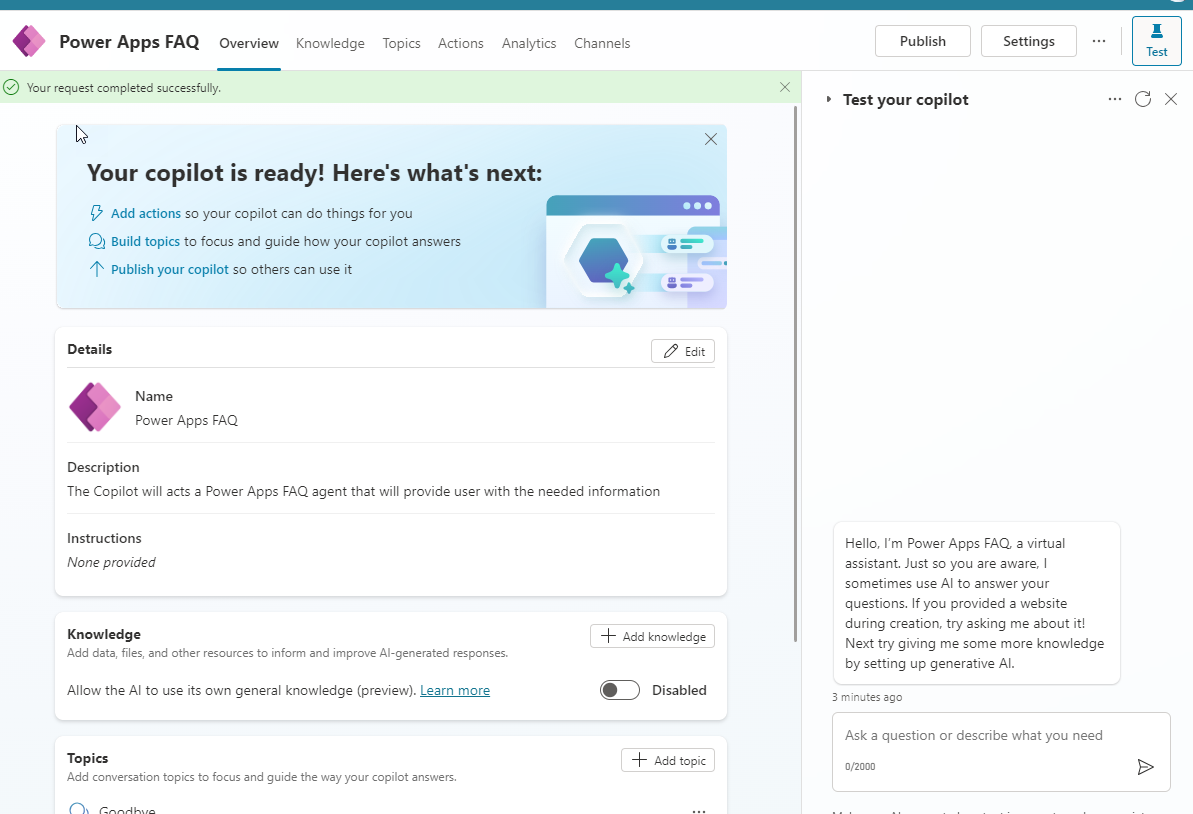
- This initializes the copilot, which is already connected to the Azure OpenAI Instance.
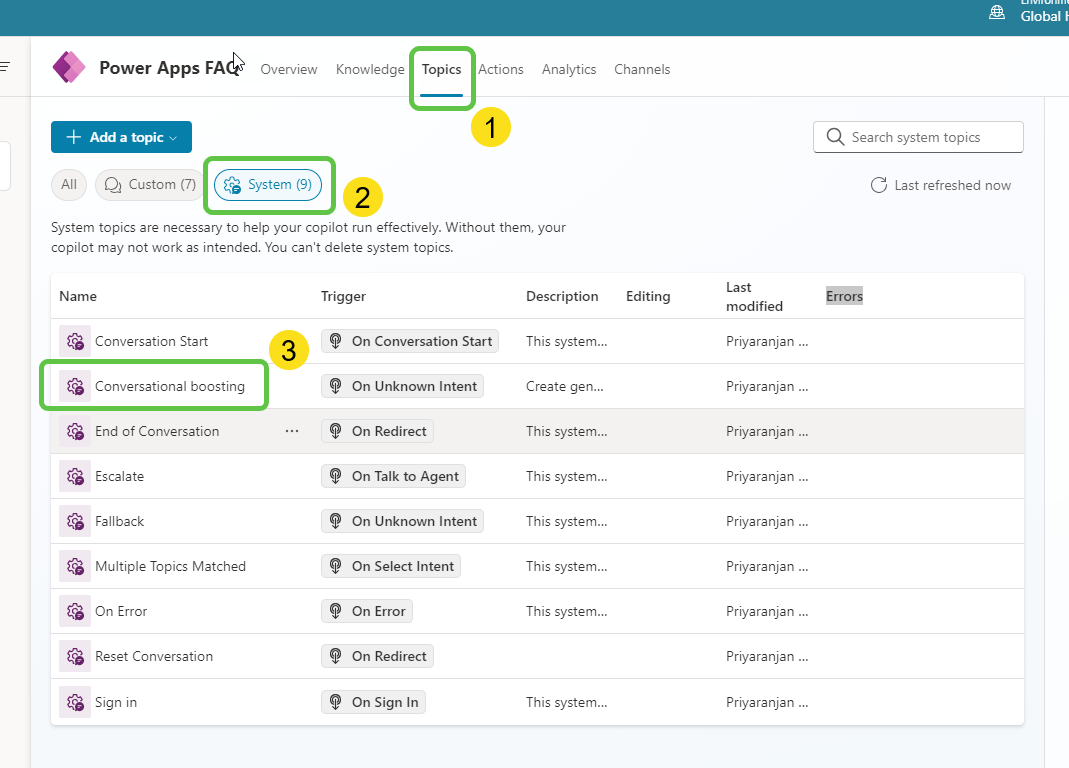
- Head over to topics and select the Conversational boosting system topic.
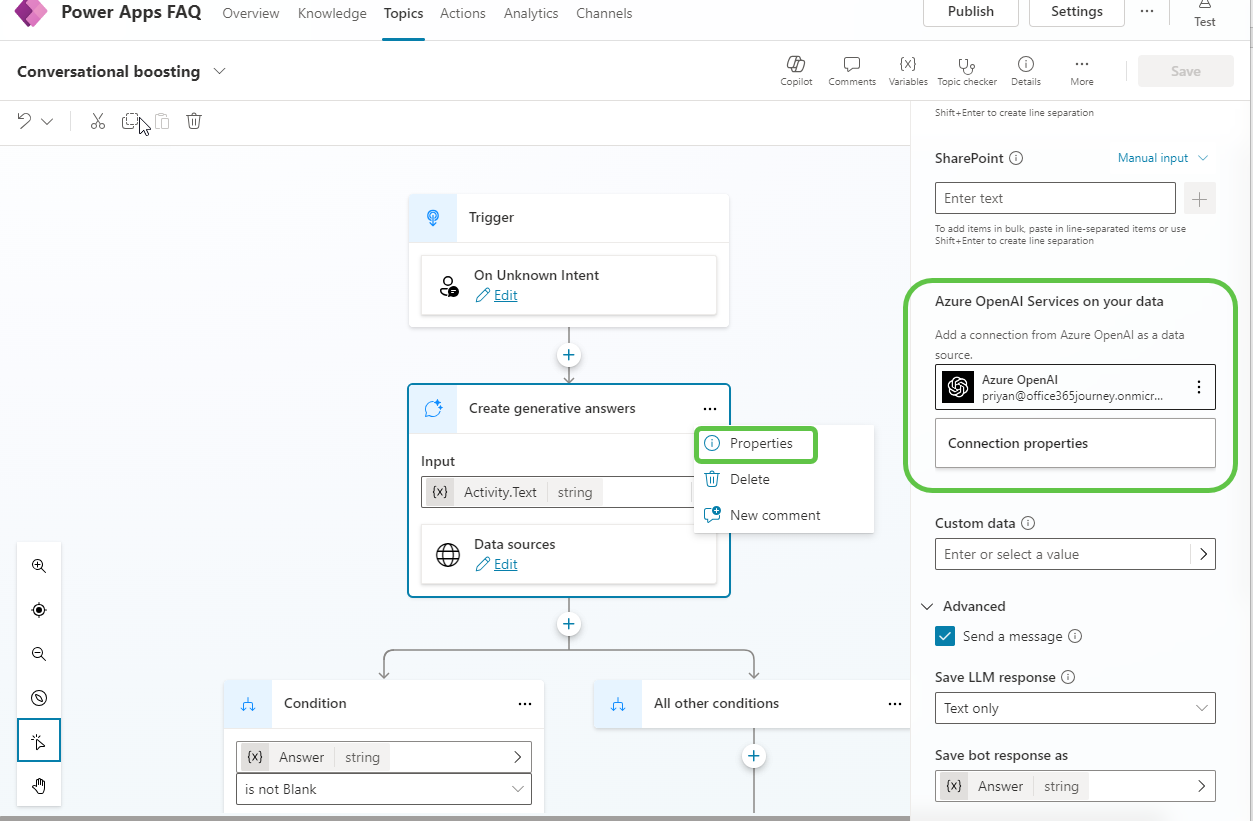
- It contains a Generative answers node preconfigured with the Azure OpenAI instance set up earlier.
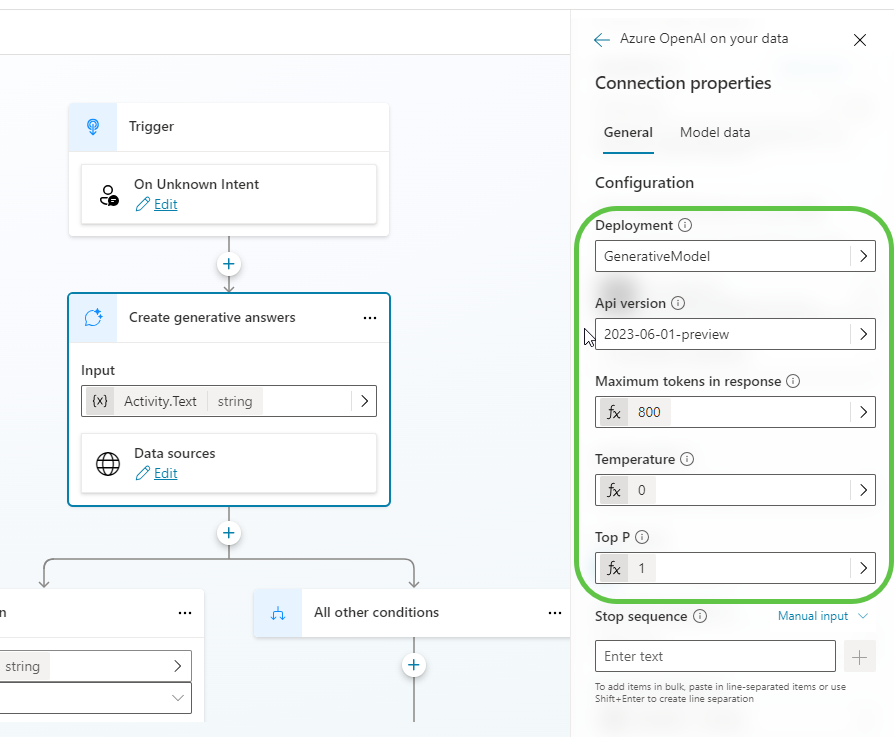
- Click on the connection properties. Under the General tab, you can see the model details and parameters used for generating answers.
- In the Model data tab, you can see the Azure AI Search data source and the field from which the data is grounded.
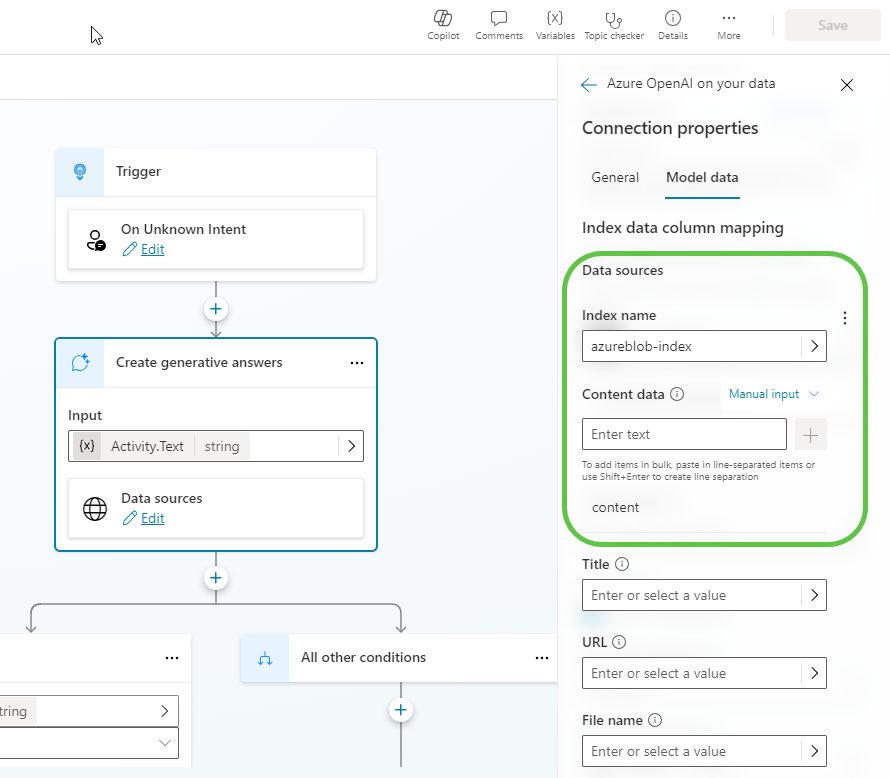
- The copilot is auto-configured and connected to the Azure OpenAI instance, which is internally connected with the Azure AI Search Instance.
Step 6: Publish the Bot
- We can publish the bot to different channels. For now, deploy it to Teams.
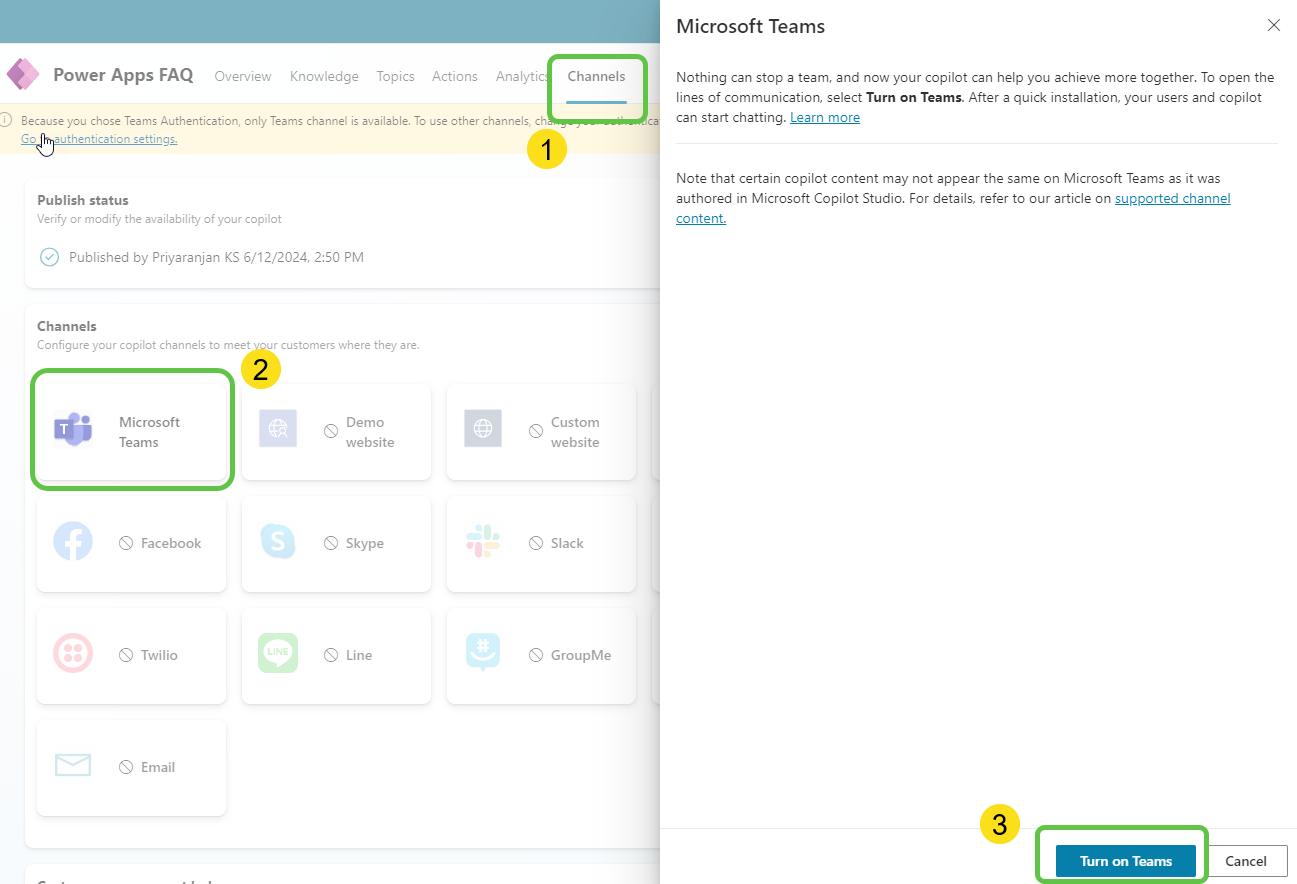
- Head over to Channels -> Microsoft Teams -> Turn on Teams.
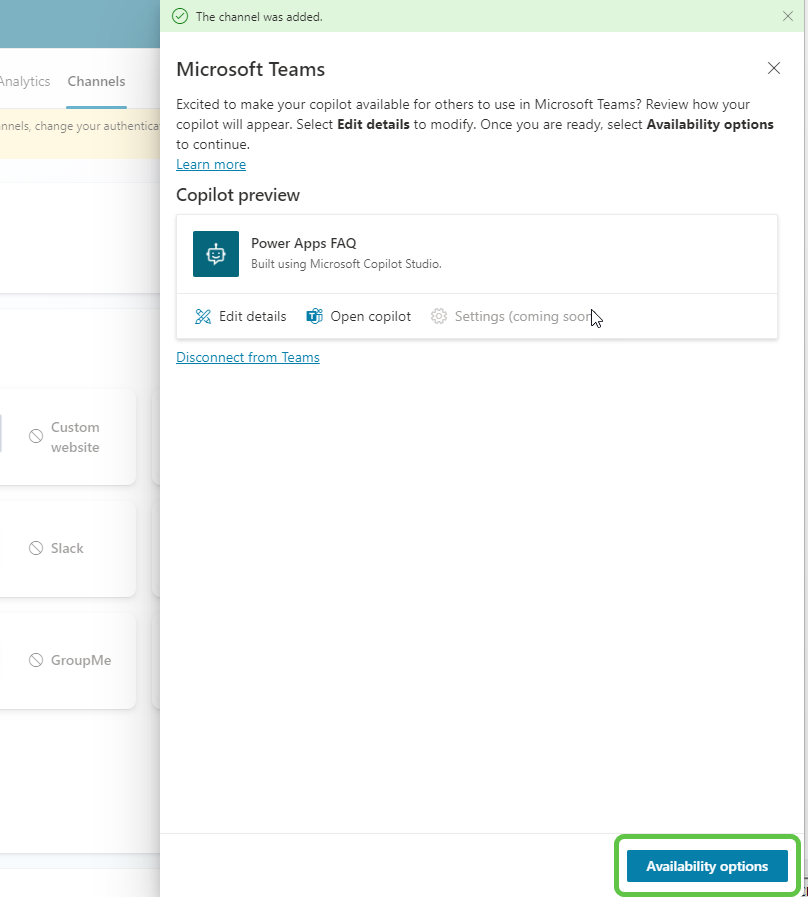
- Click on Availability Options to choose how to distribute the app in Teams.
- You can either deploy it to the app store through admin approval or upload the app as a zip and use it as a personal app.
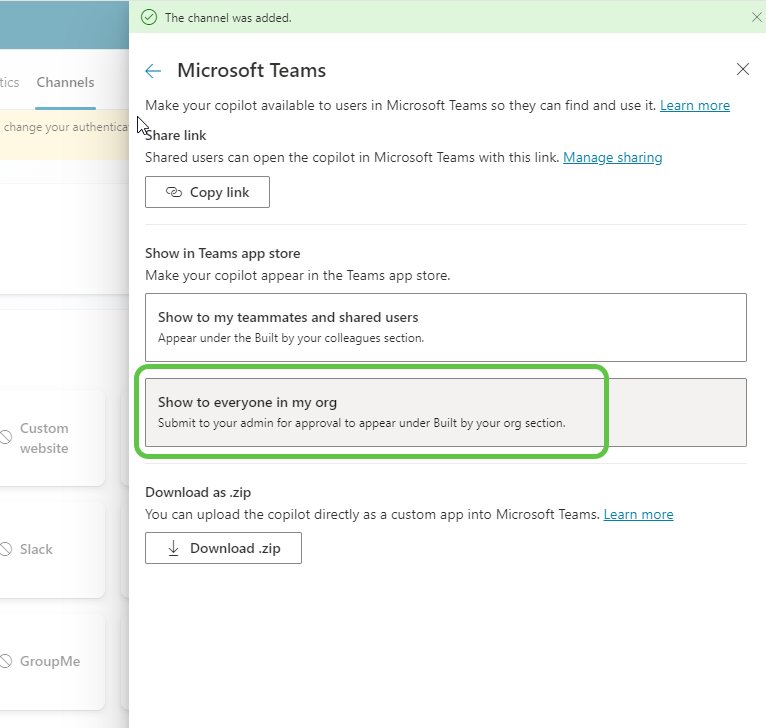
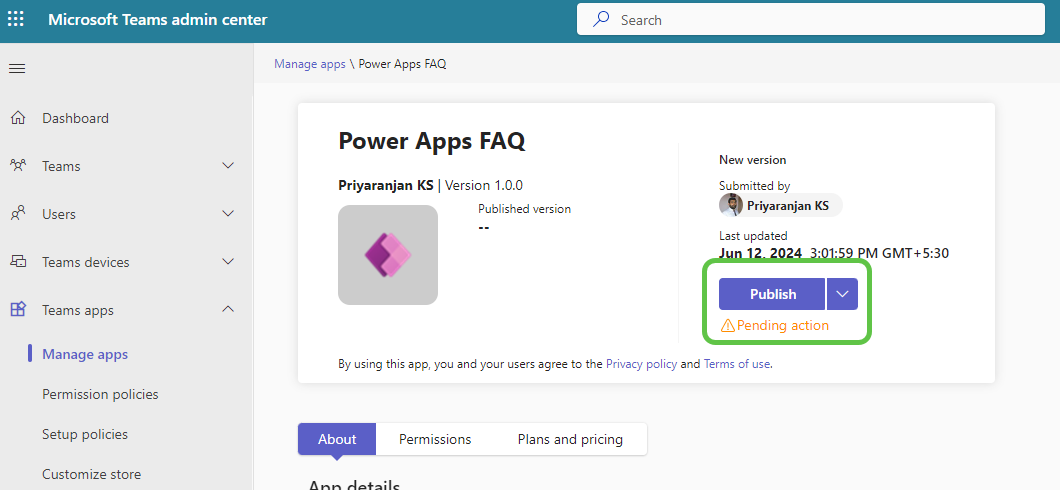
- The app becomes available in the Teams admin centre, and the admin can now publish it for org-wide use.
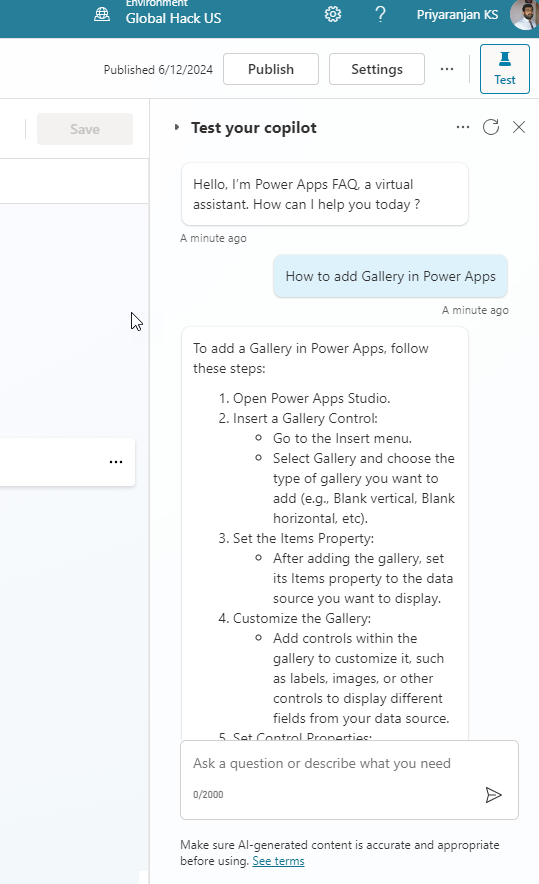
- Access the app from the Teams App Store and start a conversation. Ask anything about Power Apps, and the copilot will fetch contextual answers from the grounded Power Apps Documentation PDF and provide responses.
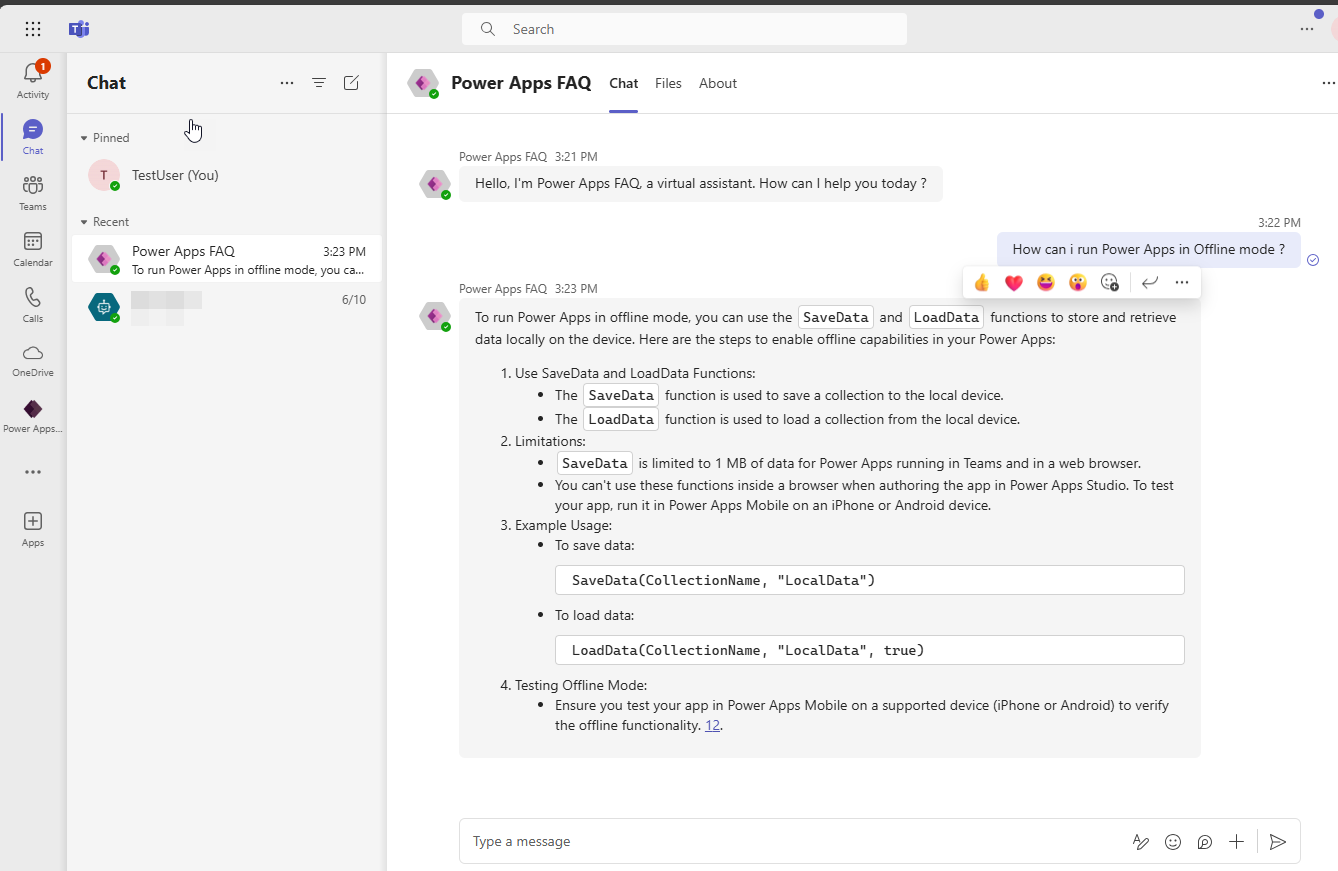
Thus we have completed the implementation and demo of a scalable Copilot that can leverage Azure AI search and Azure Open AI to provide us with contextual answers for our questions.
Alternate Approach : Power Apps Documentation as Local Datasource
So far we explored how we can build a scalable Copilot using Azure AI search Index as the primary data source. Now lets see how we can implement the same using the native local datasource approach in Copilot. For this we can upload the same Power Apps PDF documentation as a Local File Knowledge base :
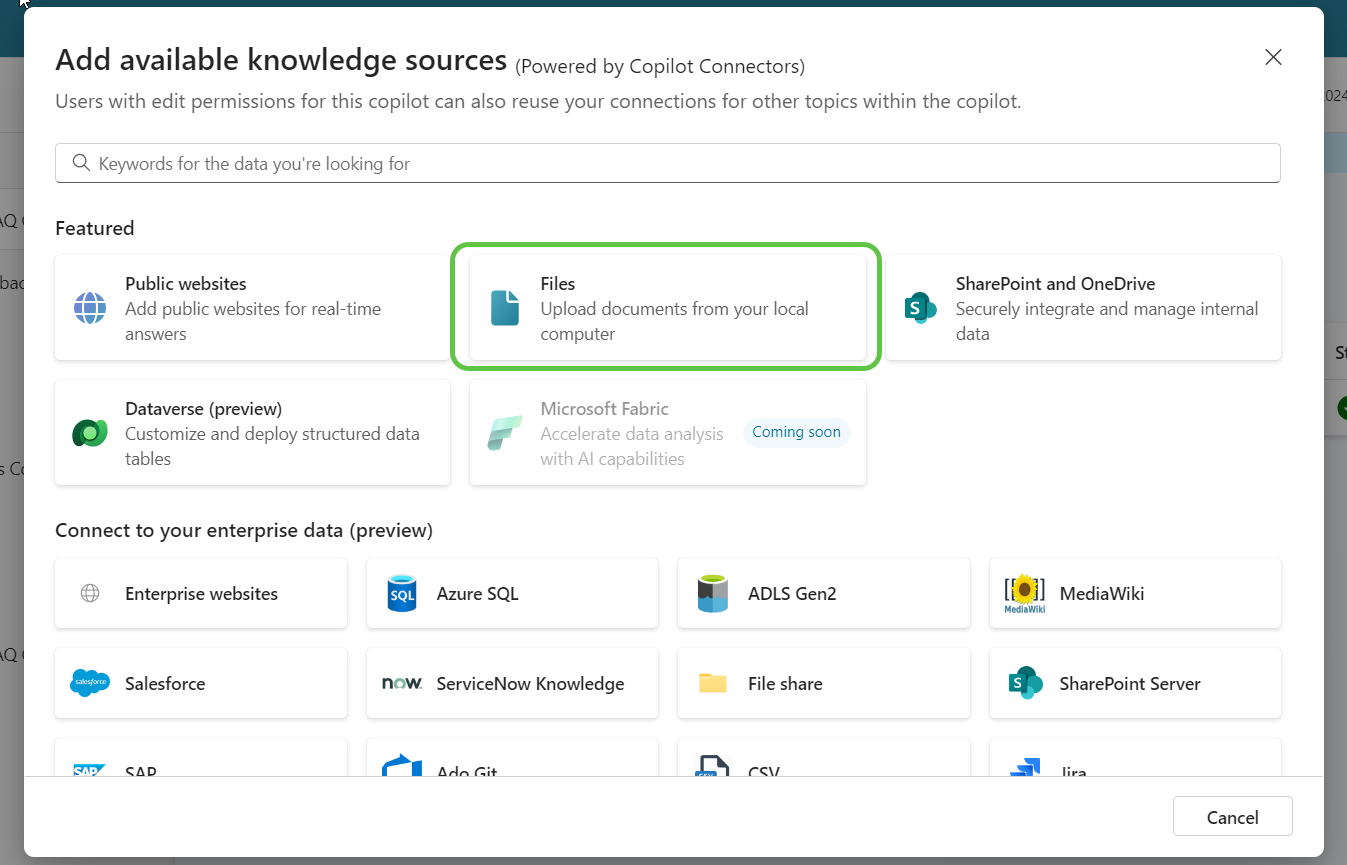
Once uploaded, depending on the size, the processing time varies and once ready we can see the status in the Knowledge section
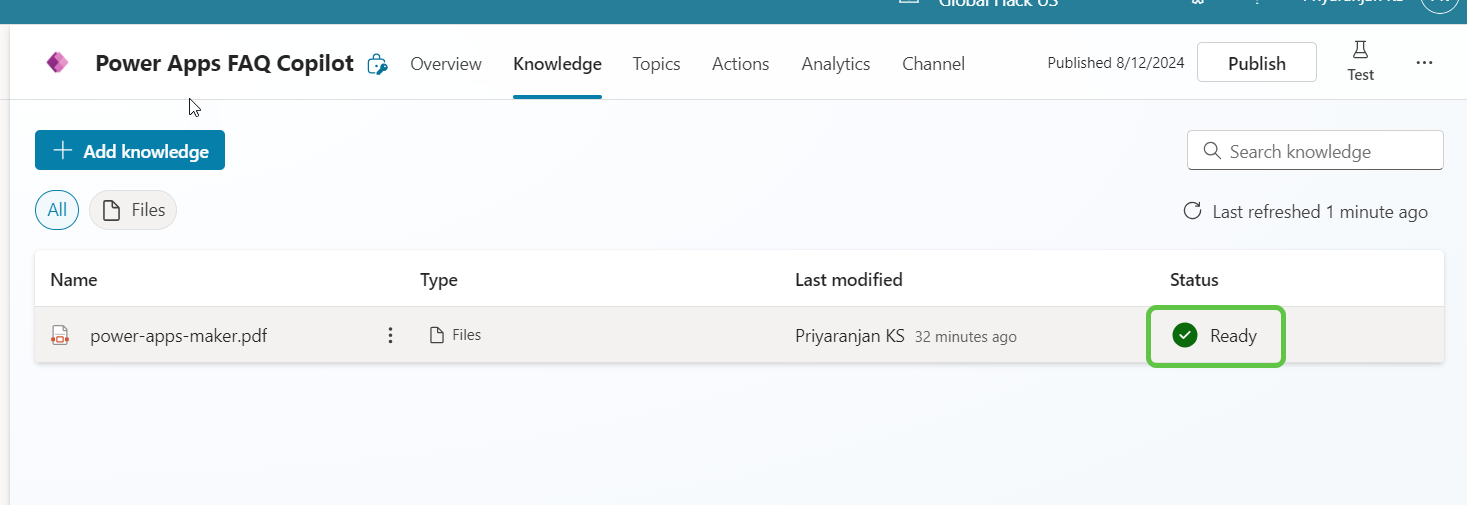
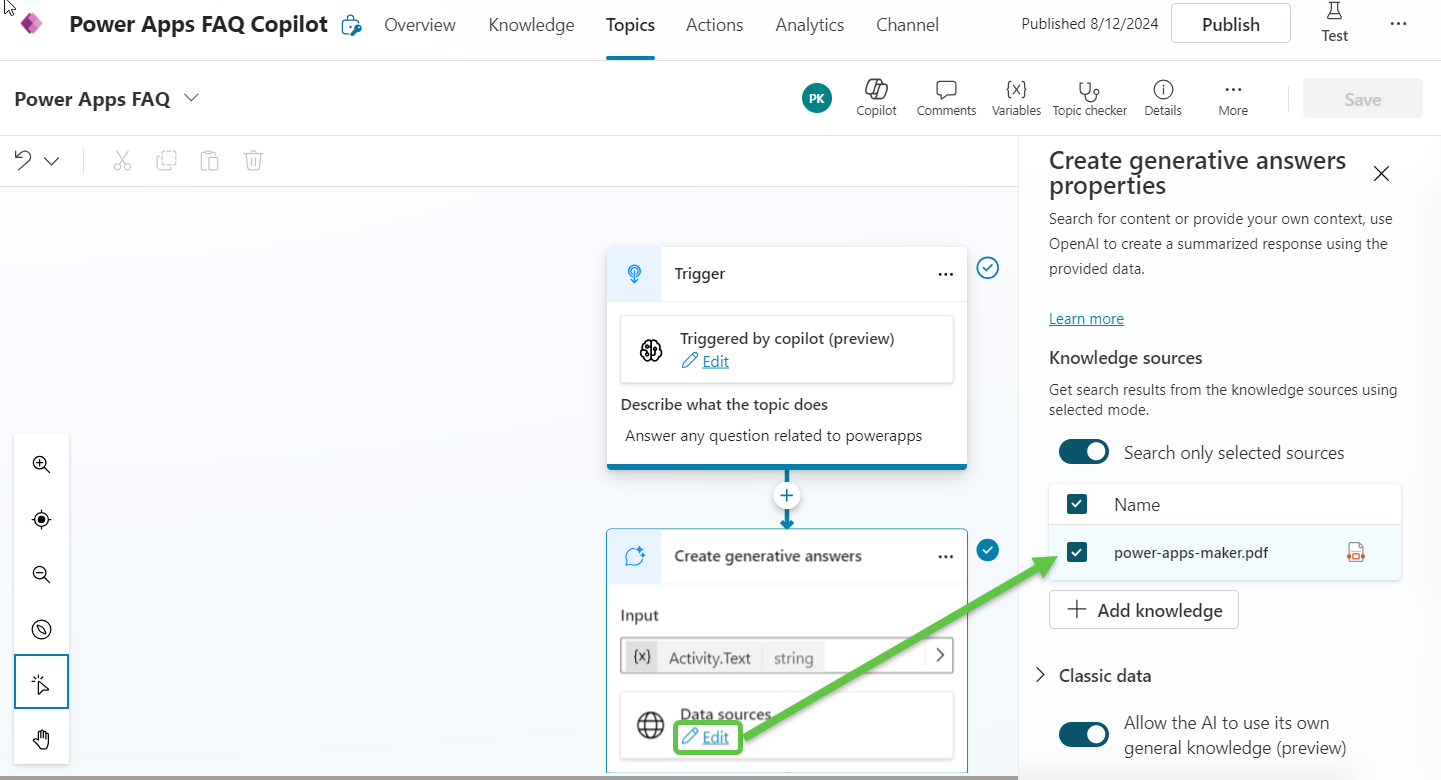
We can now create a new Topic and add the Generative Answers node and connect to this knowledge source that we have uploaded.
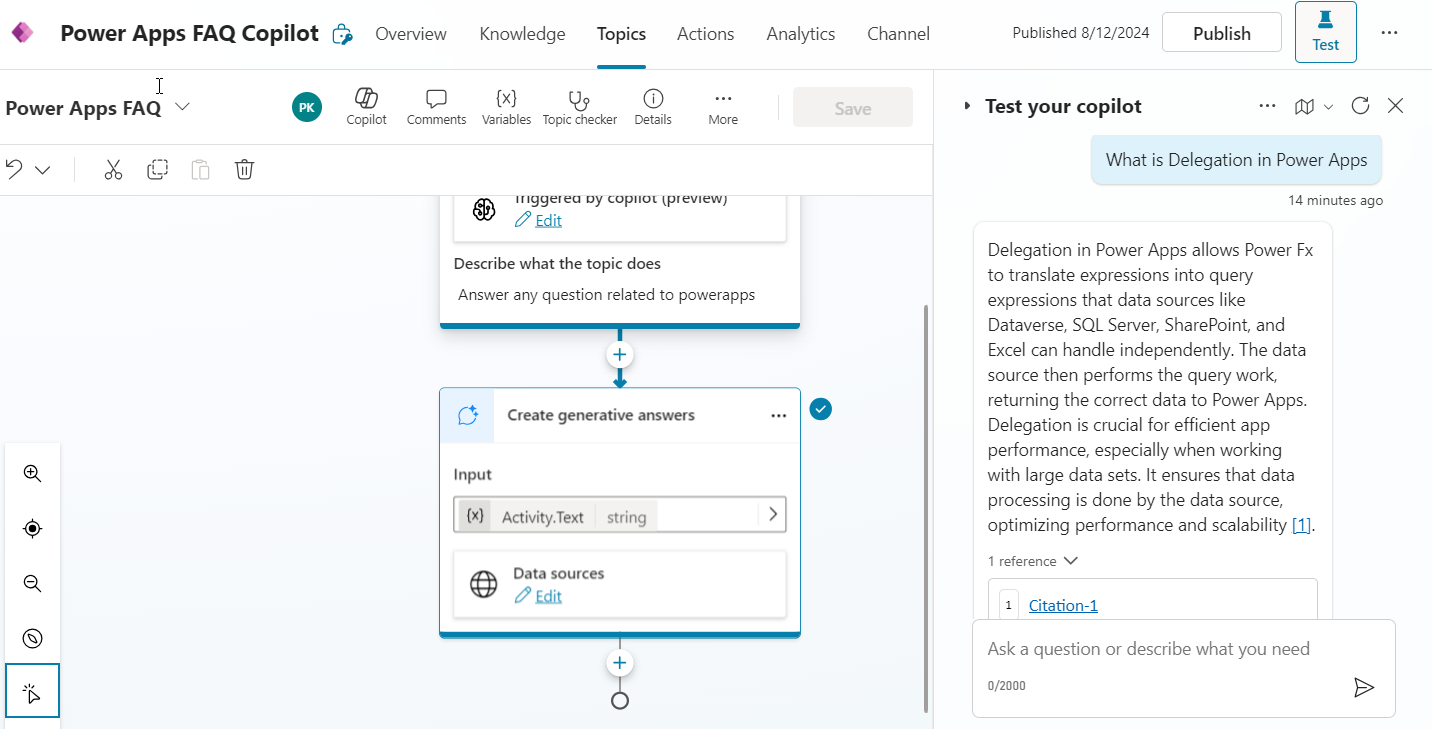
We can test the Copilot’s ability to use the local knowledge source by initiating a conversation and asking questions and we can see that we are getting back the contextual response along with citations.
High Level Data Source Comparison : Azure AI Search vs SharePoint Vs Local File
| Data Source | When to Use | Pros | Cons |
|---|---|---|---|
| Local File Upload | - Quick, simple setups | - Simplicity: Easy setup - Flexibility: User uploads as needed when creating a personal Copilot |
- Limited Scope: Best for small-scale operations - Size: - 512 MB per file limitation - Manual Process: Requires user intervention every time the document has to be updated |
| SharePoint Documents | - Enterprise applications - Collaboration and document management - Regularly updated, accessible content |
- Centralized Management: Easy to update the document from SharePoint - Version Control: Tracks document changes |
- Complexity: As of writing, Manual authentication with App registration is required for authentication configuration |
| Azure OpenAI with Azure AI Search | - Complex searches across large datasets - Aggregation and analysis of unstructured data - Enterprise-level applications requiring AI-driven insights |
- Powerful AI Capabilities: Combines NLU with robust search - Scalability: Handles large datasets - Advanced Features: Semantic and cognitive search |
- Complex Setup: Requires more configuration - Cost: Different tiers have different storage limitations. Higher the tier, higher the cost |
Conclusion
Integrating Azure OpenAI Service with Microsoft Copilot Studio opens up a lot of possibilities for creating intelligent, data-driven copilots. This guide has walked you through the process of setting up Azure AI Search, configuring Azure OpenAI, and seamlessly connecting these services in Copilot Studio. By harnessing the power of Azure’s AI capabilities, you can build copilots that provide rich, contextual responses tailored to your organizational needs. We also saw how the same Power Apps PDF documentation can be used as a Local Source Knowledge Data Source. Depending on the use case and complexity of search involved, we can use either of them as a source of generative answers.


