Table of Contents
- Introduction
- Process Flow
- Demo
- Step 1: Setting Up Your Environment
- Step 2: Preparing Your Data in Dataverse
- Step 3: Creating the Copilot in Copilot Studio
- Step 4: Enable Generative Selection of Topics
- Step 5: Create Topics
- Step 6: Authentication
- Step 7: Publish to Power Pages
- Step 8: Test the Copilot
- Conclusion
Introduction
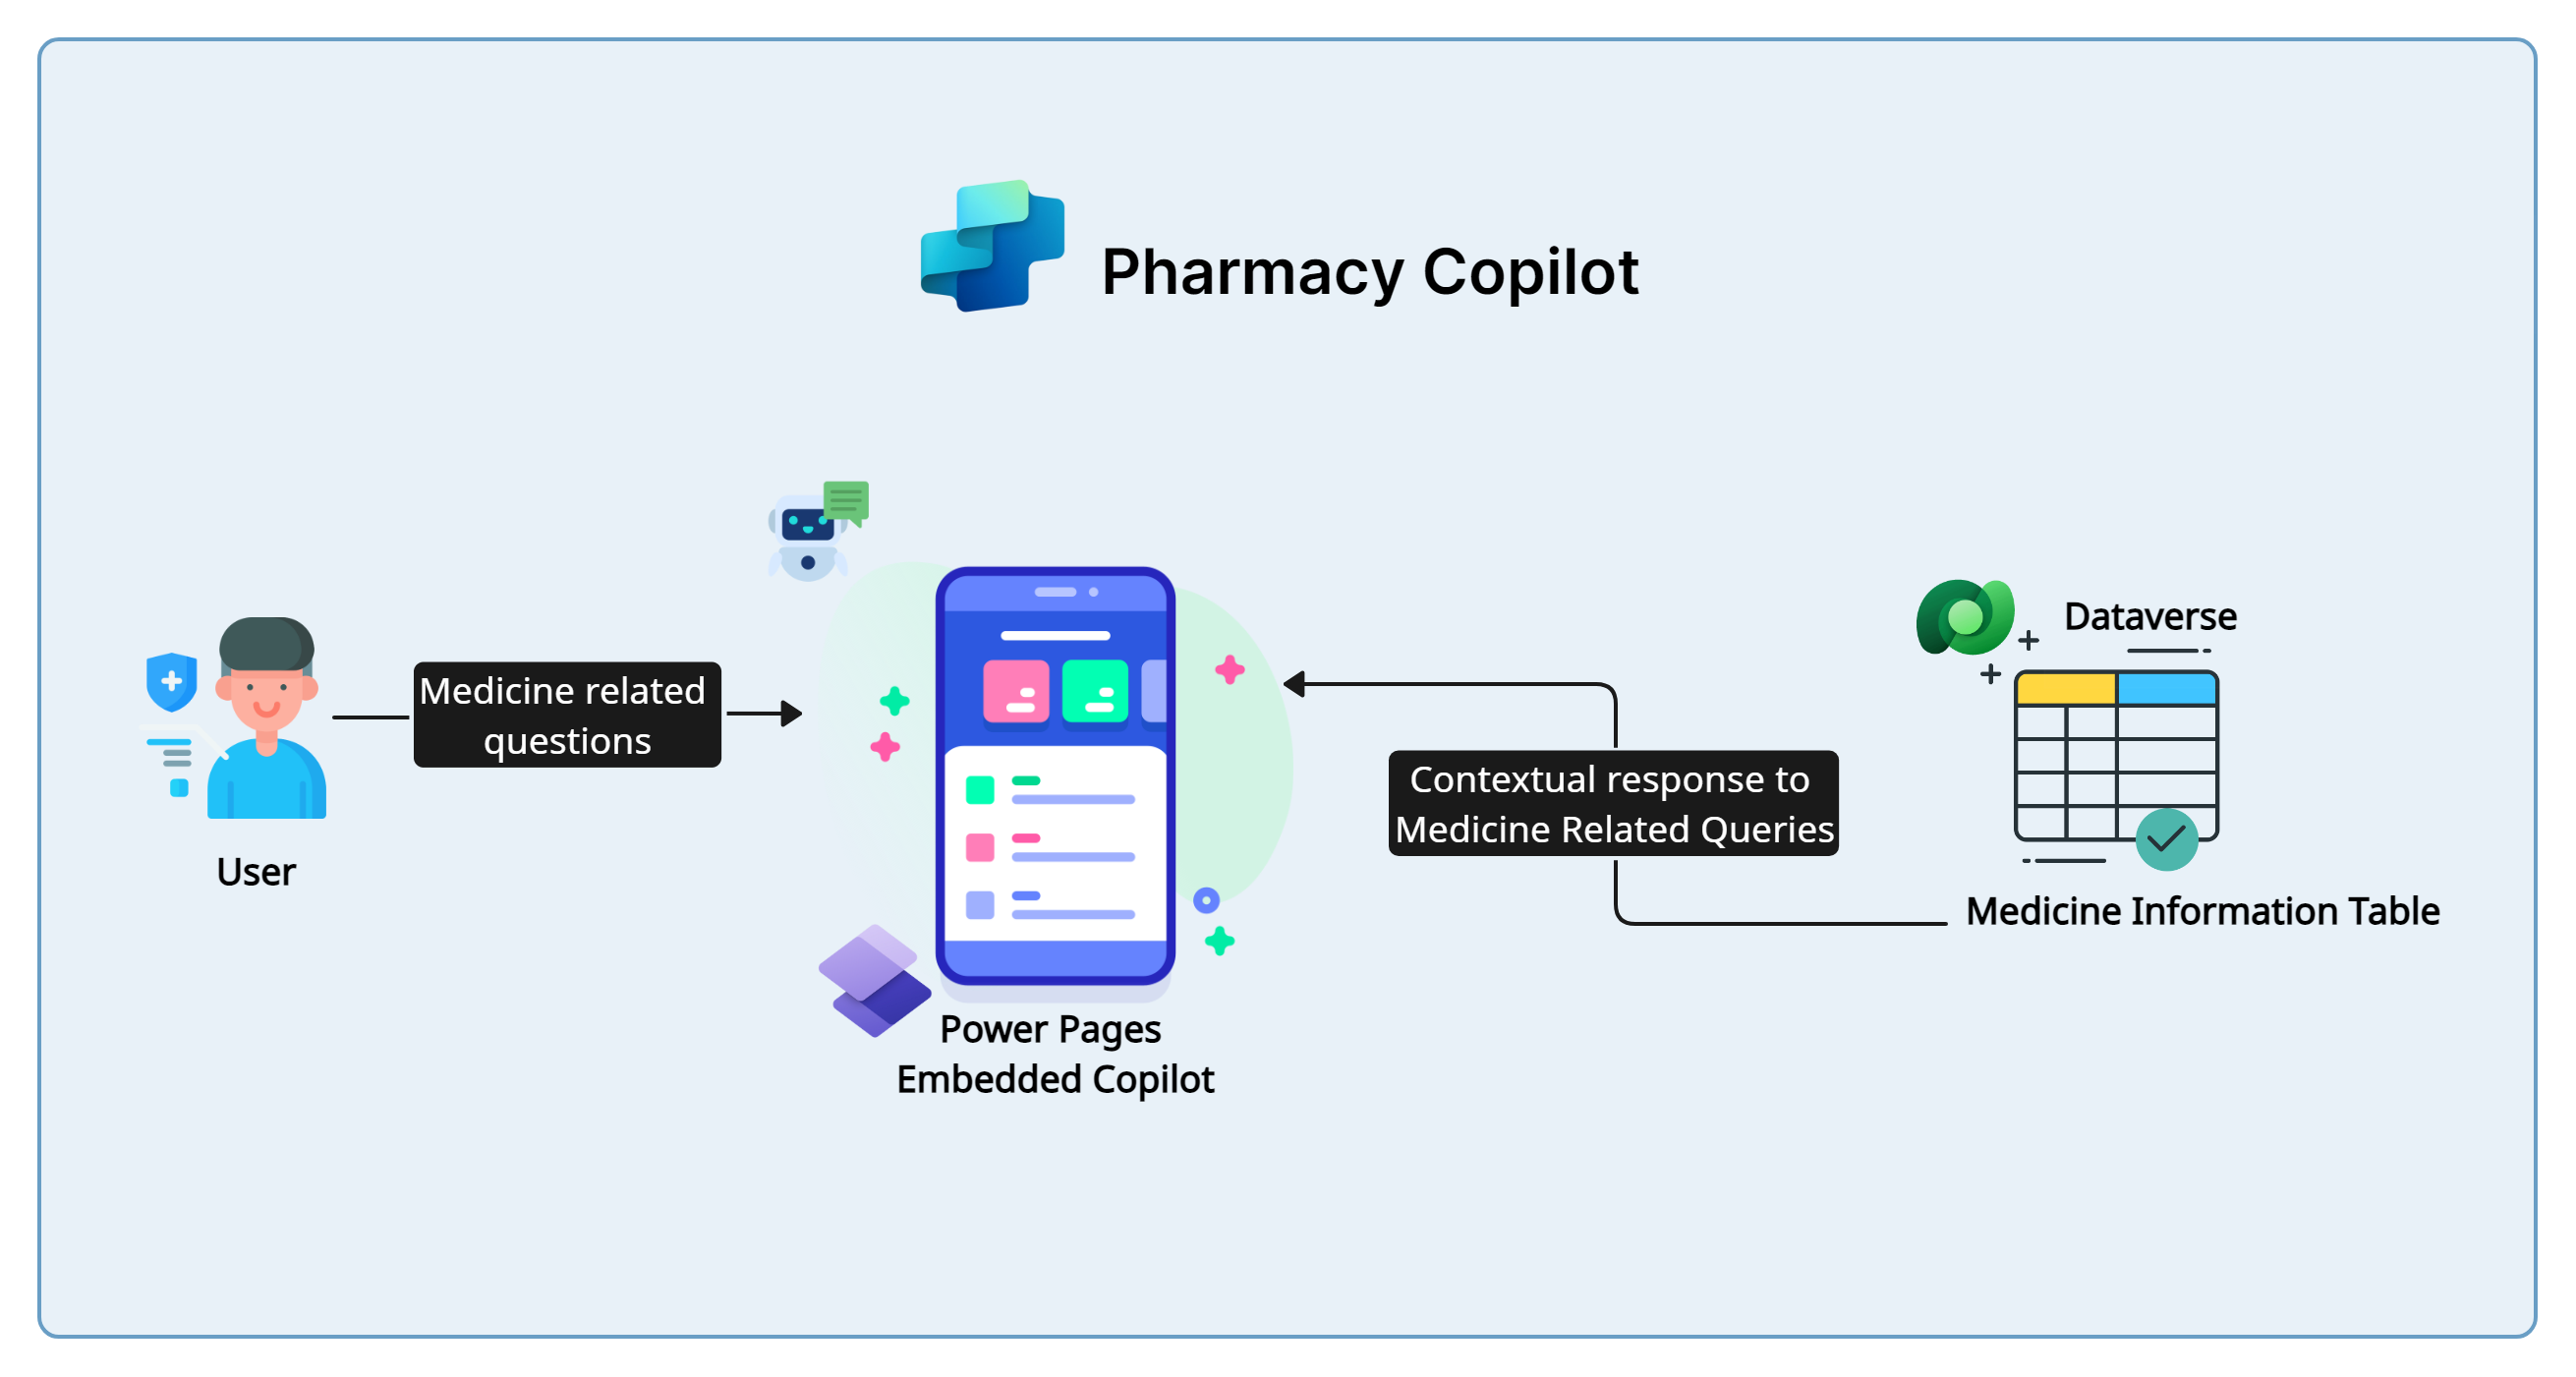
In the pharmacy domain, having instant access to detailed information about medications is quite important. A Pharmacy Assistant Copilot, capable of answering complex queries regarding drug pricing, effects on pre-existing conditions, and generic names, can significantly enhance efficiency and accuracy - This copilot does just that and it leverages a secure Dataverse backend to access enterprise data directly, ensuring reliable and comprehensive information for every query.
In this blog, we will walk through the process of building such a copilot using Microsoft Copilot Studio, leveraging the generative answers capability and Dataverse for seamless data retrieval.
Process Flow
- User Interaction: Employee initiates a query via the Copilot embedded in Power Pages.
- Data Retrieval: Copilot fetches medication information from Dataverse based on the user’s query.
- Knowledge Base Access: Utilizes the generative answers capability to provide detailed responses.
Demo
Watch the demo video below to see how the Pharmacy copilot works.
Step 1: Setting Up Your Environment
Before you start creating the copilot, ensure you have the following prerequisites:
- Microsoft Copilot Studio access.
- Dataverse environment with your enterprise data.
Step 2: Preparing Your Data in Dataverse
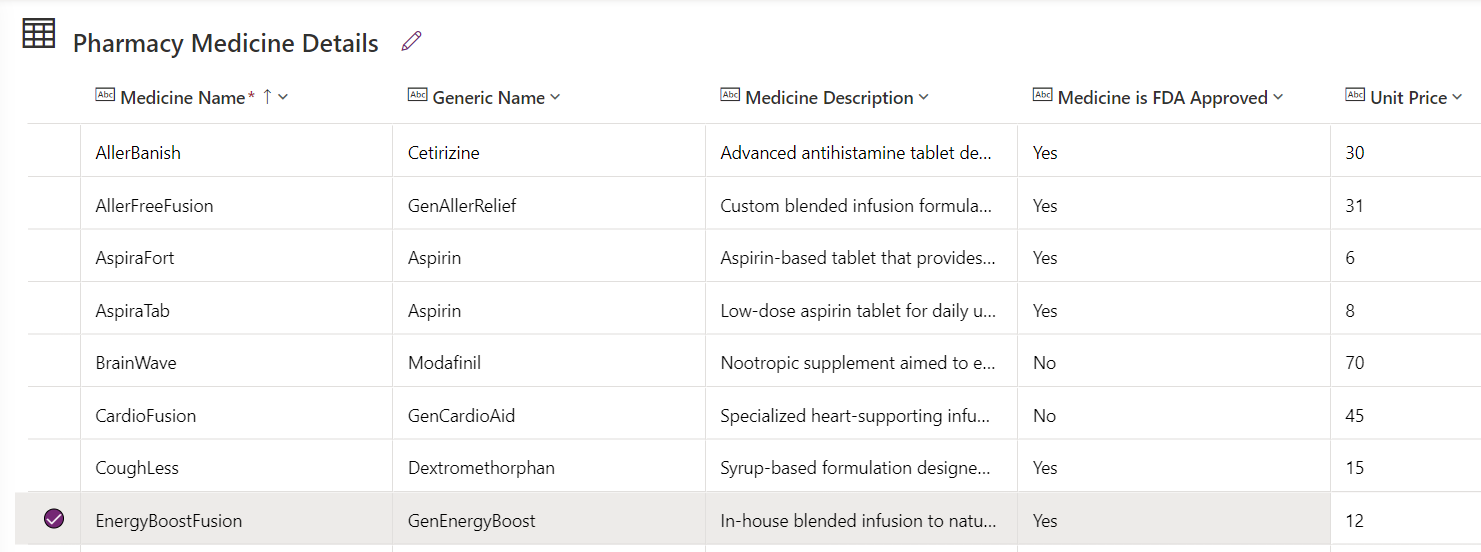
Ensure your Dataverse instance contains all necessary information about medications, including unit prices, generic names, effects on pre-existing conditions, etc. We have created a Dataverse table with the below fields:
- Medicine Name
- Medicine Description
- Generic Name
- Medicine is FDA Approved
- Unit Price
Step 3: Creating the Copilot in Copilot Studio
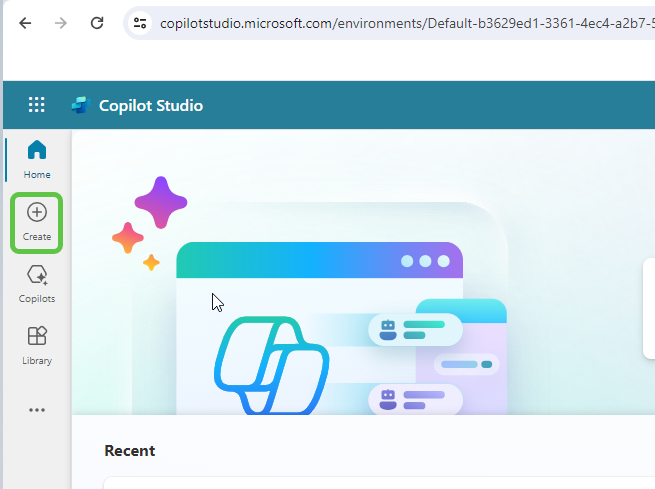
Head over to Microsoft Copilot Studio and click on Create.
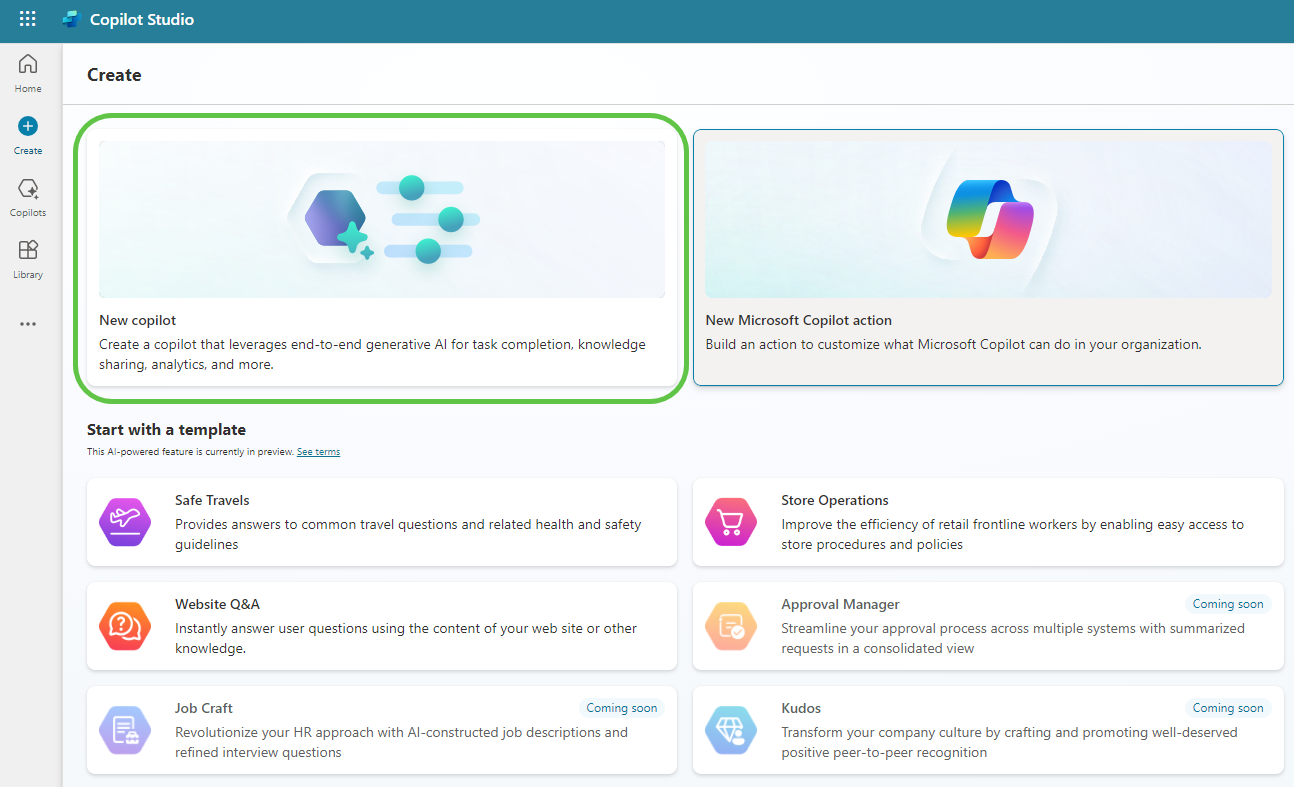
This will provide the option to create a copilot based on an existing template or create a blank copilot from scratch. Let’s select New copilot.
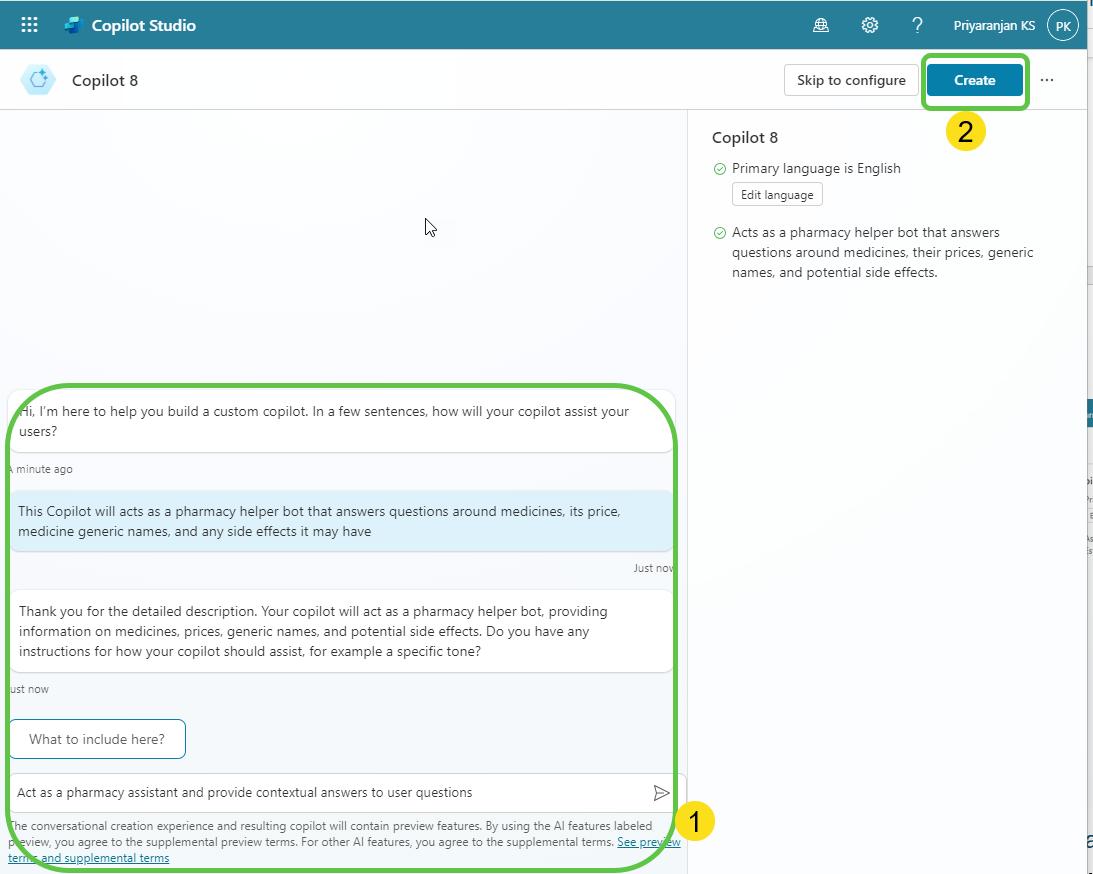
This will take you to the page where you can:
- Describe the copilot functionality and provide any specific instructions to the copilot.
- Once done, click on Create to provision the copilot.
Step 4: Enable Generative Selection of Topics
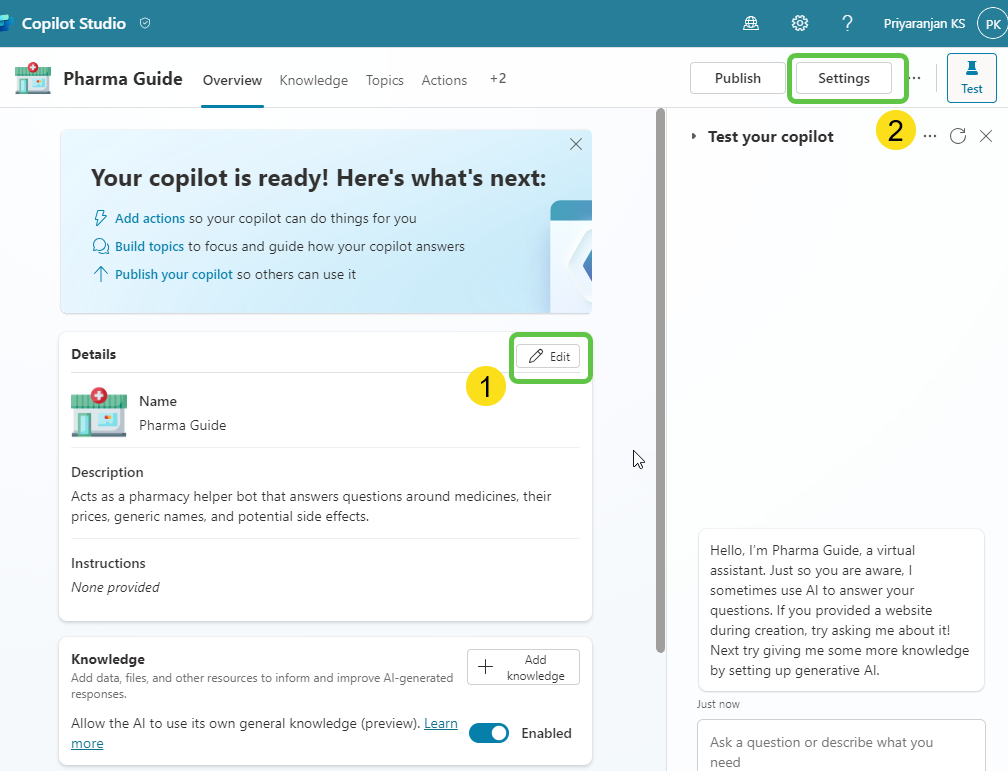
The copilot is now created. You can then make the needed configuration changes.
- Click on Edit to edit the copilot details like name, icon, and description.
- Click on Settings to enable the Generative selection of topics so that without relying on triggers, the topics will be auto-selected based on user conversation, resulting in a much smoother user experience.
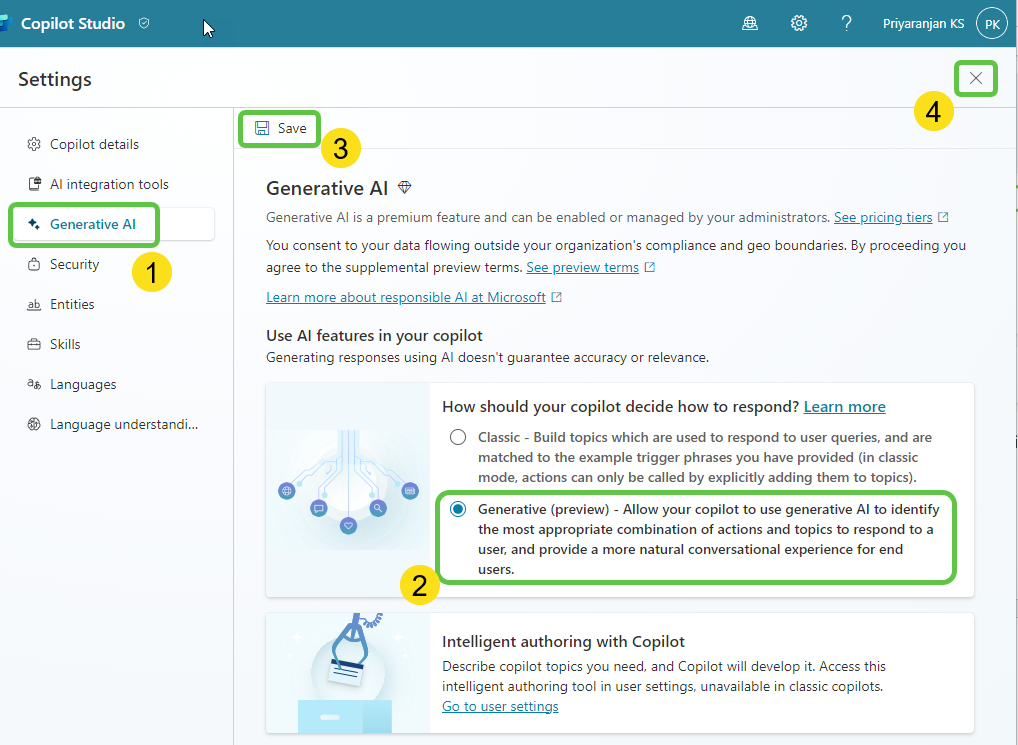
To enable the automatic detection of topics from user interaction:
- Click on Generative AI.
- Select Generative (preview).
- Click on Save to update the settings.
- Click on the Close icon to go back to the home page of this custom copilot.
Step 5: Create Topics
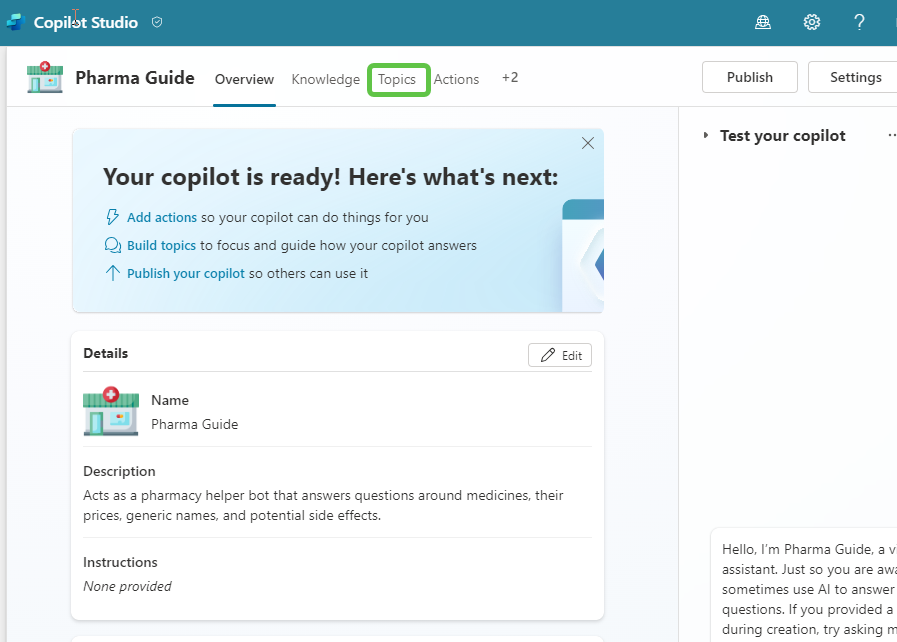
Now let’s go ahead and create the topics that will automatically redirect the conversation flow to appropriate topics based on the question user posts. Click on Topics from the navigation menu.
To add the topic, we can either go with the option to create a blank topic or use Copilot to create the topic with an initial set of prepopulated conversation nodes based on the topic description that we provide.
- Click on Add a Topic.
- Select Create from description with Copilot.
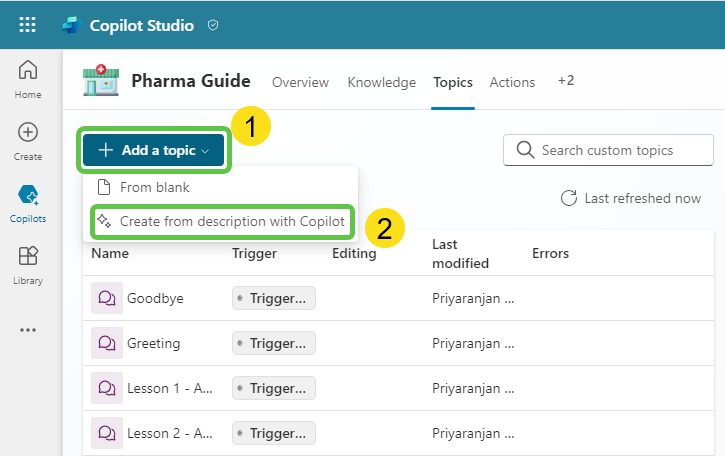
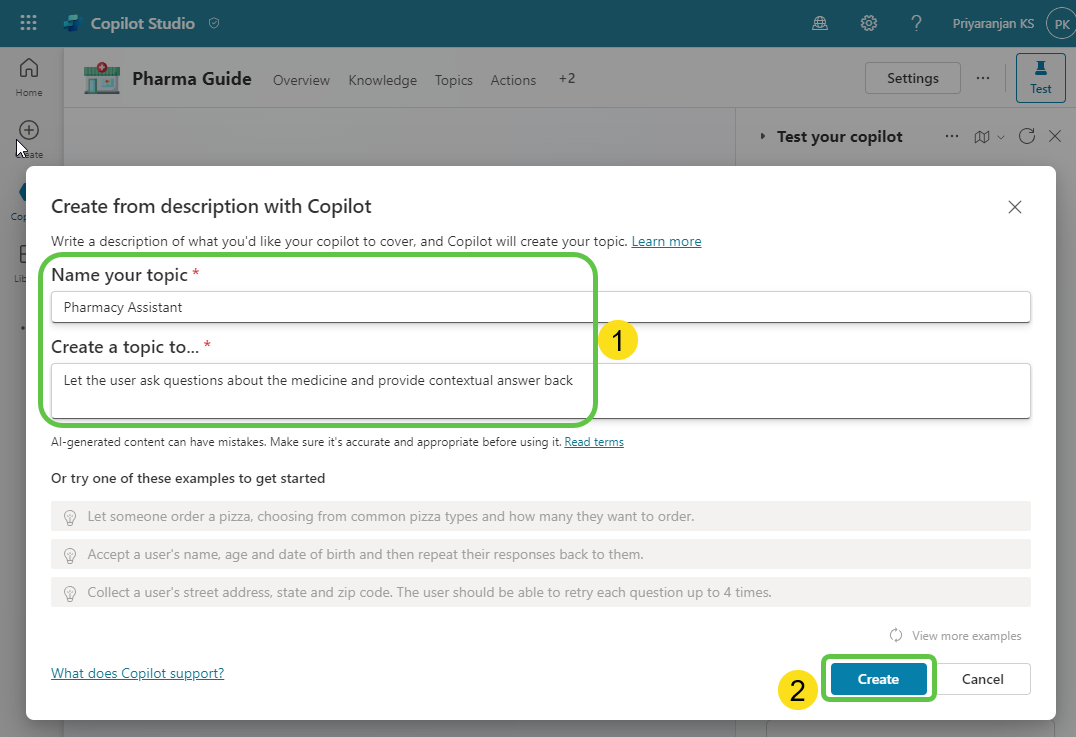
When the user asks questions regarding the medicine, we will need a topic that will take the user query and ground the medicine-related information in the Dataverse and provide the contextual answer back to the user. To do this, provide the below topic description details in the pop-up that opened when we clicked the Add topic button previously. Then, click on Create, which will provision the topic skeleton based on the provided description.
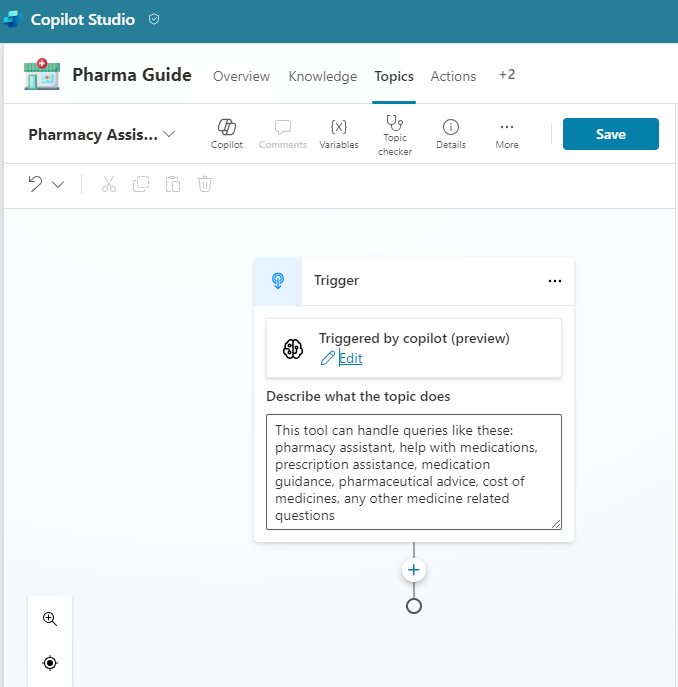
Thus, we have the basic topic created with an automatic trigger that is generated using the description provided. We can now add more conversation nodes.
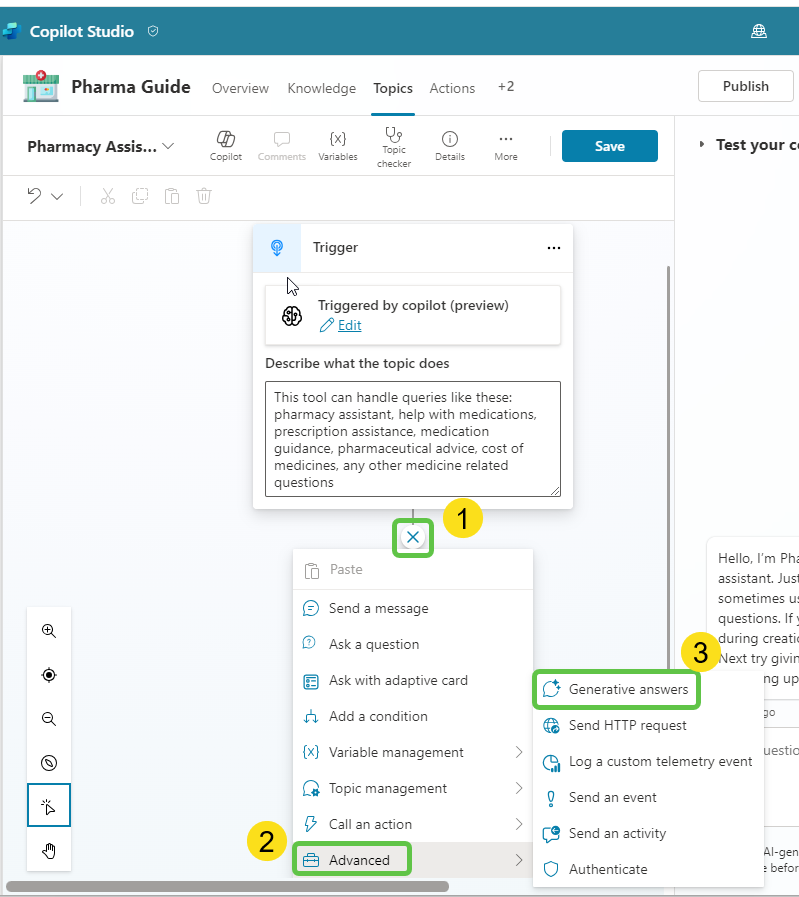
Now let’s add the Generative Answers node by:
- Selecting the + Sign.
- Click on Advanced.
- Select Generative Answers.
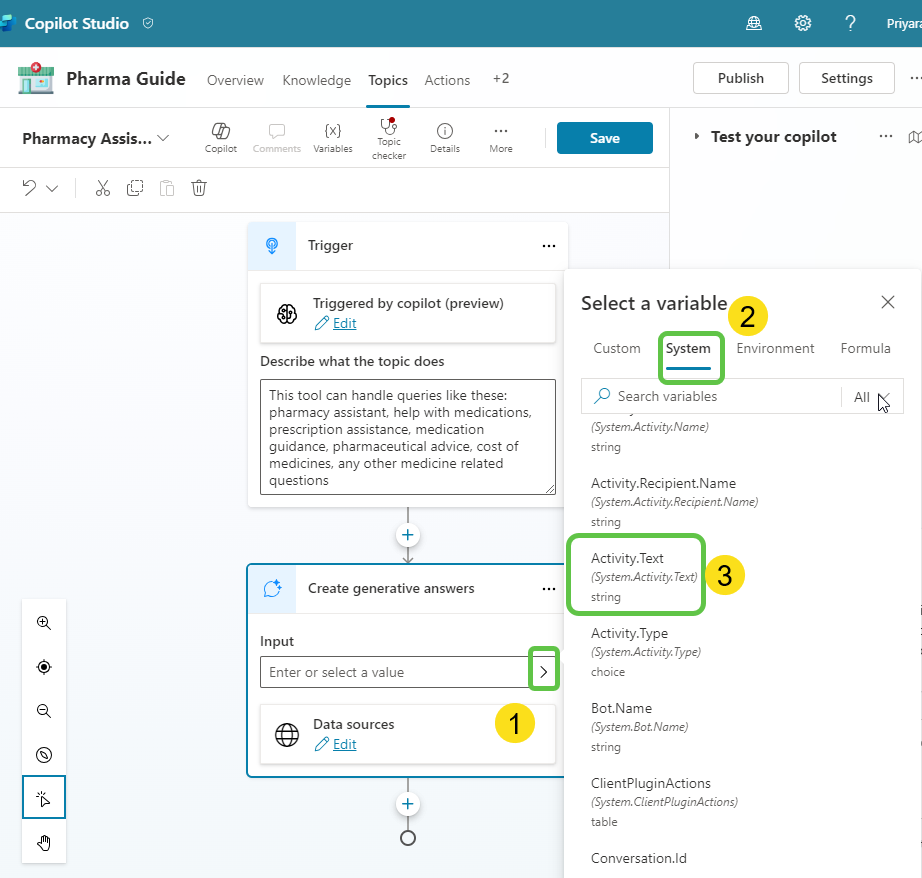
We can now configure the Generative Answers node by:
- Clicking the Right Arrow.
- Select System from the Select a variable pane.
- Select Activity.Text which will contain the text that the user had inputted to initiate the conversation which is most likely the question about a medicine.
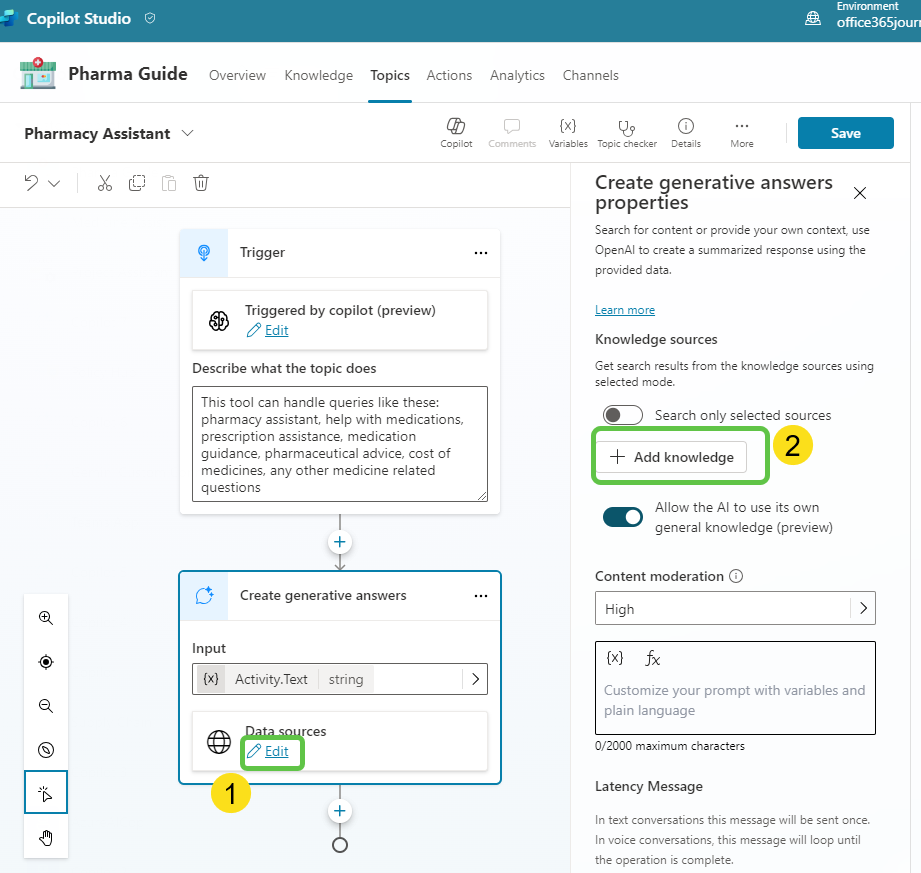
Now let’s configure the data source for the Generative answers node:
- Click on Edit.
- Select Add Knowledge.
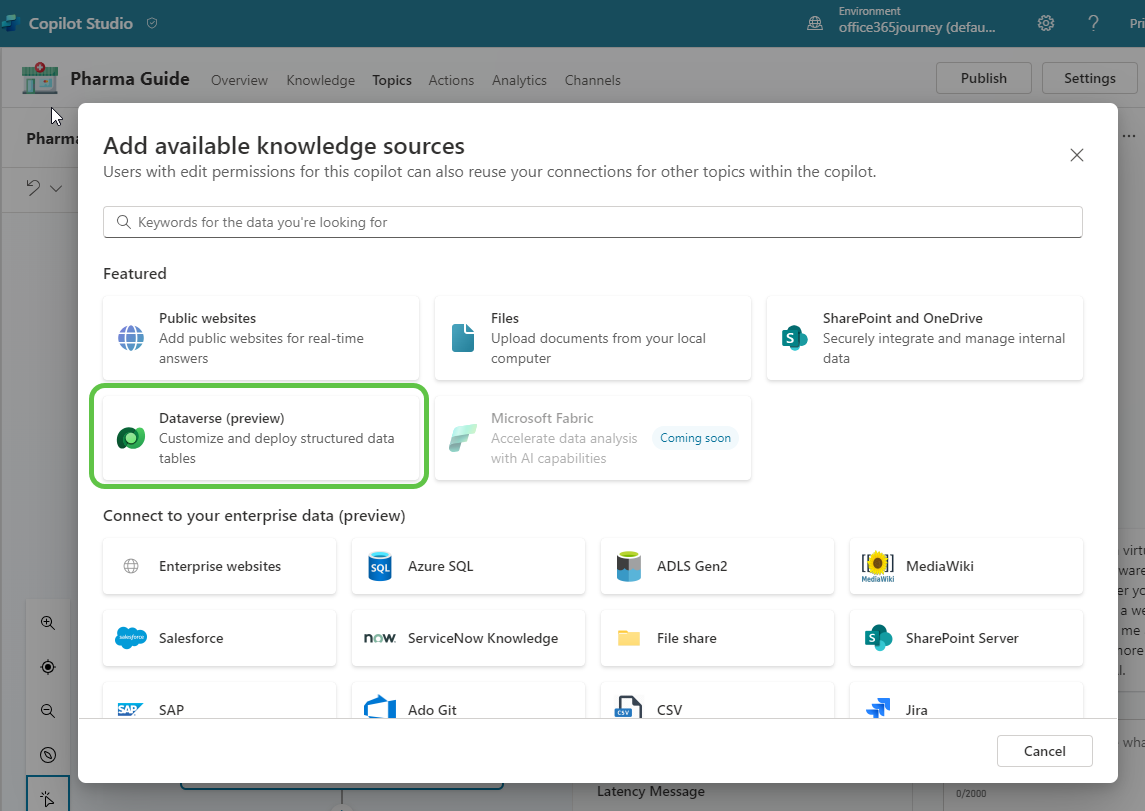
In the Add available knowledge sources pop-up, select Dataverse.
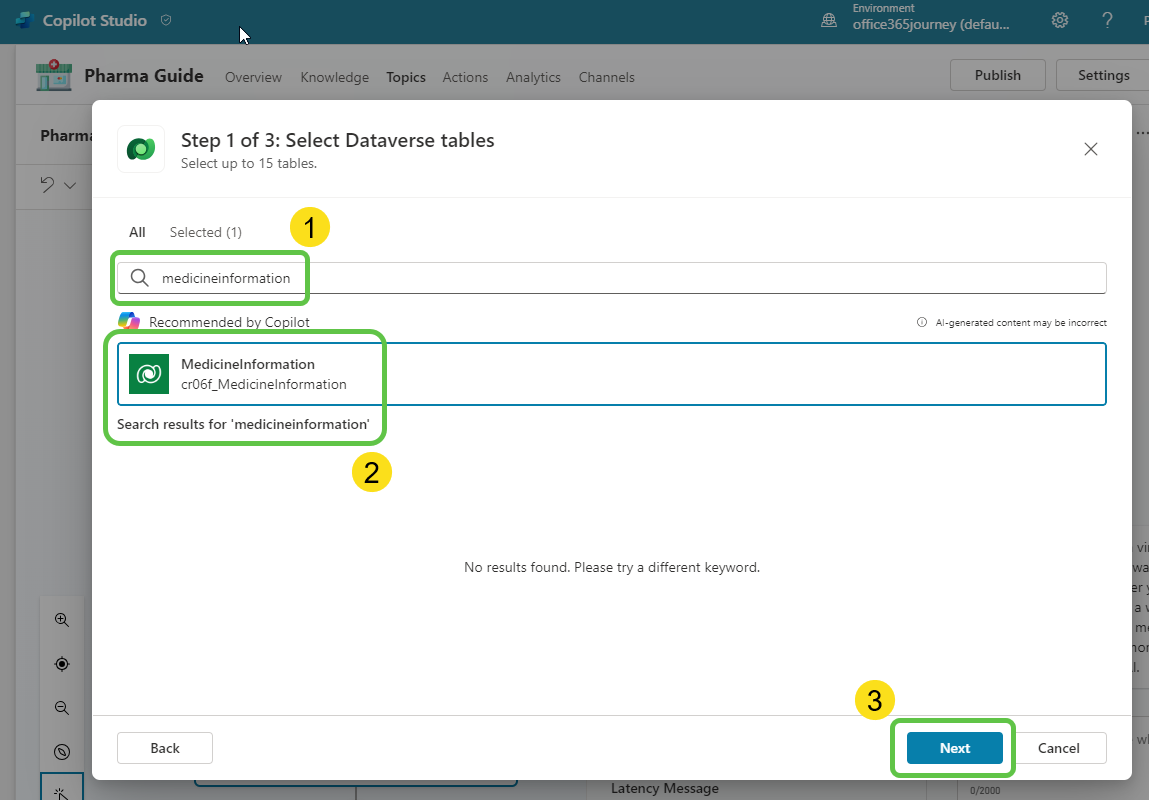
In the next window, we can:
- Search for the Dataverse table from which we want the copilot to ground the data. In our case, it is MedicineInformation.
- Select the table.
- Click on Next.
It will preview the table data, click on Next.
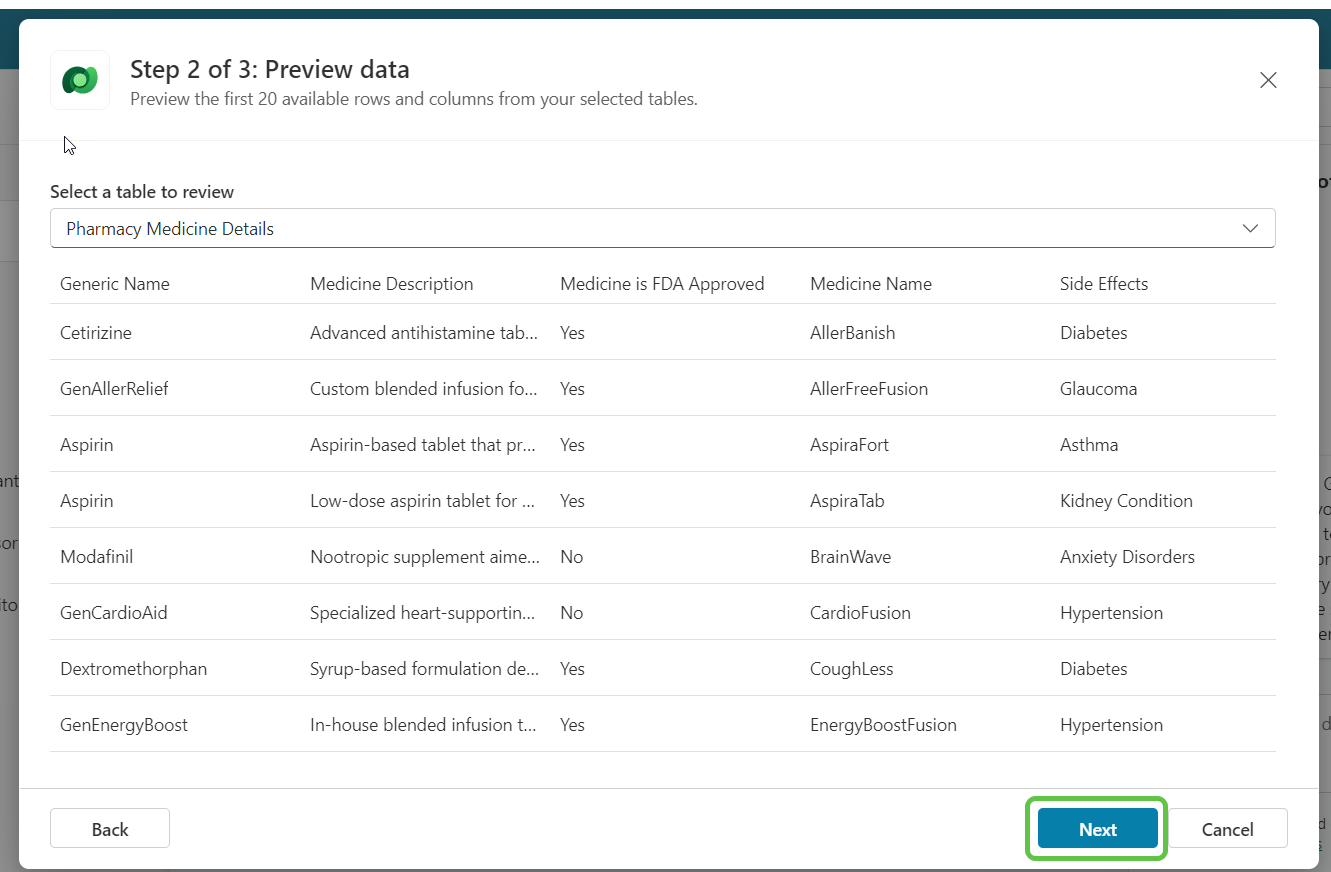
To improve the data retrieval accuracy based on the user question, we have the option to provide synonyms or alternate names for the table columns. Click on Edit.
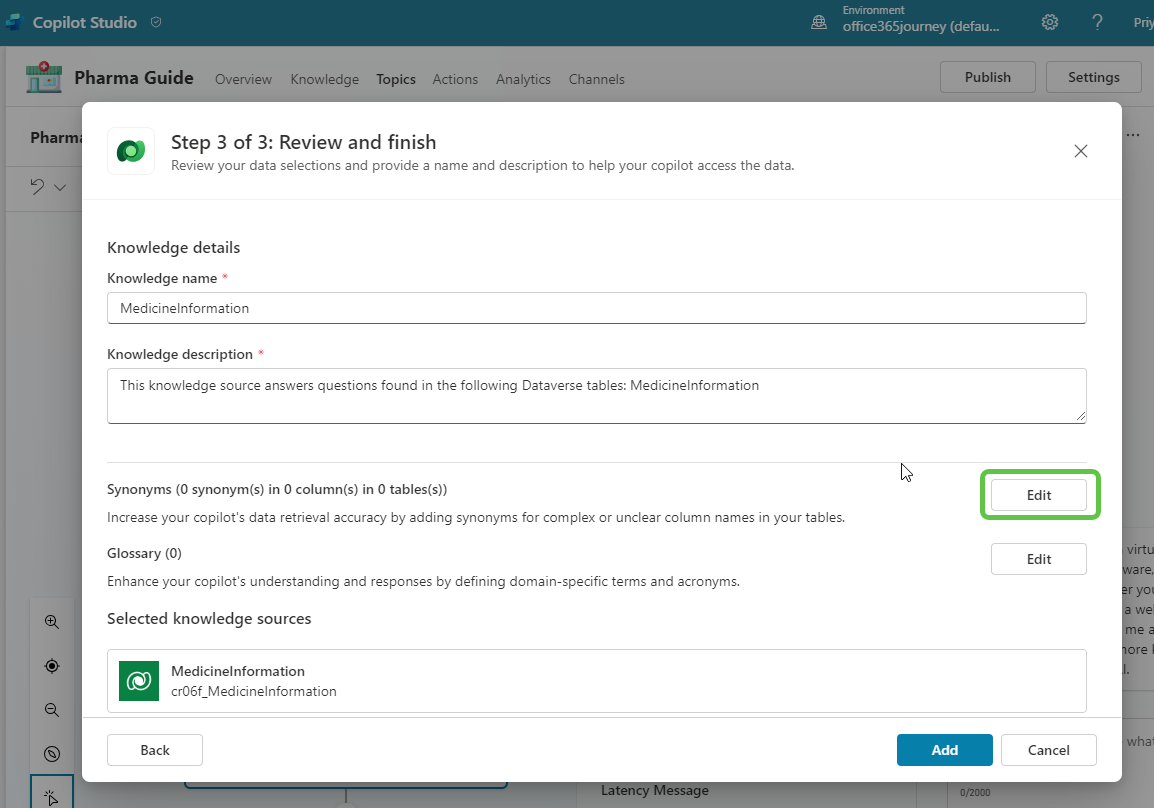
Here we can provide the column synonyms as well as the detailed description of what kind of data each column holds.
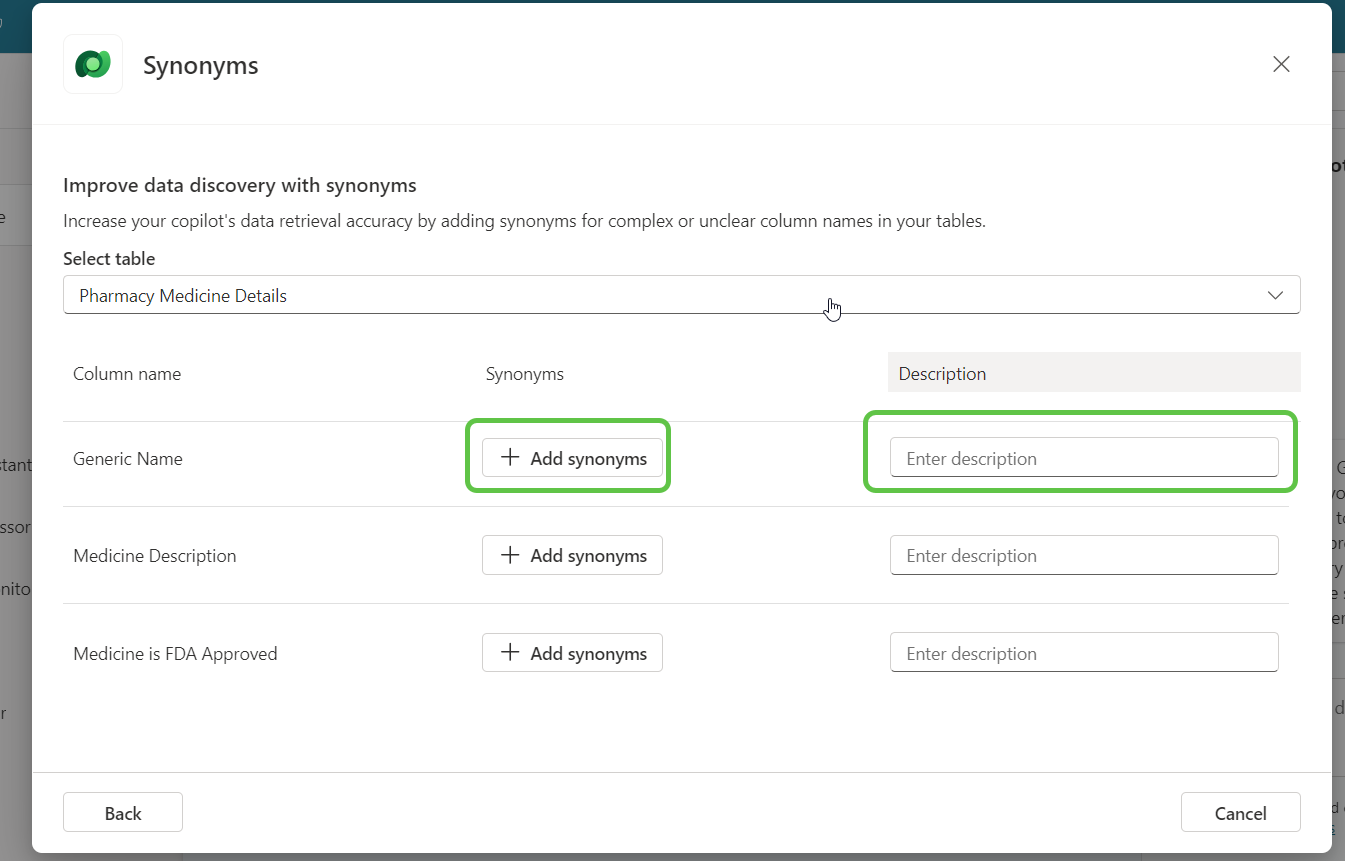
Once you have added the details, click on Back.
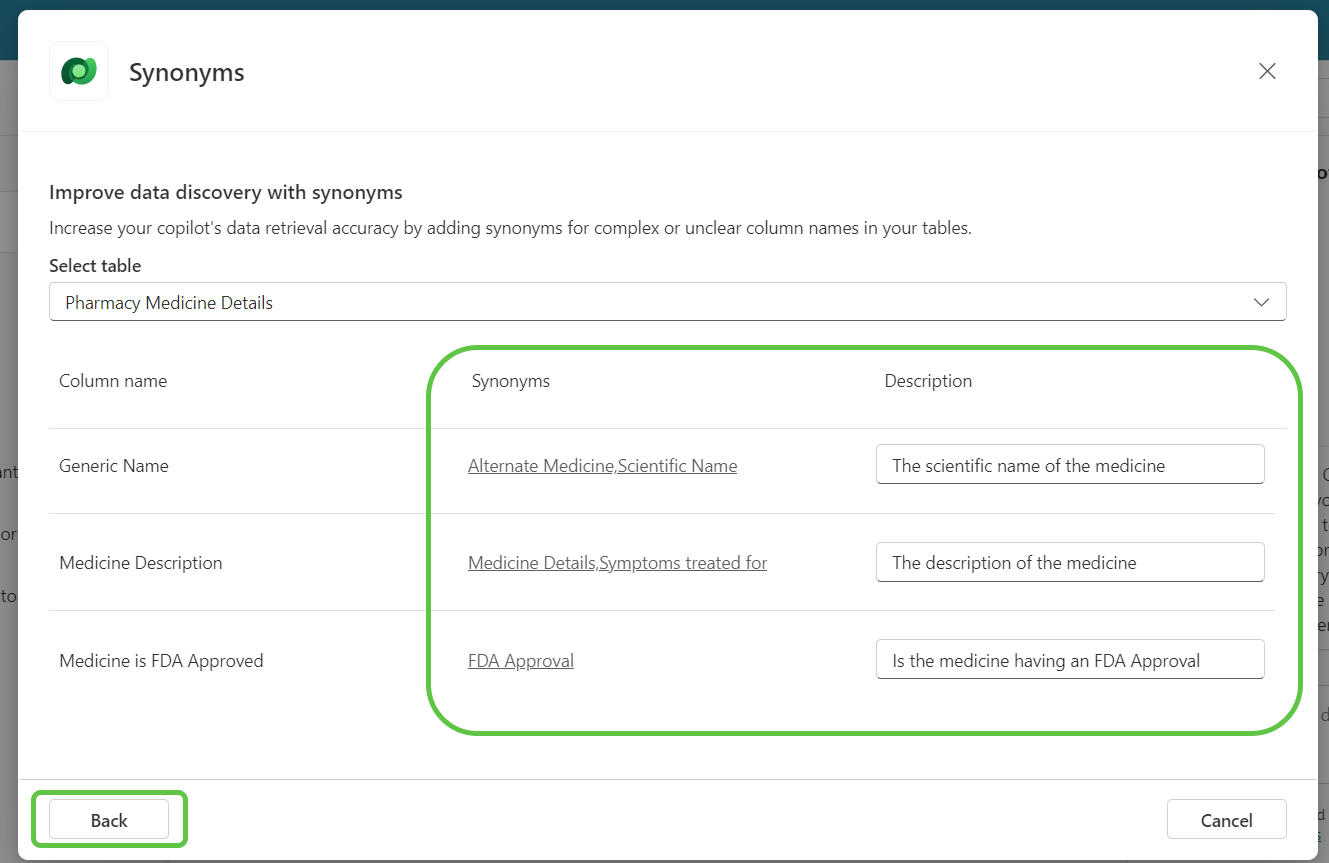
We can also add domain-specific terms and their meanings to make the grounding process more relevant by adding the information in the glossary section.
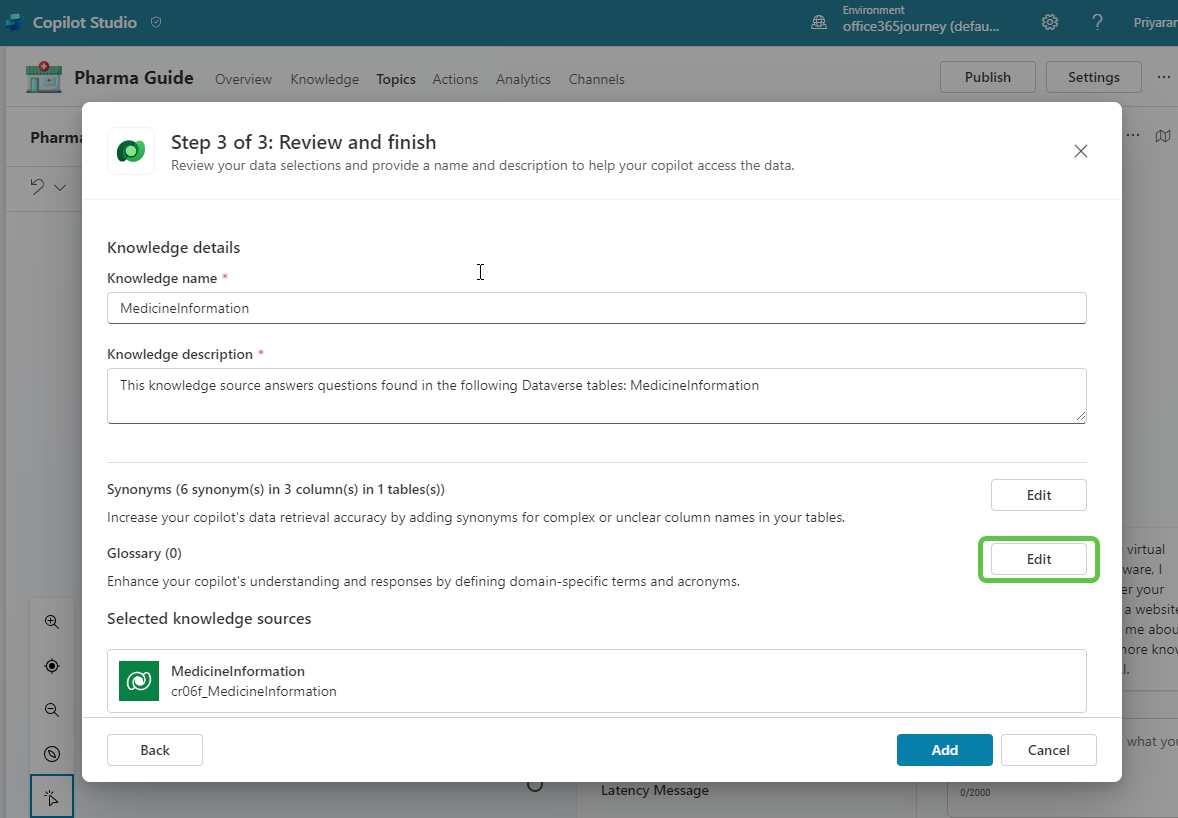
We added a few pharmacy-related glossary items. Once done, click on Back.
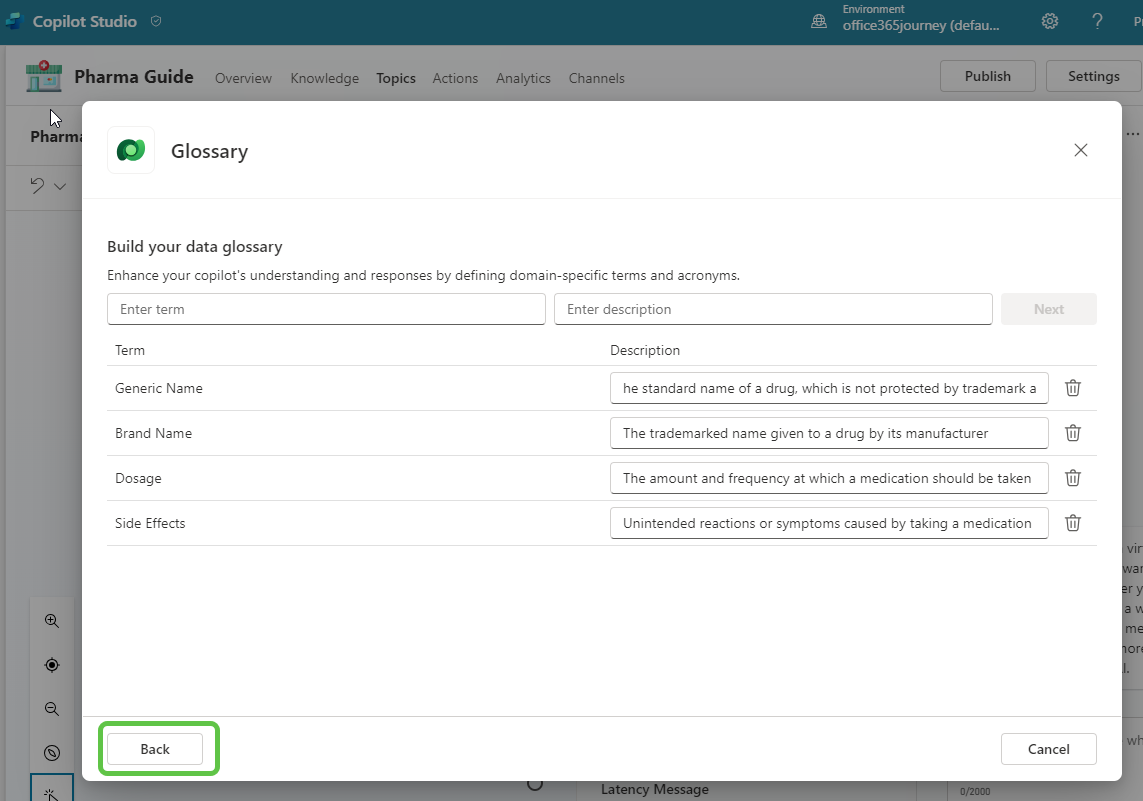
Finally, click on Add to finalize the data source.
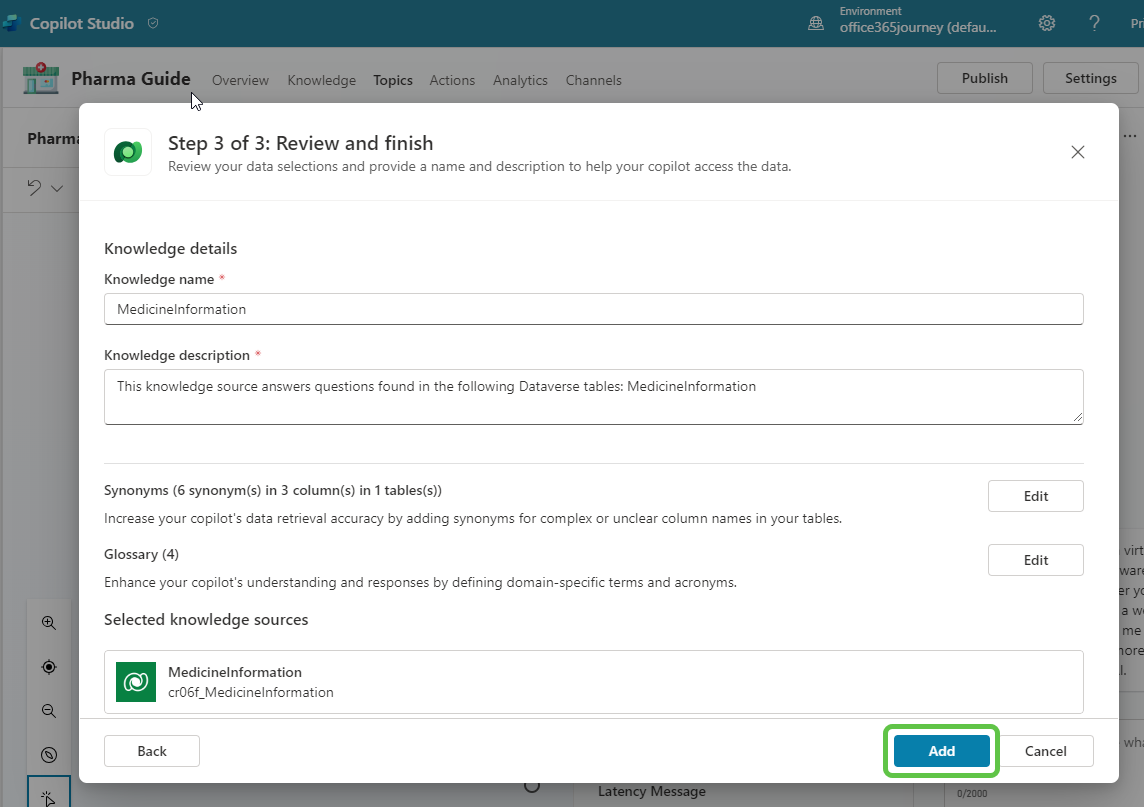
Thus, the Generative answers node is configured. To ensure that the questions are grounded only with the configured Dataverse table, we can:
- Once again, click on Edit data sources.
- Toggle Search only selected sources.
- Check the Dataverse table which we added recently.
- Click on Save.
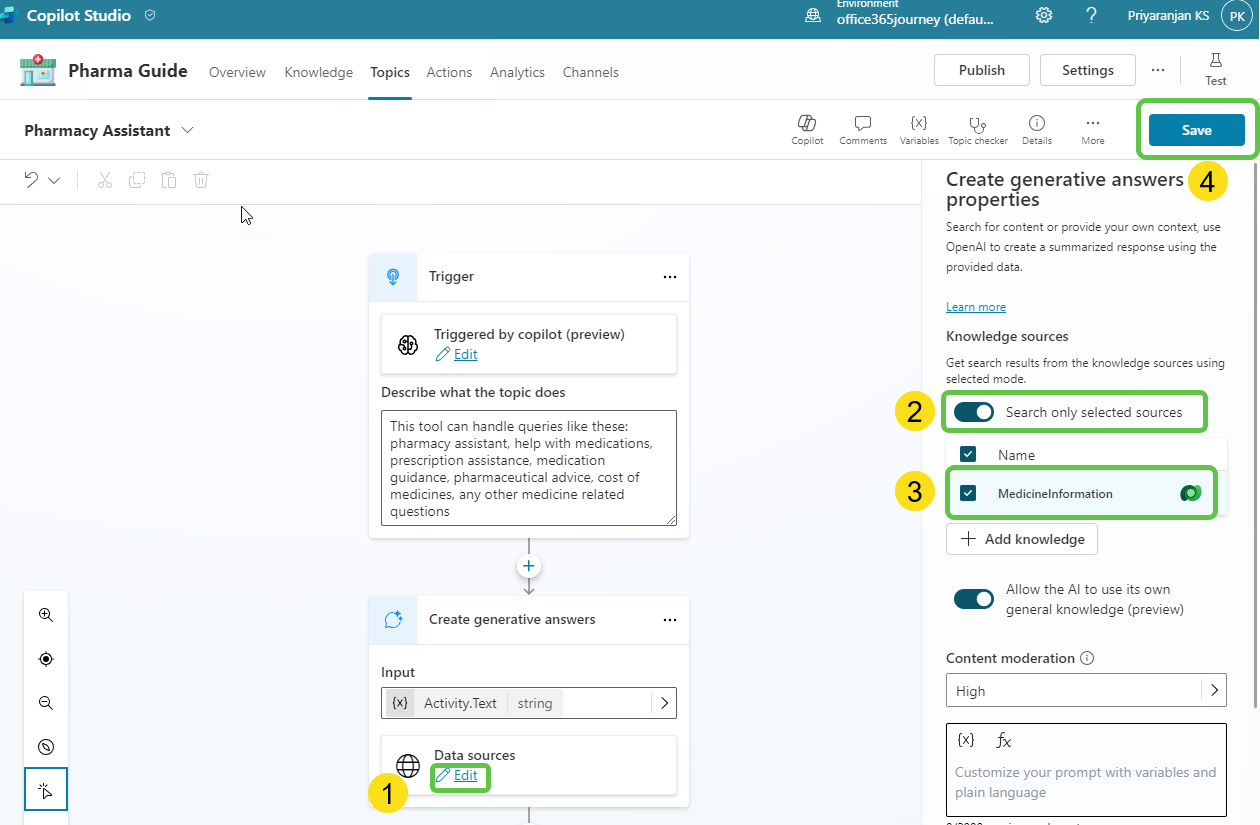
Thus, we have created the topic and the basic pharmacy assistant is all ready to be tested.
Step 6: Authentication
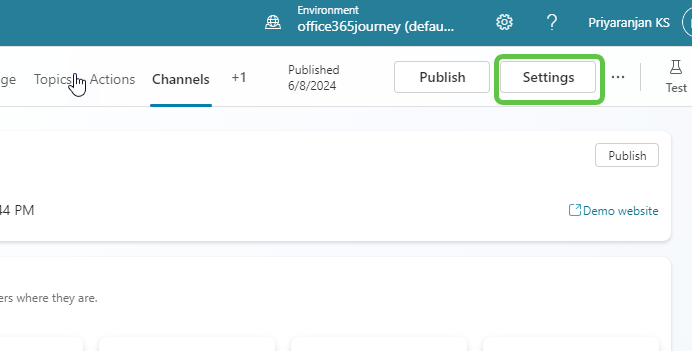
We will embed the Copilot in the Power Pages Channel as part of an end-to-end integration. To do this, we need to enable manual authentication from the Settings section.
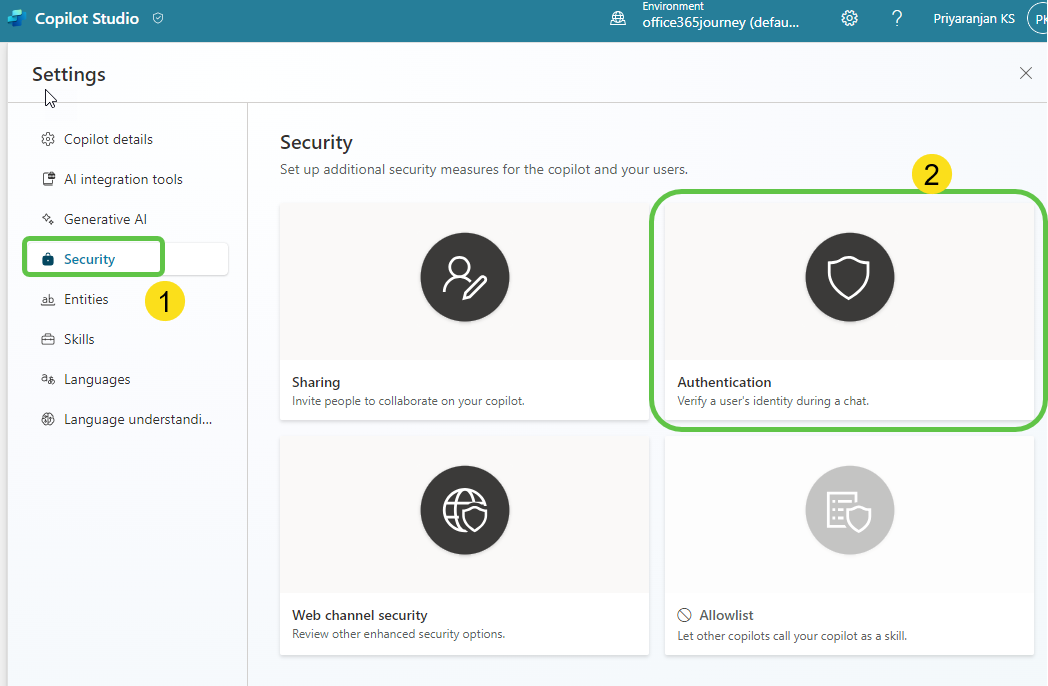
Select Authentication from the Security tab.
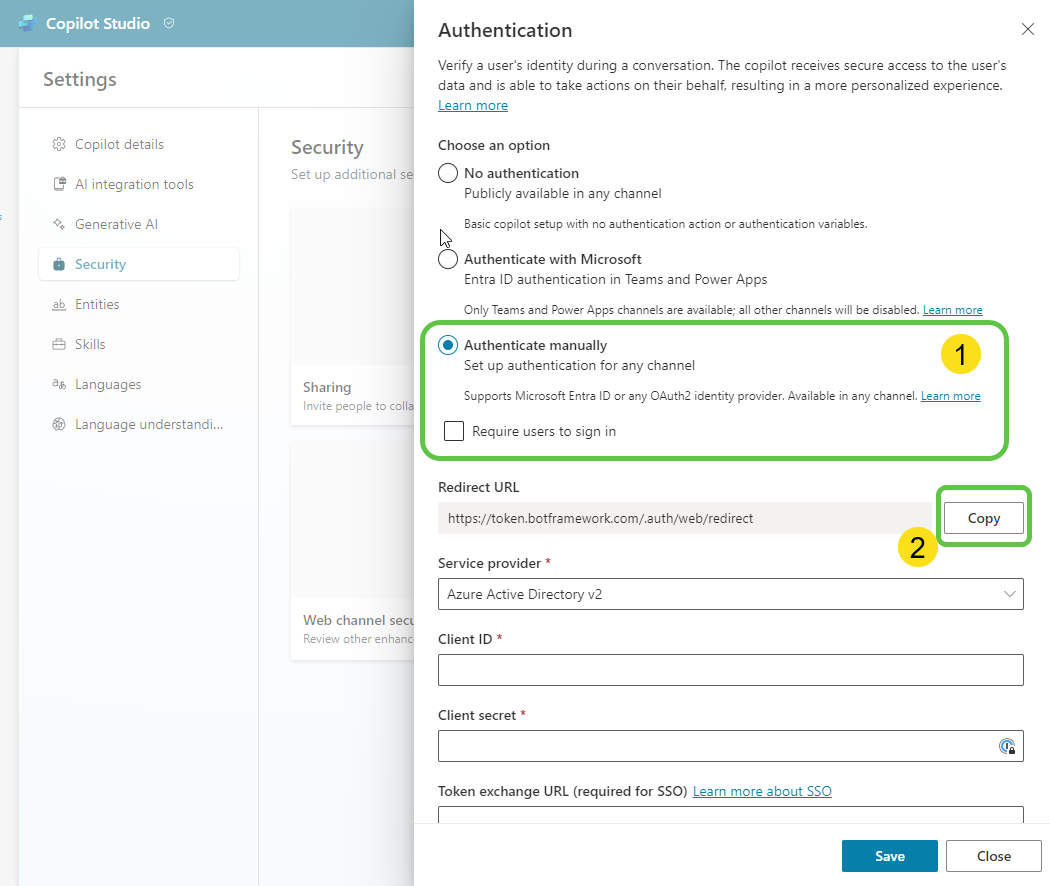
In the Authentication page:
- Select Authenticate manually.
- Copy the Redirect URL as we will need this when we create the app registration in Azure.
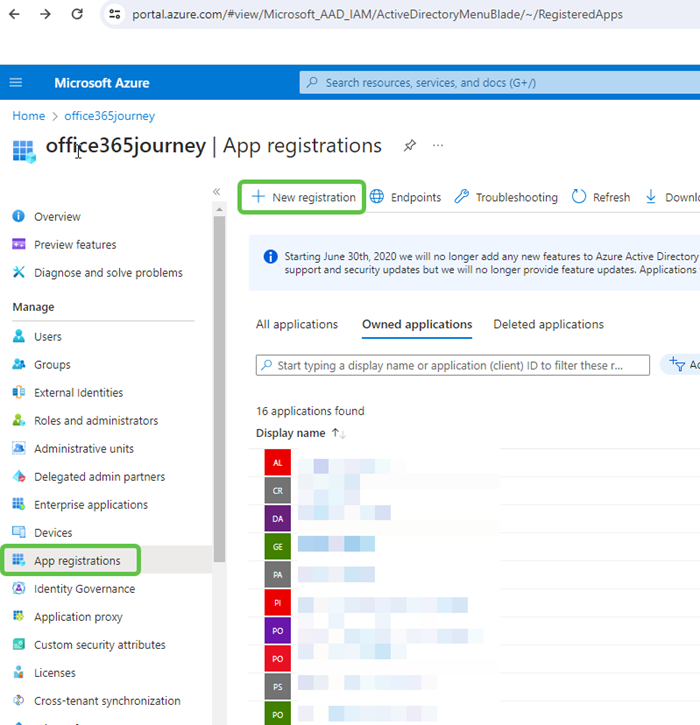
Create App Registration
Head over to Microsoft Entra ID, which will open up the Microsoft Entra ID page. Select App registrations -> New registration.
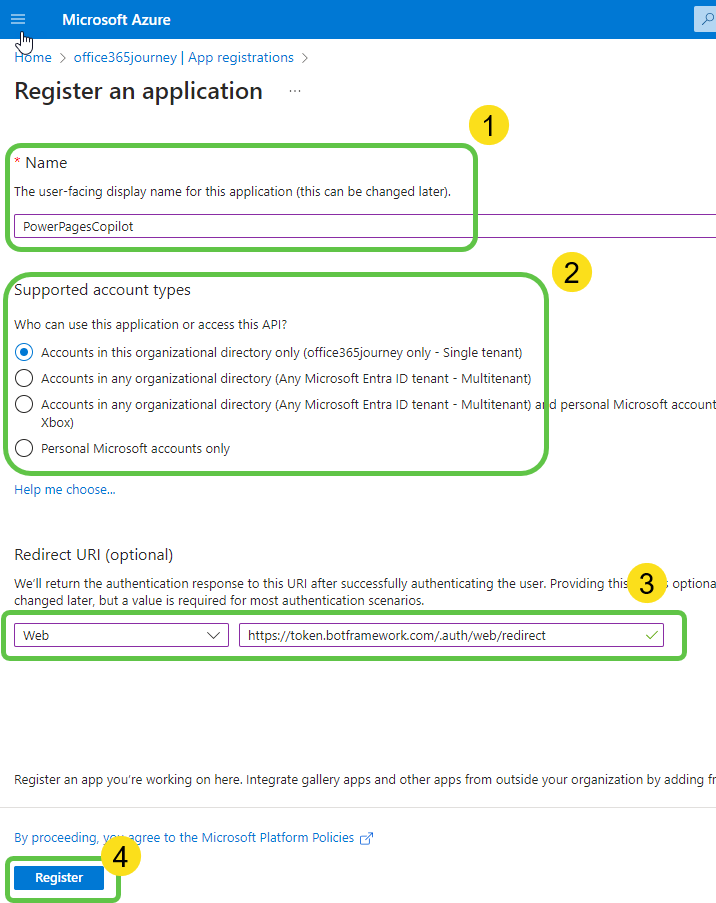
This will open up the page where you can:
- Name the app registration.
- Specify who can access the app registration (e.g., users in the current tenant or external tenant). For this demo, select Accounts in this organizational directory only.
- In Redirect URI, select the platform as Web and paste the URL that we had copied from Copilot studio in the field next to it.
- Click on Register.
The app registration process has created the app object, but we need to do a few more things to ensure that this app can be used to authenticate the user to Dataverse.
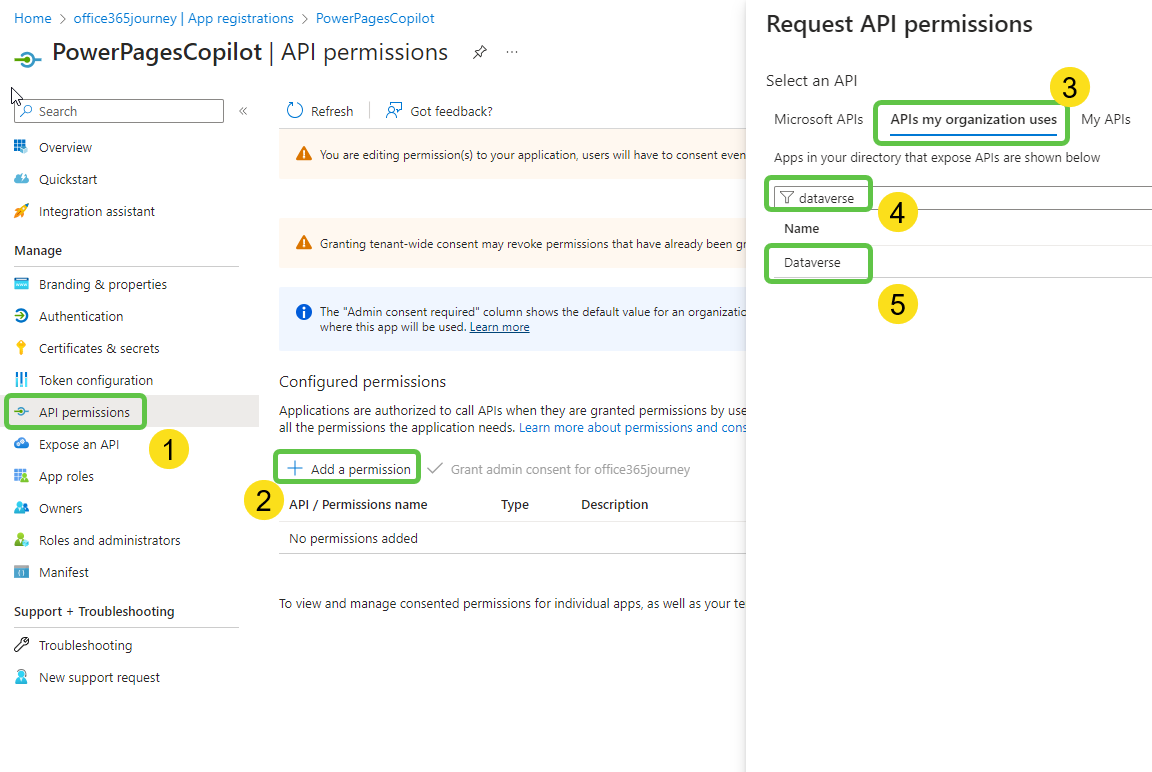
To grant the Dataverse API permission to the app:
- Select API Permissions.
- Click on Add a Permission.
- Select APIs my organization uses.
- Search for Dataverse in the search bar.
- Select the Dataverse API.
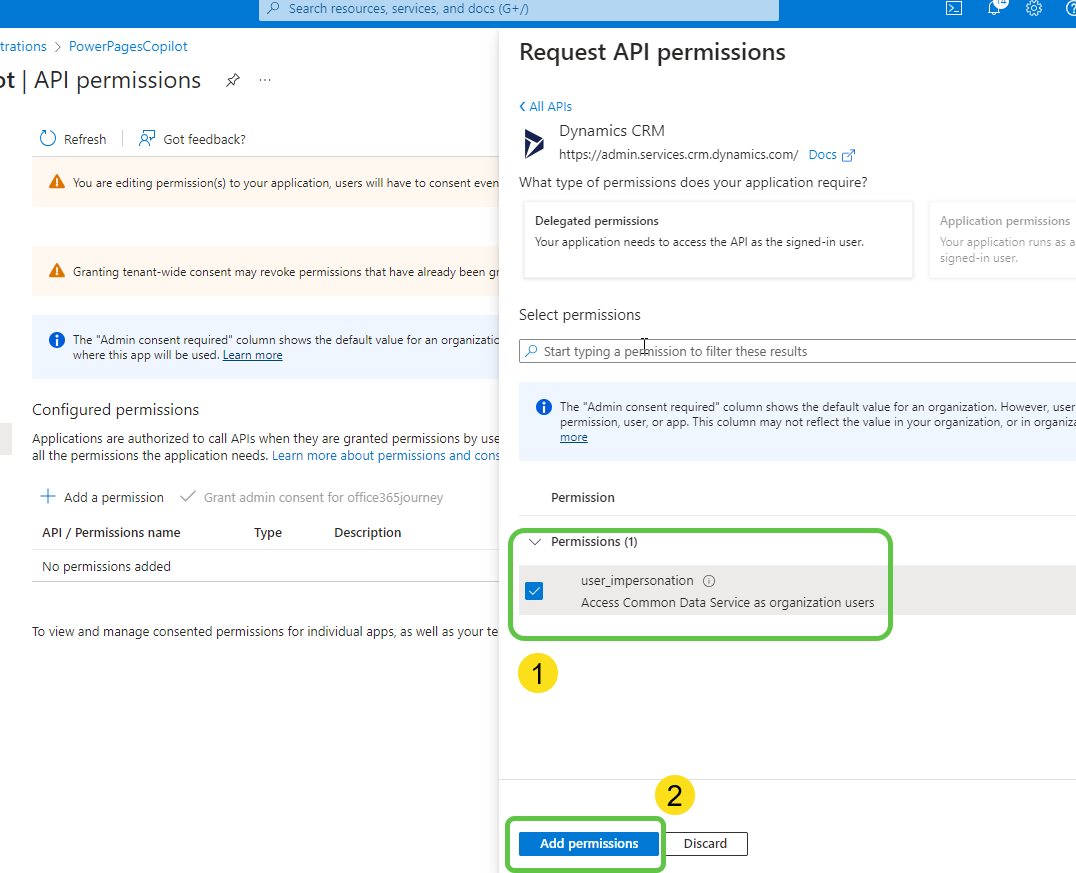
Select user_impersonation and click on Add permissions.
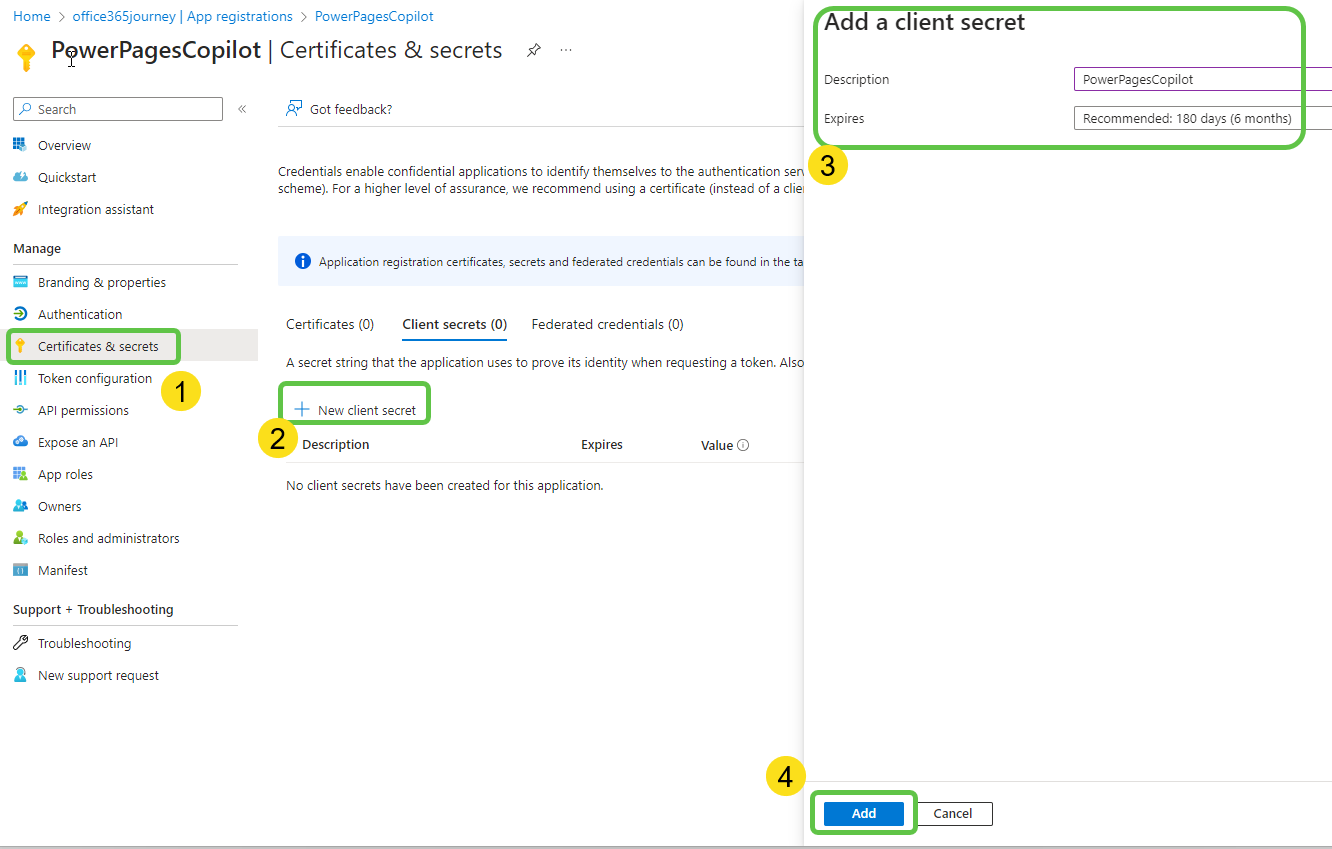
Next, we need to create a client secret by:
- Selecting Certificates & secrets.
- Clicking on New client secret.
- Specifying the description and expiry of the secret.
- Clicking on Add which will create a new secret value.
Copy the secret value and head over to the Authentication page of Copilot.
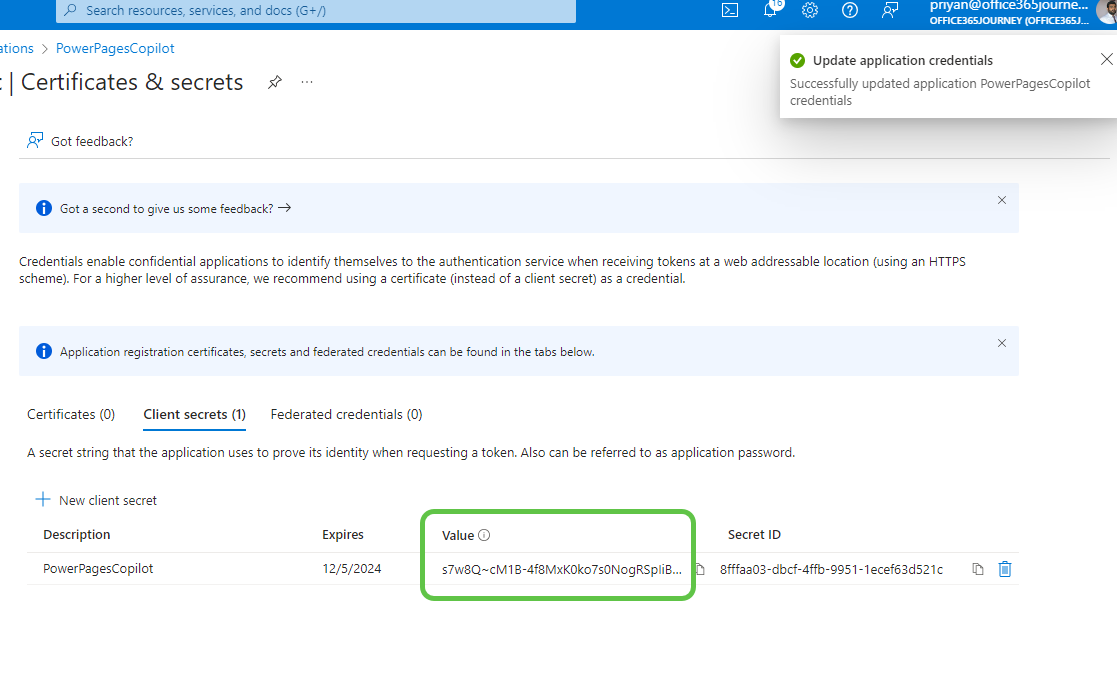
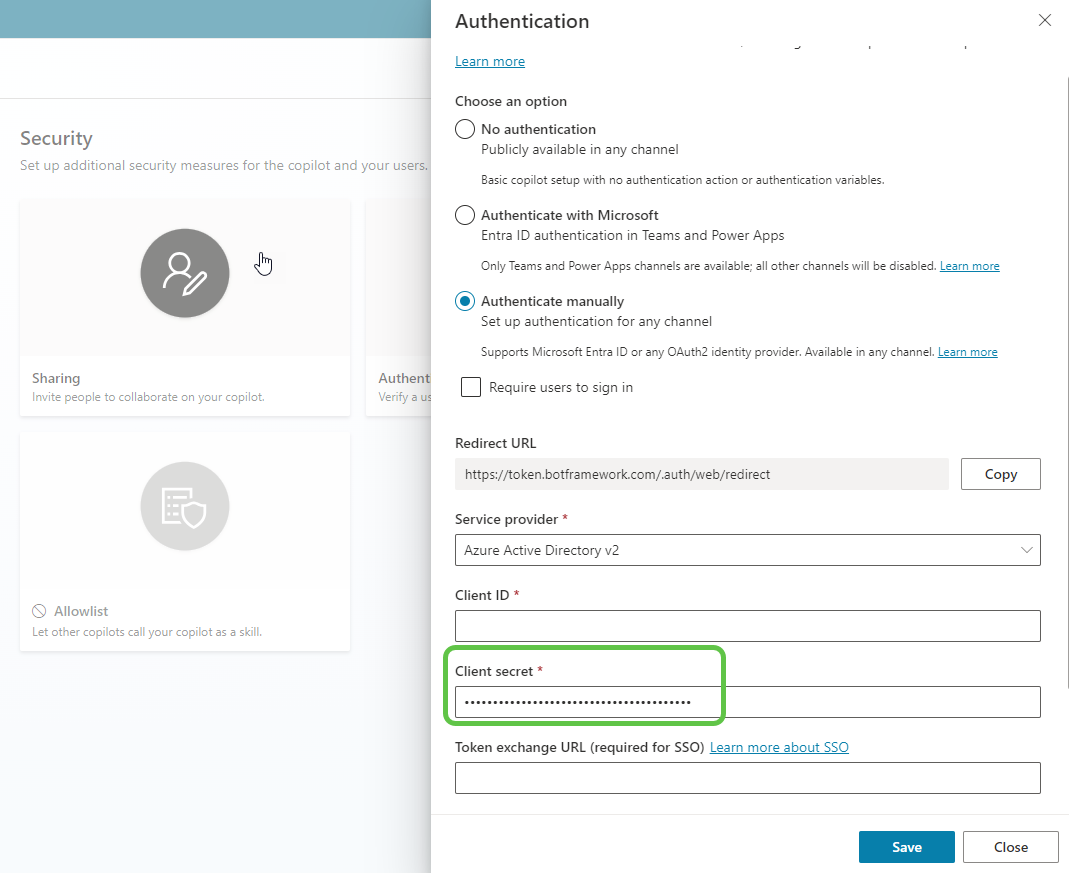
Paste the secret in the client secret field of the authentication page. We need to add the client ID as well.
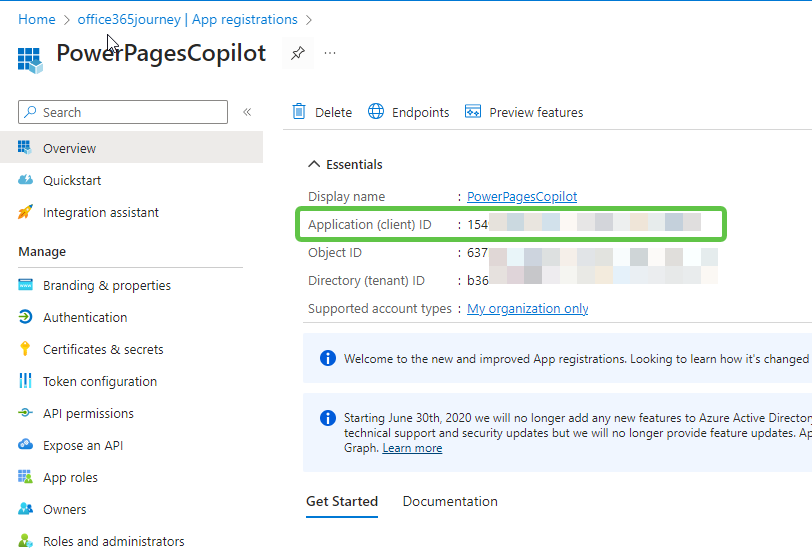
Head back to the Overview page of the Azure app that we registered recently and copy the Application ID.
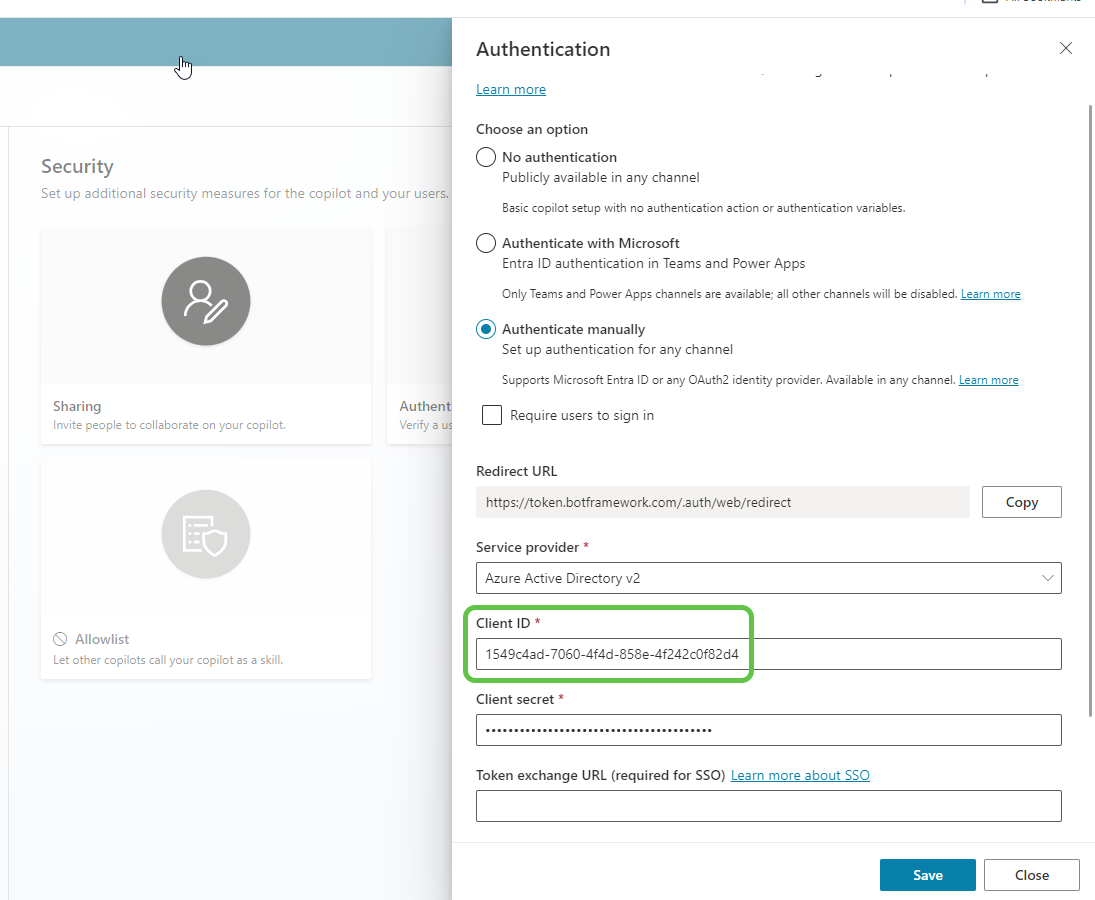
Finally, head back to the copilot and paste the client ID. Click on Save to complete the authentication configuration.
Step 7: Publish to Power Pages
Let’s publish the Copilot and select the embed code from Channels -> Custom Website -> Copy.
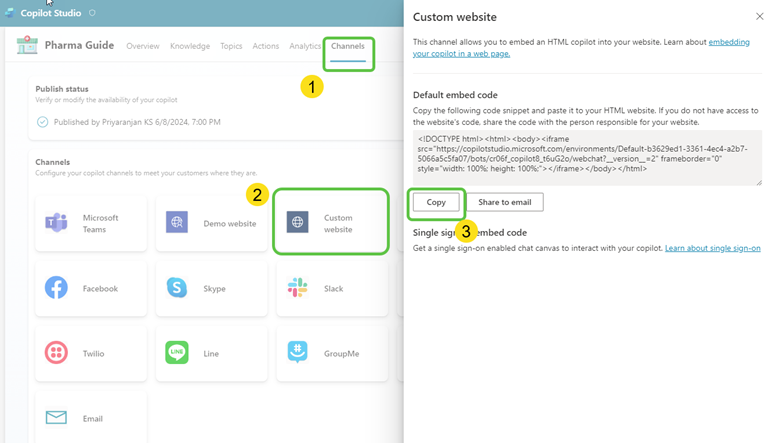
- Head over to the Power Pages site and add the above copied iframe embed code to the HTML of the site using a div
  <div class="pharmagenie">
      <h2>Ask PharmaGenie</h2>
      <div class="copilot-container"><iframe frameborder="0" src="https://copilotstudio.microsoft.com/environments/Default-b3629ed1-3361-4ec4-a2b7-5066a5c5fa07/bots/cr06f_copilot8_2o/webchat?__version__=2" style="width: 100%; height: 500px; border-radius: 10px; box-shadow: 0 4px 8px rgba(0, 0, 0, 0.1);"></iframe></div>
    </div>
  </div>
The Complete HTML used in the Power Pages is given below in case you need to try it out :
<meta charset="UTF-8" /><meta name="viewport" content="width=device-width, initial-scale=1.0" /><title>PharmaGenie Apothecary</title><link rel="stylesheet" href="styles.css" /><link rel="preconnect" href="https://fonts.googleapis.com" /><link rel="preconnect" href="https://fonts.gstatic.com" crossorigin="" /><link href="https://fonts.googleapis.com/css2?family=Montserrat:wght@400;600&display=swap" rel="stylesheet" />
<script>
// JavaScript to hide elements with the class 'footer-bottom'
document.addEventListener("DOMContentLoaded", function() {
const footerElements = document.querySelectorAll('.footer-bottom');
footerElements.forEach(element => {
element.style.display = 'none';
});
});
</script>
<header class="header">
<div class="container header-container">
<img src="/apothecaryrounded.png" alt="PharmaGenie Logo" class="logo" />
<div class="header-content">
<h1>PharmaGenie Apothecary</h1>
<nav class="nav">
<ul>
<li><a href="#home">Home</a></li>
<li><a href="#services">Services</a></li>
</ul>
</nav>
</div>
</div>
</header>
<section id="home" class="hero">
<div class="hero-content">
<h2>Welcome to PharmaGenie Apothecary</h2>
<p>Your trusted source for comprehensive pharmacy assistance and medication information.</p>
<button onclick="scrollToServices()" class="cta-button">Explore Our Services</button>
</div>
</section>
<section id="main-content" class="main-content">
<div class="container">
<div class="services">
<h2>Our Services</h2>
<div class="service-list">
<div class="service-item">
<img src="/medicalinfo.png" alt="Medication Information" class="service-image" />
<div class="service-description">
<h3>Medication Information</h3>
<p>Get detailed information about various medications, including their prices, effects, and alternatives.</p>
</div>
</div>
<div class="service-item">
<img src="/personalized.png" alt="Personalized Consultation" class="service-image" />
<div class="service-description">
<h3>Personalized Consultation</h3>
<p>Chat with PharmaGenie for personalized advice and get answers to your pharmaceutical queries based on your specific needs.</p>
</div>
</div>
<div class="service-item">
<img src="/wellness.png" alt="Health and Wellness Tips" class="service-image" />
<div class="service-description">
<h3>Health and Wellness Tips</h3>
<p>Receive valuable health tips and recommendations for managing your medication effectively and maintaining overall well-being.</p>
</div>
</div>
</div>
</div>
<div class="pharmagenie">
<h2>Ask PharmaGenie</h2>
<div class="copilot-container"><iframe frameborder="0" src="https://copilotstudio.microsoft.com/environments/Default-b3629ed1-3361-4ec4-a2b7-5066a5c5f7/bots/cr06f_copilot8_t6uG2o/webchat?__version__=2" style="width: 100%; height: 500px; border-radius: 10px; box-shadow: 0 4px 8px rgba(0, 0, 0, 0.1);"></iframe></div>
</div>
</div>
</section>
<script>
function scrollToServices() {
document.getElementById('main-content').scrollIntoView({ behavior: 'smooth' });
}
</script>
<div class="row sectionBlockLayout text-left" style="display: flex; flex-wrap: wrap; margin: 0px; min-height: auto; padding: 8px;">
<div class="container" style="padding: 0px; display: flex; flex-wrap: wrap;"><div class="col-md-12 columnBlockLayout" style="flex-grow: 1; display: flex; flex-direction: column; min-width: 250px; word-break: break-word;"></div></div>
</div>
- The CSS used for the site is also given below in case you want to try it out.
/* styles.css */

/* General Styles */
body {
    margin: 0;
    font-family: 'Montserrat', sans-serif;
    color: #333;
    background-color: #f0f0f3;
    display: flex;
    flex-direction: column;
    align-items: center;
    justify-content: center;
}

.container {
    width: 90%;
    margin: auto;
    display: flex;
    flex-wrap: wrap;
}

/* Header Styles */
.header {
    width: 100%;
    background-color: #f0f0f3;
    padding: 1em 0;
    box-shadow: 0 4px 6px rgba(0, 0, 0, 0.1);
    text-align: center;
}

.header-container {
    display: flex;
    align-items: center;
    justify-content: center;
}

.logo {
    width: 100px;
    height: 100px;
    margin-right: 15px;
}

.header-content {
    text-align: center;
}

.header h1 {
    margin: 0;
    font-weight: 600;
    color: #4a4a4a;
}

.nav {
    margin-top: 10px;
}

.nav ul {
    list-style: none;
    padding: 0;
    display: flex;
    justify-content: center;
    gap: 20px;
}

.nav ul li a {
    text-decoration: none;
    color: #4a4a4a;
    font-weight: 600;
}

.nav ul li a:hover {
    color: #007bff;
}

/* Hero Section */
.hero {
    width: 100%;
    padding: 2em 0;
    text-align: center;
    background-color: #f0f0f3;
}

.hero-content {
    max-width: 600px;
    margin: auto;
    background: #e0e0e0;
    box-shadow: 7px 7px 20px #bebebe, -7px -7px 20px #ffffff;
    padding: 2em;
    border-radius: 15px;
}

.hero h2 {
    font-size: 2em;
    margin: 0;
    color: #4a4a4a;
}

.hero p {
    font-size: 1.2em;
    color: #4a4a4a;
}

.cta-button {
    margin-top: 20px;
    padding: 10px 20px;
    font-size: 1em;
    color: #fff;
    background-color: #007bff;
    border: none;
    border-radius: 25px;
    box-shadow: 7px 7px 20px #bebebe, -7px -7px 20px #ffffff;
    cursor: pointer;
}

.cta-button:hover {
    background-color: #0056b3;
}

/* Main Content Section */
.main-content {
    width: 100%;
    padding: 2em 0;
    display: flex;
    justify-content: space-between;
    background-color: #f0f0f3;
    gap: 20px;
    align-items: stretch;
}

/* Services Section */
.services {
    flex: 1;
    min-width: 300px;
    padding-right: 20px;
    display: flex;
    flex-direction: column;
    justify-content: space-between;
}

.services h2 {
    font-size: 1.8em;
    color: #4a4a4a;
    margin-bottom: 1em;
}

.service-list {
    display: flex;
    flex-direction: column;
    gap: 20px;
    flex: 1;
}

.service-item {
    display: flex;
    align-items: center;
    background: #e0e0e0;
    box-shadow: 7px 7px 20px #bebebe, -7px -7px 20px #ffffff;
    padding: 1.5em;
    border-radius: 15px;
    text-align: left;
    gap: 20px;
}

.service-image {
    width: 75px;
    height: 75px;
    object-fit: cover;
    border-radius: 10px;
    box-shadow: 3px 3px 10px rgba(0, 0, 0, 0.1);
}

.service-description {
    flex: 1;
}

.service-item h3 {
    font-size: 1.4em;
    color: #4a4a4a;
    margin-bottom: 10px;
}

.service-item p {
    font-size: 1em;
    color: #4a4a4a;
}

/* PharmaGenie Section */
.pharmagenie {
    flex: 1;
    min-width: 300px;
    padding-left: 20px;
    display: flex;
    flex-direction: column;
    justify-content: center;
}

.pharmagenie h2 {
    font-size: 1.8em;
    color: #4a4a4a;
    margin-bottom: 1em;
    text-align: center;
}

.copilot-container {
    width: 100%;
    background: #e0e0e0;
    box-shadow: 7px 7px 20px #bebebe, -7px -7px 20px #ffffff;
    padding: 1em;
    border-radius: 15px;
    flex: 1;
}
-
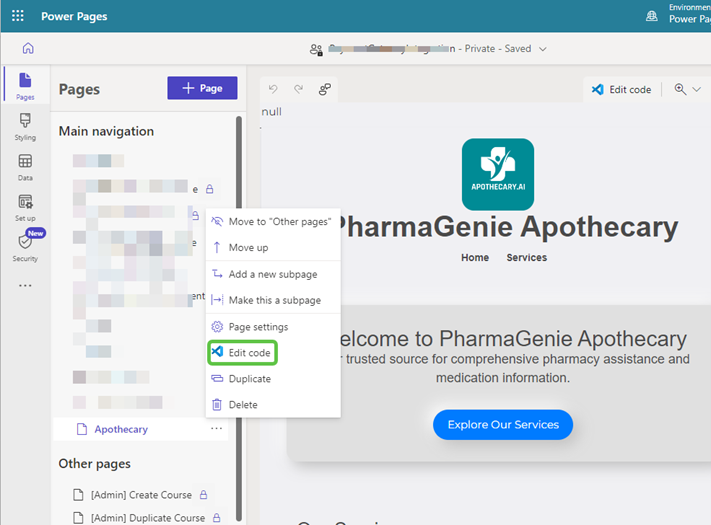
You can open the page in VSCode using the Edit Code option.
-
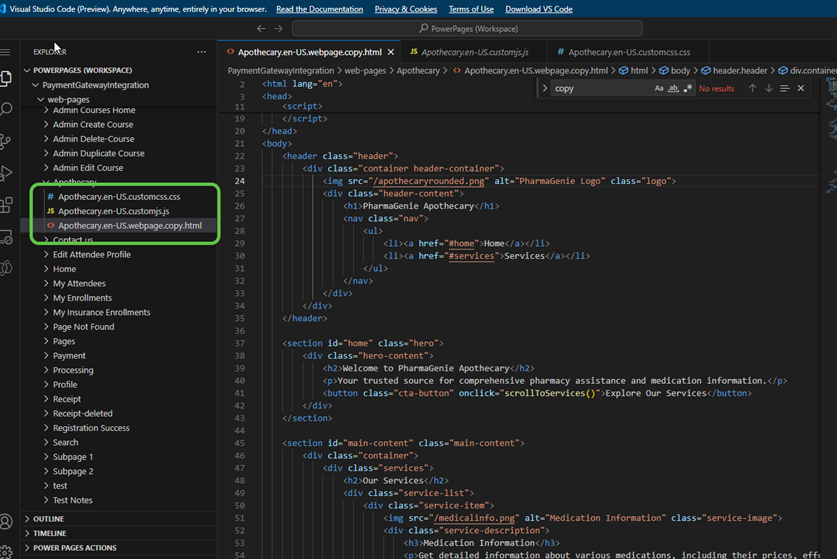
Add the above HTML and CSS to the VS Code and save it.
-
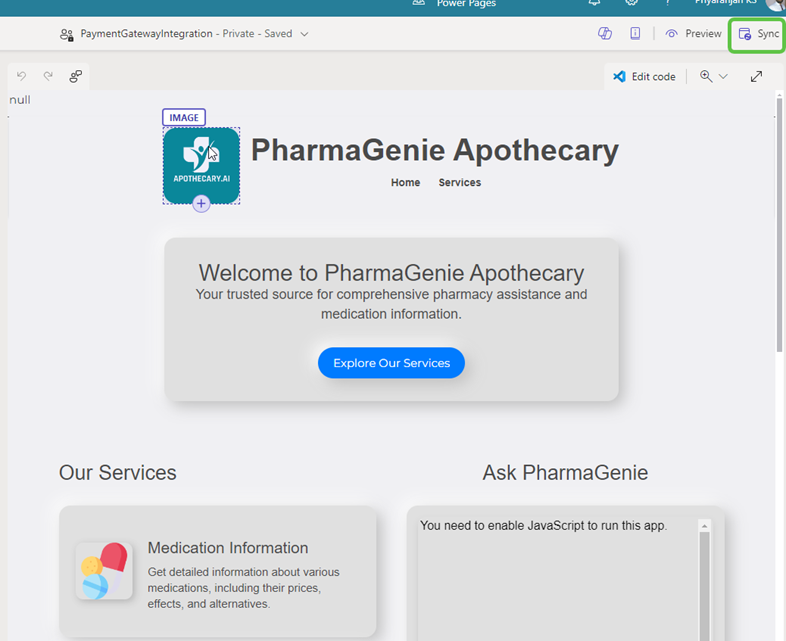
Now head back to the Power Pages site and sync it for the changes to be reflected.
Step 8: Test the Copilot
-
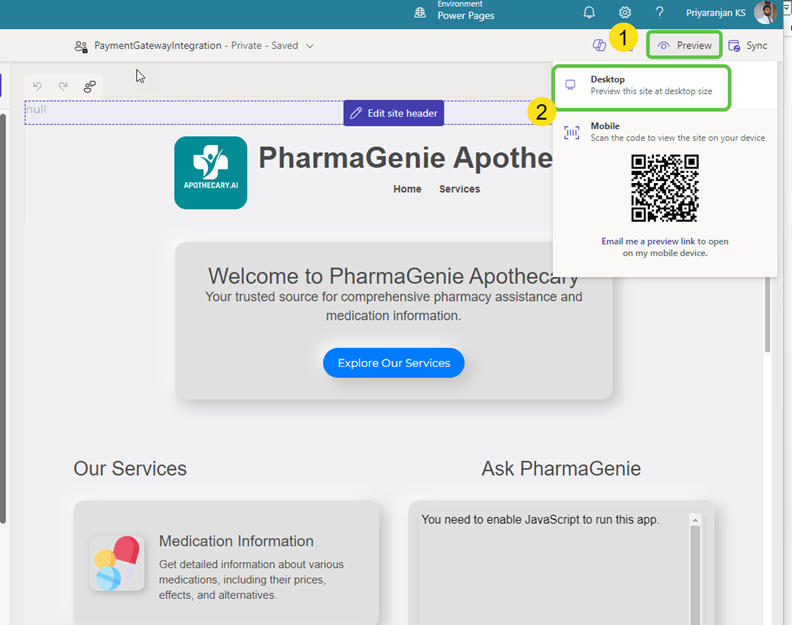
Click on Preview -> Desktop to test the added copilot in the Power Pages site.
-
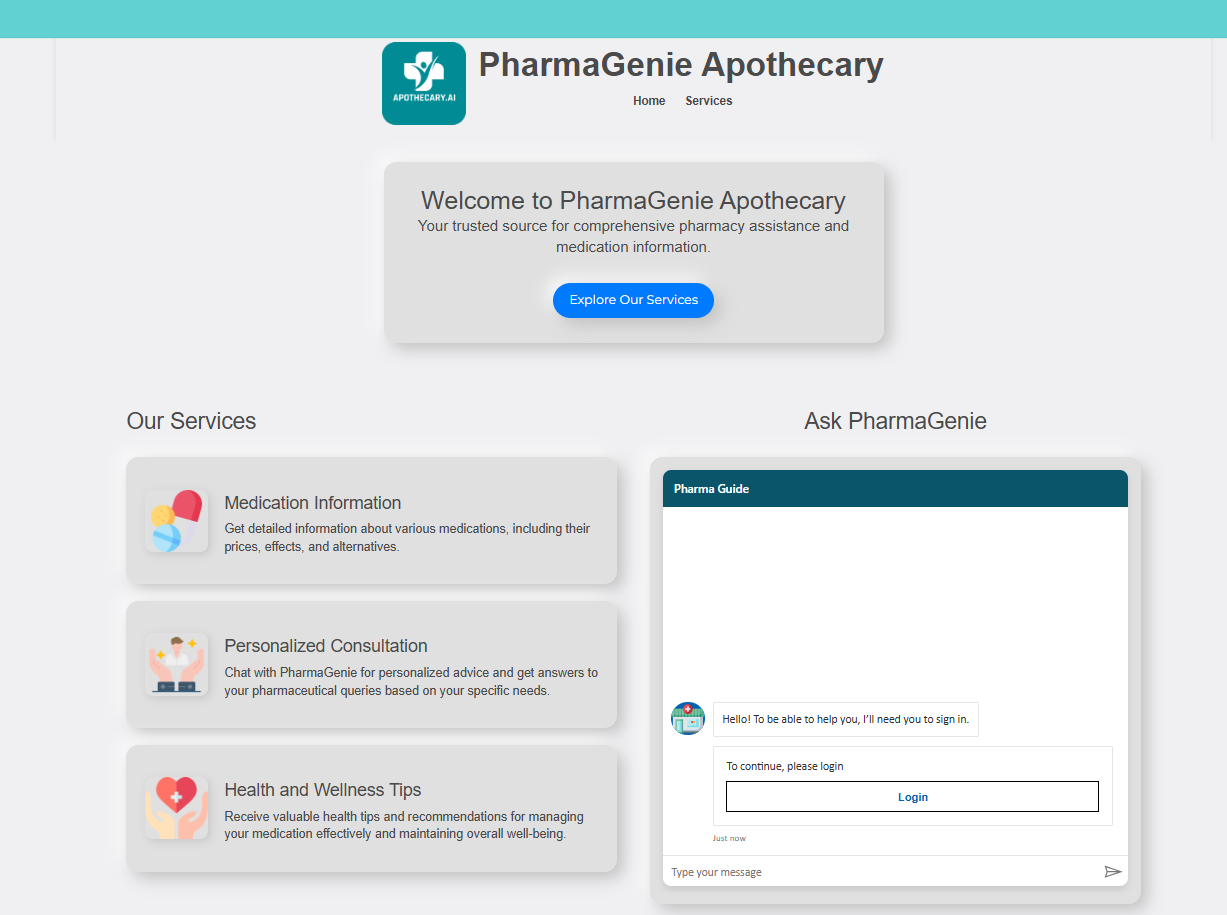
This will open up the page and you will see that the Copilot component has come up on the page.
-
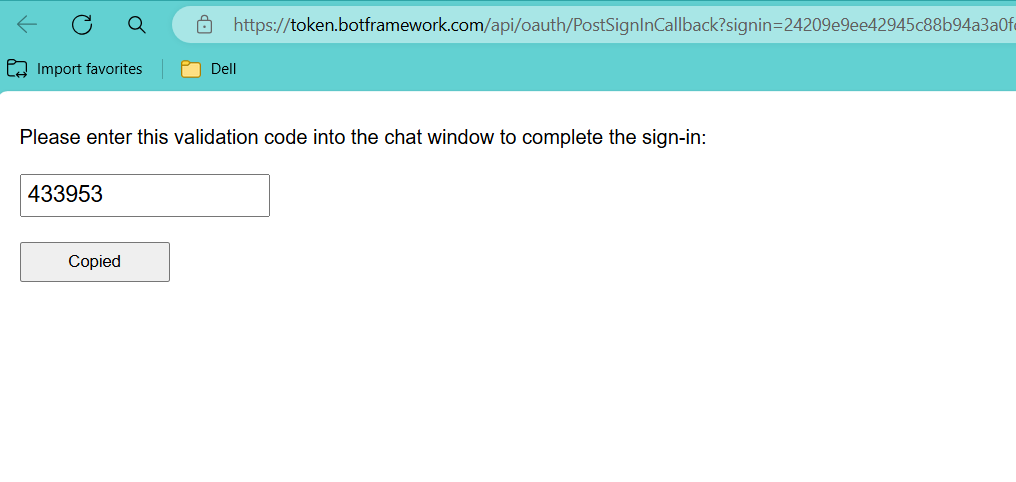
Lets Log in first which will invoke the manual authentication where we will copy the token generated
-
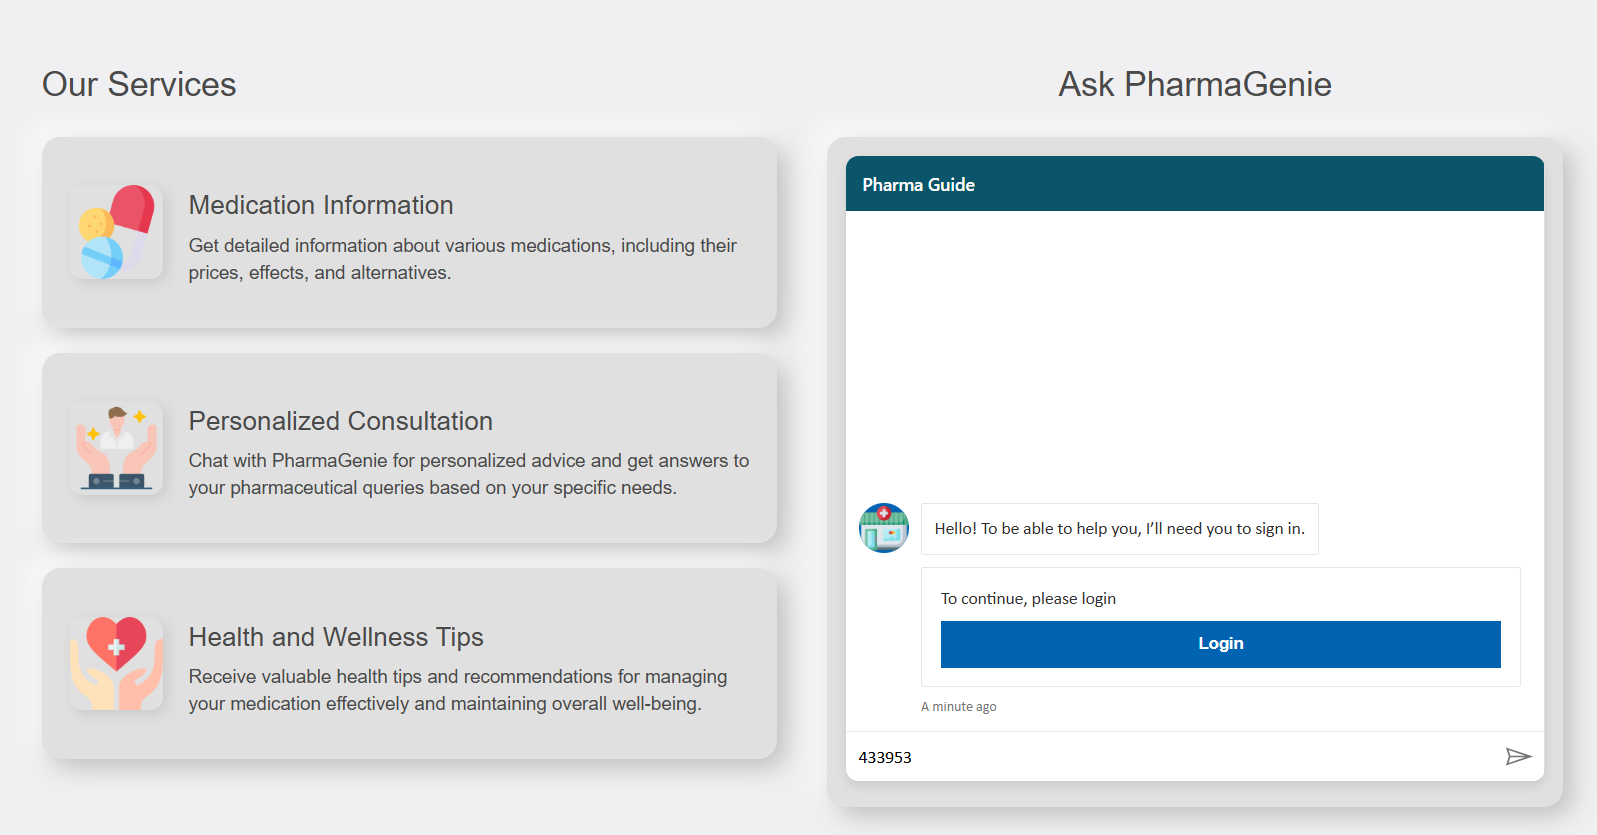
We will paste the token and press Enter
-
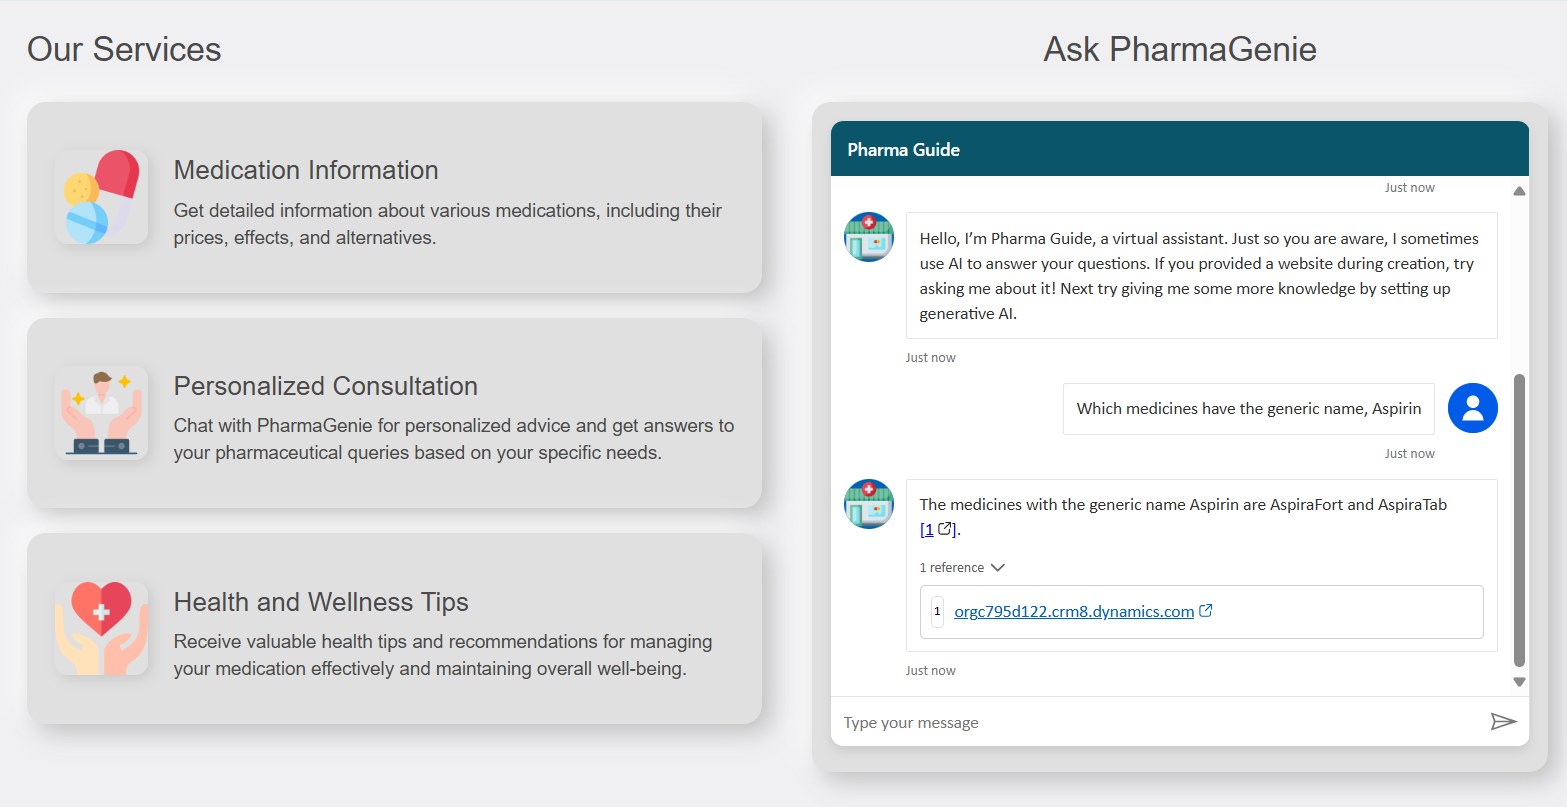
Let’s initiate the conversation and ask a few pharmacy-related questions. First lets ask which medicines have the generic name as Aspirin. It will fetch the 2 medicines that matches this query from dataverse and it will also provides the citation link to the view of the table where we can see the medicine details
-
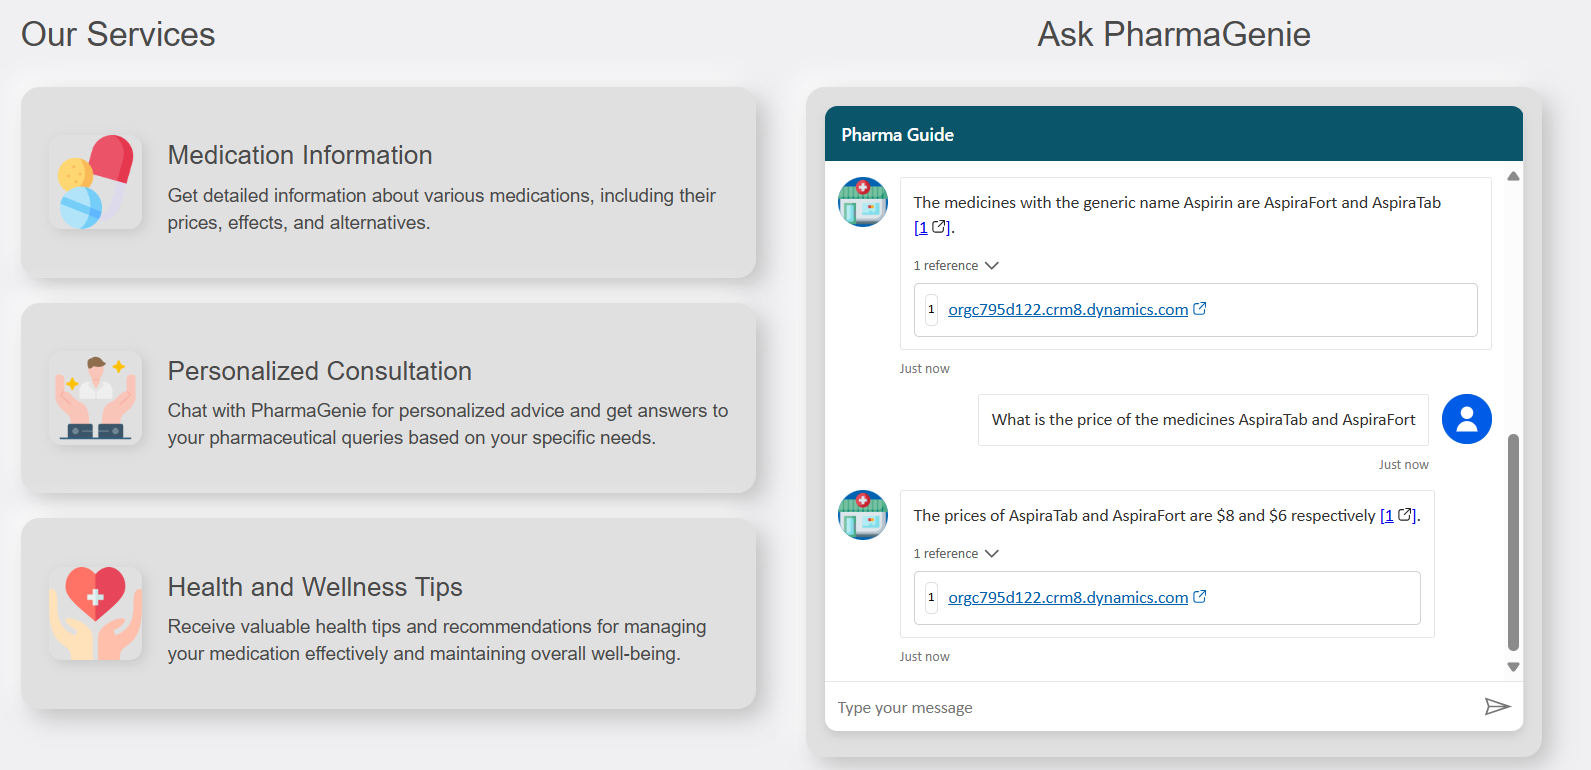
Now lets ask the unit price for these medicines and we can see that the respective contextual answers are fetched from the back end table and shown to us
-
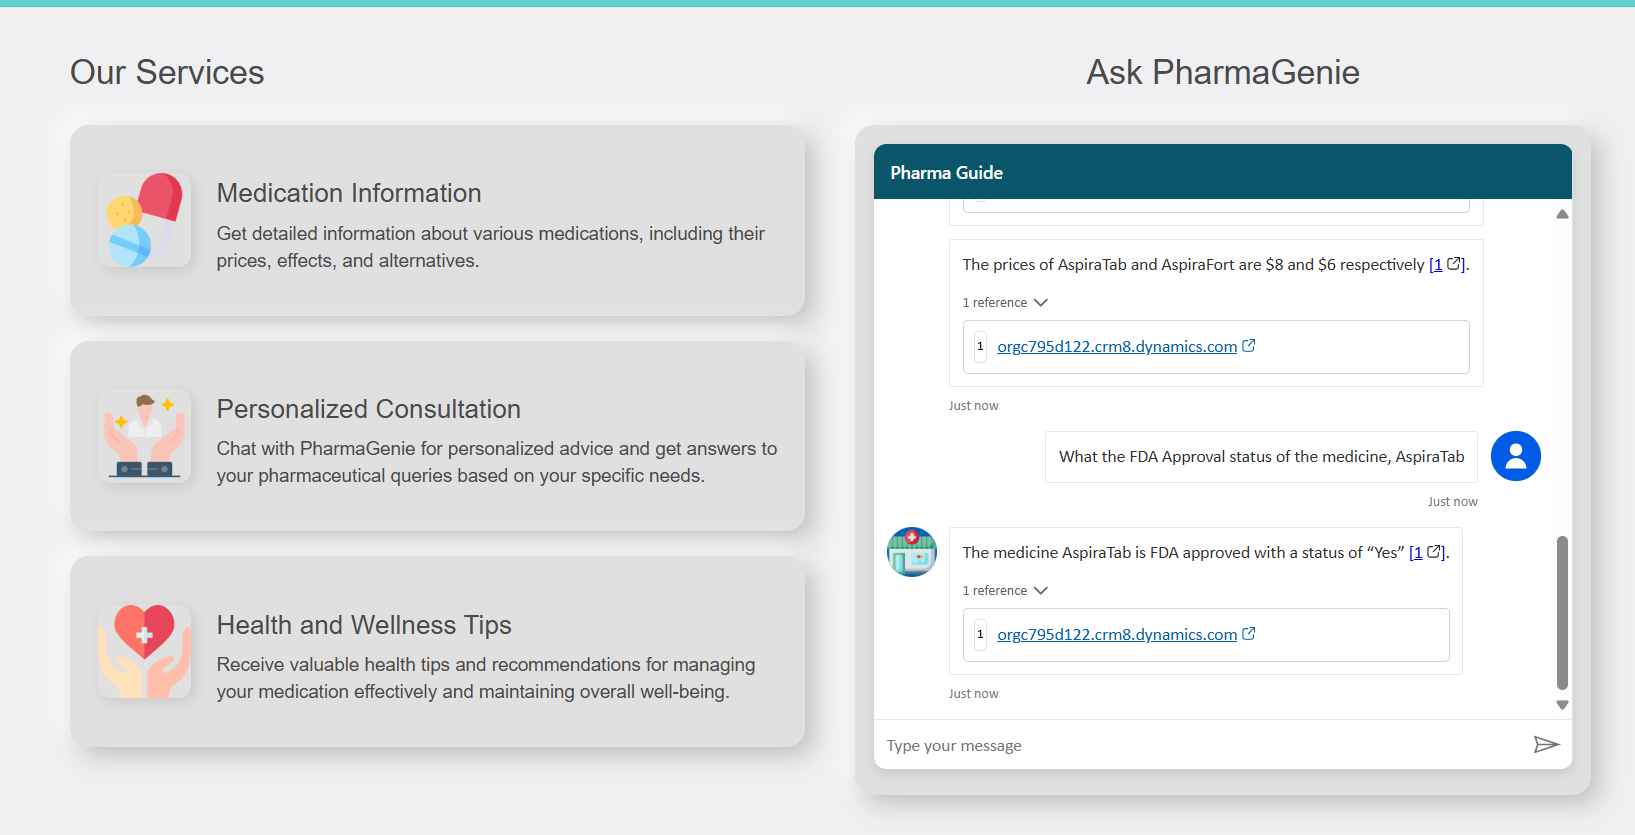
Finally , lets check if the medicine has an FDA approval and we get the related answer back in a conversational way.
Conclusion
By following these steps, we’ve successfully built a robust Pharmacy Assistant Copilot that seamlessly integrates with Dataverse and delivers accurate, real-time medication information. Using Power Pages, we can easily embed this Copilot into a user-friendly website, making it accessible to healthcare professionals.


