Table of Contents
- Introduction
- User Interaction Process Flow
- Technologies Involved
- Prerequisites
- Demo
- Step 1: Get the Gemini API Key
- Step 2: Create a Custom Connector in Power Automate
- Testing the Connector
- Step 3: Create Copilot
- Step 4: Enable Generative Selection of Topics
- Step 5: Create Topics
- Step 6: Create the Prompt and Assign it to the Variable
- Step 7: Add the Google Gemini Custom Connector as an Action
- Test the Copilot
- Conclusion
Introduction
In this blog, we will explore how to create a custom connector for the Google Gemini API in Microsoft Power Platform and use it within Copilot to build a dynamic Meal and Fitness Advisor. This process leverages advanced AI capabilities to generate personalized recommendations based on user inputs such as meal preferences and fitness goals.
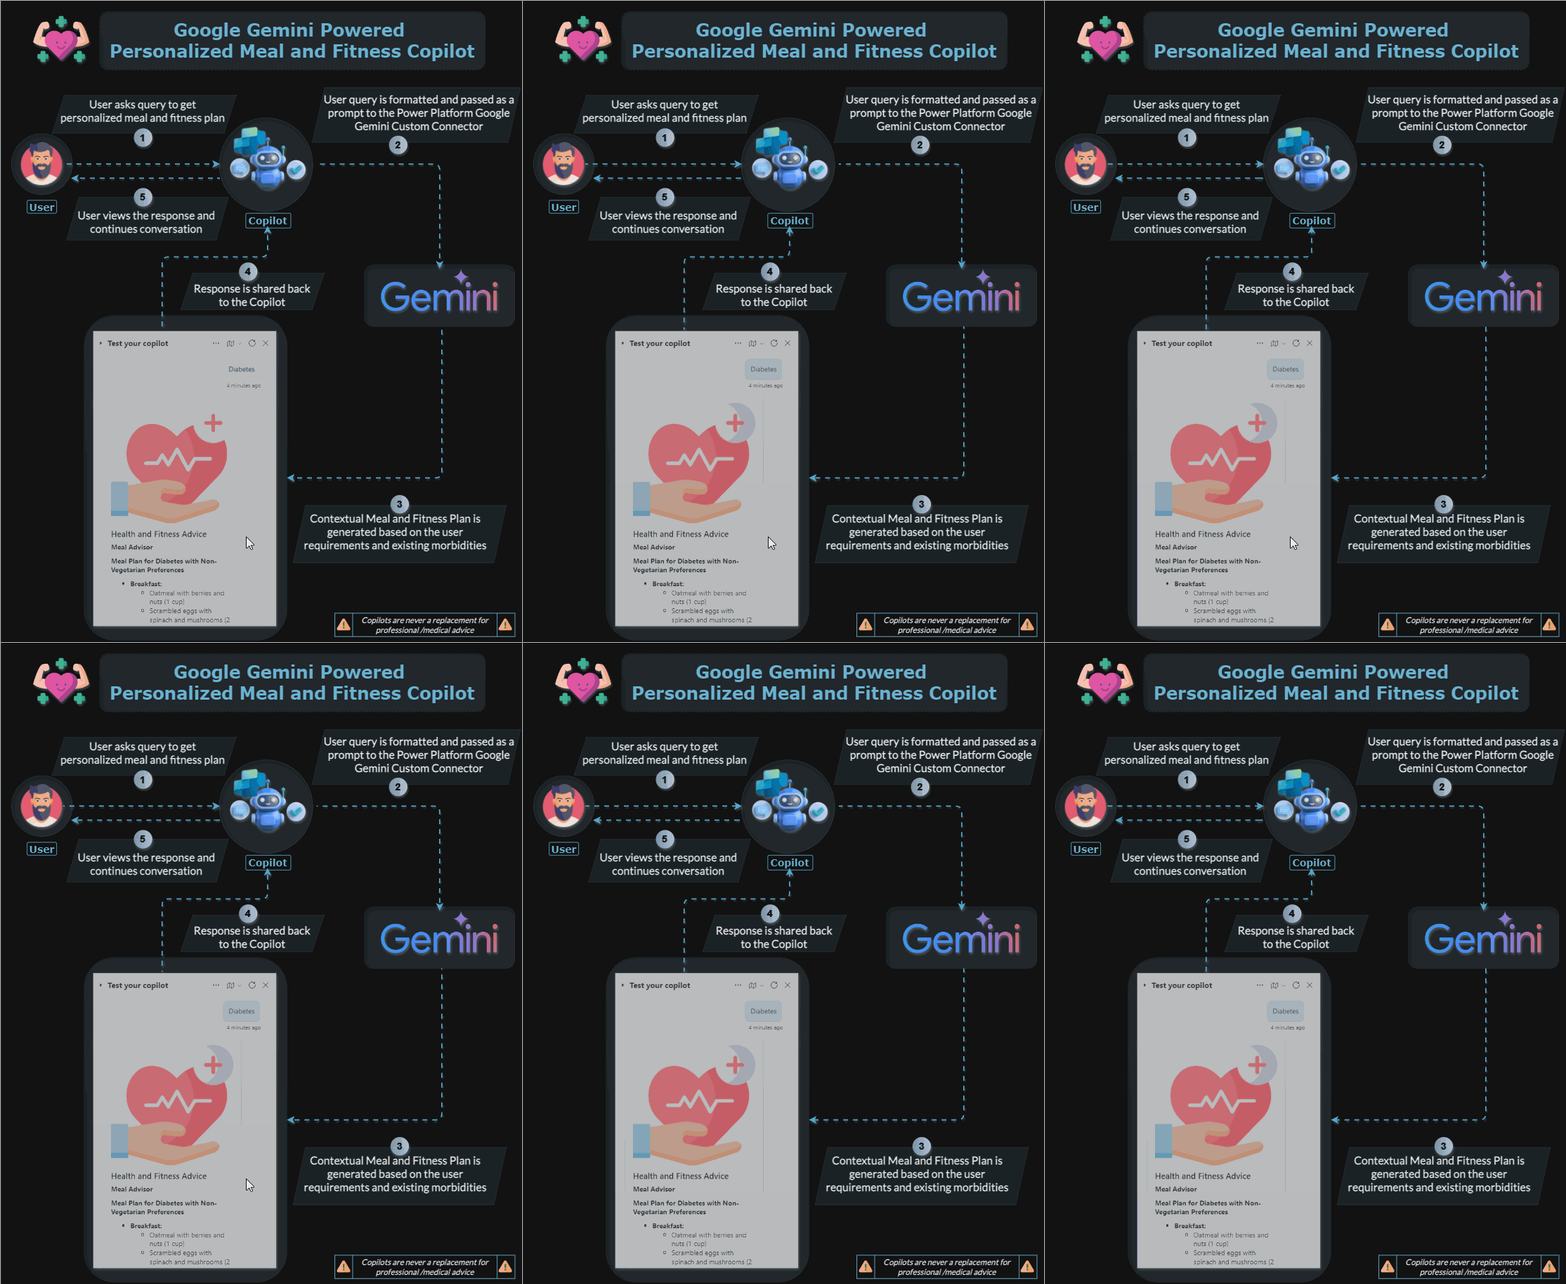
The user can ask personalized Meal and Fitness plan and the Copilot will use Google Gemini API connector to provide back the contextual plan back to the user.
User Interaction Process Flow
The overall process flow will be as follows :
- User Query: User asks the Copilot for a personalized meal and fitness plan.
- Query Formatting: Copilot formats the user’s query and sends it to the Google Gemini Custom Connector.
- Response Generation: Google Gemini API generates a contextual meal and fitness plan based on the user’s inputs.
- Response Handling: The response is sent back to the Copilot.
- User Interaction: User views the personalized meal and fitness plan and continues the conversation.
Technologies Involved
- Google Gemini API: Used for generating personalized content based on user inputs.
- Microsoft Power Automate: To create a custom connector that interacts with the Google Gemini API.
- Copilot Studio: To create and manage the Copilot bot.
- Microsoft Teams: The platform where the Copilot will be deployed and used.
We will follow these steps to achieve our goal:
- Obtain the API key from Google AI Studio.
- Create a custom connector to interact with the Google Gemini API.
- Develop a Copilot in Copilot Studio that utilizes this custom connector to get the personalized Meal and Fitness Plan.
Prerequisites
- Access to the Google Gemini API and API keys.
- Access to Microsoft Power Automate and Copilot Studio.
Demo
Watch the demo video below to see how the Meal and Fitness Plan Advisor Copilot works.
Step 1: Get the Gemini API Key
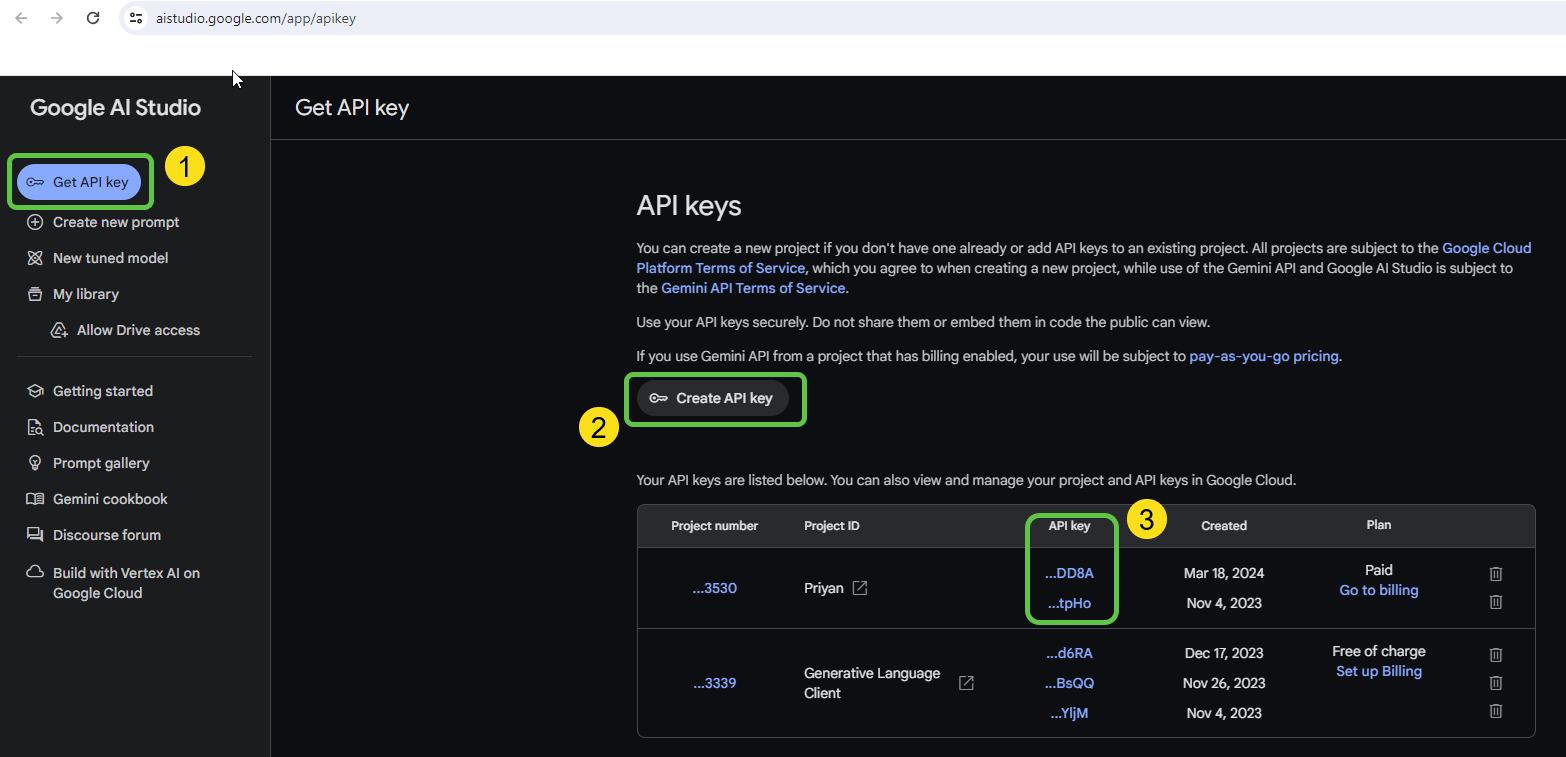
Head over to the Google AI Studio and get your API key by clicking on Create API Key, which can be used to authenticate the Google Gemini API.
Step 2: Create a Custom Connector in Power Automate
-
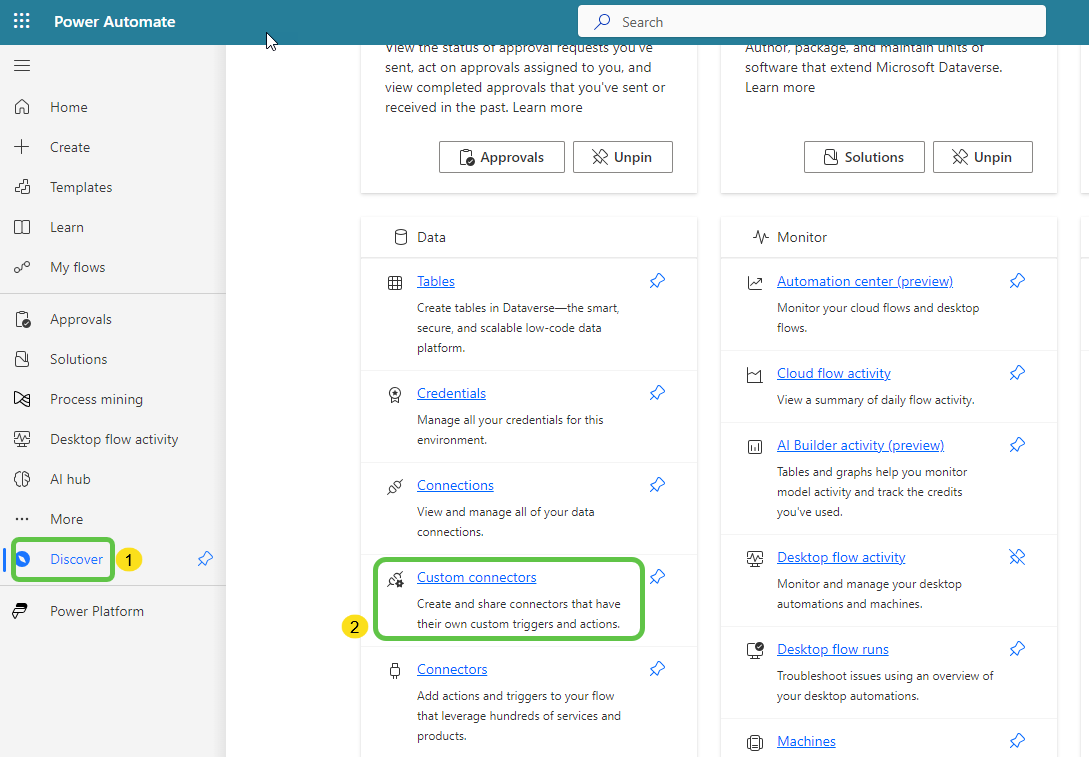
Head over to Power Automate and from the Discover menu, select Custom Connectors.
-
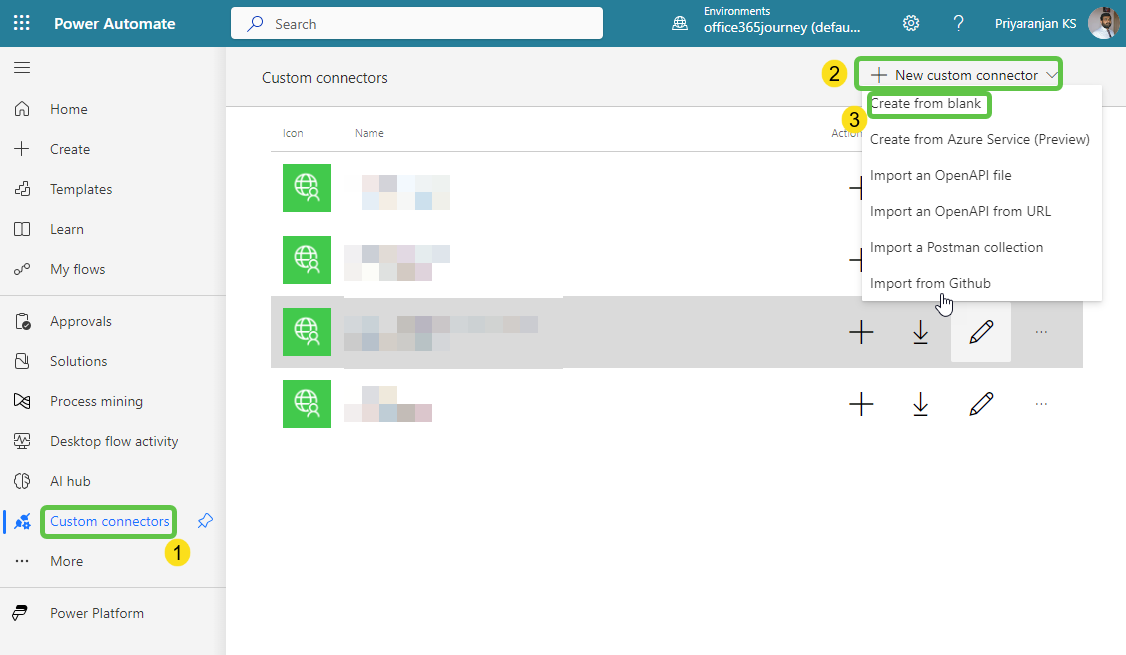
Click on New custom connector and select Create from blank to provision a connector from scratch.
-
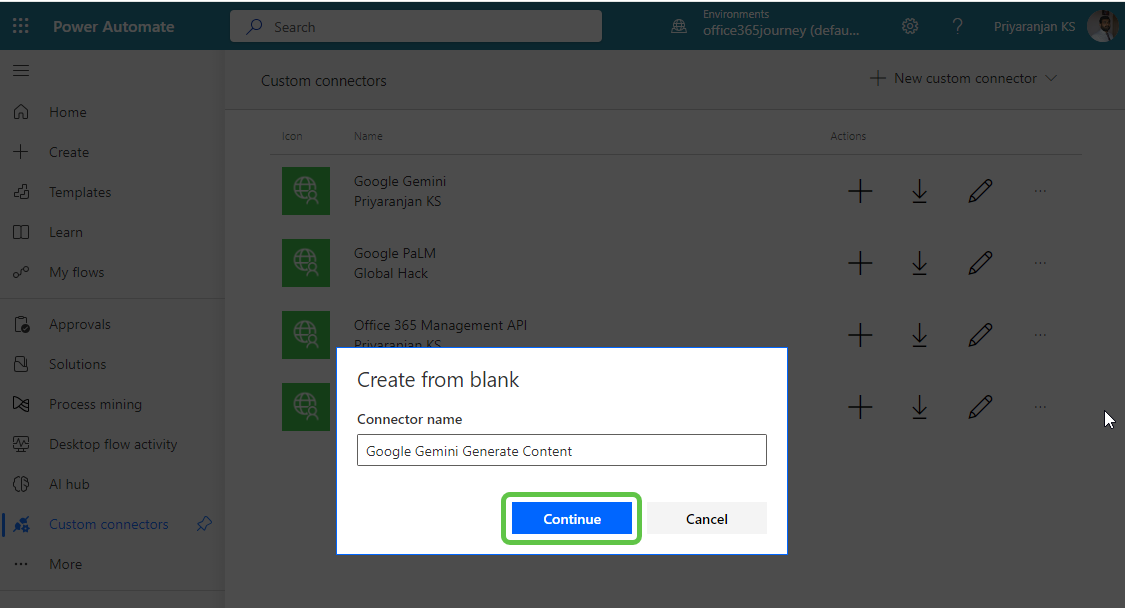
Mention the API connector name as Google Gemini Generate Content in the pop-up and click on Next.
-
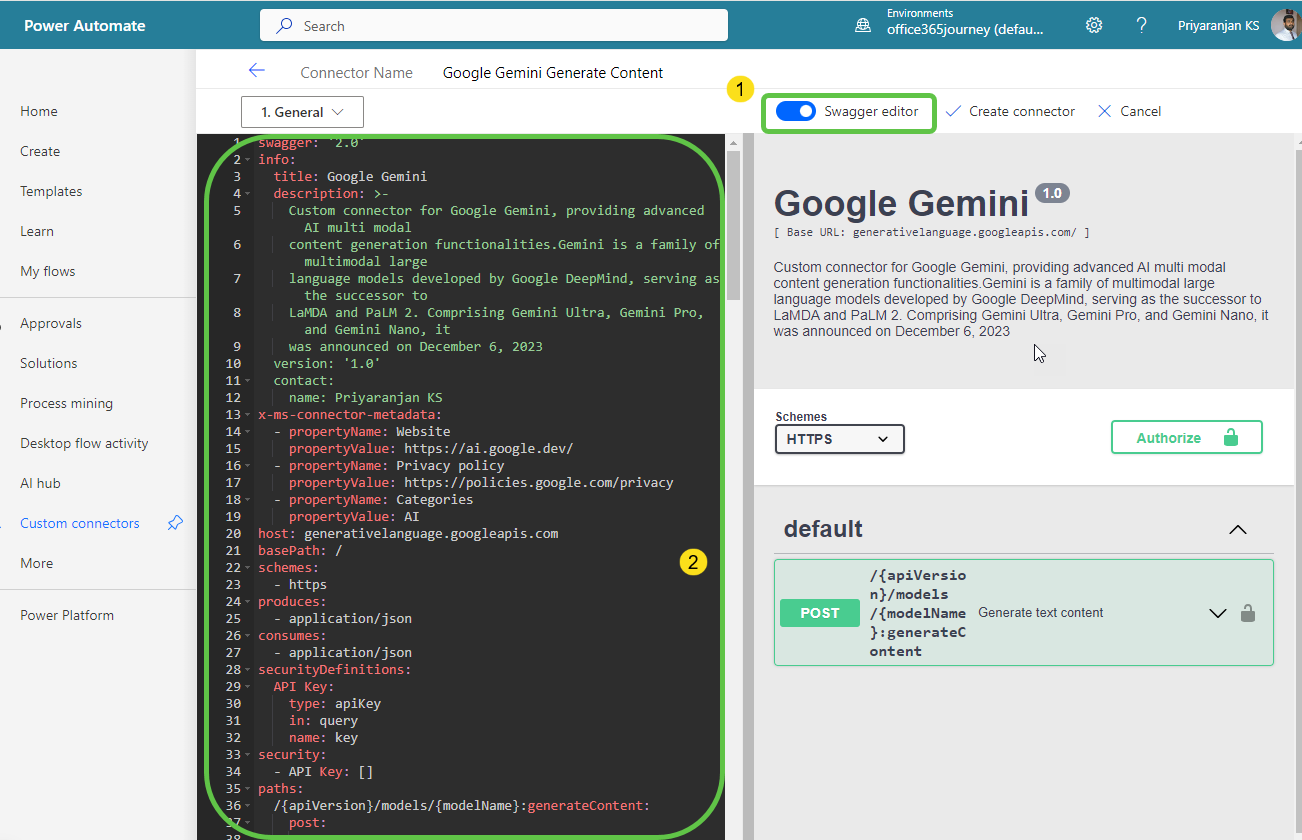
This will open the editor where we can toggle the swagger editor and paste the below swagger file content that we have defined for the Text Generation endpoint.
swagger: '2.0'
info:
  title: Google Gemini
  description: >-
    Custom connector for Google Gemini, providing advanced AI multi modal
    content generation functionalities.Gemini is a family of multimodal large
    language models developed by Google DeepMind, serving as the successor to
    LaMDA and PaLM 2. Comprising Gemini Ultra, Gemini Pro, and Gemini Nano, it
    was announced on December 6, 2023
  version: '1.0'
  contact:
    name: Priyaranjan KS
x-ms-connector-metadata:
  - propertyName: Website
    propertyValue: https://ai.google.dev/
  - propertyName: Privacy policy
    propertyValue: https://policies.google.com/privacy
  - propertyName: Categories
    propertyValue: AI
host: generativelanguage.googleapis.com
basePath: /
schemes:
  - https
produces:
  - application/json
consumes:
  - application/json
securityDefinitions:
  API Key:
    type: apiKey
    in: query
    name: key
security:
  - API Key: []
paths:
  /{apiVersion}/models/{modelName}:generateContent:
    post:
      summary: Generate text content
      description: Generates a text response from the model given an input message.
      operationId: GenerateTextContent
      parameters:
        - in: path
          name: apiVersion
          x-ms-summary: API Version
          x-ms-url-encoding: single
          required: true
          type: string
          default: v1beta
          description: API version to use for the endpoint. Eg- v1beta
        - in: path
          name: modelName
          x-ms-summary: Model Name
          x-ms-url-encoding: single
          required: true
          type: string
          default: gemini-pro
          description: Name of the model to be used for text generation. Eg - gemini-pro
        - in: body
          name: body
          required: true
          schema:
            type: object
            properties:
              contents:
                type: array
                x-ms-summary: Contents
                description: Contents for generating the text response.
                items:
                  type: object
                  required:
                    - parts
                  properties:
                    role:
                      type: string
                      x-ms-summary: Role
                      default: user
                      description: >
                        Optional. The producer of the content. Must be either
                        'user' or 'model'
                    parts:
                      type: array
                      x-ms-summary: Parts
                      description: Parts of the content for text generation.
                      items:
                        type: object
                        required:
                          - text
                        properties:
                          text:
                            type: string
                            x-ms-summary: Text
                            description: Required.Text for generating the response.
              safetySettings:
                type: array
                x-ms-summary: Safety Settings
                description: Optional.Safety settings for text content generation.
                items:
                  type: object
                  properties:
                    category:
                      type: string
                      x-ms-summary: Category
                      description: Optional.The category of content to be filtered.
                    threshold:
                      type: string
                      x-ms-summary: Threshold
                      description: >-
                        Optional.The threshold for filtering content in the
                        specified category.
              generationConfig:
                type: object
                properties:
                  maxOutputTokens:
                    type: integer
                    x-ms-summary: Max Output Tokens
                    description: >-
                      Optional.The maximum number of tokens to include in a text
                      candidate.
                  temperature:
                    type: number
                    x-ms-summary: Temperature
                    description: Optional.Controls the randomness of the text output.
                  topP:
                    type: number
                    x-ms-summary: Top P
                    description: >-
                      Optional.The maximum cumulative probability of tokens to
                      consider when sampling.
                  topK:
                    type: integer
                    x-ms-summary: Top K
                    description: >-
                      Optional.The maximum number of tokens to consider when
                      sampling.
                  candidateCount:
                    type: integer
                    x-ms-summary: Candidate Count
                    description: Optional. Number of candidate responses to generate.
                  stopSequences:
                    type: array
                    x-ms-summary: Stop Sequences
                    description: >-
                      Optional.The set of character sequences that will stop
                      text output generation.
                    items:
                      type: string
                      description: >-
                        Optional.The set of character sequences that will stop
                        text output generation.
      responses:
        '200':
          description: Successful text response
          schema:
            type: object
            properties:
              text:
                type: string
                description: The generated text response.
              candidates:
                type: array
                items:
                  type: object
                  properties:
                    content:
                      type: object
                      properties:
                        parts:
                          type: array
                          items:
                            type: object
                            properties:
                              text:
                                type: string
                    finishReason:
                      type: string
                    index:
                      type: integer
                    safetyRatings:
                      type: array
                      items:
                        type: object
                        properties:
                          category:
                            type: string
                          probability:
                            type: string
              promptFeedback:
                type: object
                properties:
                  safetyRatings:
                    type: array
                    items:
                      type: object
                      properties:
                        category:
                          type: string
                        probability:
                          type: string
Testing the Connector
-
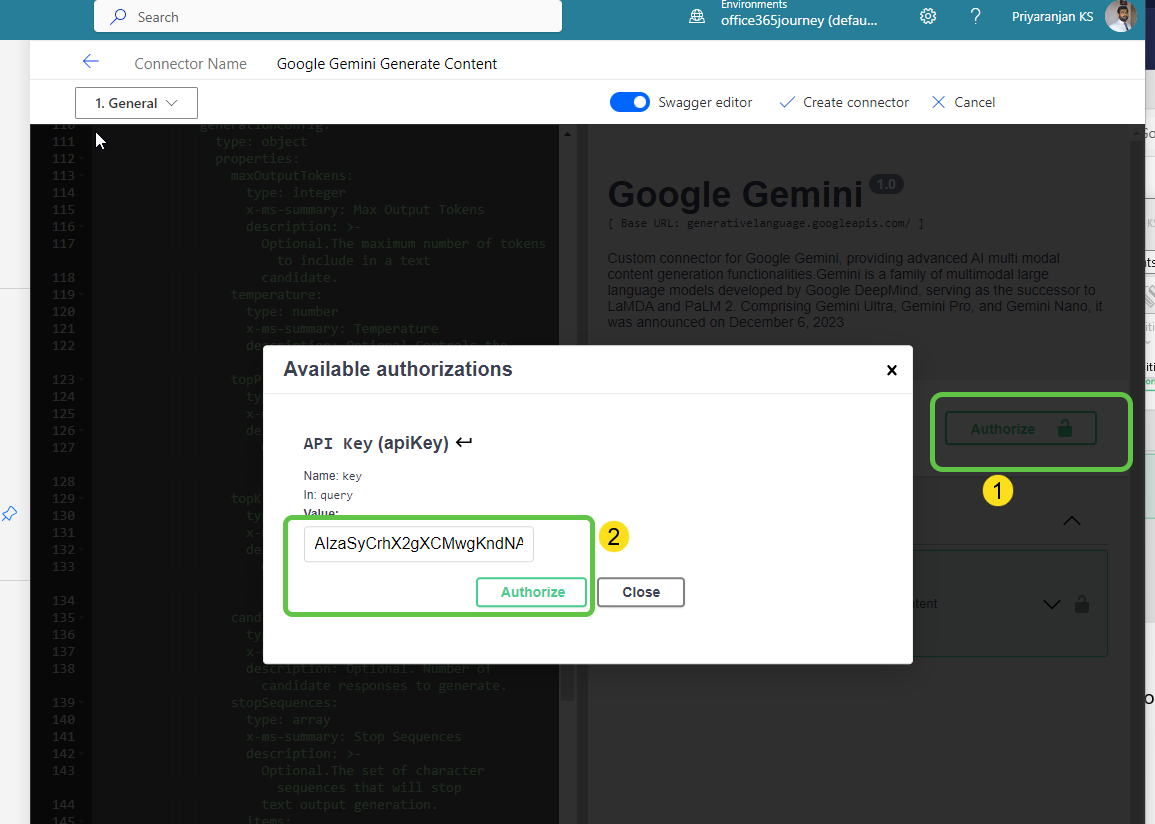
We can use the in-built test functionality to ensure that your connector works correctly. To do this, click on Authorize and paste the Google API Key which we copied from the Google AI Studio into the field and click on Authorize.
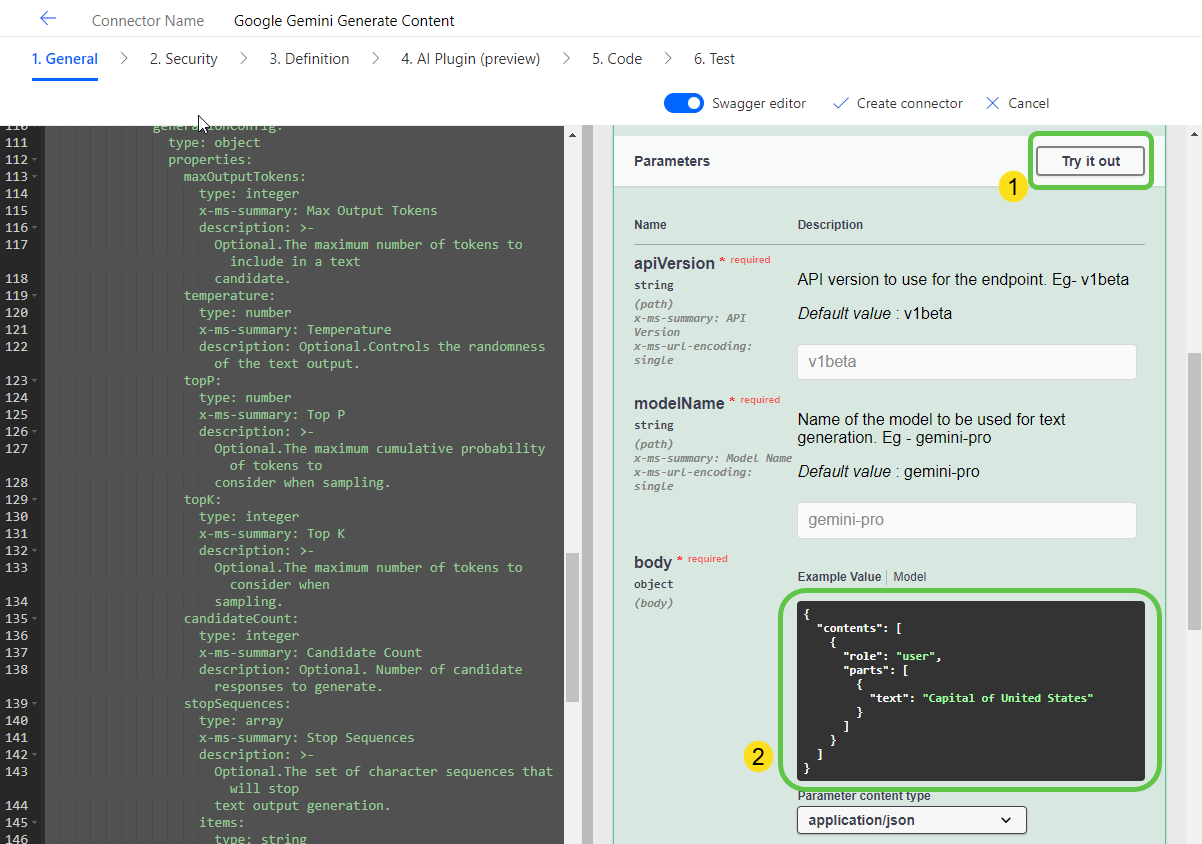
- Click on Try it out and paste the below text in the body. Here we are passing the query to find the capital of the United States in the body.
 {
   "contents": [
     {
       "role": "user",
       "parts": [
         {
           "text": "Capital of United States"
         }
       ]
     }
   ]
 }
-
Click on Execute to invoke the API and get back the contextual response from Google Gemini.
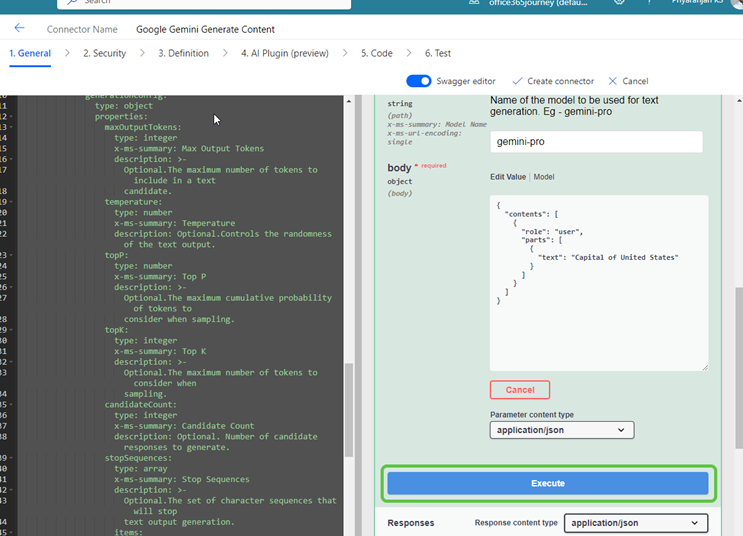
-
As we go down the editor, we can see that it has successfully fetched back the capital of the United States.
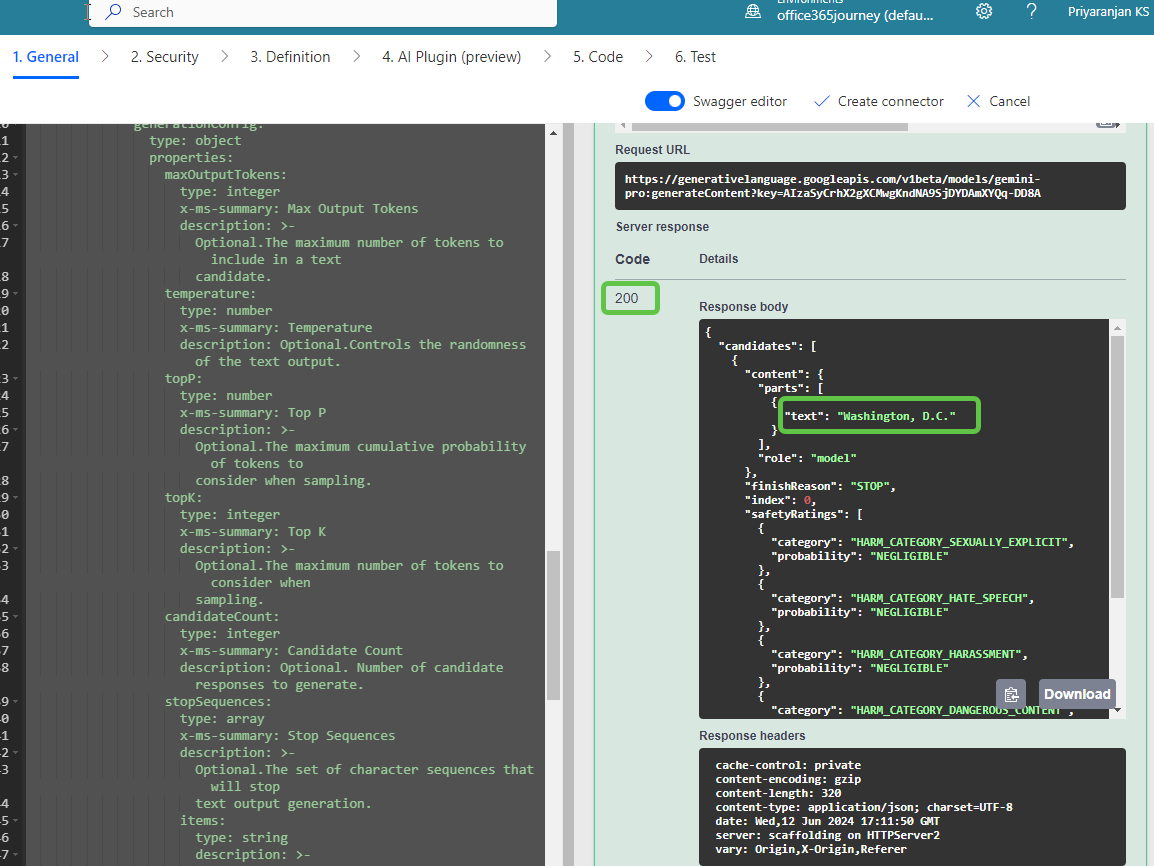
-
Now that we have created the connector using the swagger definition, let’s click on Create Connector.
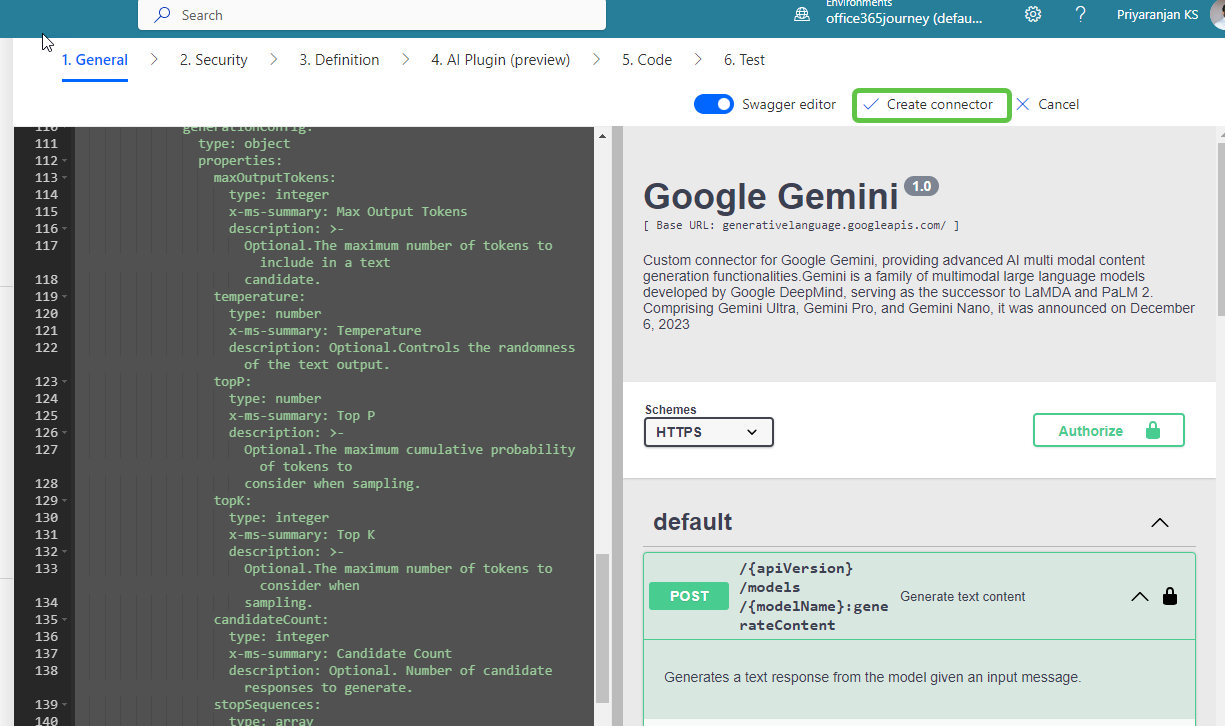
-
The Google Gemini Generate Content Connector is now available for use within the Power Platform.
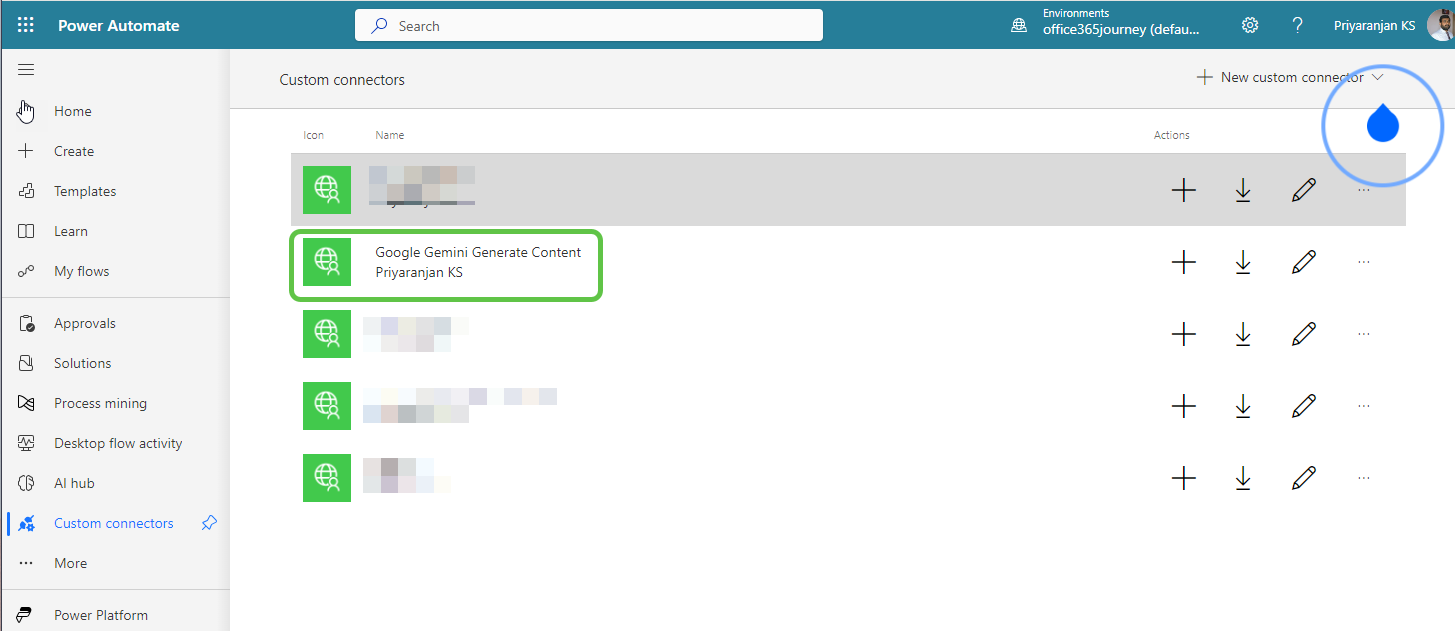
Step 3: Create Copilot
-
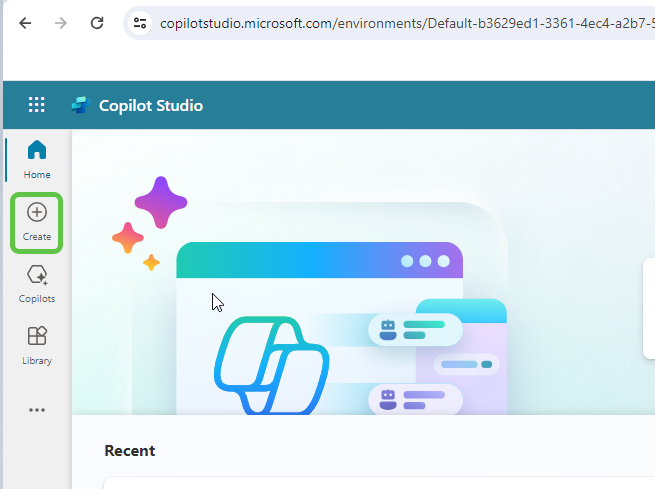
Head over to Copilot Studio and click on Create.
-
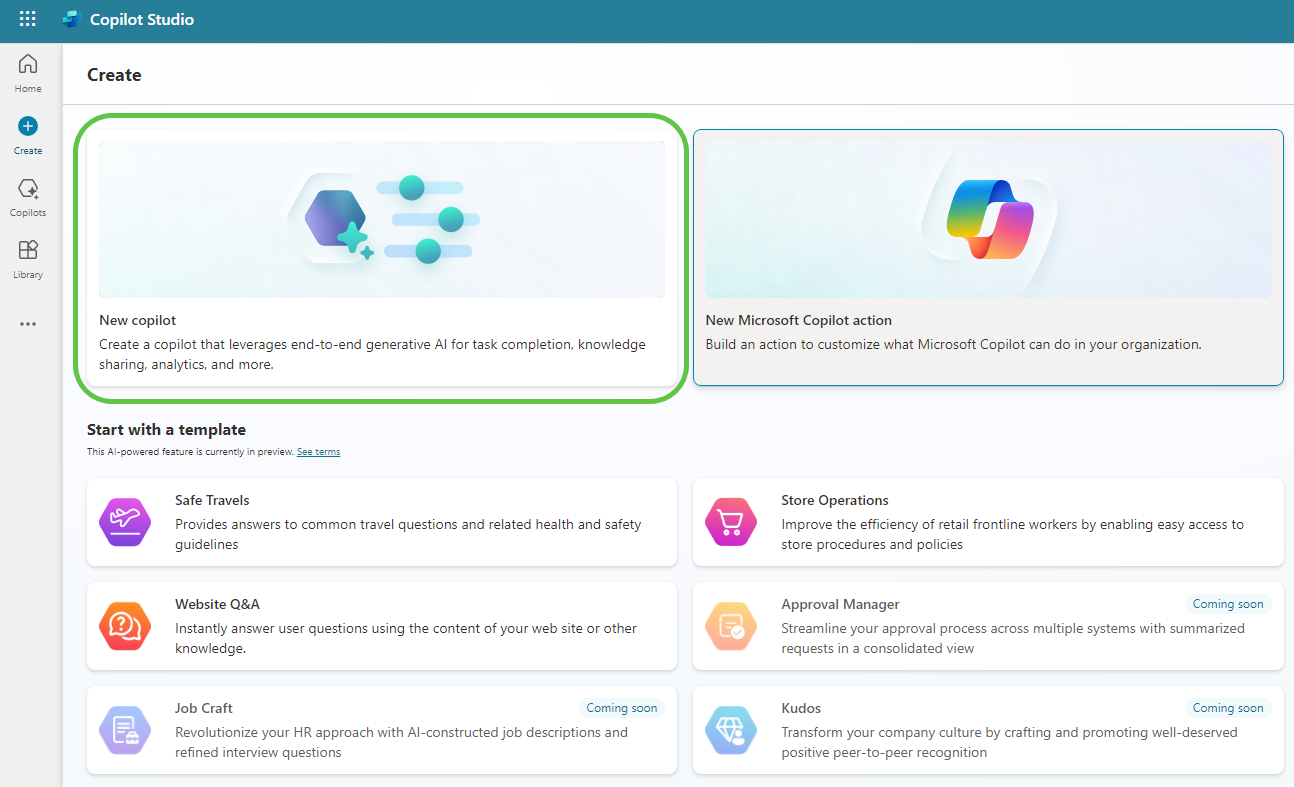
This will provide us the option to create a copilot based on an existing template or create a blank copilot from scratch. Let’s select New copilot.
-
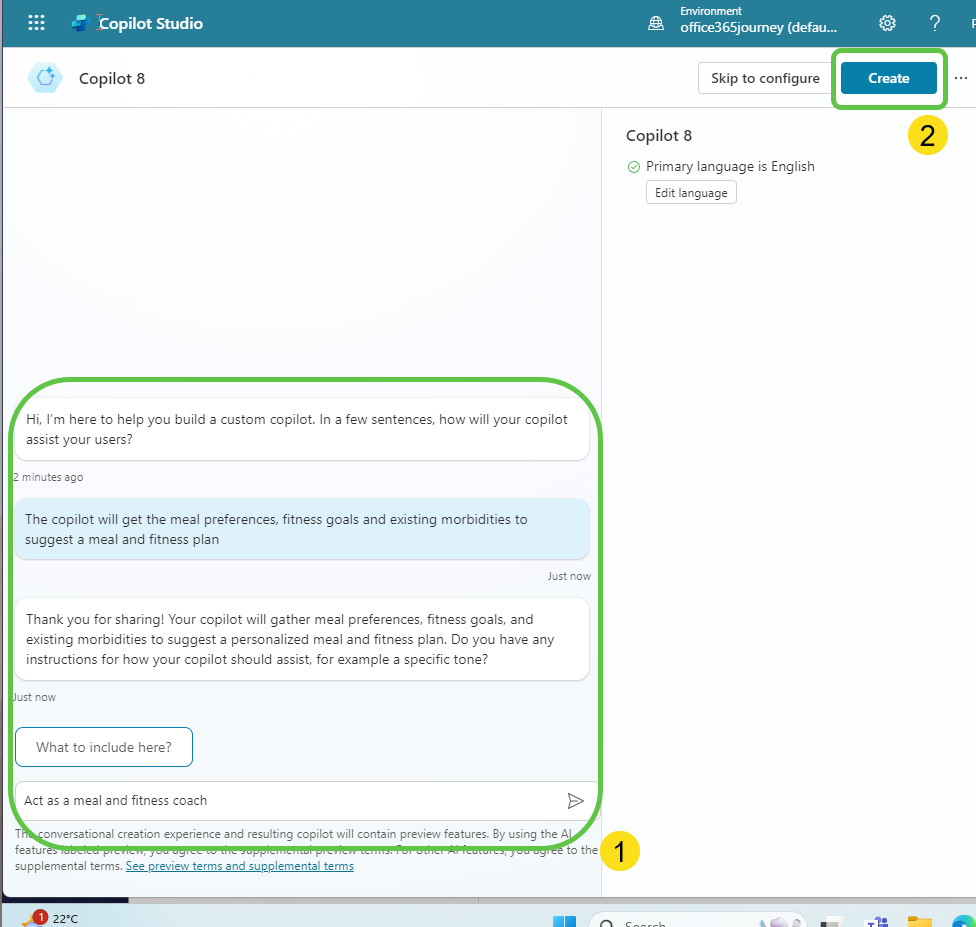
This will take us to the page where we can:
- Describe the copilot functionality and provide any specific instructions to the copilot.
- Once done, click on Create to provision the copilot.
Step 4: Enable Generative Selection of Topics
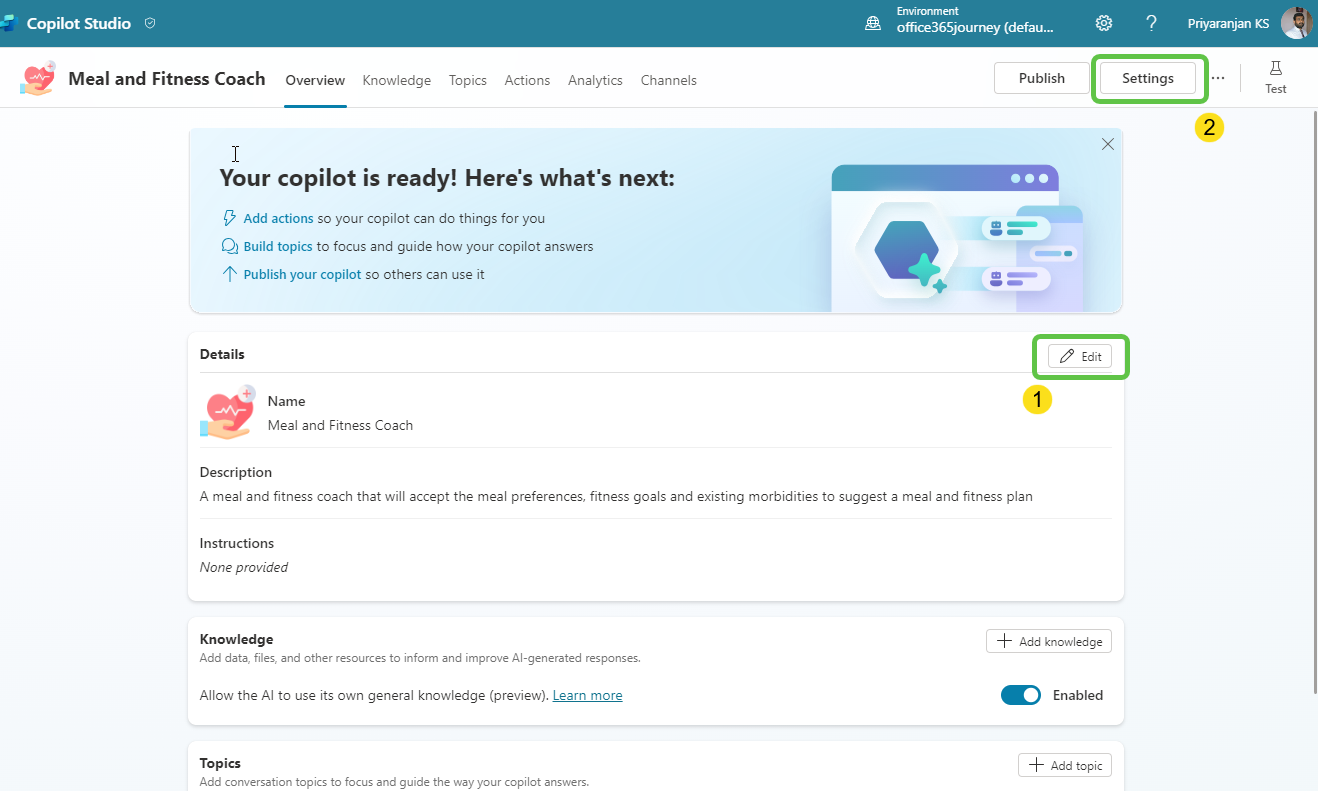
- The copilot is now created. We can then make the needed configuration changes:
- Click on Edit, edit the copilot details like name, icon, and description.
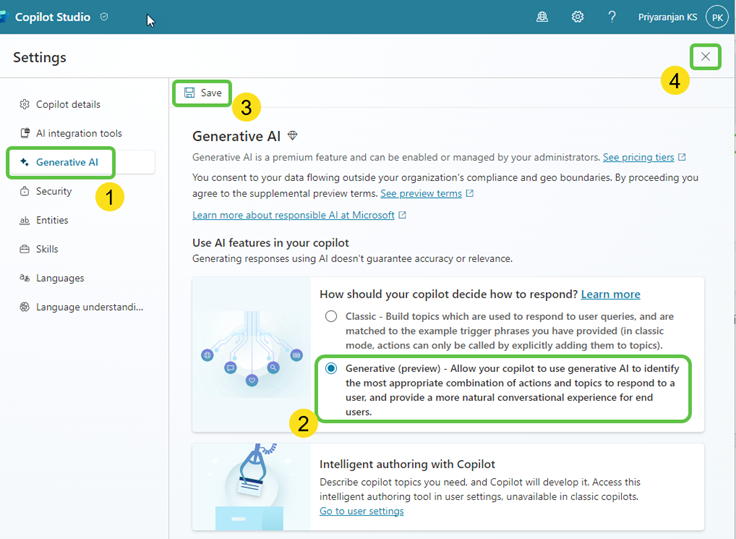
- Click on Settings to enable the Generative selection of topics so that without relying on triggers, the topics will be auto-selected based on user conversation resulting in a much smoother user experience.
- To enable the automatic detection of topics from user interaction:
- Click on Generative AI.
- Select Generative (preview).
- Click on Save to update the settings.
- Click on the Close icon to go back to the home page of this custom copilot.
Step 5: Create Topics
- Now let’s go ahead and create the topics that will automatically redirect the conversation flow to appropriate topics based on the question the user posts.
- Click on Topics from the navigation menu.
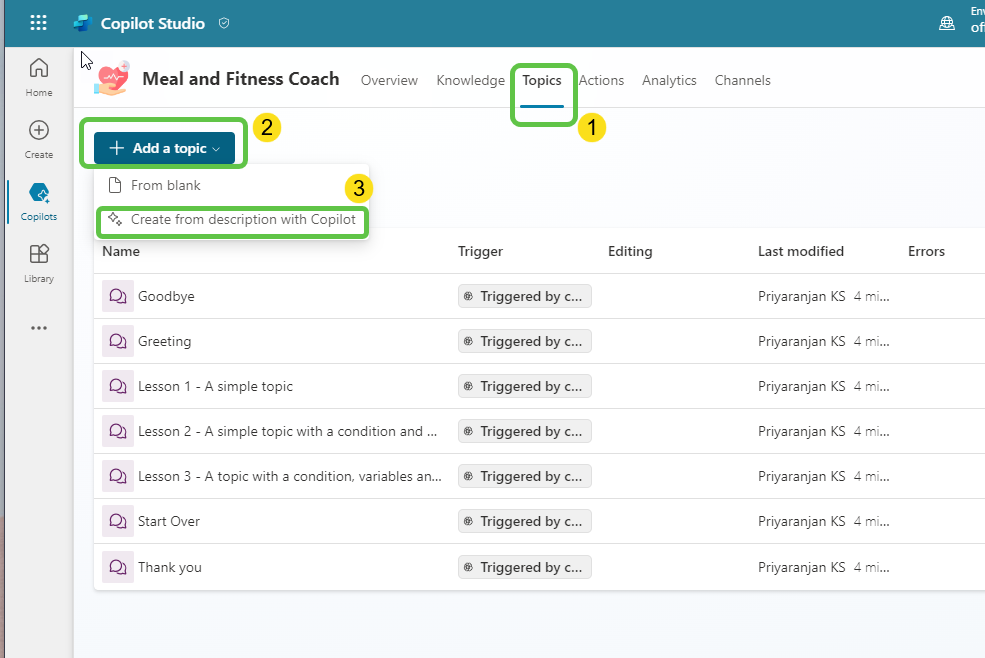
- To add the topic, we can either go with the option to create a blank topic or use Copilot to create the topic with an initial set of prepopulated conversation nodes based on the topic description that we provide.
- Click on Add a Topic and
- Select Create from description with Copilot.
-
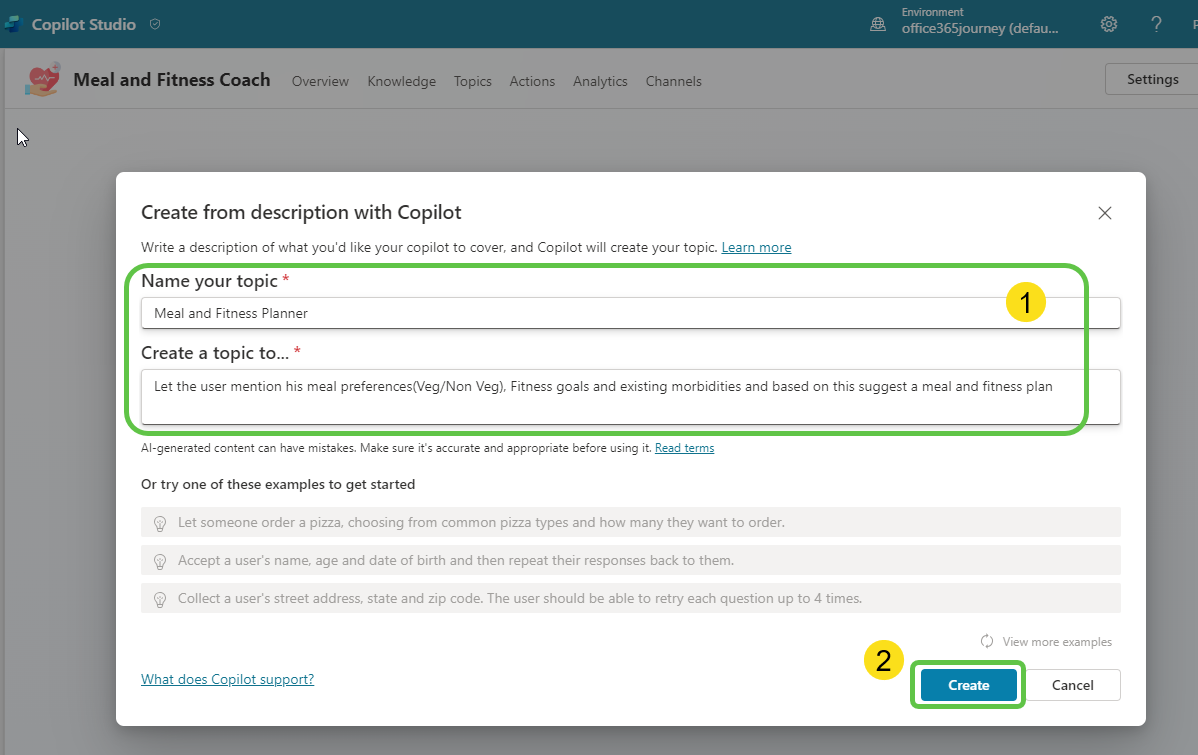
Let’s provide the below topic description details in the pop-up that opened when we clicked the Add topic button previously. Then, click on Create, which will provision the topic skeleton based on the provided description.
-
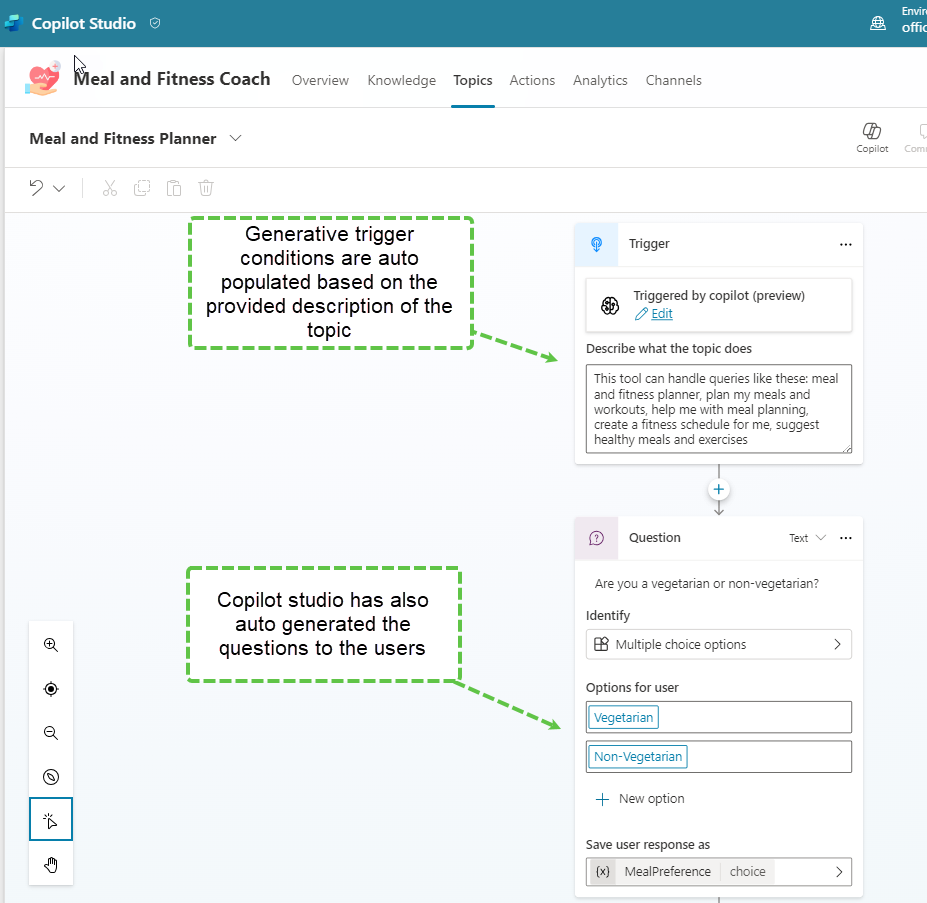
Thus, we have the basic topic created with an automatic trigger as well as a few questions to the user which are generated using the description provided.
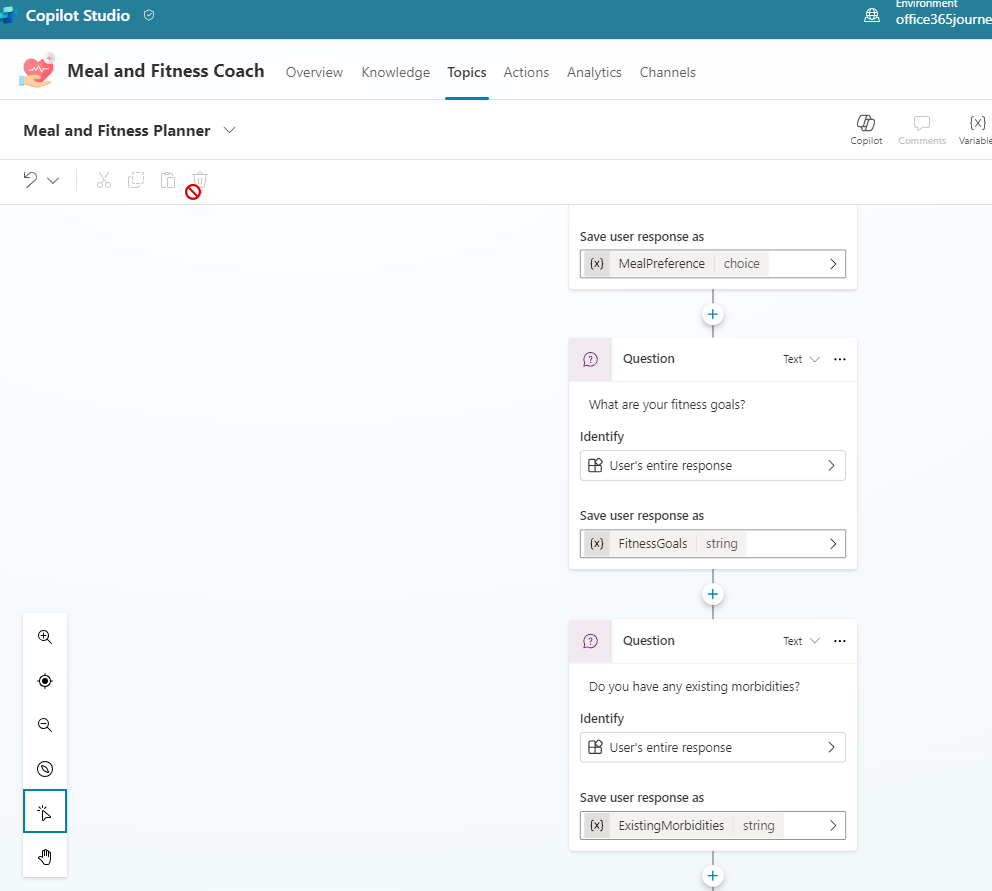
- In addition to the meal preference, the questions around fitness goals and morbidities are also generated automatically, and responses are stored in respective variables which we will use down the line to pass to Google Gemini.
Step 6: Create the Prompt and Assign it to the Variable
-
Let’s create the prompt and assign it to the variable. For this, we will select Variable management -> Set a variable value.
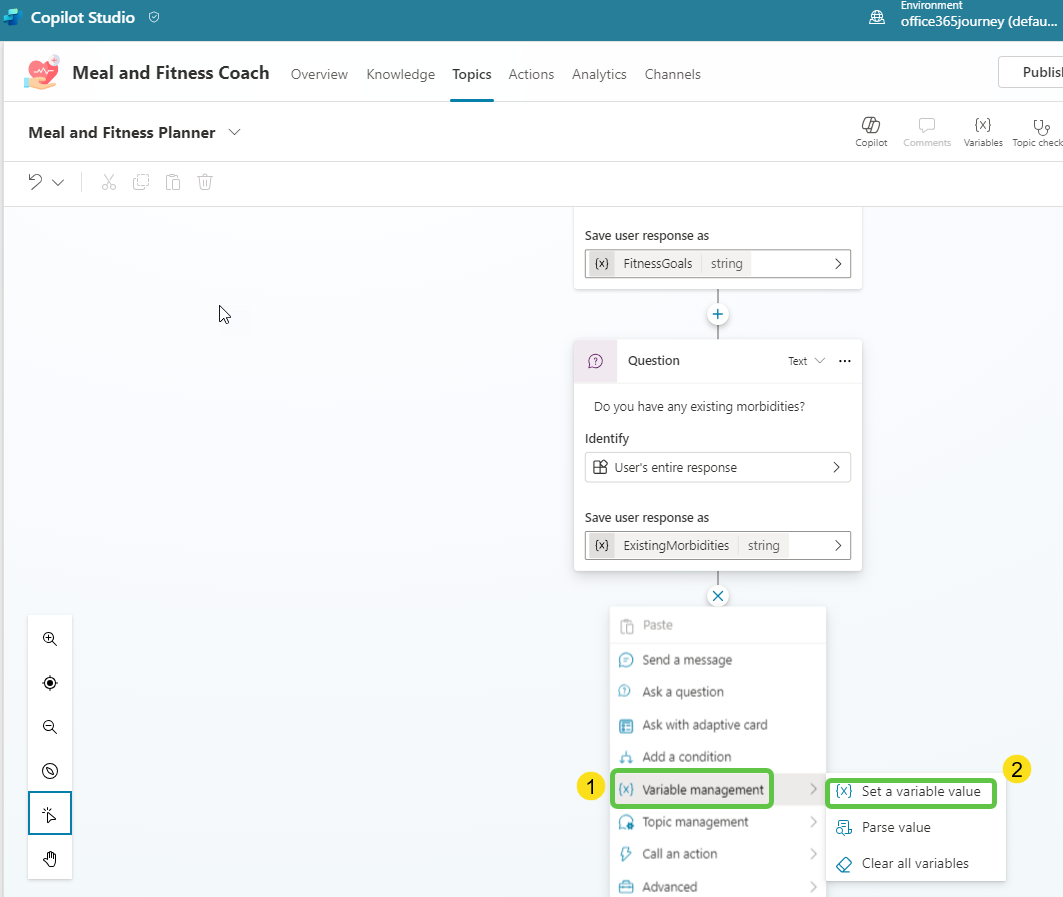
-
We will create a new variable and name it as varPrompt.
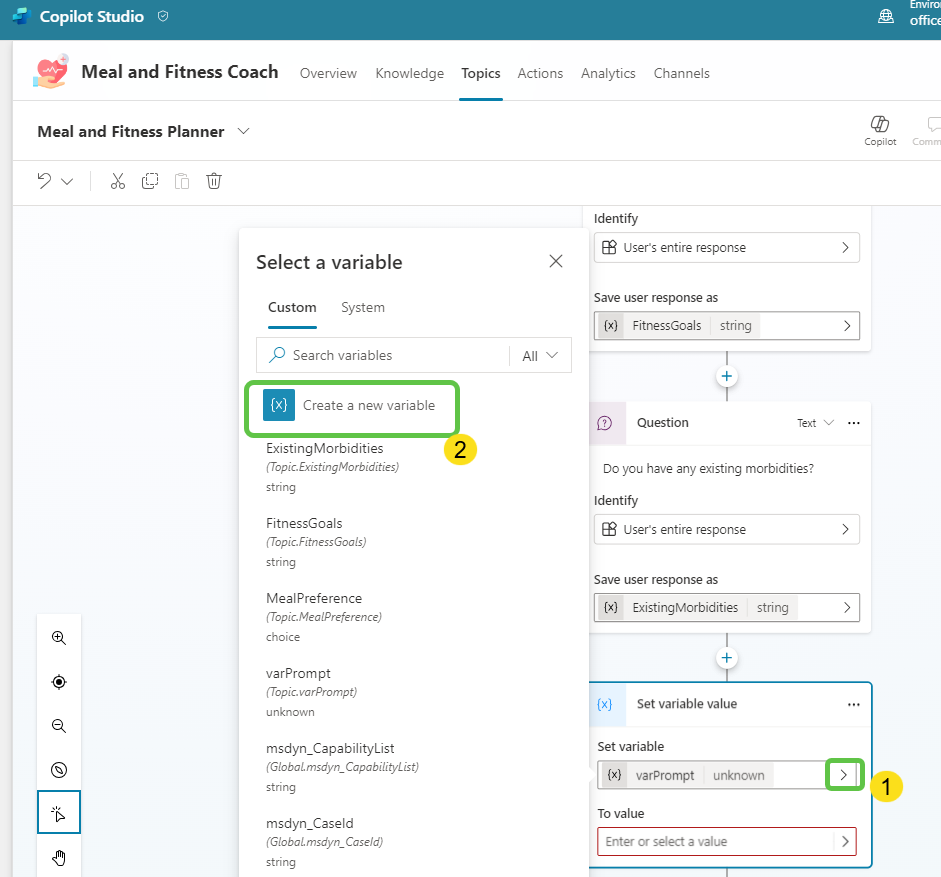
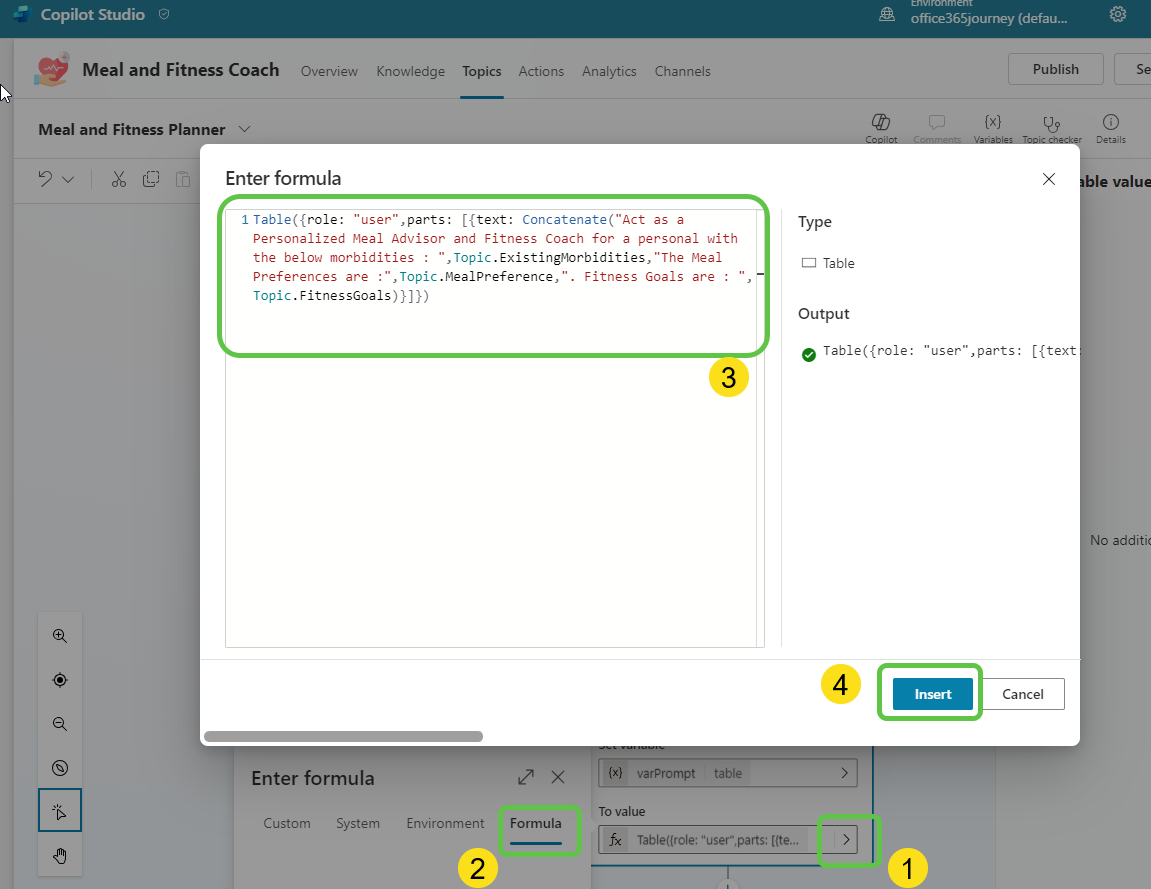
- We will be creating a table-structured prompt to send it to the Google Gemini Custom Connector. In the To value field, use the below concatenate formula to create a prompt which will contain the meal preference, fitness goals, and morbidities information.
Table({role: "user", parts: [{text: Concatenate("Act as a Personalized Meal Advisor and Fitness Coach for a personal with the below morbidities: ", Topic.ExistingMorbidities, "The Meal Preferences are: ", Topic.MealPreference, ". Fitness Goals are: ", Topic.FitnessGoals)}]})The table structure described in the prompt is used to format the input data for the Google Gemini API’s text generation endpoint.
- Role: This specifies who is providing the input. In this context, the role is set to “user,” indicating that the input is coming from the user of the system. This helps the AI model understand the perspective or the context from which the content is generated.
- Parts: This is an array containing the actual content to be processed by the AI model. Parts will contain the actual prompt that describes the context and what is expected as a response from the model.
-
Once the formula is added to the box, click on Insert.
Step 7: Add the Google Gemini Custom Connector as an Action
-
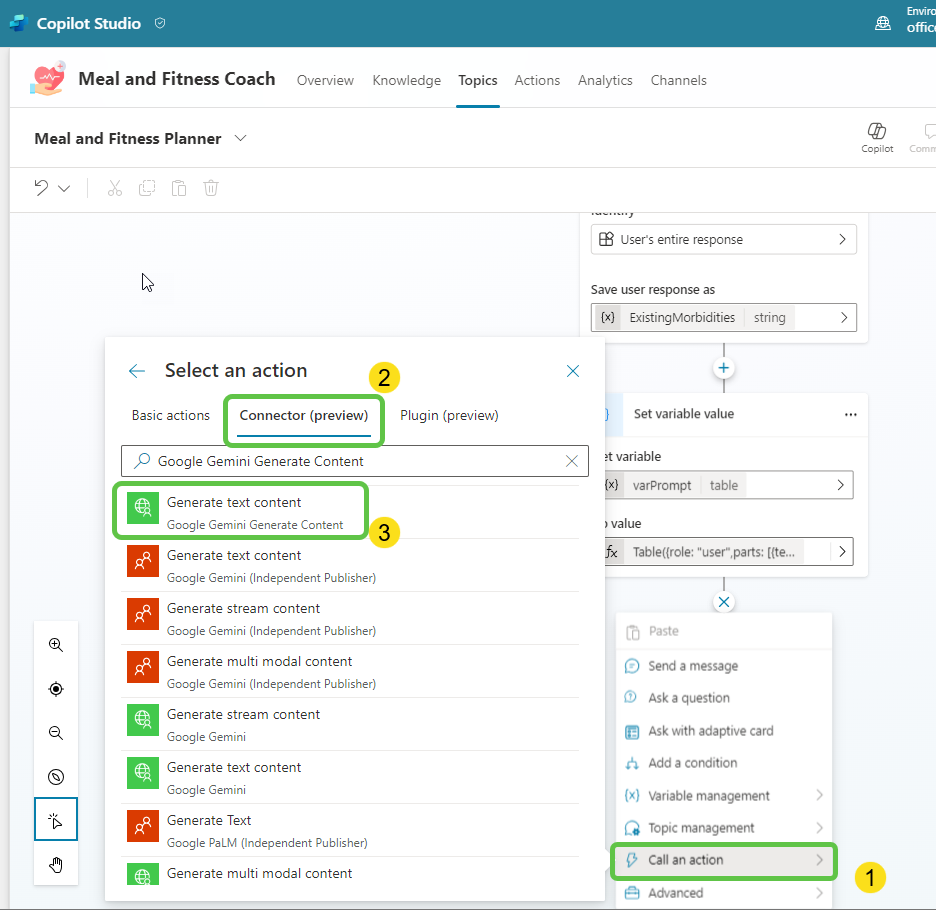
Now that the prompt is ready, let’s add the Google Gemini custom connector as an action.
-
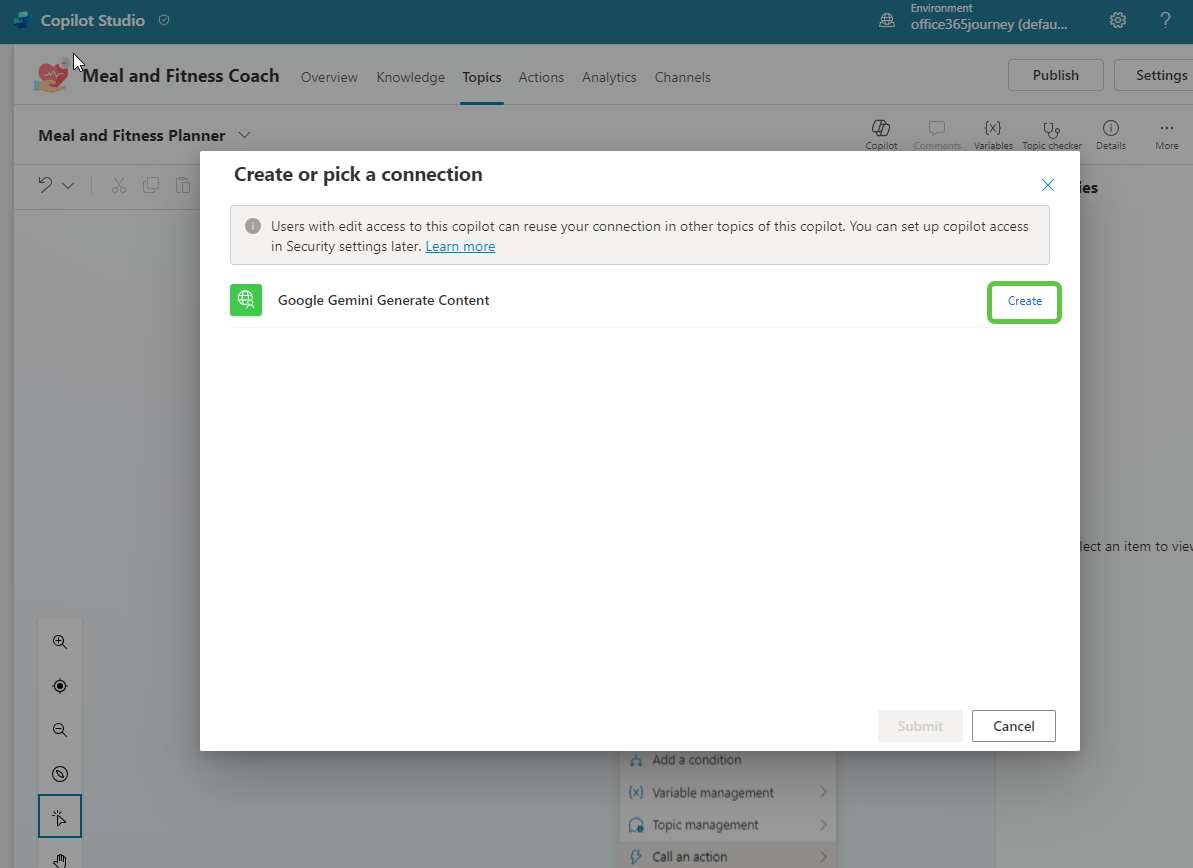
As we add the connector, it will ask to create a connection. Click on Create.
-
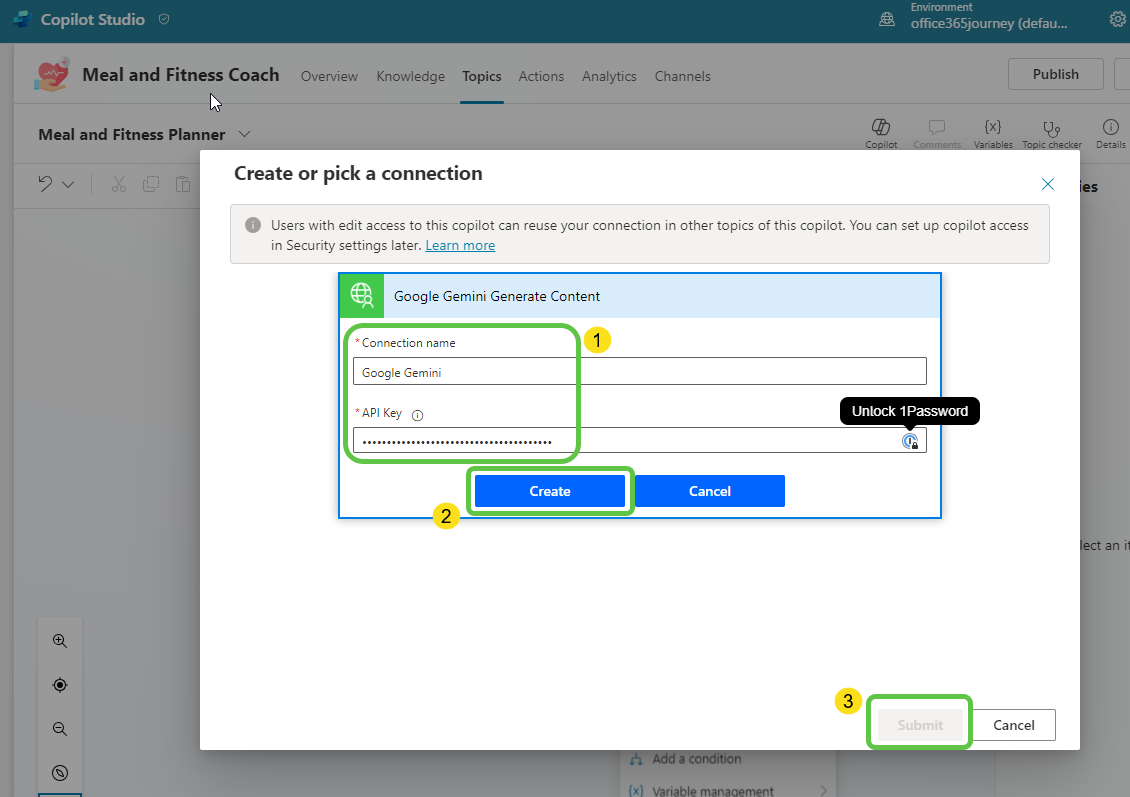
Add the connection name and paste the Google API Key copied from Google AI Studio. Click on Create and then Submit.
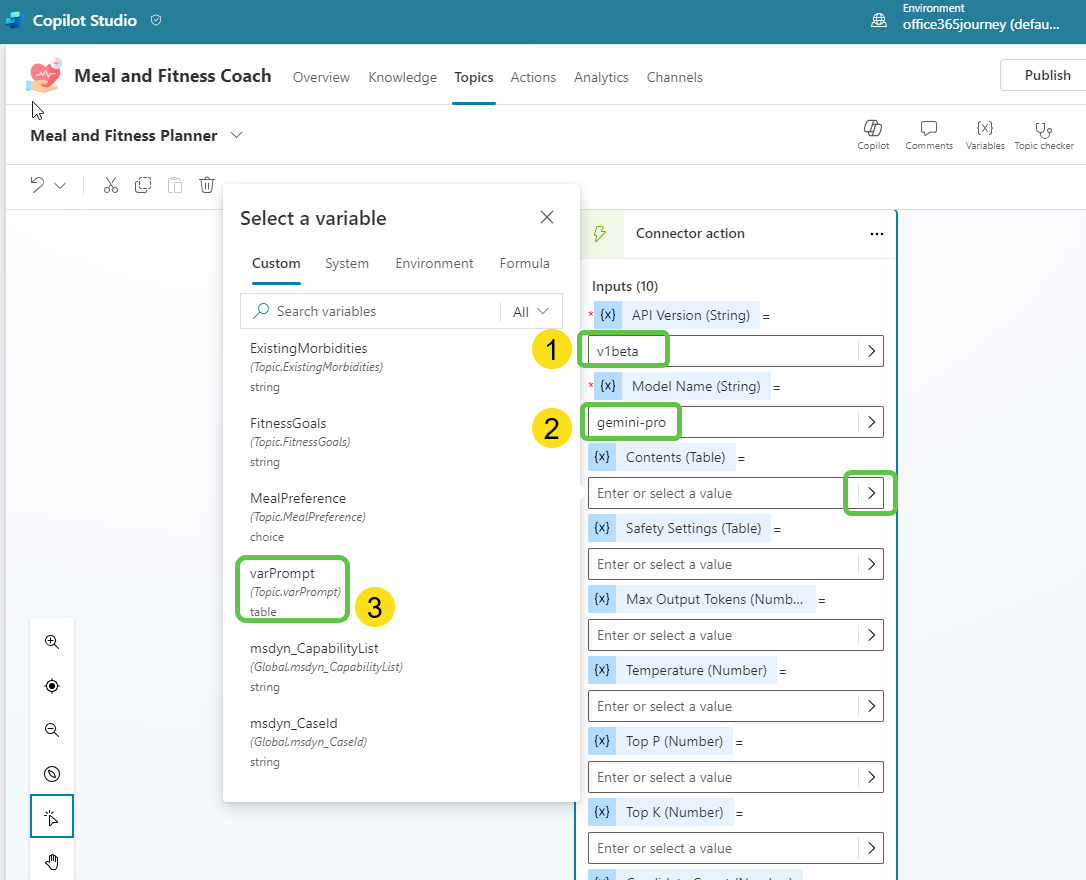
- Let’s configure the Google Gemini custom connector with the needed input values.
- Specify the API Version as v1beta.
- Mention the model name as gemini-pro.
- For the Contents field, select the varPrompt variable that we had created earlier.
-
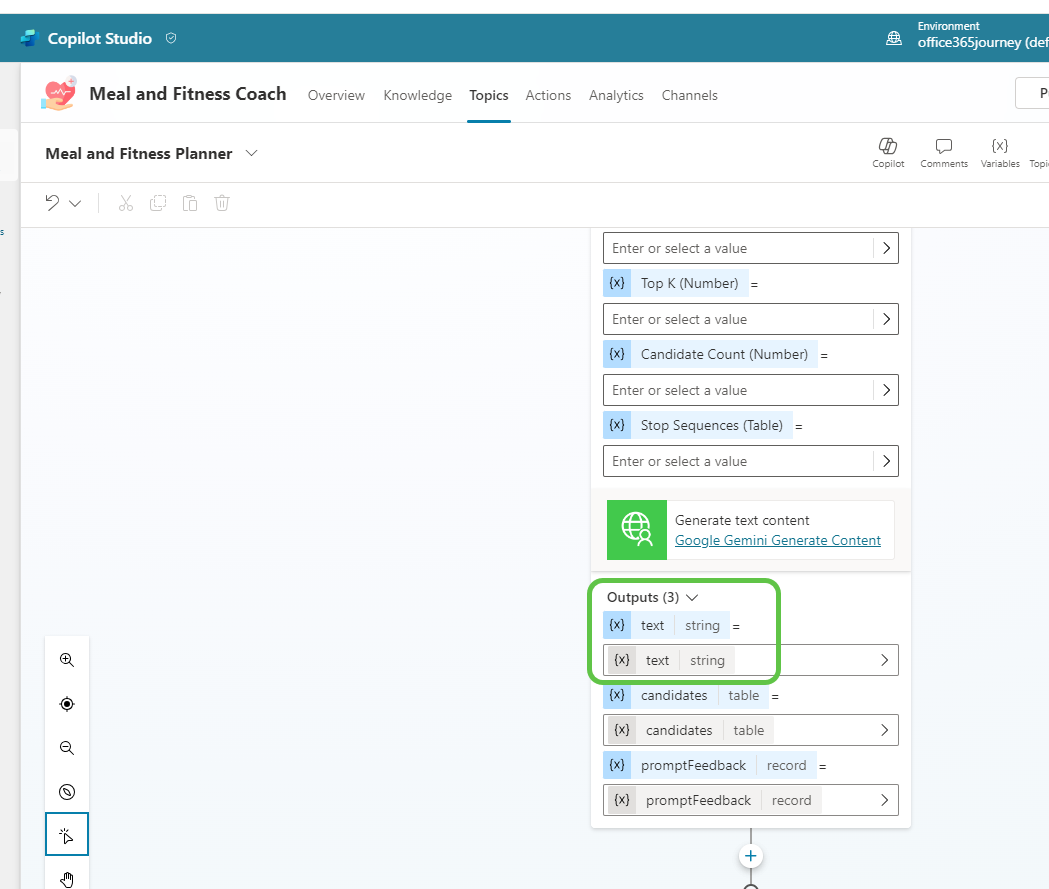
We can see that the generative output of the connector is stored in the variable text.
-
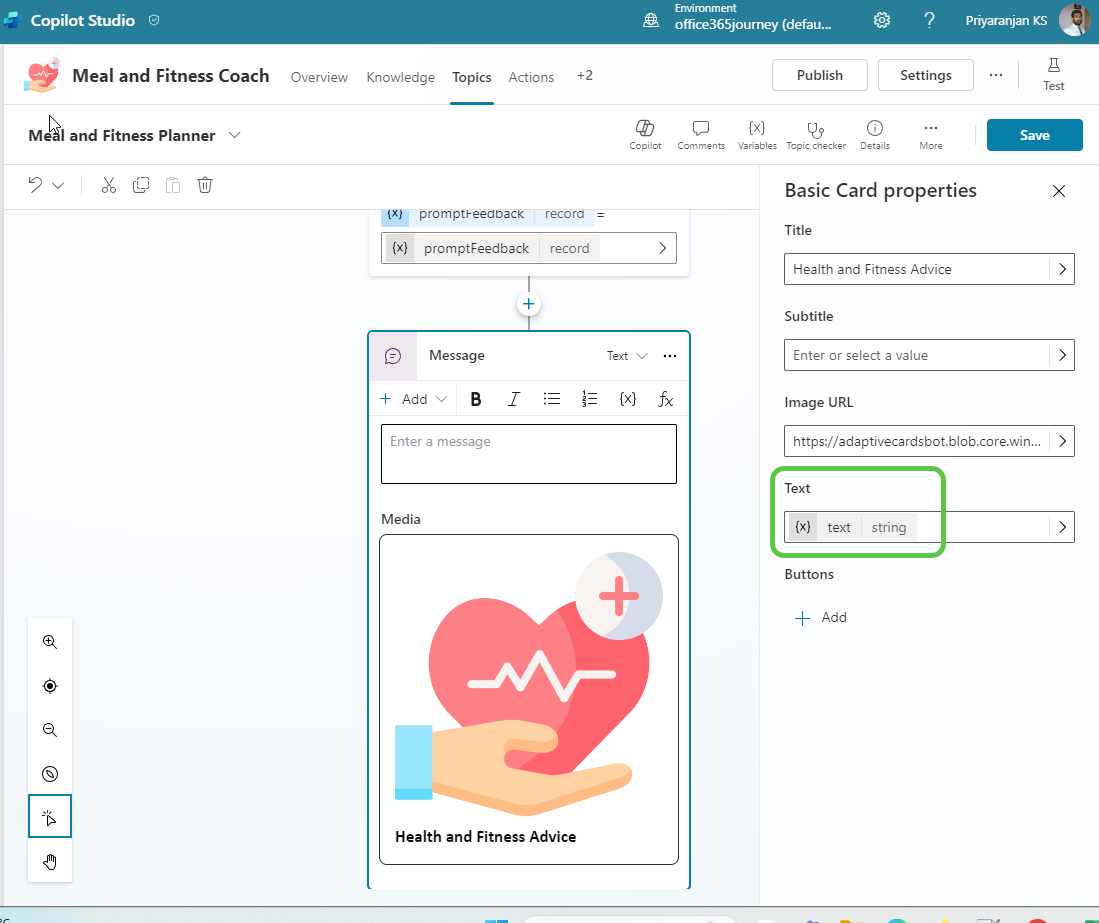
Now let’s add a basic card and show the text output back to the user.
Test the Copilot
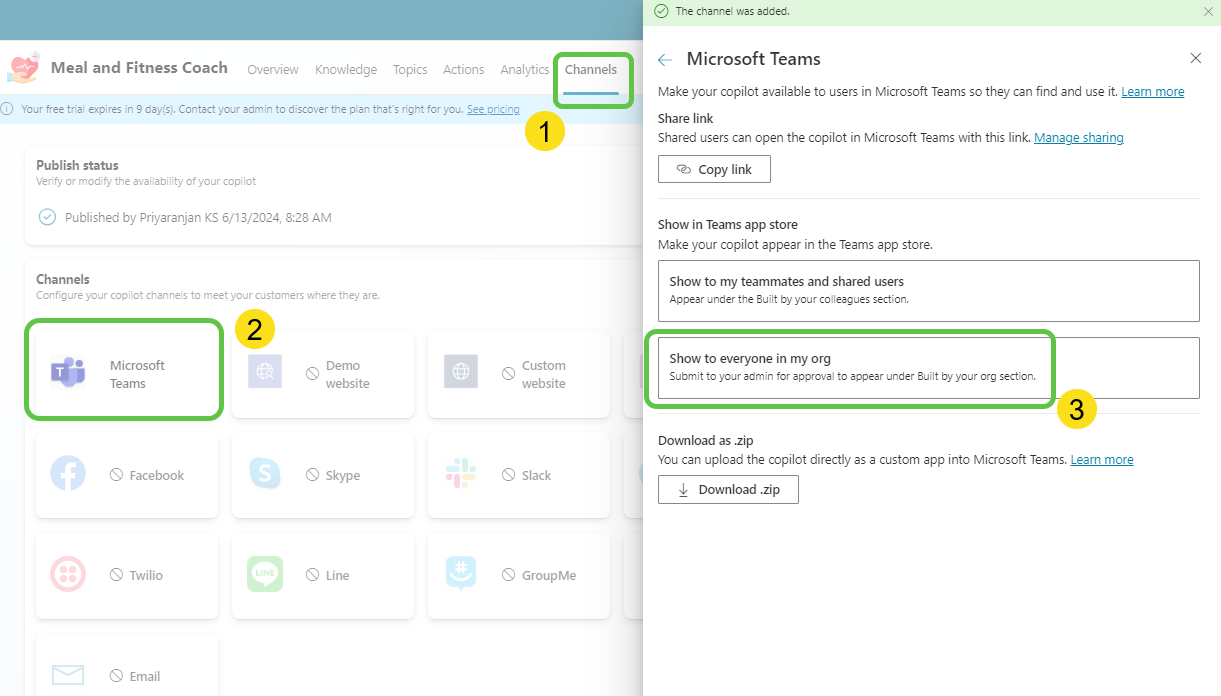
We have published the bot and will distribute it to Microsoft Teams by submitting it to the admin for approval.
Admins can now publish this to the organization from the Teams admin center.
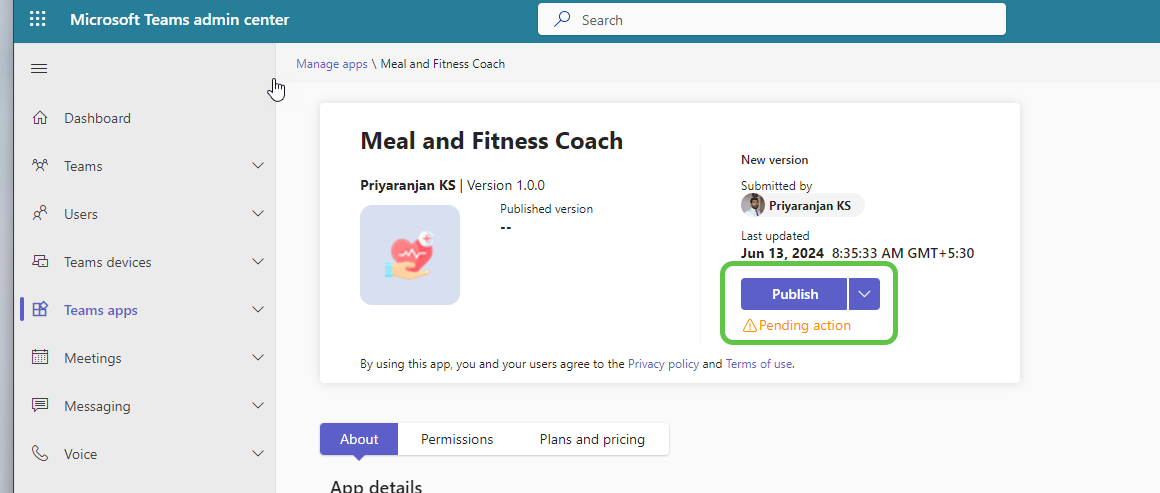
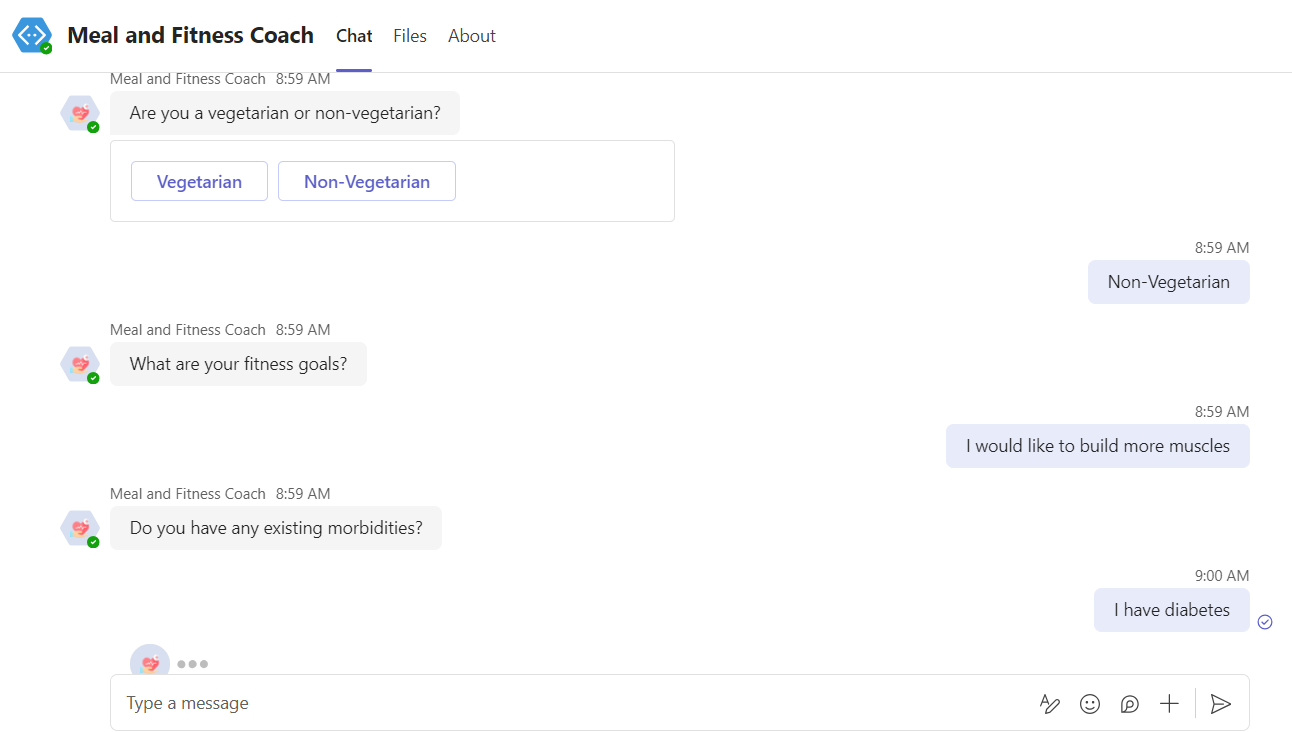
The Meal and Fitness Coach has now become available in the Teams app store which we can start using.We have provided the basic information and preferences around the meal and fitness plan that we are looking at.
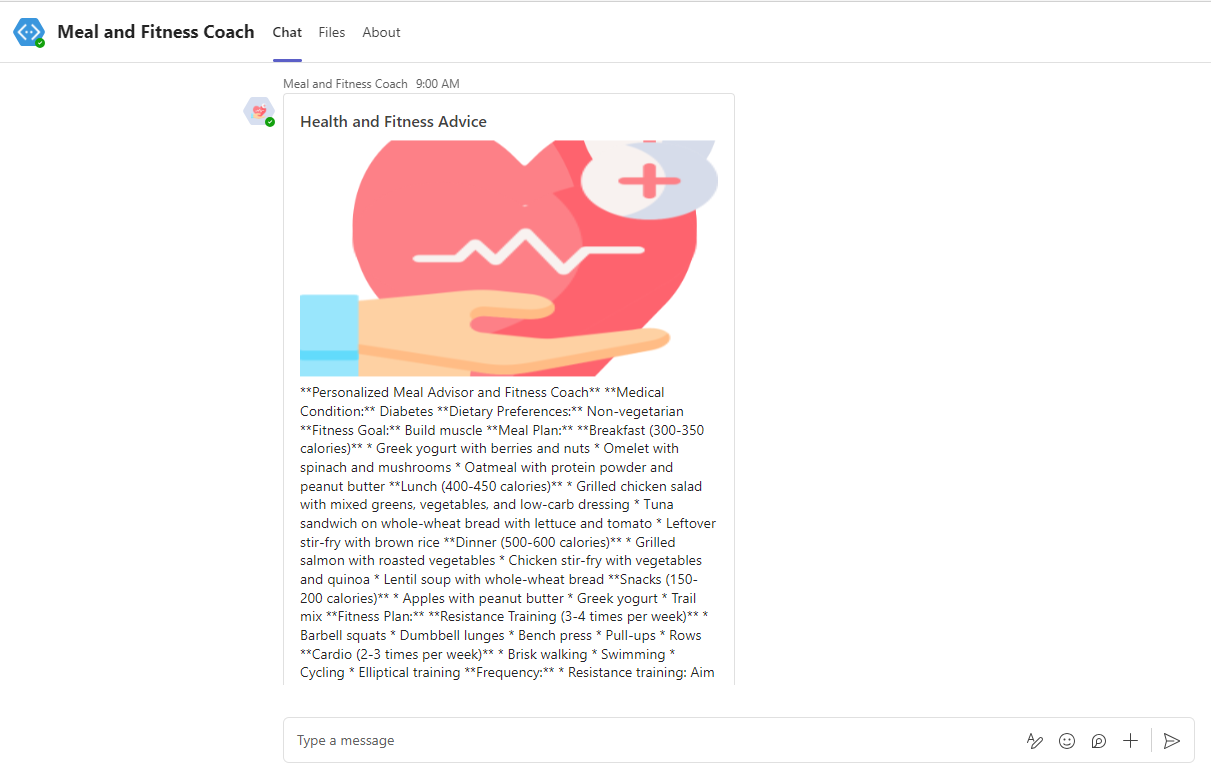
Google Gemini API is invoked through the custom connector, and we can see the detailed meal and fitness plan provided by the copilot.
Conclusion
In this blog, we explored how to create a custom connector for Google Gemini in Microsoft Power Platform and use it within Copilot to build a dynamic Meal and Fitness Advisor. By integrating advanced AI capabilities through this custom connector, we can generate personalized recommendations based on user inputs, such as meal preferences and fitness goals.


