Table of Contents
- Introduction
- Process Flow
- Demo
- Prerequisites
- Technologies Involved
- Steps to Create the Customer Service Copilot
- Step 1: Provisioning a Dynamics 365 Customer Service Trial
- Step 2: Creating Necessary Dataverse Tables
- Step 3: Setting Up Azure AI Language Service for Sentiment Analysis
- Step 4: Configuring the Copilot in Copilot Studio and Setting Up the Handover
- Step 5: Creating the Copilot
- Step 6: Configuring the Copilot
- Step 7: Creating Topics
- Step 8: Configure Transfer to Agent Node
- Step 9: Create the Queue
- Step 10: Create Workstream
- Step 11: Testing in Power Pages
- Conclusion
Introduction
Providing exceptional customer service is crucial for businesses to thrive. One of the key aspects of modern customer service is leveraging AI to analyze and respond to customer feedback efficiently. This blog will guide you through creating a dynamic customer service Copilot using Microsoft Dynamics 365, Azure AI Language Service, and Copilot Studio. The Copilot will analyze user feedback for sentiment and handle it accordingly, either storing positive feedback in Dataverse or escalating negative feedback to a human agent through Omnichannel.
Process Flow
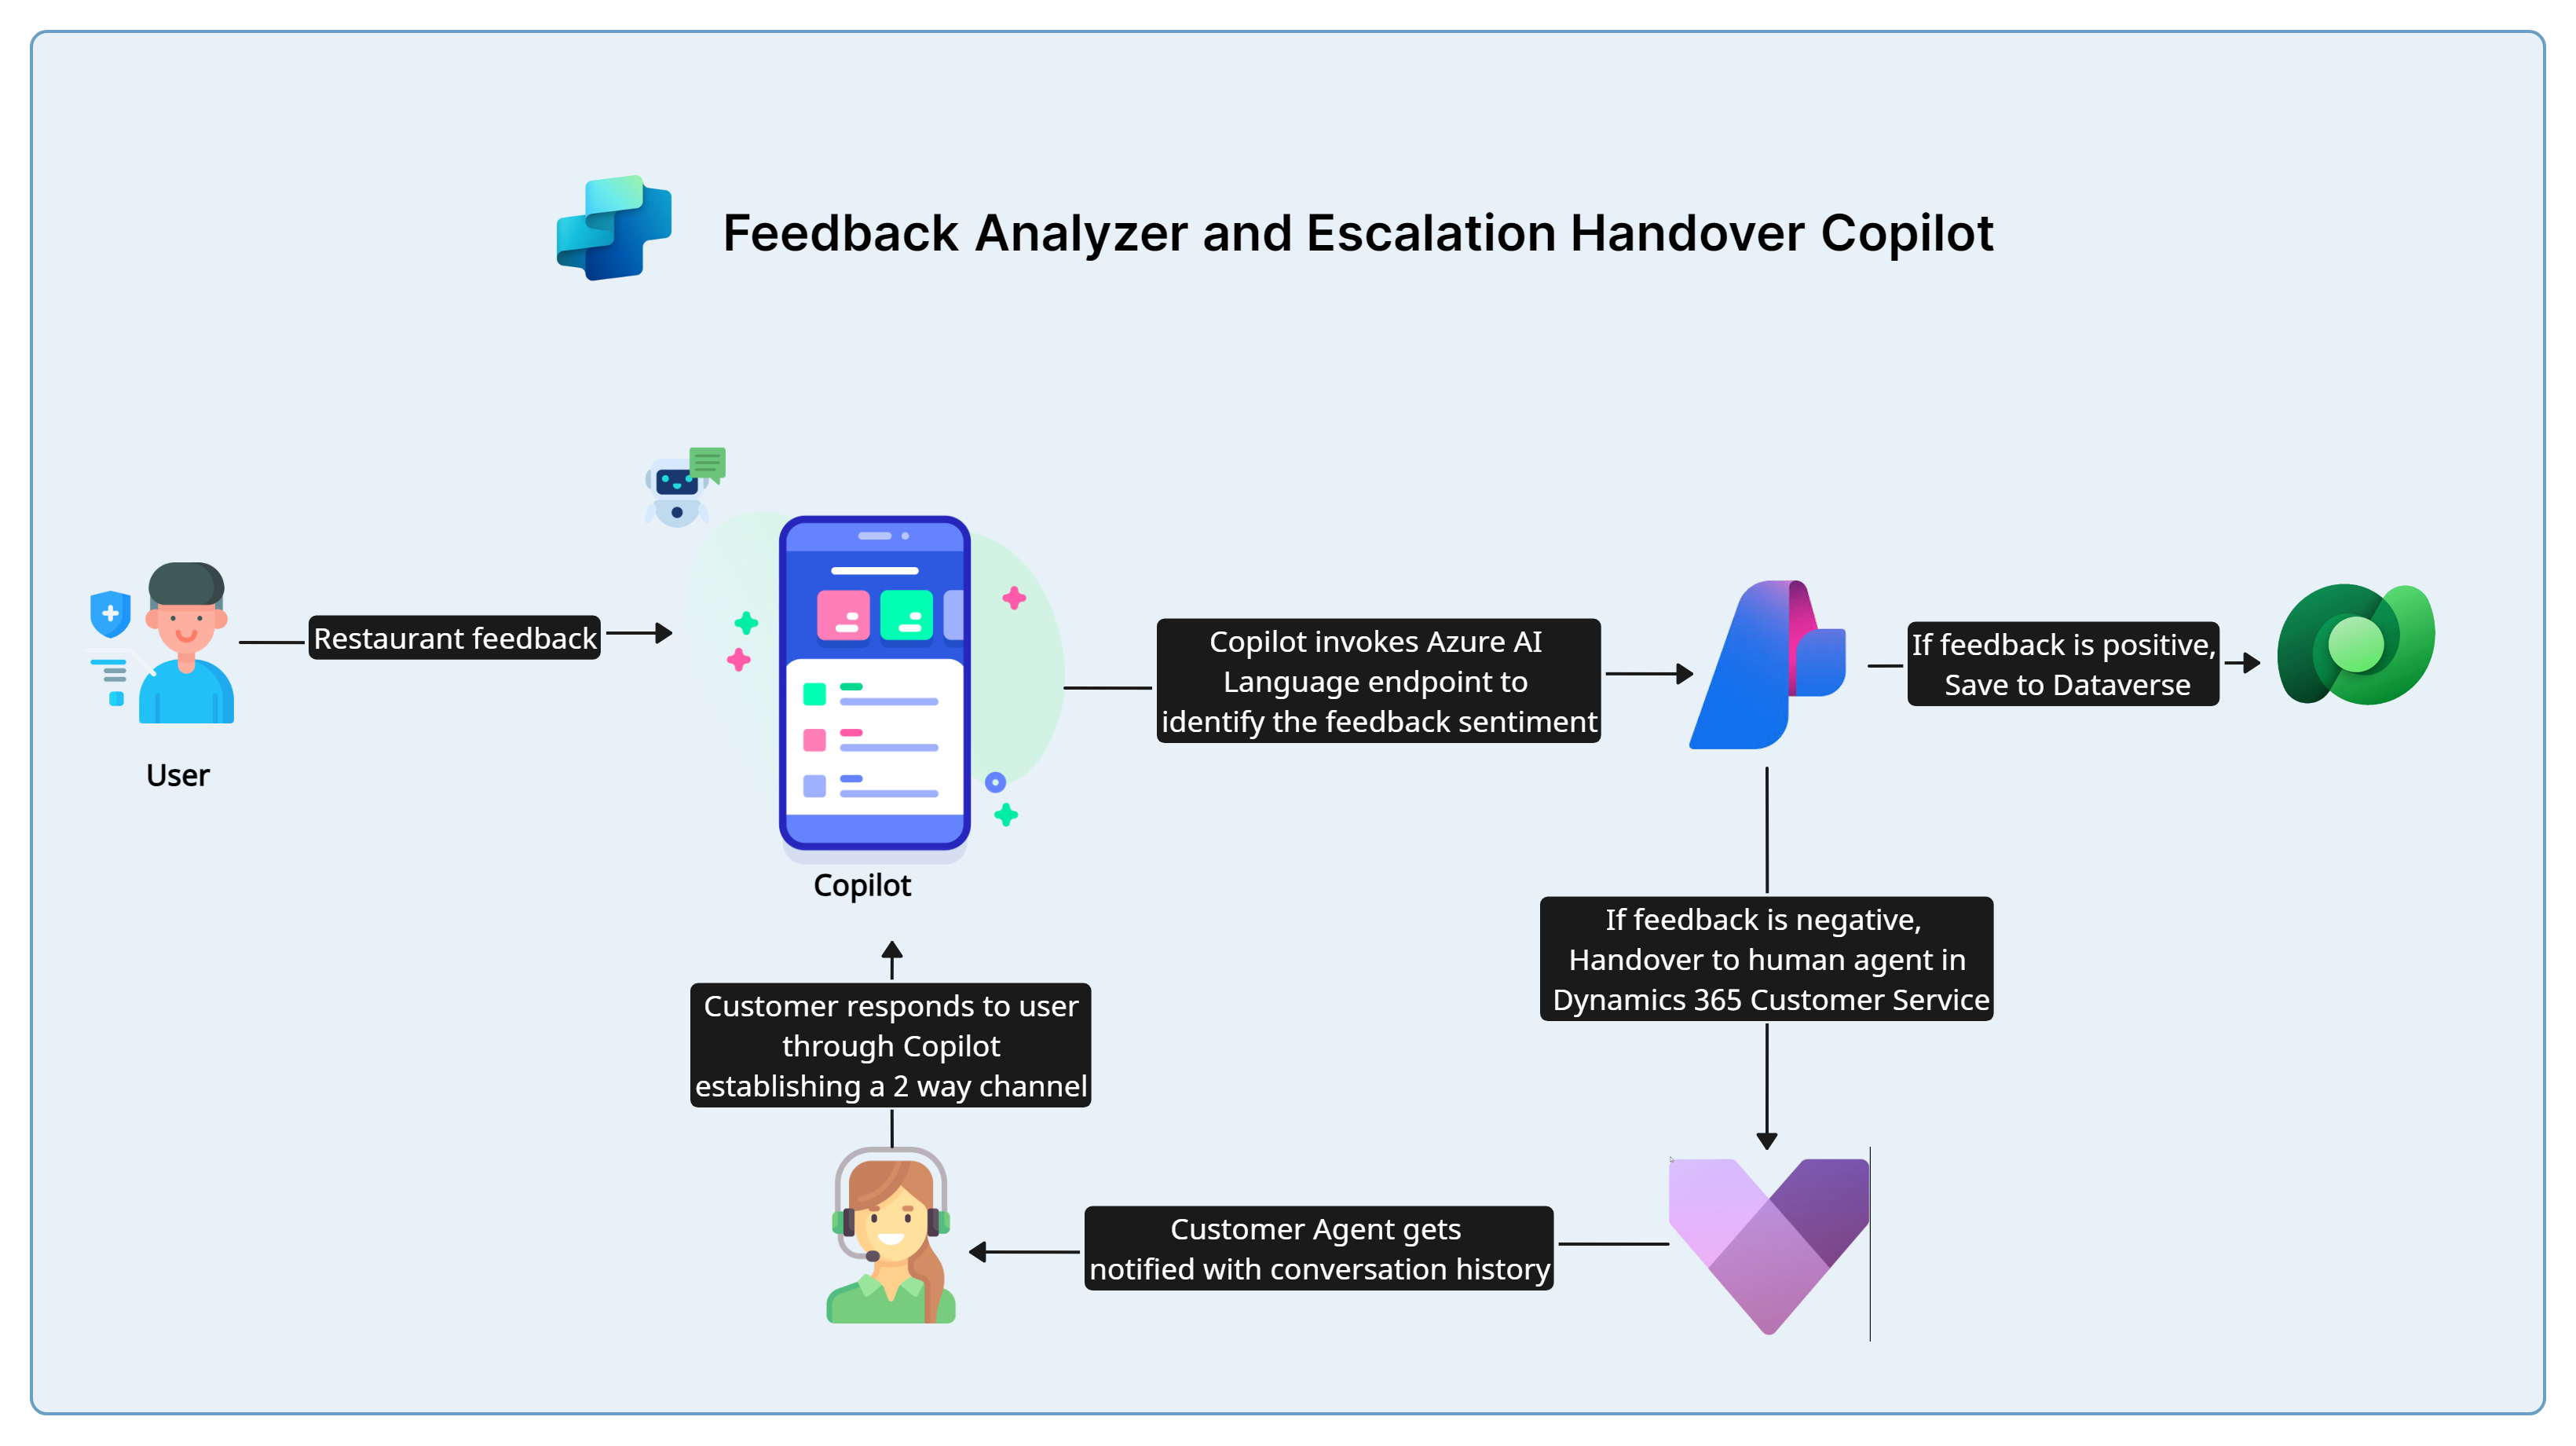
This guide will walk you through the process of setting up an intelligent Customer Service Copilot from scratch. The steps involved are:
- User provides restaurant feedback via a chat interface.
- Copilot receives the feedback and invokes the Azure AI Language endpoint to perform sentiment analysis on the feedback.
- Azure AI Language endpoint identifies the feedback sentiment.
- If the feedback is positive:
- The feedback is saved to Dataverse.
- If the feedback is negative:
- The feedback is handed over to a human agent in Dynamics 365 Customer Service.
- If the feedback is positive:
- Customer agent gets notified with the conversation history and can respond to the user through Copilot, establishing a two-way communication channel.
This flow ensures that all feedback is appropriately analyzed and acted upon, with positive feedback being stored for future reference and negative feedback being escalated to human agents for immediate attention.
Demo
Watch the demo video below to see how the intelligent Customer Service Copilot works.
Prerequisites
Before we begin, ensure you have the following:
- A Microsoft account
- Access to Azure Portal
- Dynamics 365 Customer Service trial
- Basic understanding of Power Platform and Azure services
Technologies Involved
- Dynamics 365 Customer Service: For providing a comprehensive customer service platform.
- Azure AI Language Service: For analyzing the sentiment of user feedback.
- Dataverse: For storing feedback data.
- Copilot Studio: For creating and configuring the Copilot.
- Power Pages: For embedding the chat widget and testing the Copilot interactions.
Steps to Create the Customer Service Copilot
Step 1: Provisioning a Dynamics 365 Customer Service Trial
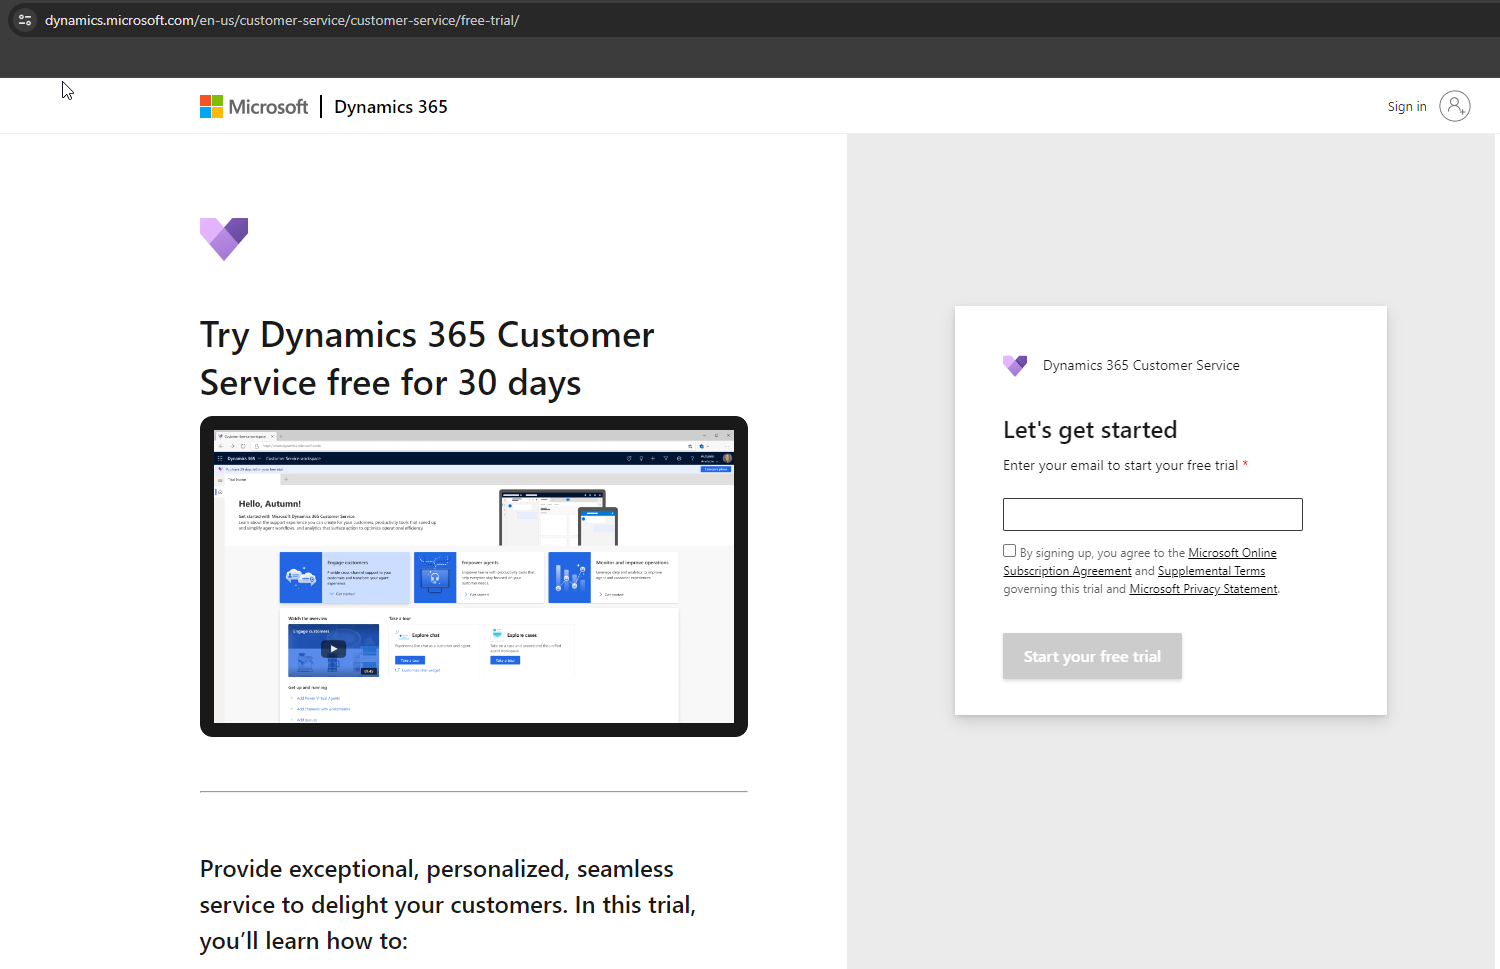
Go to Dynamics 365 Customer Service trial to sign up for the trial.
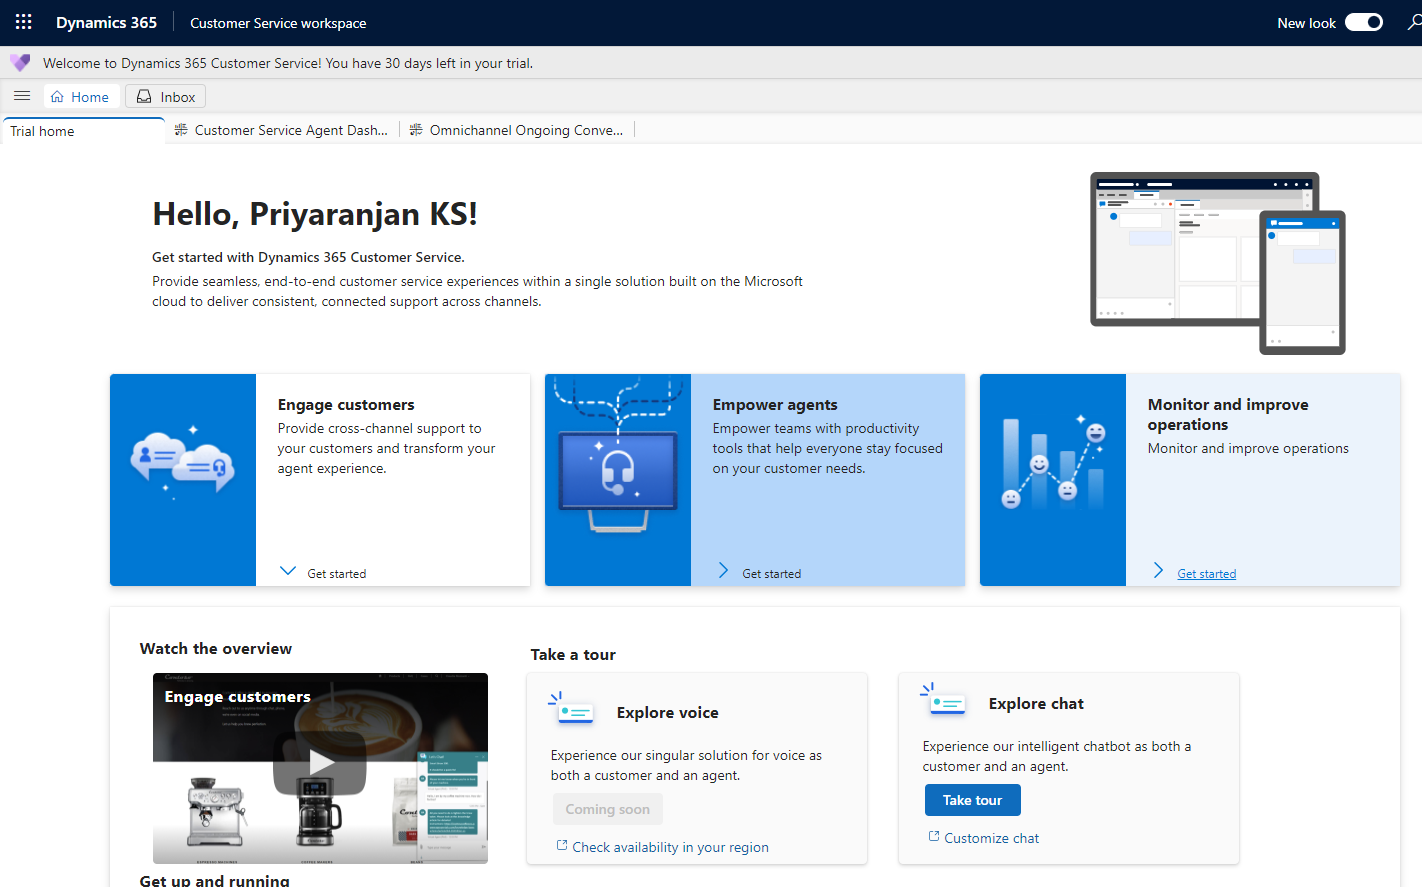
Once provisioned, you will land on the customer service workspace which gives you a 30-day trial run time.
Step 2: Creating Necessary Dataverse Tables
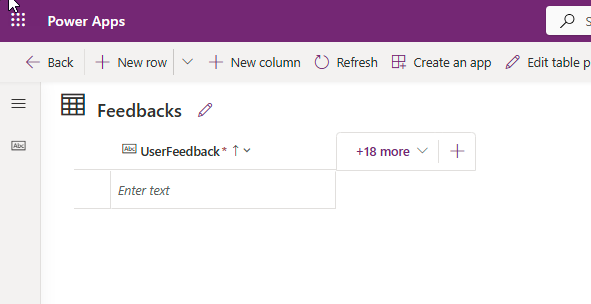
Create a Dataverse table to store positive feedback, so it doesn’t need to be escalated to a human agent.
Step 3: Setting Up Azure AI Language Service for Sentiment Analysis
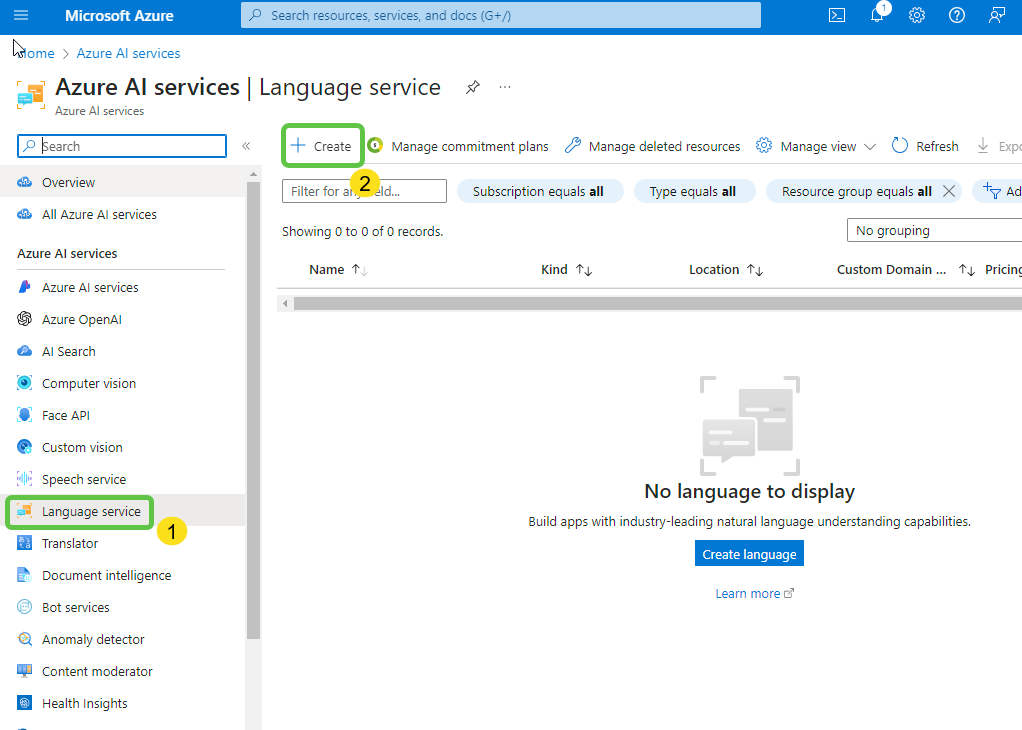
We will also need to create an instance of Azure AI Language service to help us with the sentiment analysis of the user submitted feedback.
- Head over to the Azure AI Services section and from the left pane select Language Service and click on Create.
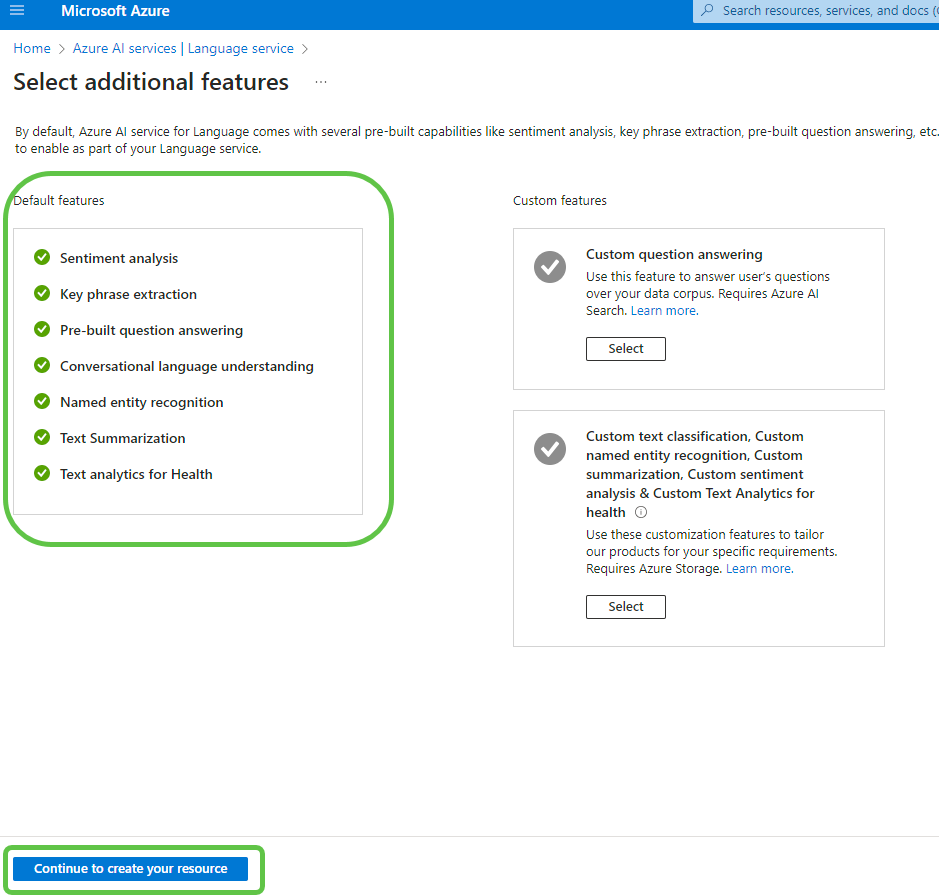
- The next page will show the default features that come with the service and the option to add custom features. We will go with the default features as it contains sentiment analysis. Click on Continue to create your resource.
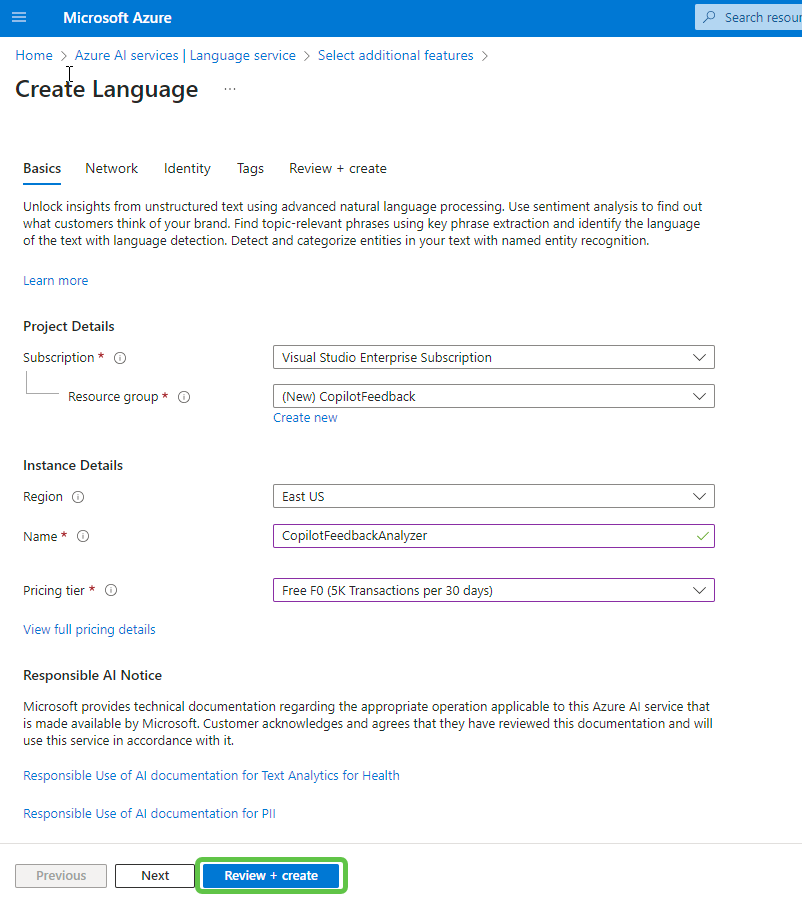
- Mention the subscription and instance details and click on Review + Create.
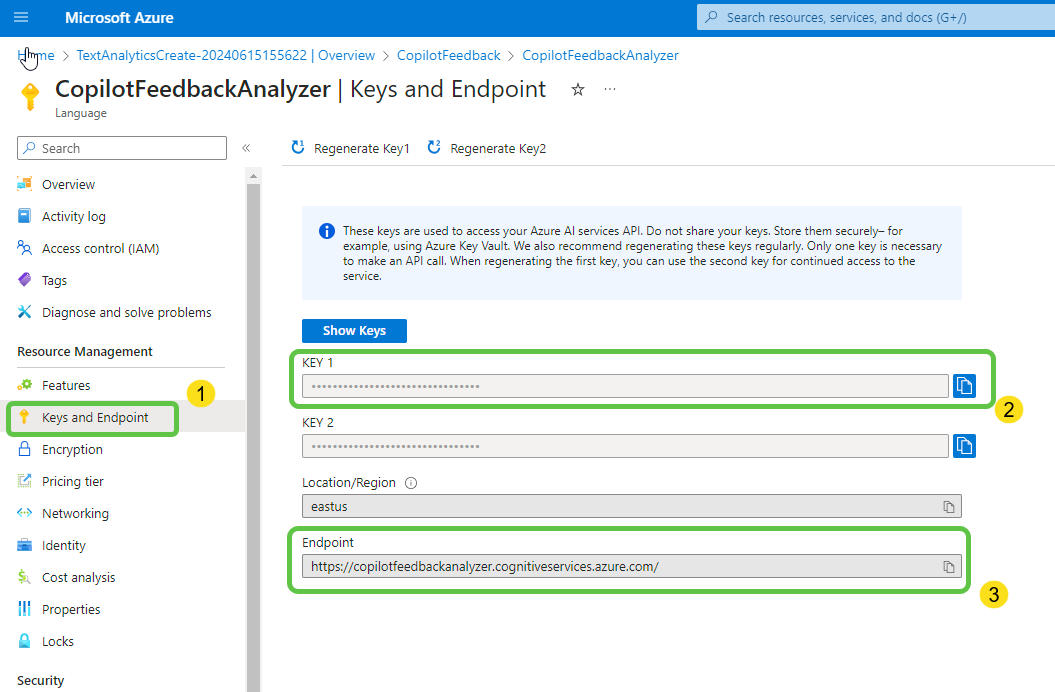
- Once the resource is created, we can head over to the page and from the Keys and endpoint section copy the Endpoint and Keys so that we can use it within the Copilot Studio to connect to the Azure AI Language Connector.
Step 4: Configuring the Copilot in Copilot Studio and Setting Up the Handover
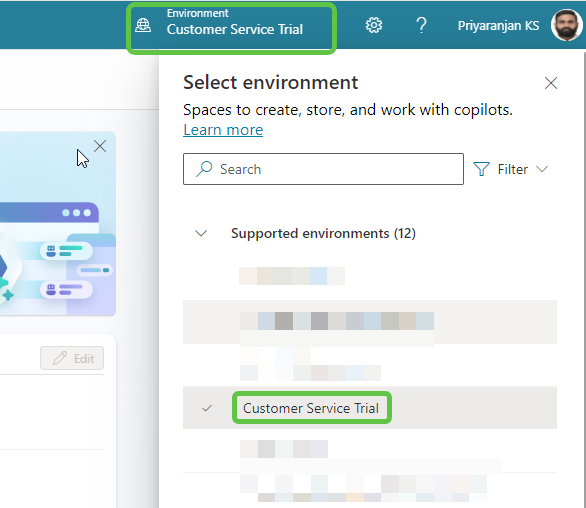
- Head over to Copilot Studio and select the Customer Service environment that got created as we signed up for the trial.
Step 5: Creating the Copilot
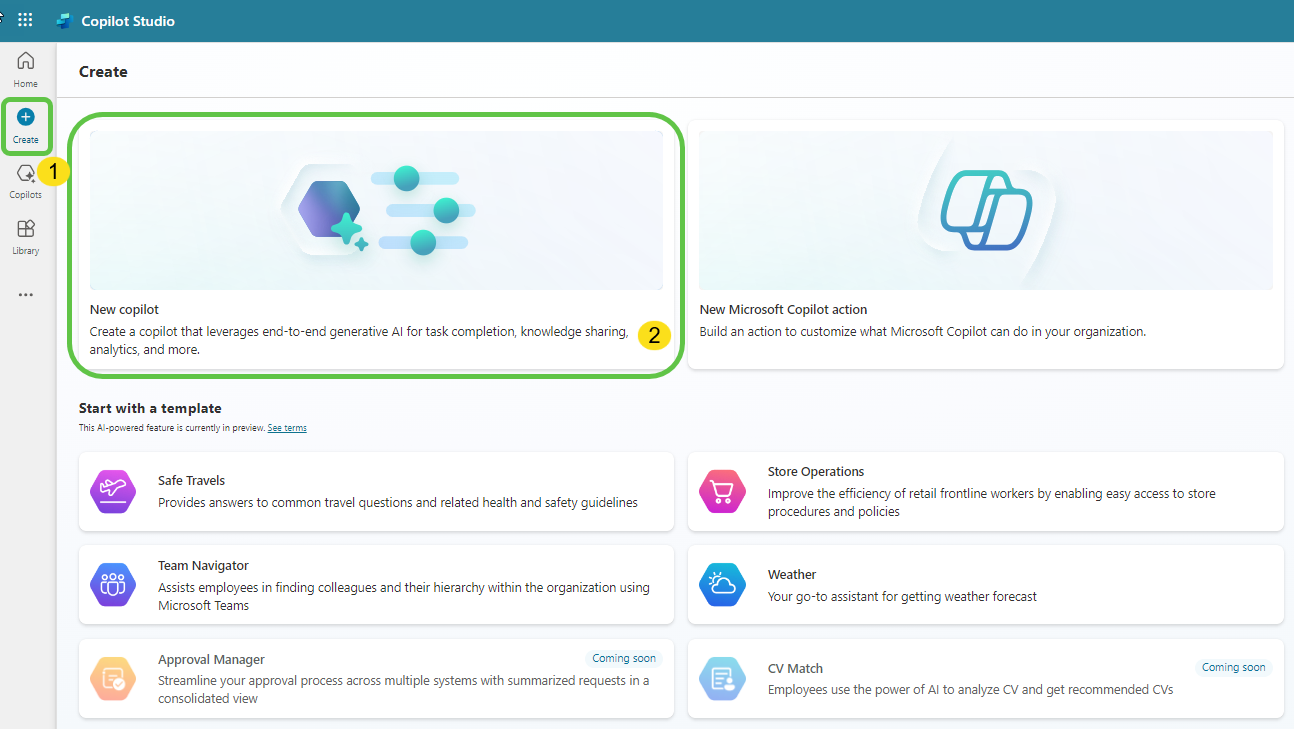
- Click on Create.
- This will provide us the option to create a Copilot based on an existing template or create a blank Copilot from scratch. Let’s select New Copilot.
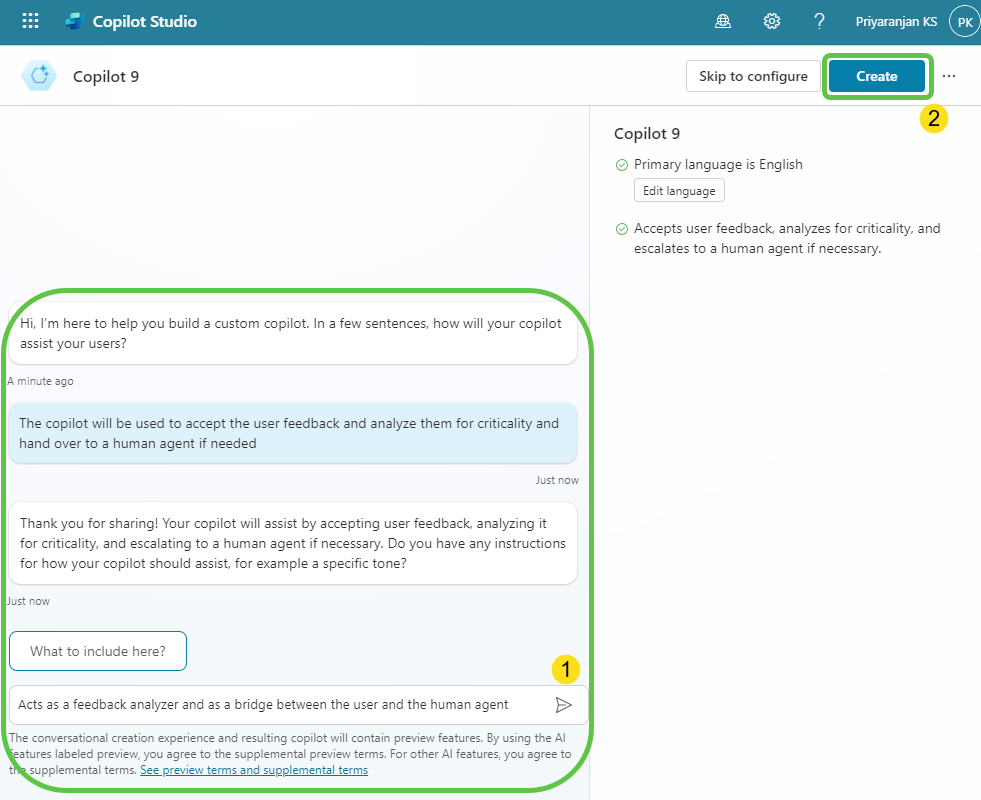
- This will take us to the page where we can:
- Describe the Copilot functionality and provide any specific instructions to the Copilot.
- Once done, click on Create to provision the Copilot.
Step 6: Configuring the Copilot
The Copilot is now created. We can then make the needed configuration changes.
- Click on Edit, edit the Copilot details like name, icon, and description.
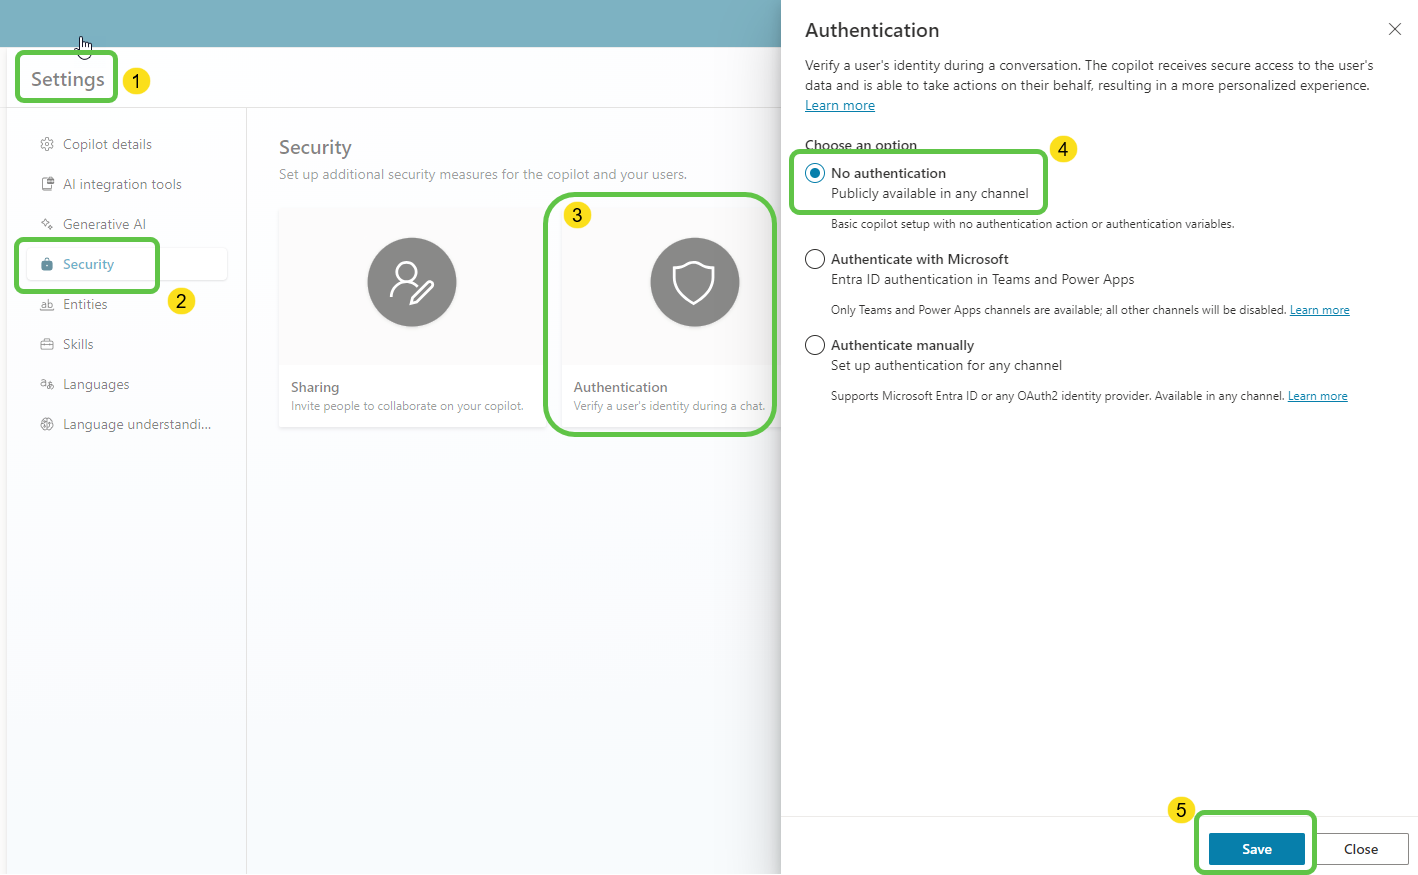
- Click on Settings to set the authentication to No Authentication.
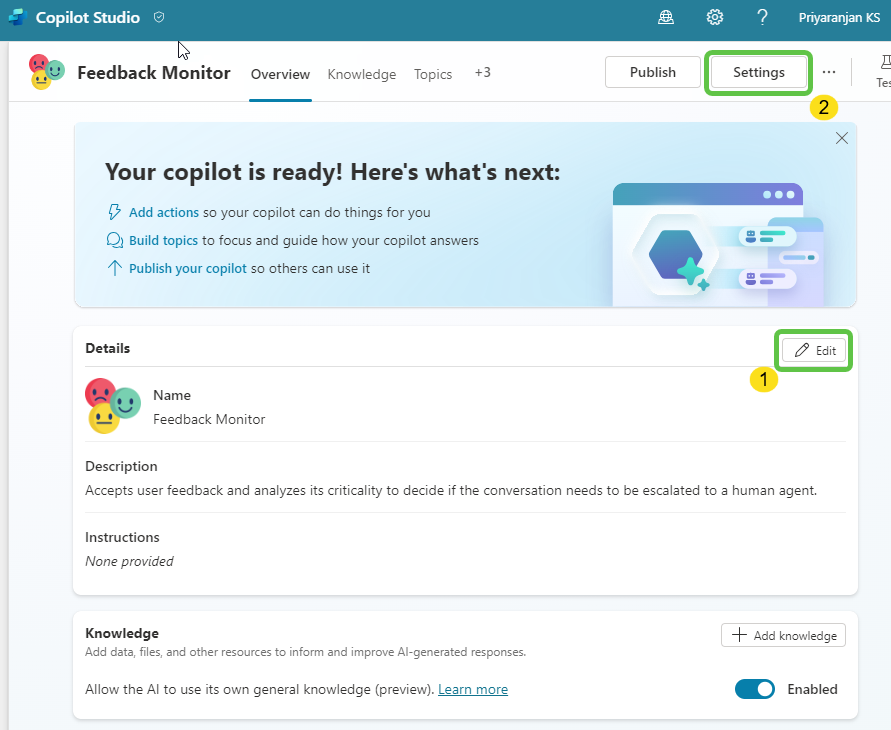
- From the Settings section, select Security -> Authentication. Choose No authentication and click on Save so that the Copilot will be accessible without authentication to public users to give feedback.
Step 7: Creating Topics
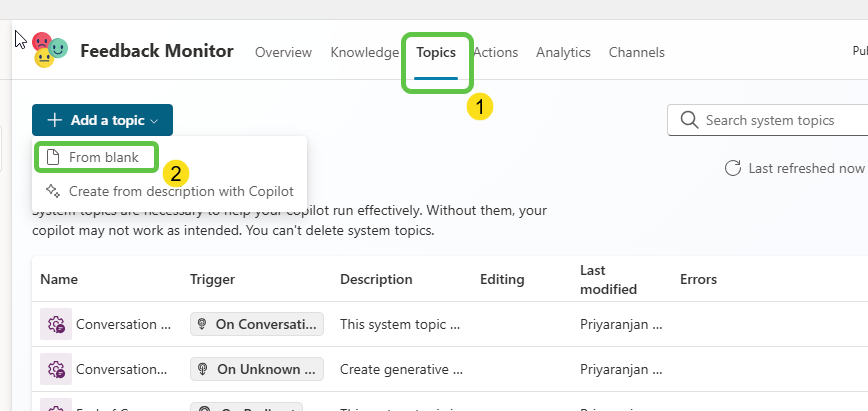
- Click on Topics from the navigation menu.
- To add the topic, we can either go with the option to create a blank topic or use Copilot to create the topic with an initial set of prepopulated conversation nodes based on the topic description that we provide.
- Let’s click on Add a Topic and select From blank.
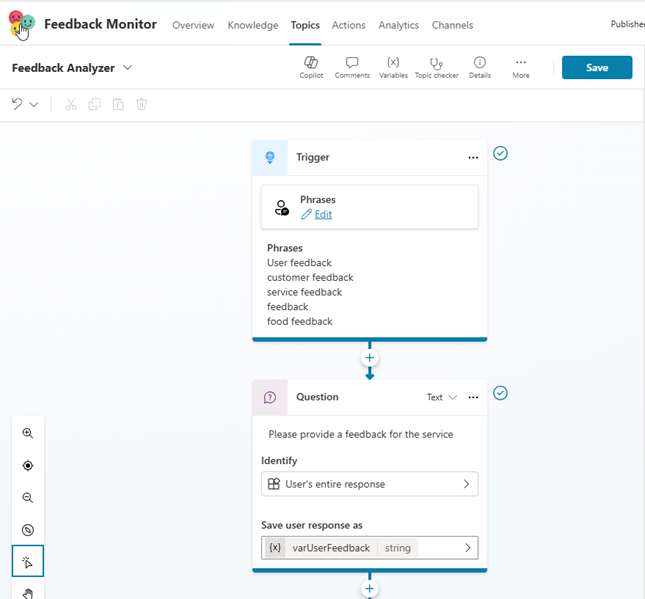
- We have named the topic as Feedback Analyzer and added the trigger phrases that will invoke this topic. As a conversation starter, we are also asking the question about the feedback and the response is stored in the variable varUserFeedback.
Note: We are not enabling the Generative selection of topics due to existing issues in Agent Handover where null messages are posted during the handover process (we will see this down the line).
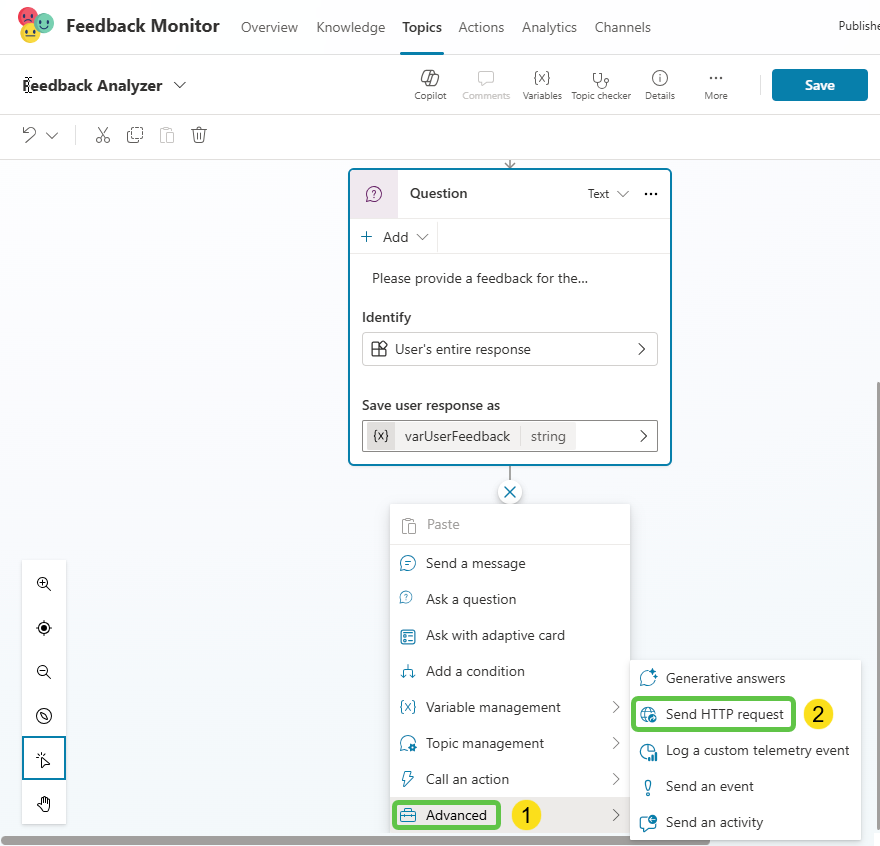
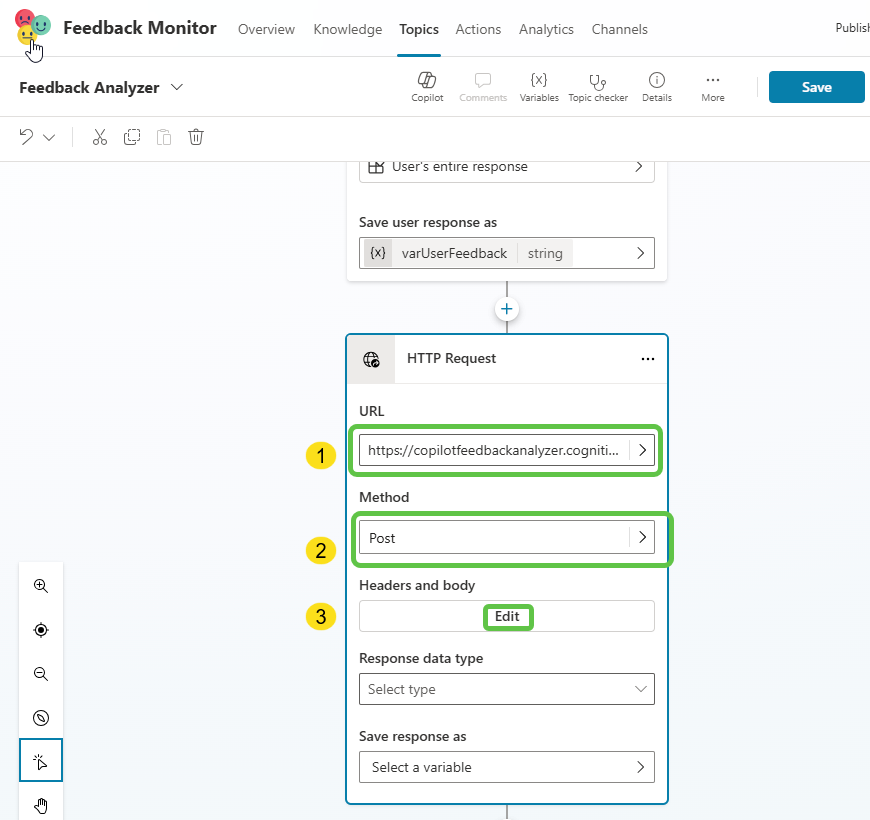
- Now we will add the HTTP request node by selecting Advanced -> Send HTTP request so that we can invoke the Azure AI Language endpoint to detect the user feedback sentiments.
- Let’s configure the HTTP request node by:
- Specify the URL of the Azure AI Language instance that we had created earlier and append
text/analytics/v3.1/sentimentto it. The URL will look like belowhttps://<Azure AI Language Instance Name>.cognitiveservices.azure.com/text/analytics/v3.1/sentiment - Mention the method as POST
- Click on Edit to update the header and body
- Specify the URL of the Azure AI Language instance that we had created earlier and append
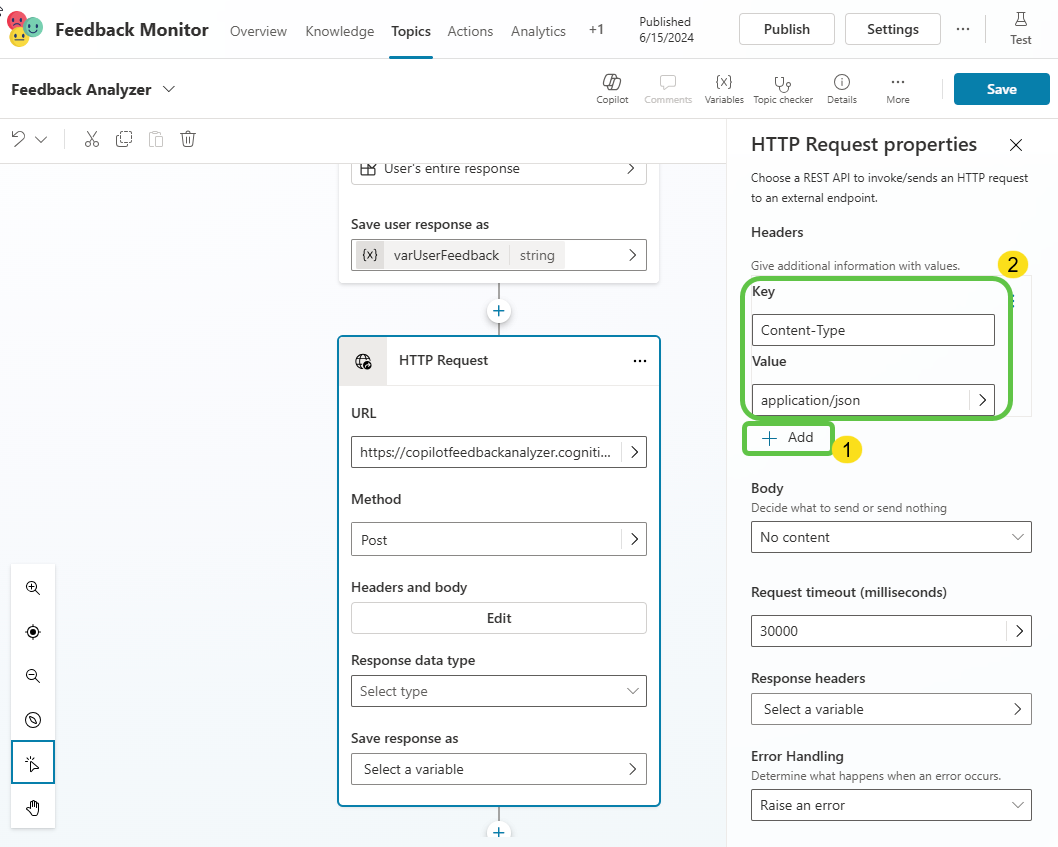
- We will add 2 header attributes:
- Click on Add
- Mention the first parameter key as Content-Type and value as
application/json
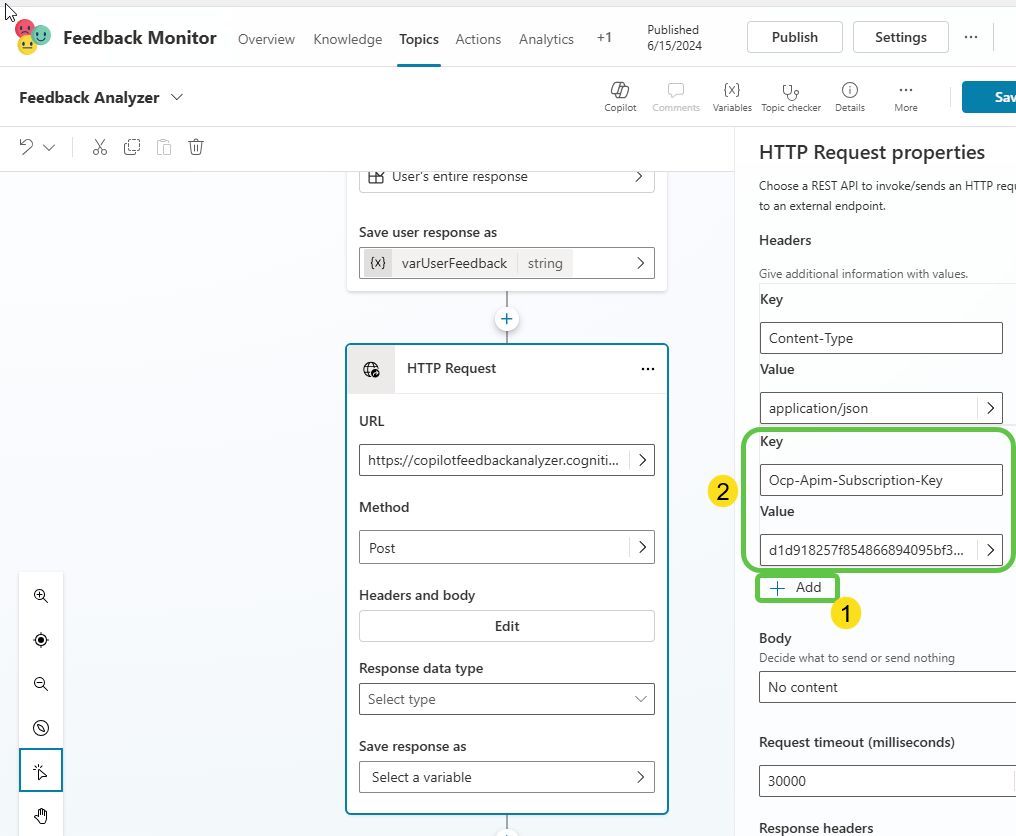
- Let’s add one more attribute for the API Key:
- Click on Add
- Mention the key as Ocp-Apim-Subscription-Key and value as
<the key copied from the Azure AI Language Instance>
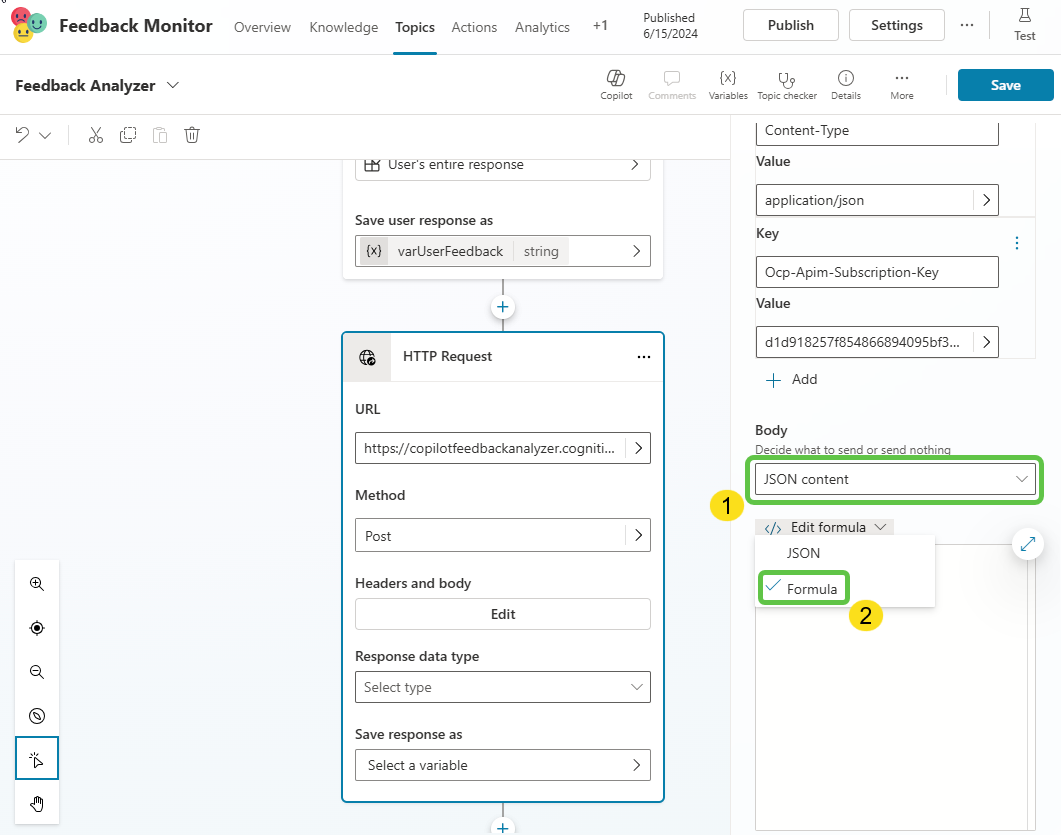
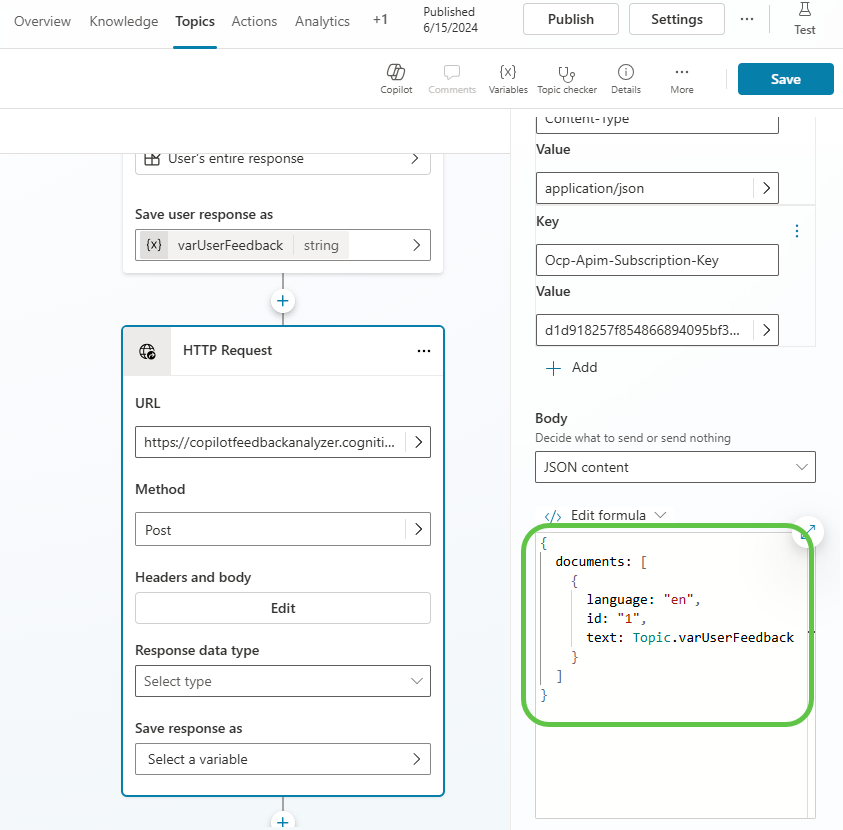
- Now we will add the body of the request by selecting the:
- JSON Content from the drop-down
- Ensure that you select Formula as the way of mentioning the body within the box so that we can pass in dynamic content which is the user feedback variable.
- Add the below formula to the box which will format the body as expected by the Azure AI Language API where text key will contain the user feedback submitted.
{
  documents: [
{
  language: "en",
  id: "1",
  text: Topic.varUserFeedback
}
  ]
}
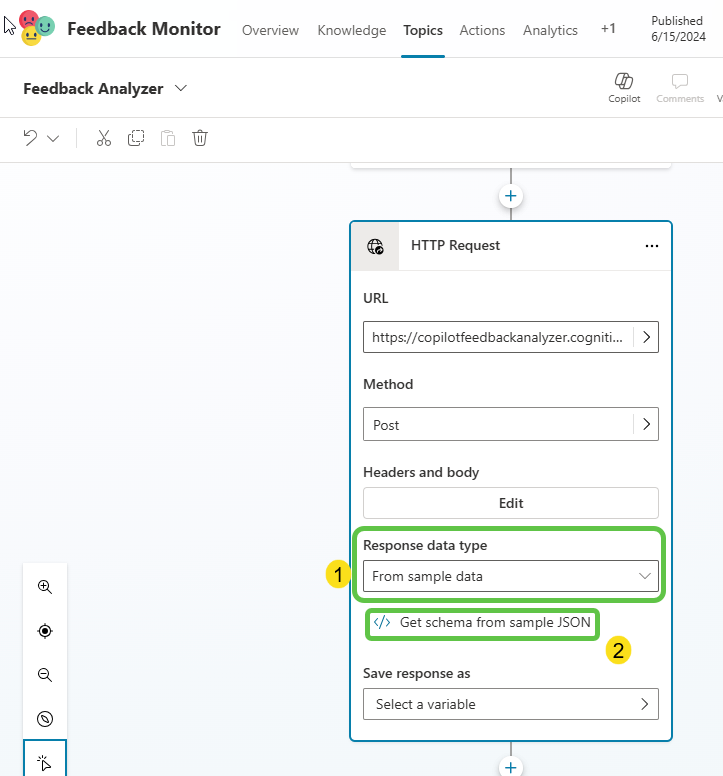
- Now let’s configure the Response data type as From sample data and click on Get schema from sample JSON so that we can pass the sample output of the Azure AI Language API and the response schema can be auto-generated from it.
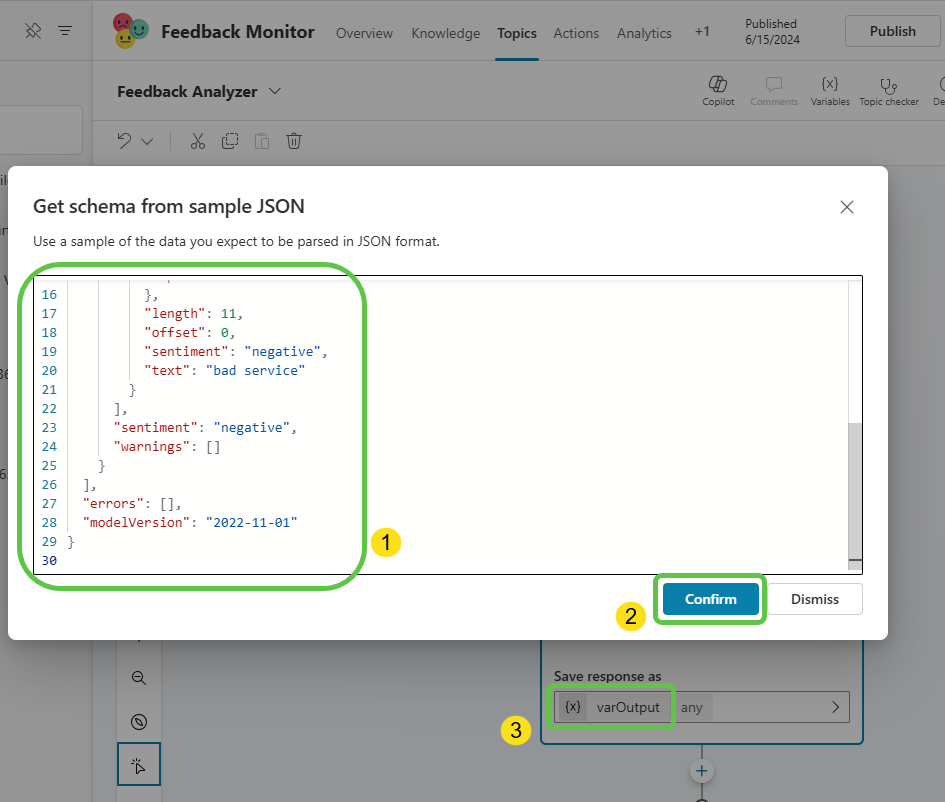
- We will add the below sample output JSON to generate the schema:
{ "documents": [ { "confidenceScores": { "negative": 0.98, "neutral": 0.01, "positive": 0.01 }, "id": "1", "sentences": [ { "confidenceScores": { "negative": 0.98, "neutral": 0.01, "positive": 0.01 }, "length": 11, "offset": 0, "sentiment": "negative", "text": "bad service" } ], "sentiment": "negative", "warnings": [] } ], "errors": [], "modelVersion": "2022-11-01" }- Add the Sample JSON to the pop-up
- Click on Confirm which will convert this into a schema
- Finally, save the output to a new variable varOutput
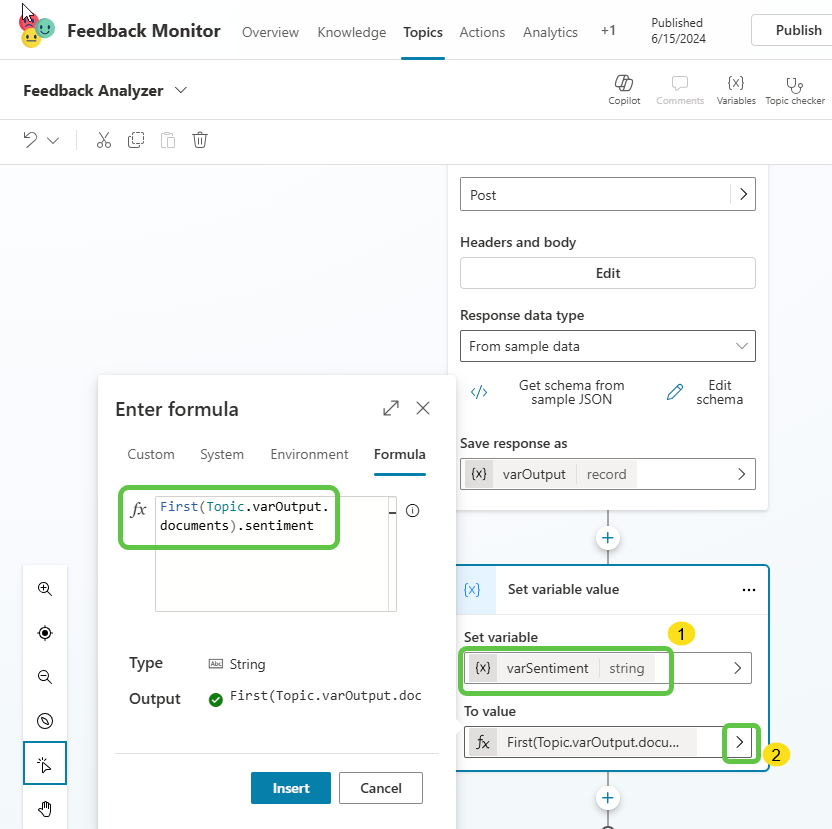
- As we can see in the above sample output, the Sentiment value is nested within the node
documents->sentences->sentimentwhich we will be trying to extract using Power Fx. For this, we will add a new variable and use the below Power Fx:First(Topic.varOutput.documents).sentiment- Create a new variable named varSentiment in the Set variable field
- Assign the above Power Fx formula to the To value field so that we can extract the sentiment value from the output
- Now that we have the sentiment value, we will add a condition check and if the sentiment is negative, we will escalate it to a human agent using the Transfer conversation node.
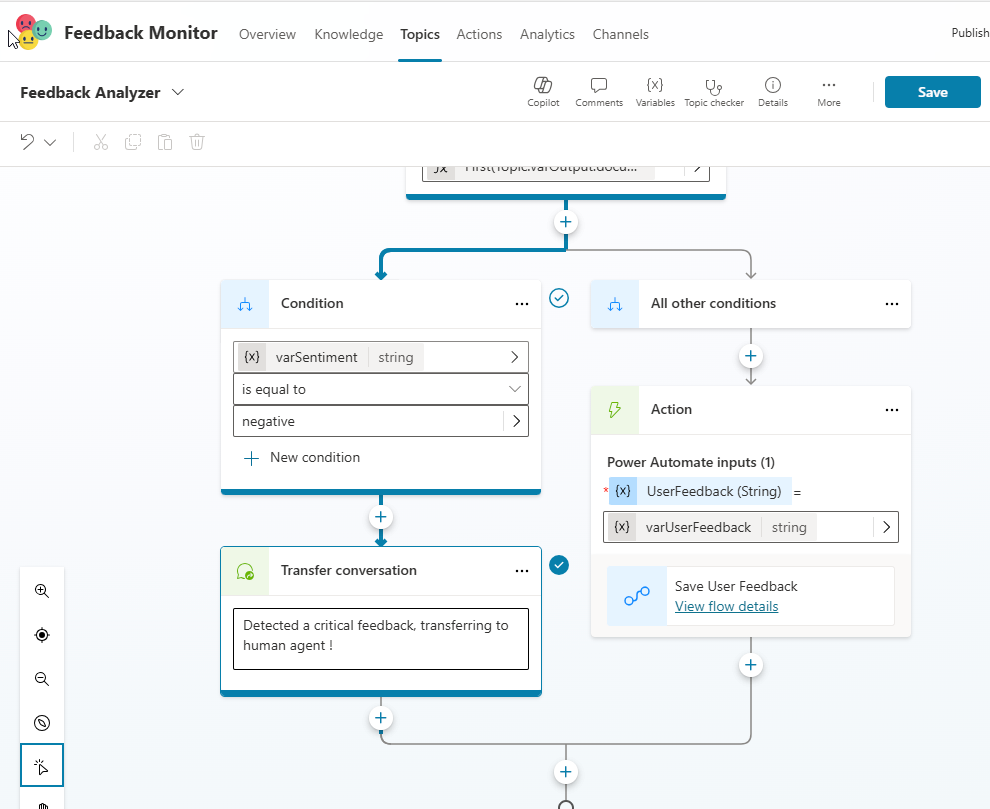
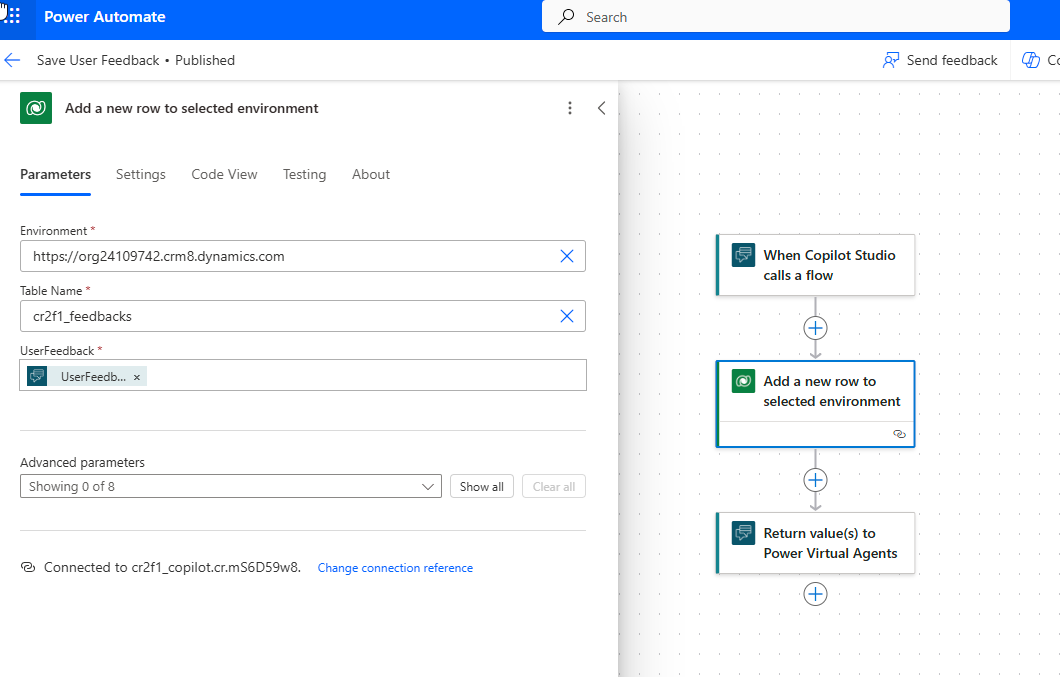
- If feedback is positive, we can save the feedback to Dataverse by calling a Power Automate and passing the user feedback. We will not be able to use the Dataverse connector directly in this scenario because we have enabled No authentication for the Copilot. The positive feedback saving flow is pretty simple as it directly saves the feedback to the table.
Step 8: Configure Transfer to Agent Node
Before making further changes, let’s save the Topic and publish the bot once. Now let’s configure the Agent transfer by selecting Channels -> Dynamic 365 Customer Service.
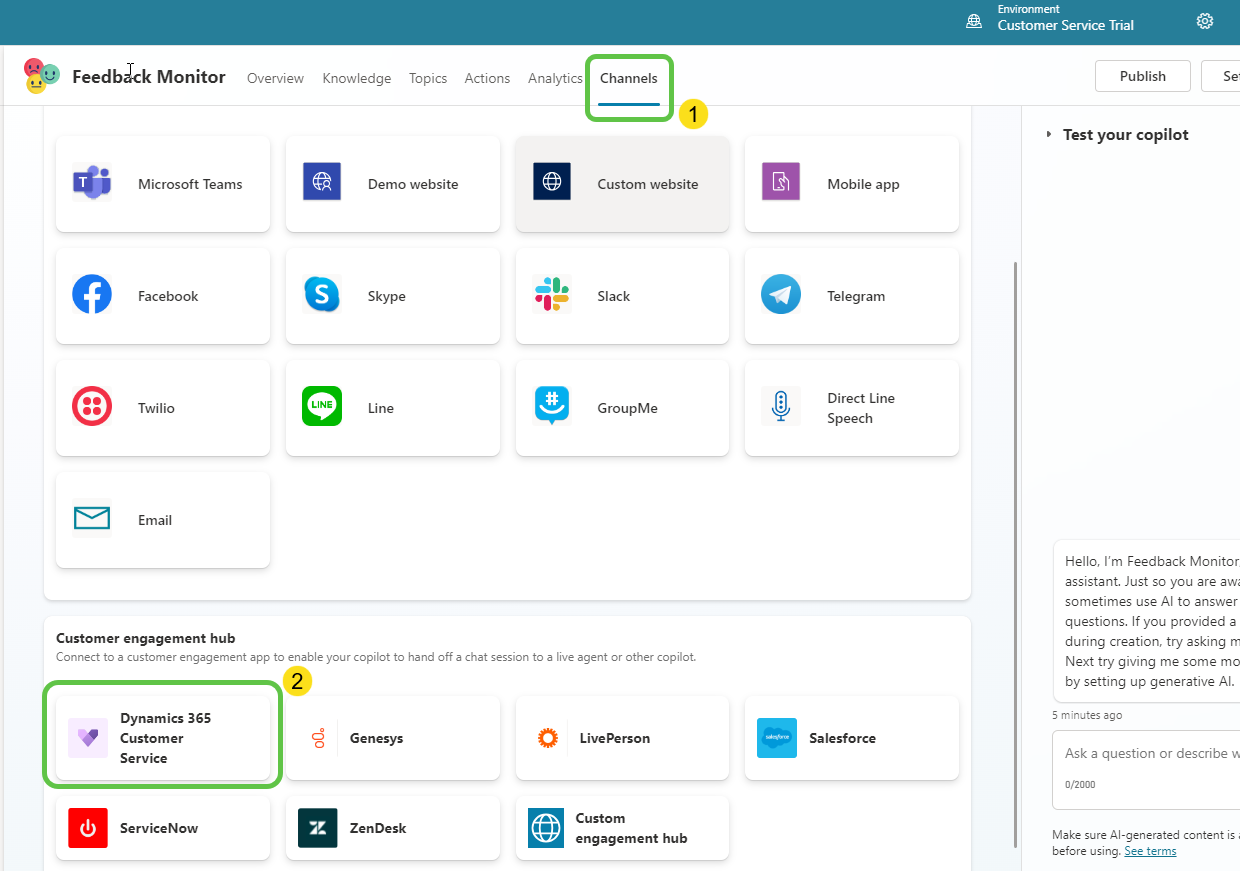
We would need a Dynamics 365 Customer Service environment for the Omnichannel agent transfer to work.
We can see the message stating, we don’t have access to all the required variables and actions. The mentioned packages aren’t required to hand off to Omnichannel for Customer Service, but they provide Copilot authors with a better experience by providing extra variables and actions.
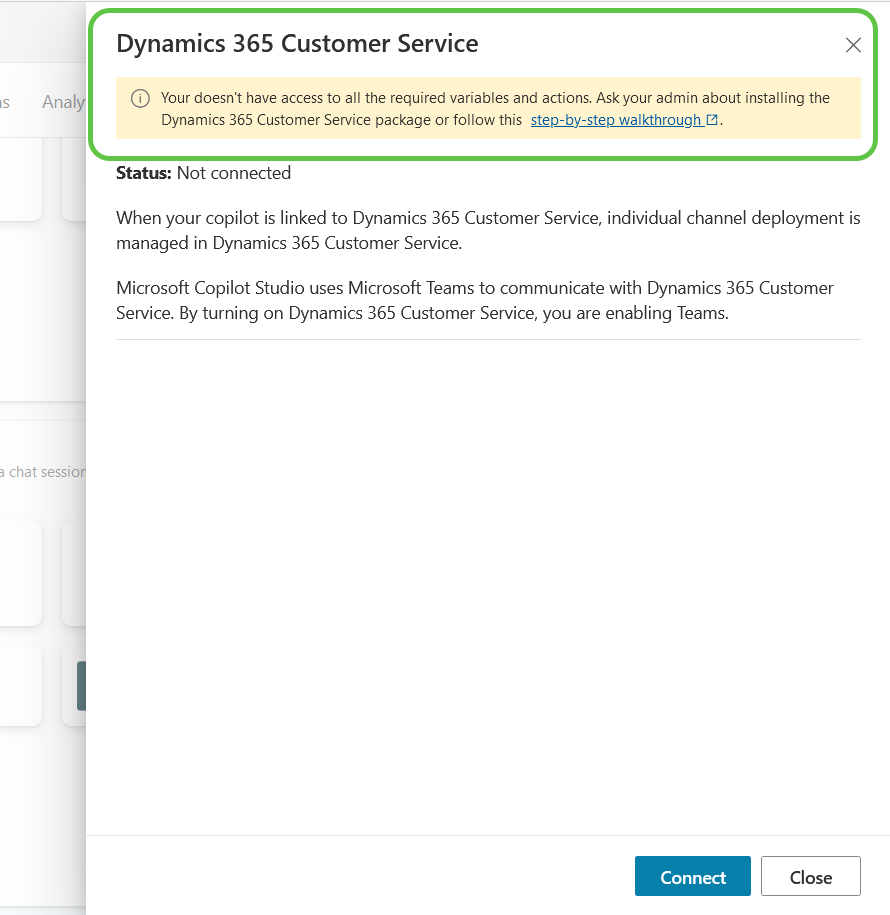
So let’s install the package from here.
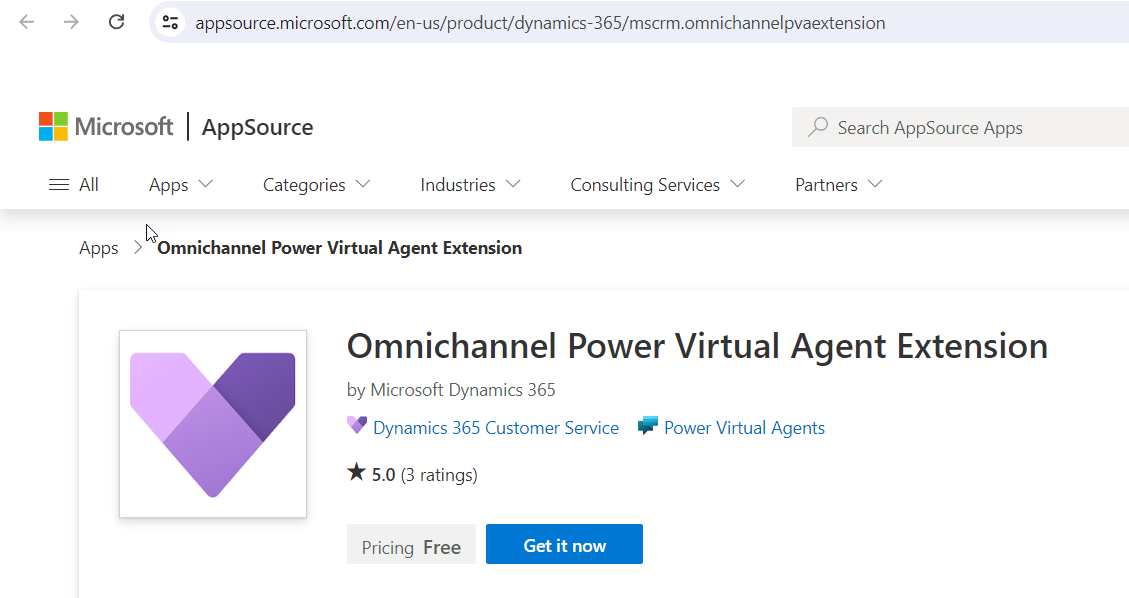
Mention the user account and click on Get It Now.
Next, we will select the environment where we would like to install the Omnichannel Extension and click on Install.
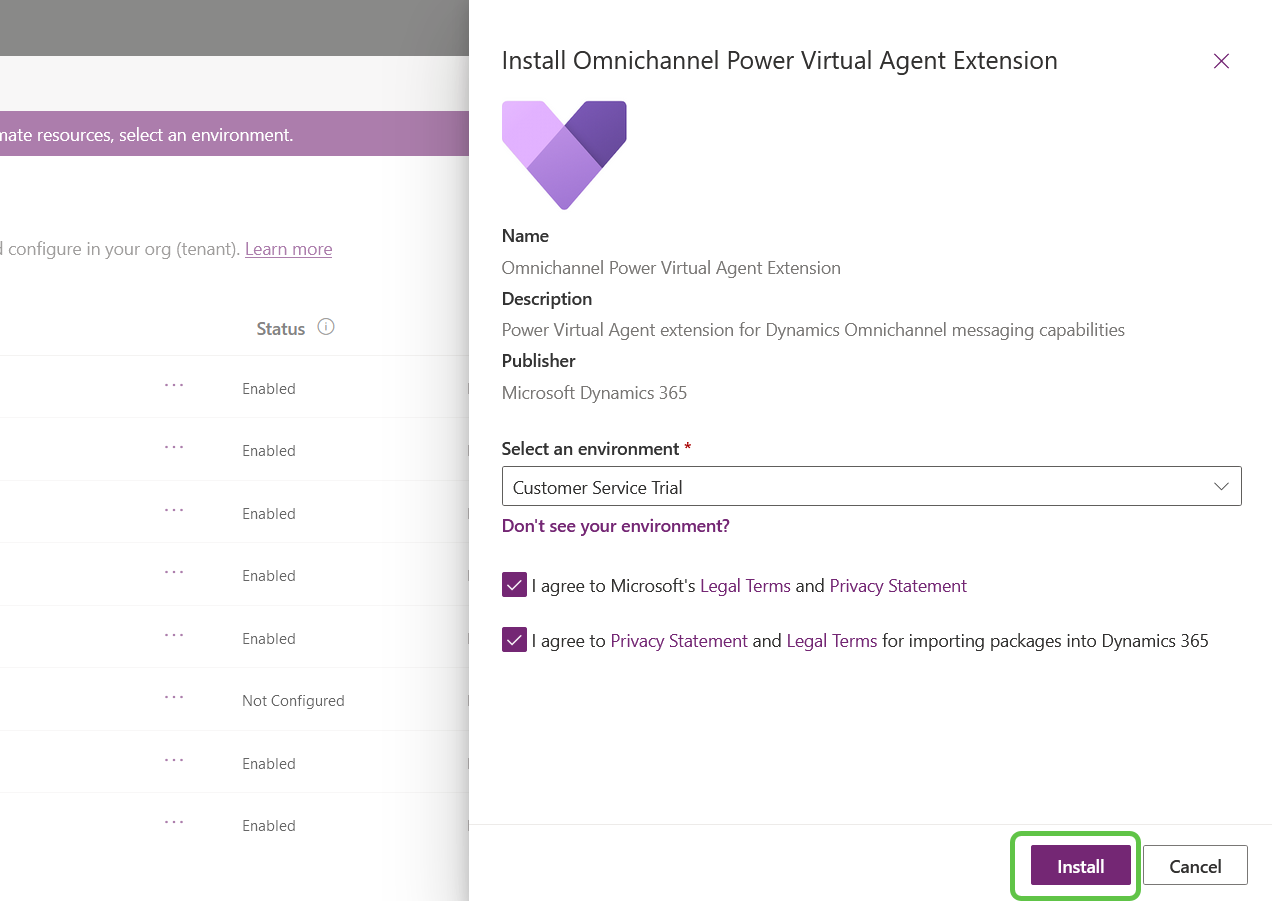
This will install the needed extensions and if we head back to the Copilot channel page, we can now see that the warning message is no longer there.
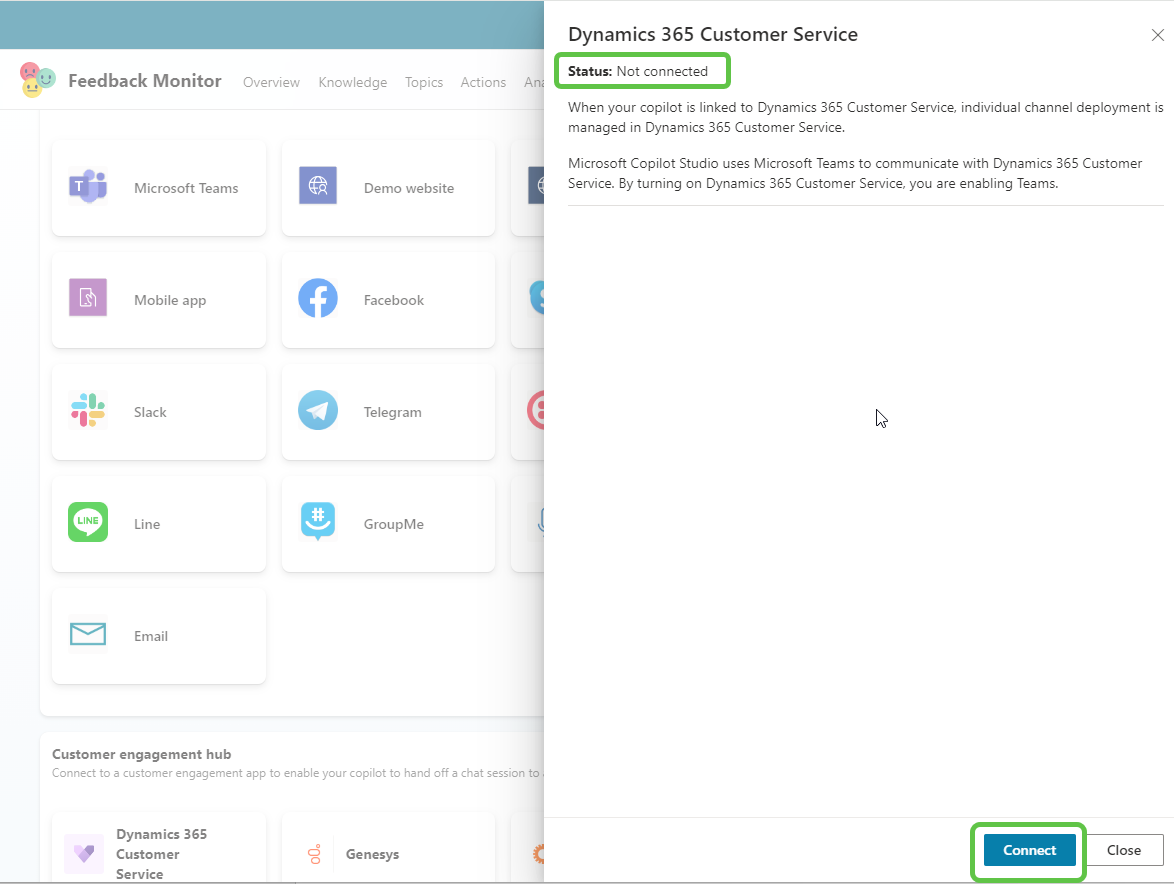
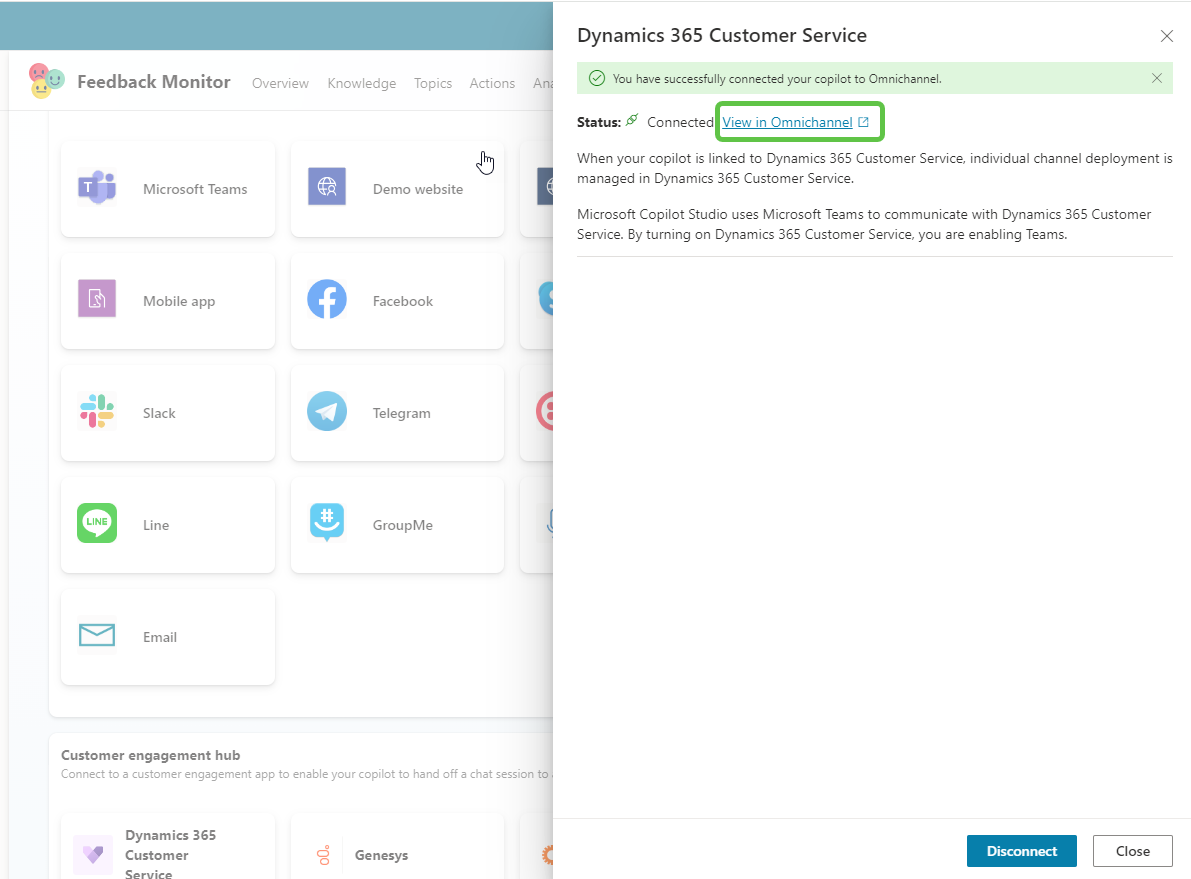
Since we had signed up for a trial customer service instance, it is available for us to connect. We can see the status is currently Not connected, let’s click on Connect.
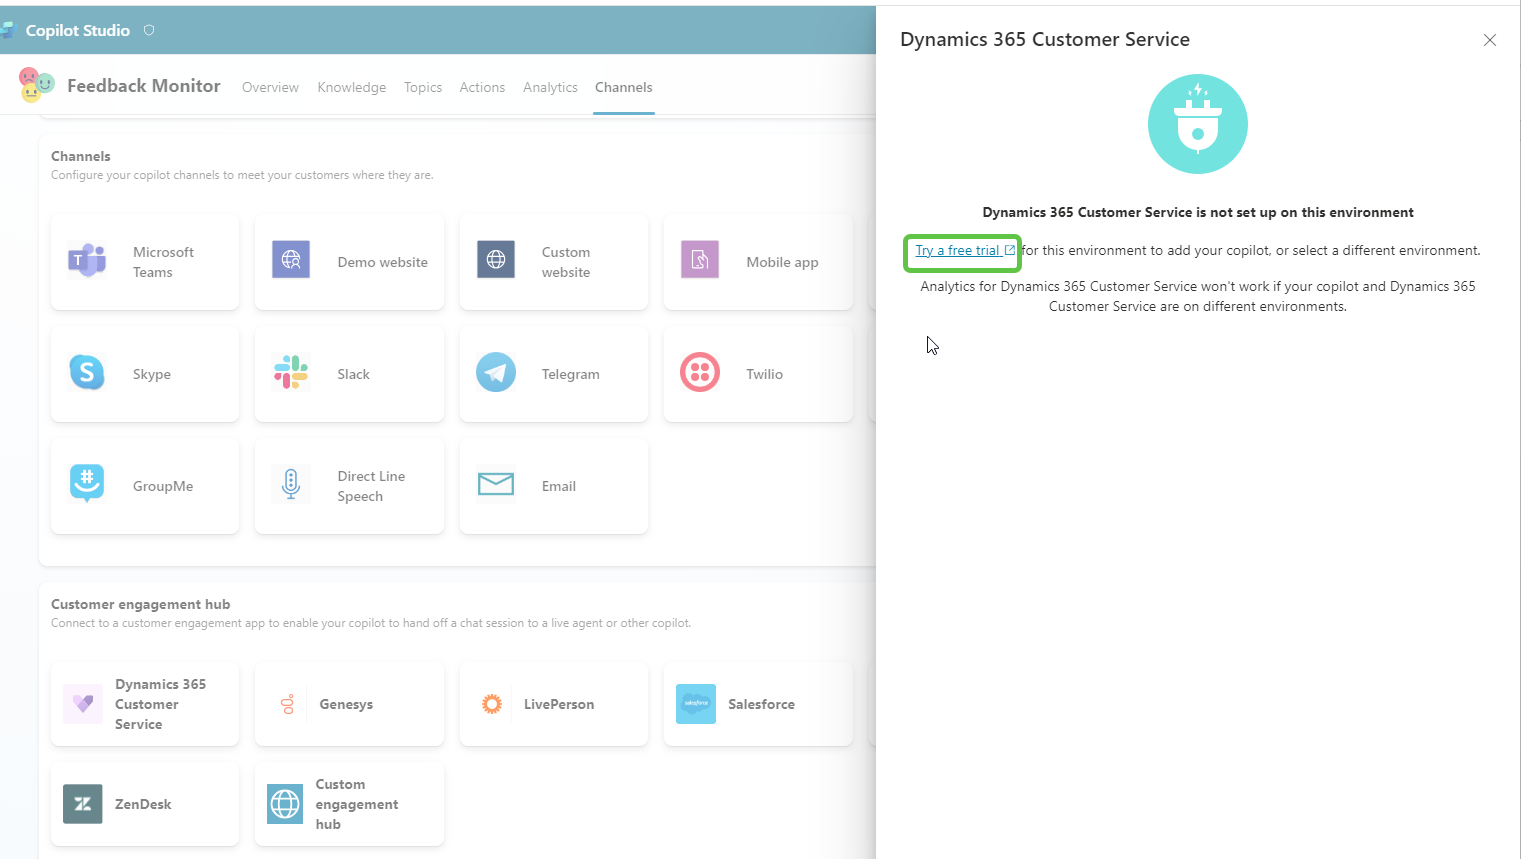
Note: In case you end up seeing the below message even after having a Customer Service instance, it is probably because your Copilot and Customer Service are in two different environments. Both have to be in the same environment to configure the handover.
Thus we have established the connection between the Copilot and Omnichannel. Click on View in Omnichannel so that we can head over to the Omnichannel admin center.
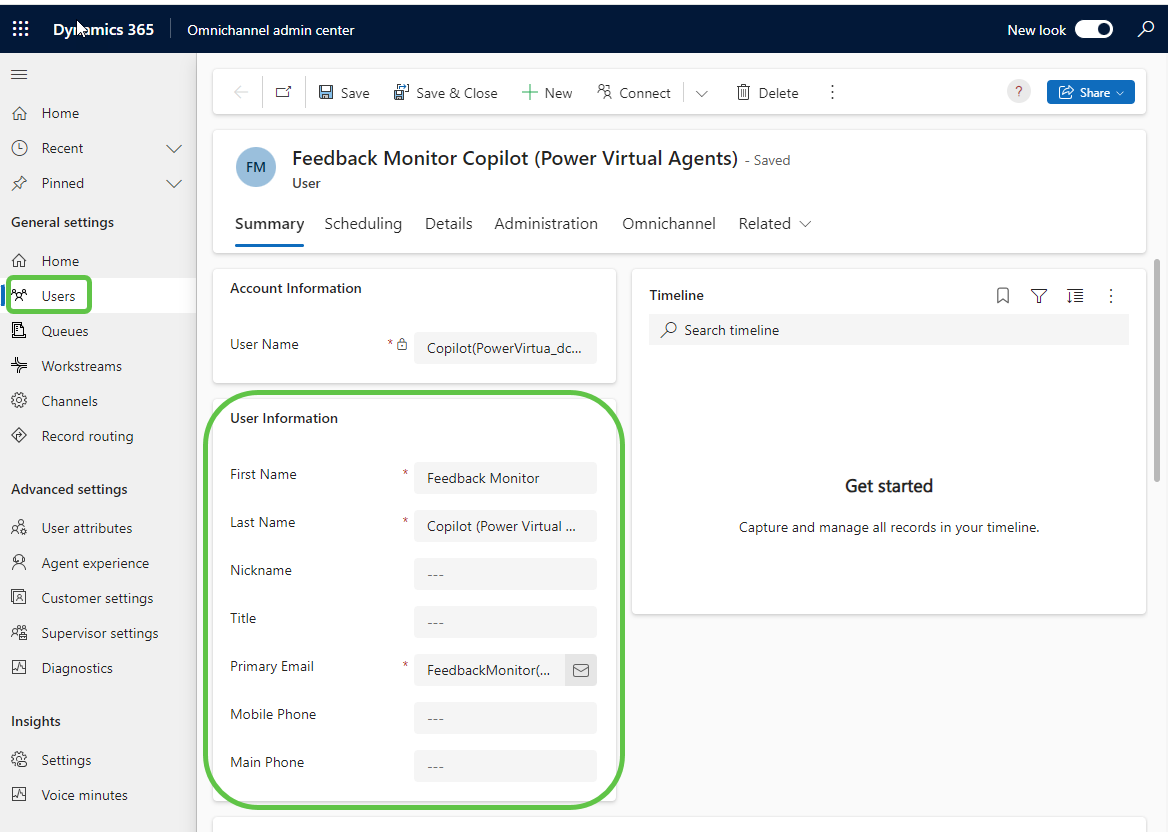
In the Users section of the Omnichannel admin center, we can see that the Copilot has been added as a user.
Step 9: Create the Queue
So as to proceed with successfully performing the handover we need to do 3 actions:
- Create a Queue
- Create a Workstream
- Create a RuleSet
Though we can do this from the Omnichannel admin center, it is deprecated, and we are advised to start using the Customer Service Admin center going forward. So let’s head over to by clicking the Open Customer Service admin center.
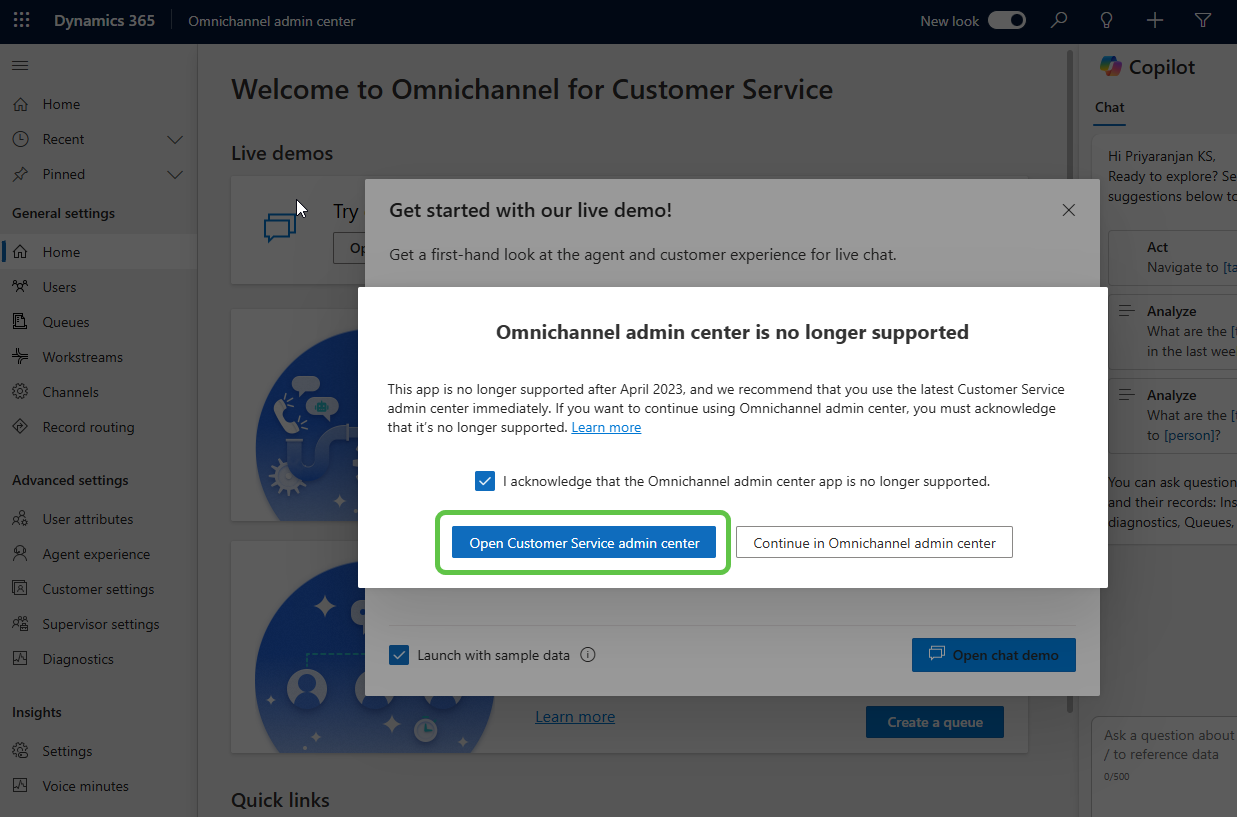
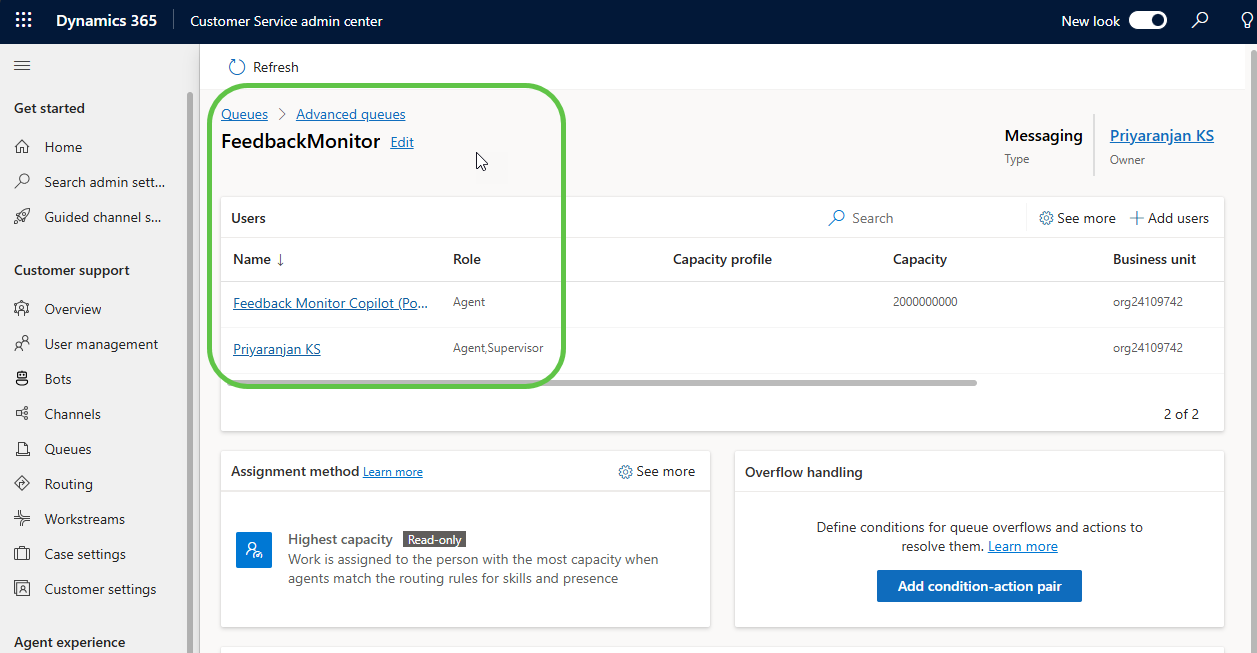
Now that we are inside the Customer Service admin center, to hold the incoming conversations that are handed over, we will create a Queue and add the human agent as well as the Copilot that we have created to the queue.
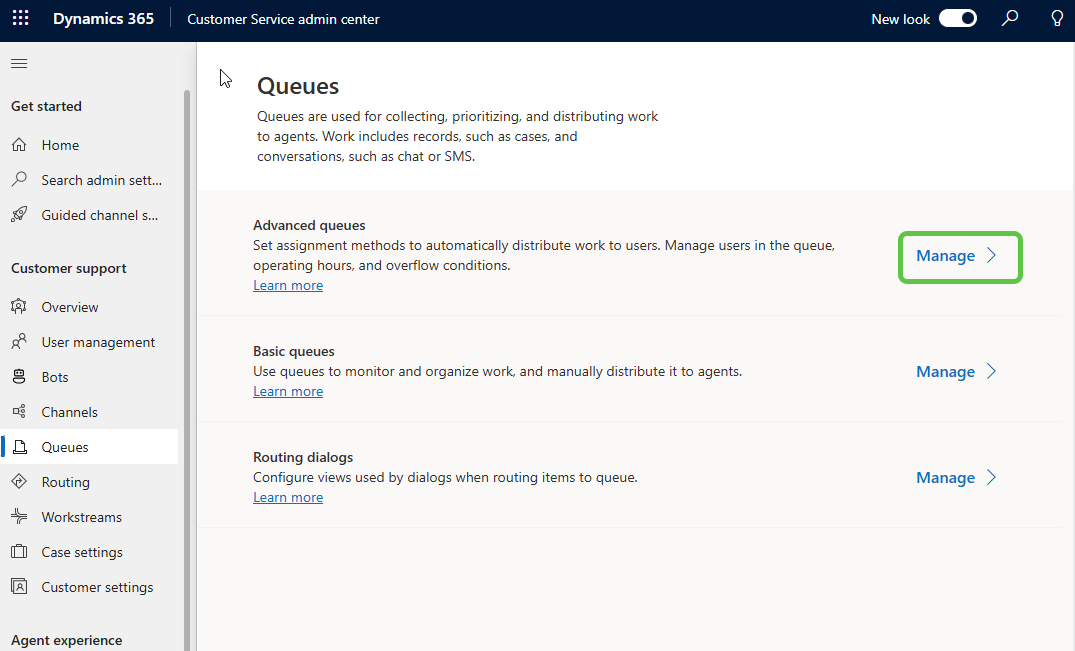
- Click on Queues from the left side pane.
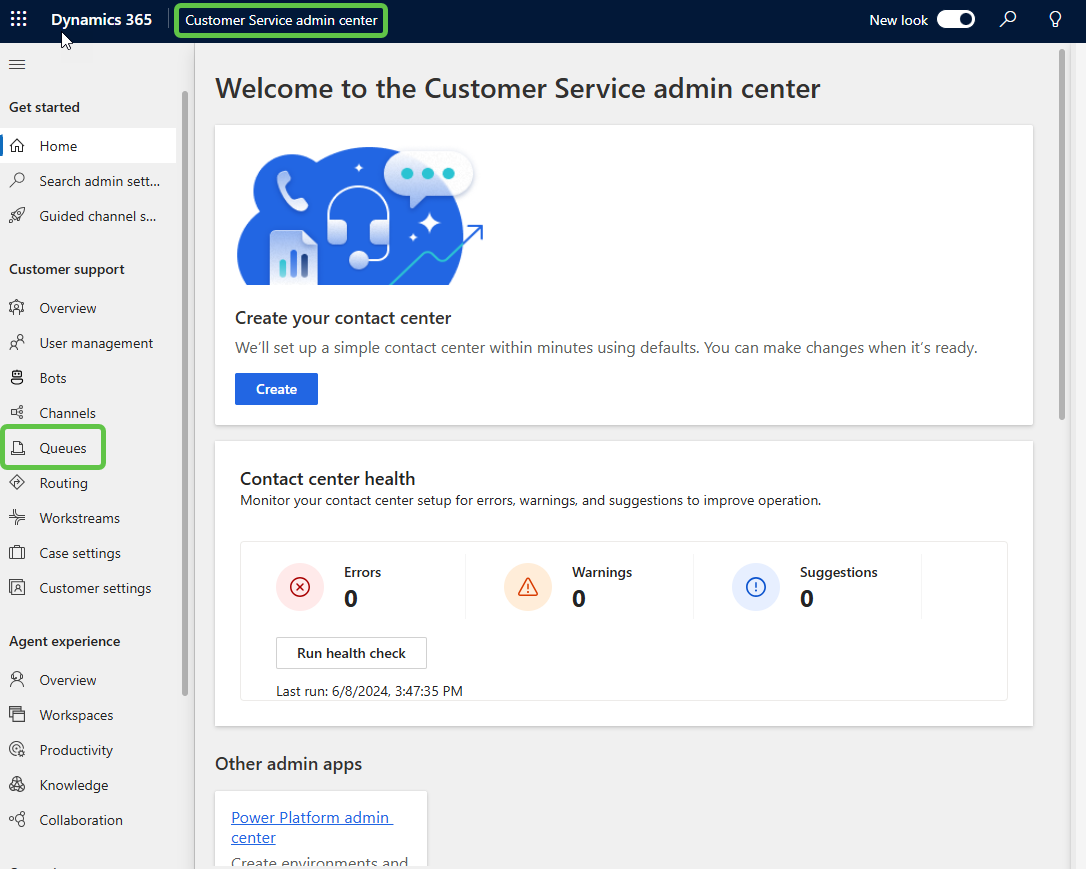
- From the Advanced queues section, click on Manage.
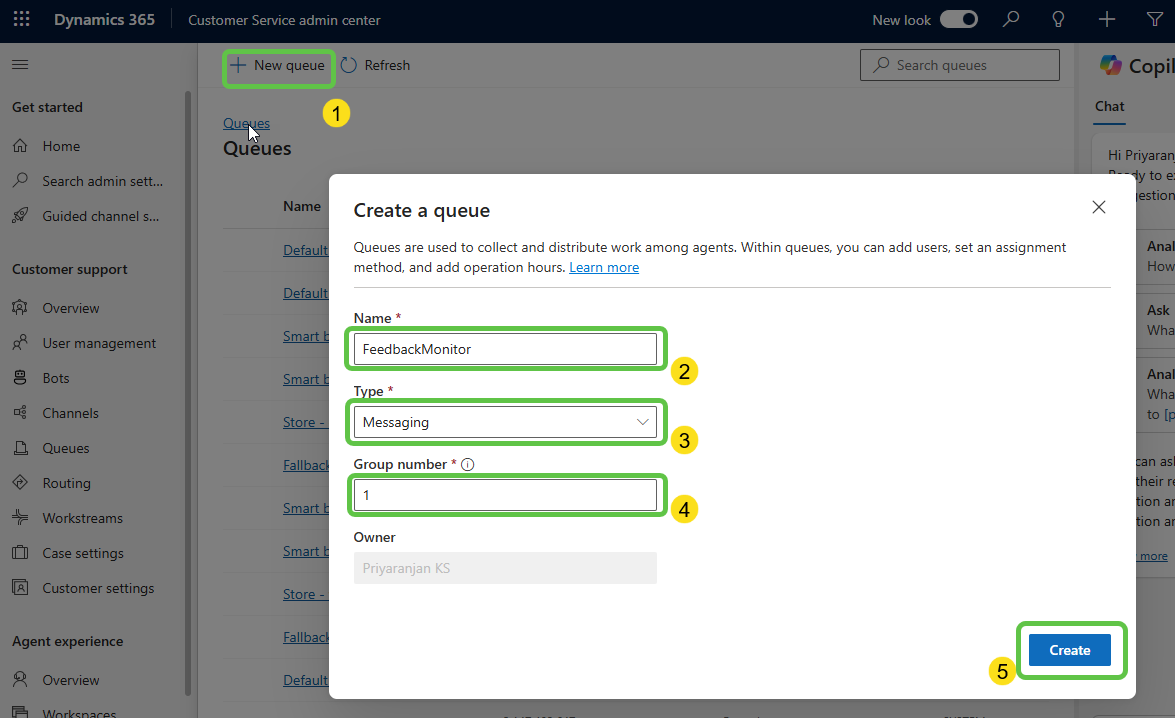
We will configure the queue by:
- Click on New Queue.
- Mention the Queue Name.
- We can create a Messaging/Record/Voice queue. For this demo, we will create a messaging handover queue.
- Specify the Group Number. Assigning a group number helps you organize your queues in the list view if there are multiple queues. The group number won’t affect the priority of the queue or the incoming conversations.
- Click on Create to provision the queue.
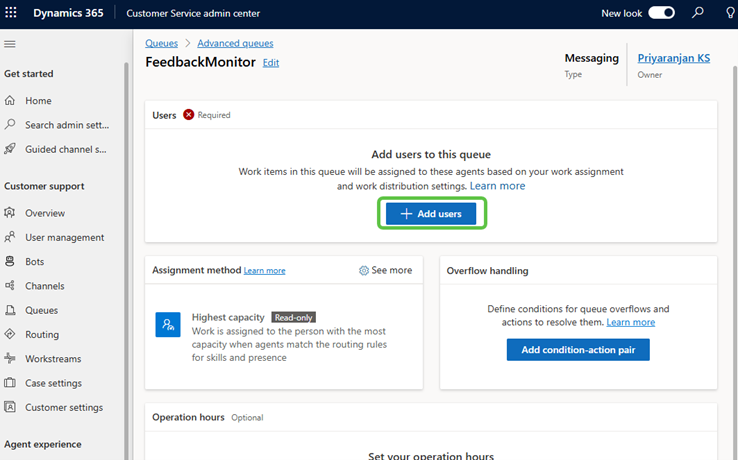
Once the queue is created, it will take us to the newly created queue page. Click on Add Users as we have to add the Human Agent as well as the Copilot to the Queue.
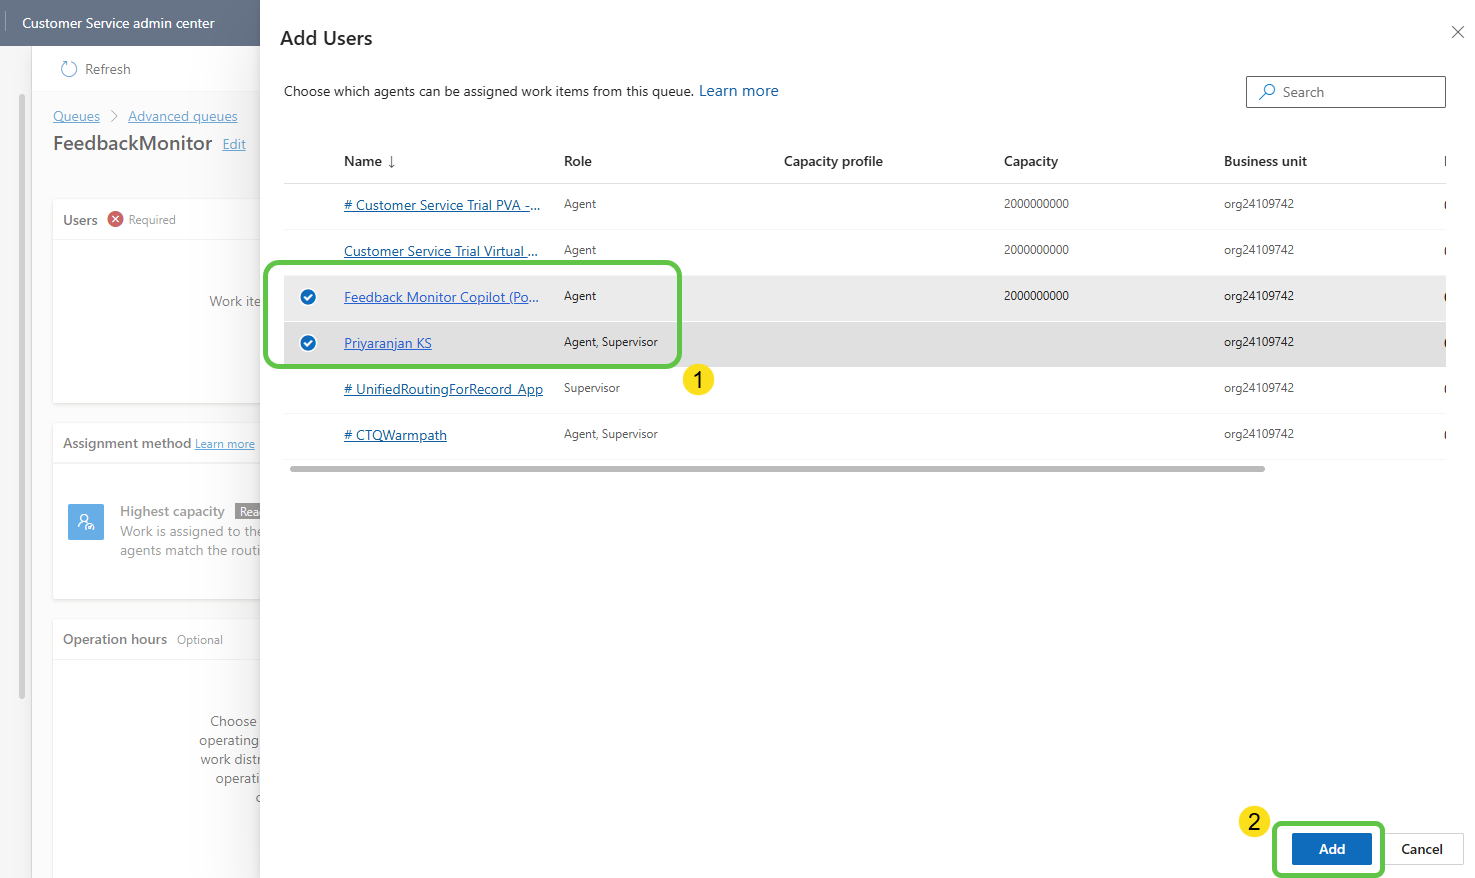
Select the human agent user as well as the Copilot agent instance and click on Add.
The queue setup is now done and we will add this to a workstream as the conversation handovers will first come to the workstream and from there it is routed to different queues.
Step 10: Create Workstream
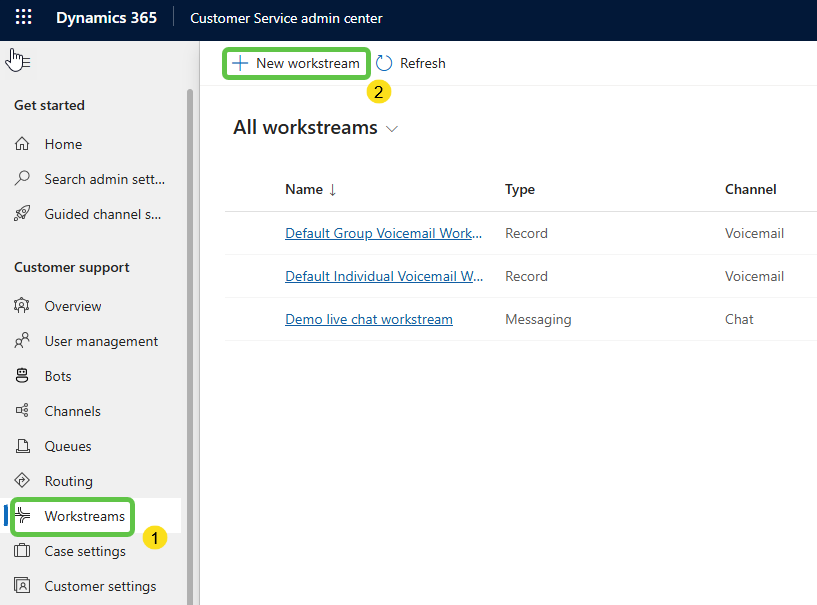
Now let’s create a Workstream. A workstream acts as a container to route, and assign work items.
- From the Workstreams tab in the left pane, click on New Workstream.
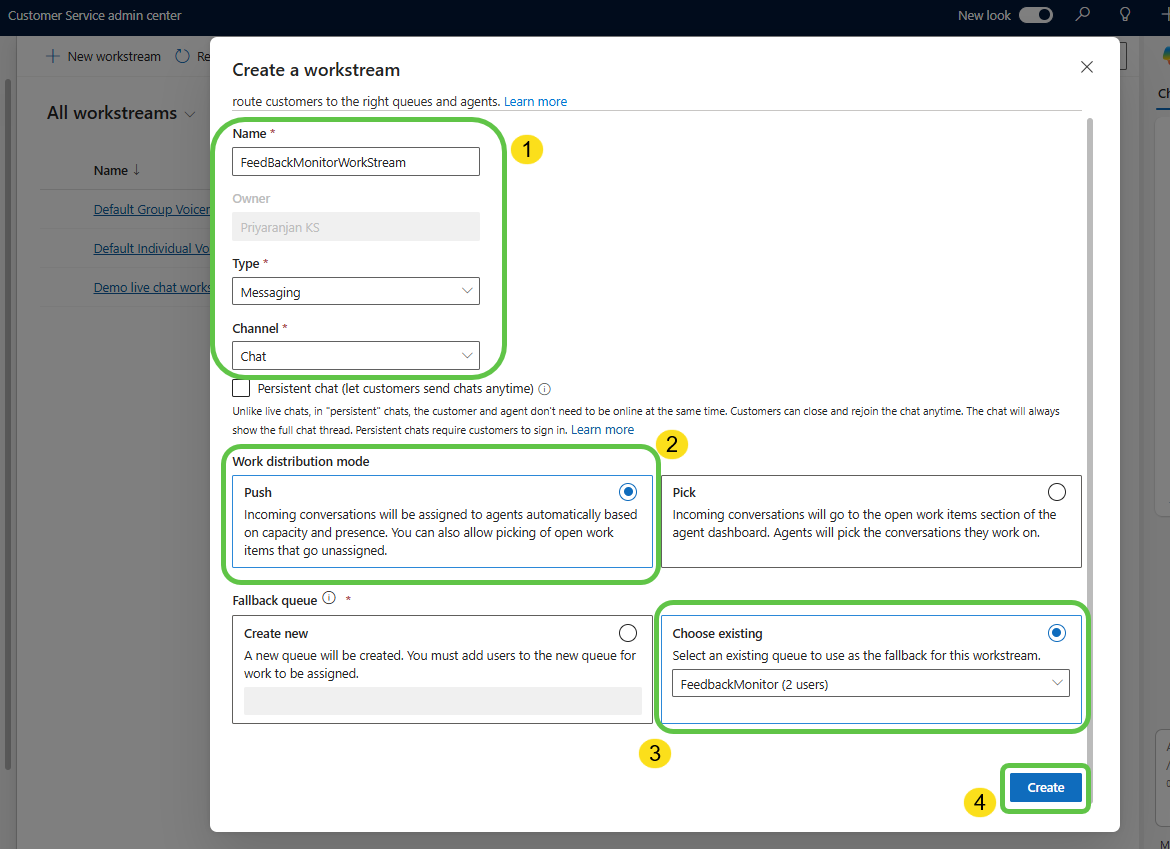
Let’s configure the workstream by:
- Specifying the workstream name, Type as Messaging and the channel type as Chat.
- Select the work distribution mode as Push so that when a conversation comes, it is auto assigned to agents based on capacity and presence.
- We will come to routing rules in a while. If there are no routing rules defined, then we need a fallback or default queue to which the conversation will be handed over. For this, we have already created a queue earlier, so let’s select choose existing and pick the FeedbackMonitor queue.
- Click on Create.
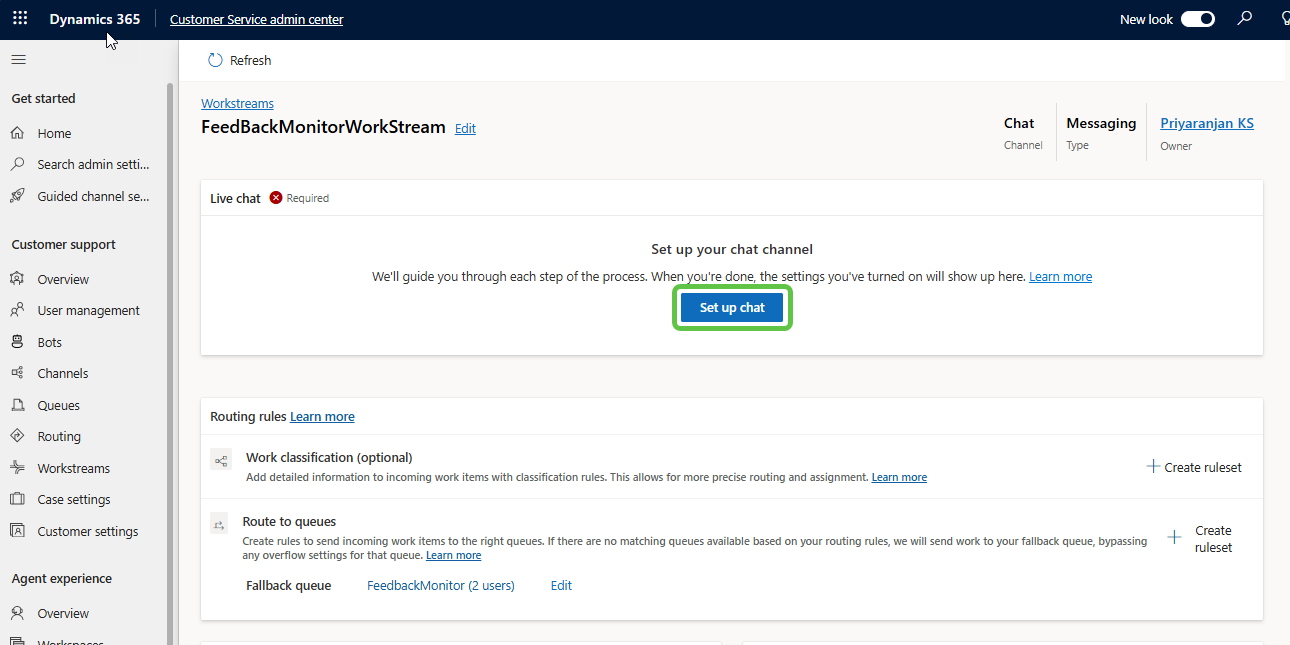
Once the workstream is created it will automatically take us to the newly created workstream where we can configure the chat that we will be using for interacting with the users. The Copilot interactions will now be hosted within this chatbot.
- Click on Set up chat.
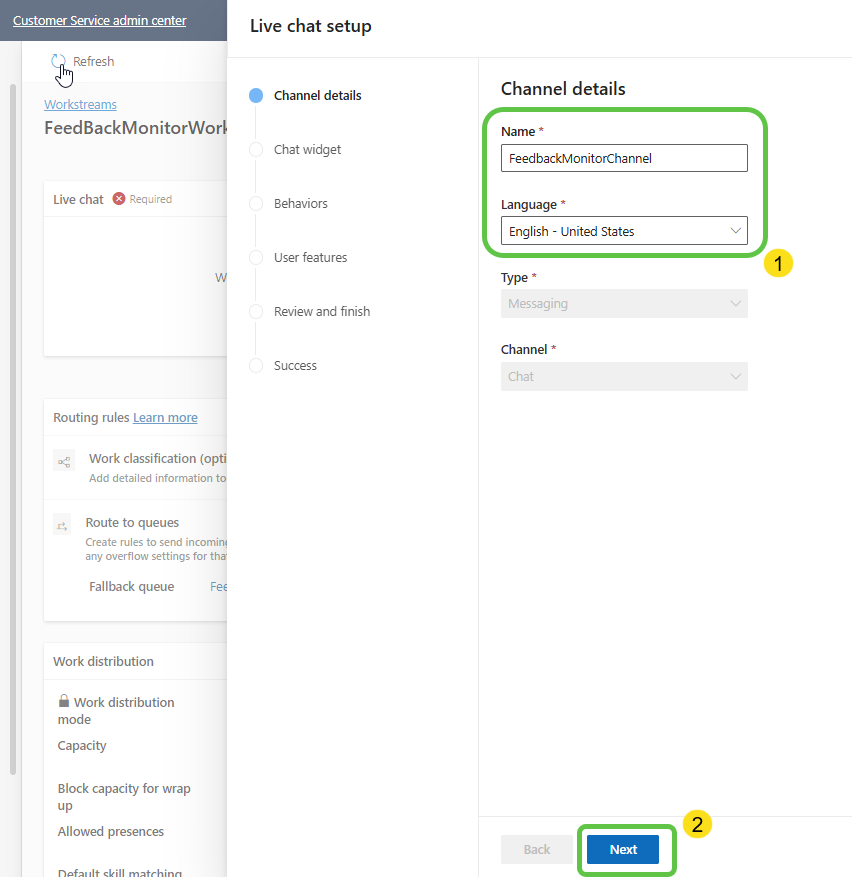
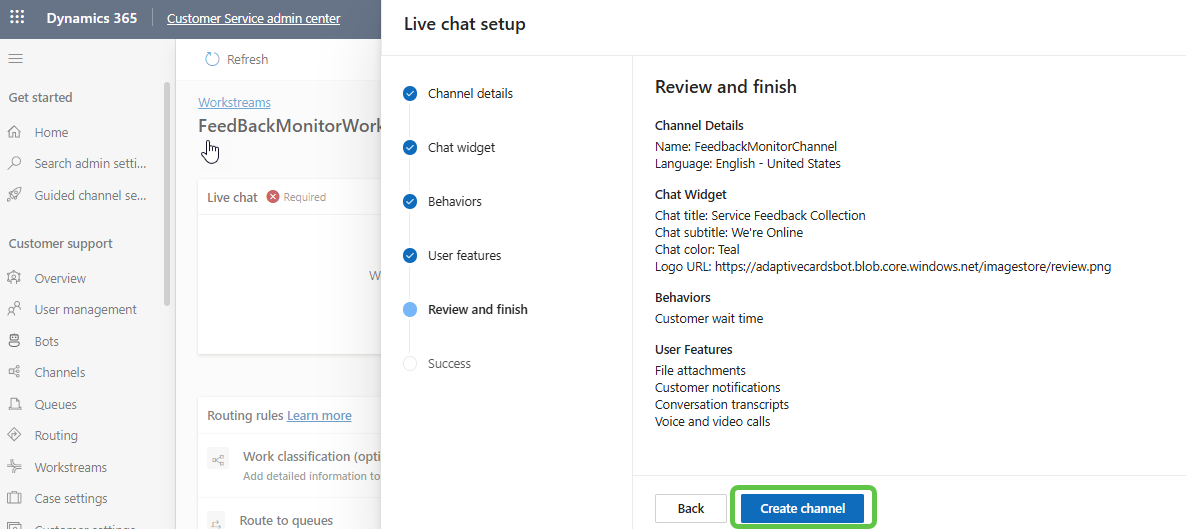
This will open up the popup where we can define the chat channel attributes like name and language and click on Next.
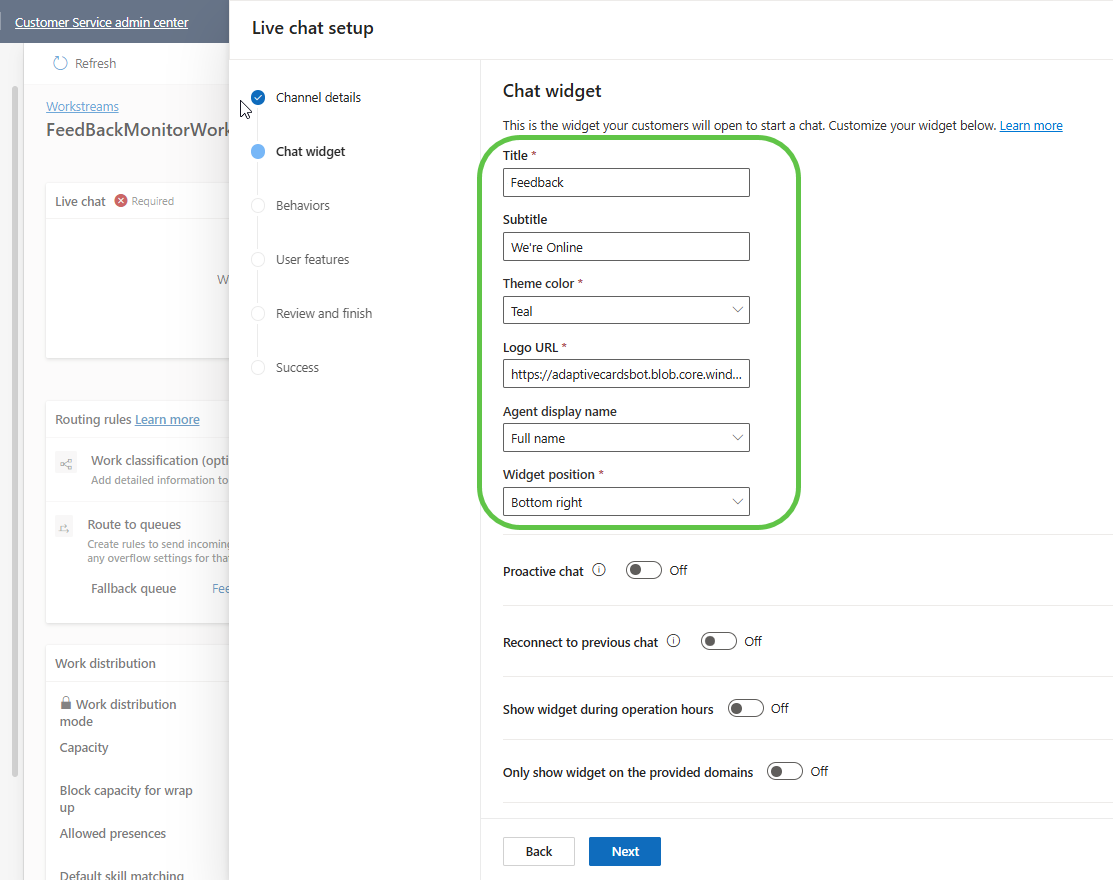
In the next page, we can define the look and feel of the chat bot widget that will host the Copilot conversations and the human agent handover. We have provided the title, subtitle, theme color, Azure blob hosted logo URL, agent display name as well as the widget positioning. Click on Next.
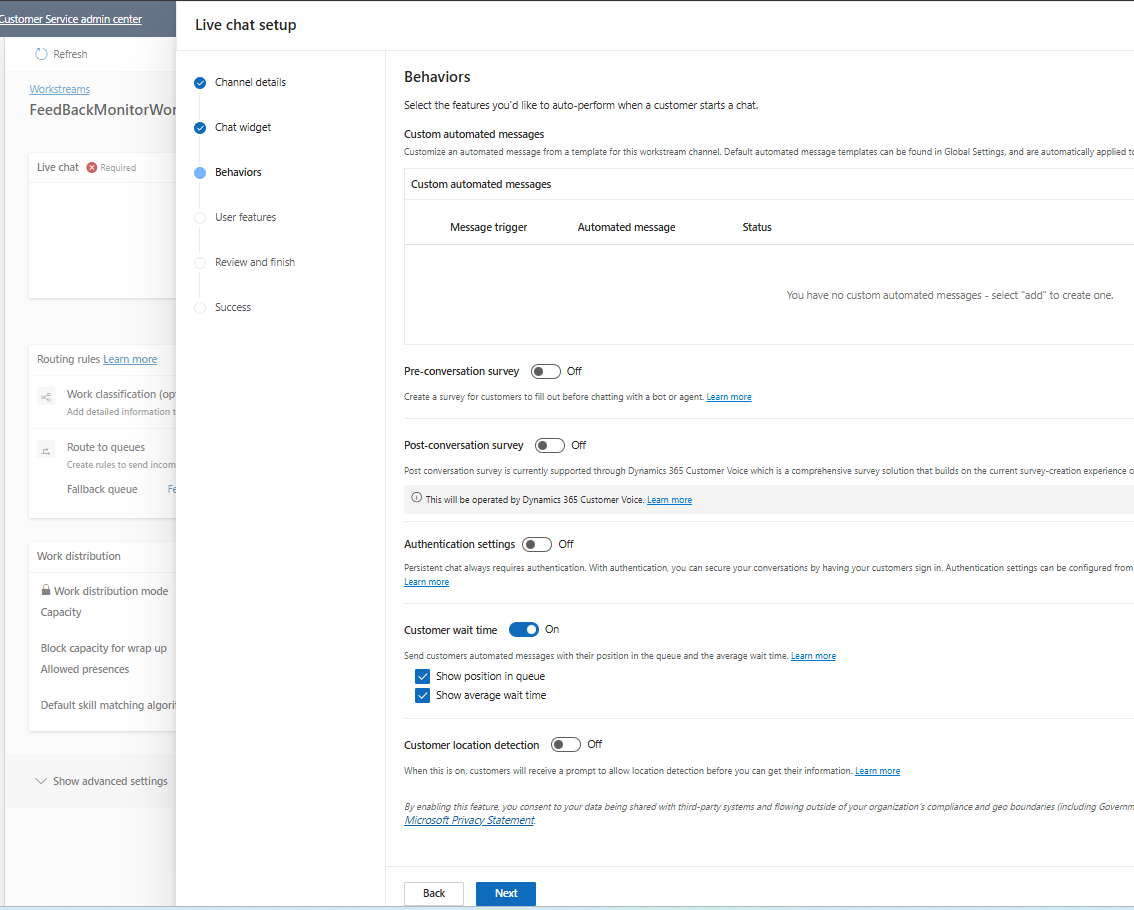
We will retain the chat channel behavior parameters AS IS and click on Next.
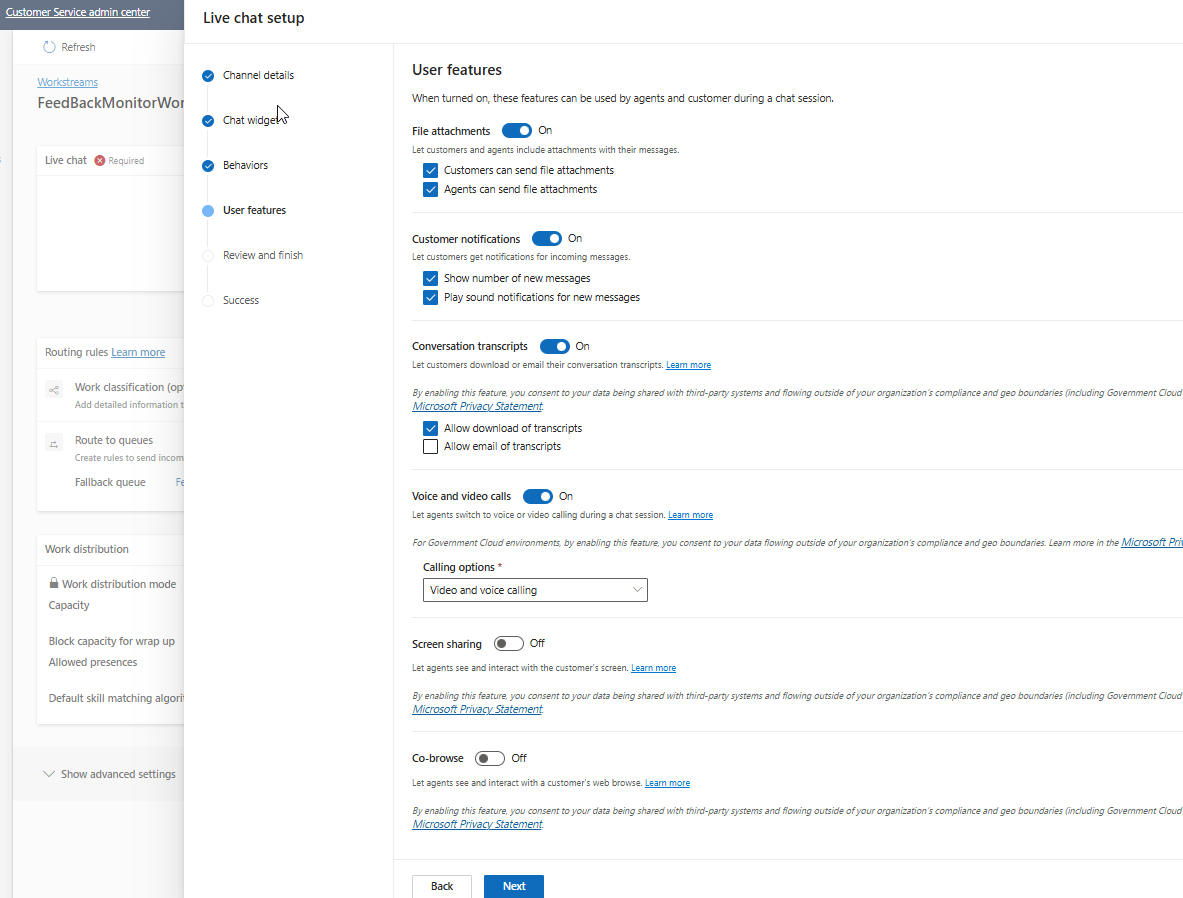
We will retain the user features like file upload, customer notifications, and conversation transcripts ON and click on Next.
Let’s click on Create channel to provision the chat channel.
Once the channel is created, it will take us to the chat channel section where we can copy the Chat Widget Javascript code by clicking on the Copy Live Chat Widget 2.0 Script. This can later be embedded into the website or Power Pages which will allow the user to chat with the Copilot and initiate the handover to the agent as part of the escalation process.
We can also create a rule set from this section which allows us to define some conditions and route the conversation to specific queues. If there are no rulesets defined, the fallback queue that we created earlier will be used.
Clicking on the Ruleset will allow us to add conditions to route conversations. This comes in handy if there are multiple queues. For instance, we can check the incoming customer name and route the conversation to a specific queue where a particular agent assigned to that customer can handle all the related conversations.
We will for the time being go with the fallback default queue that we have created.
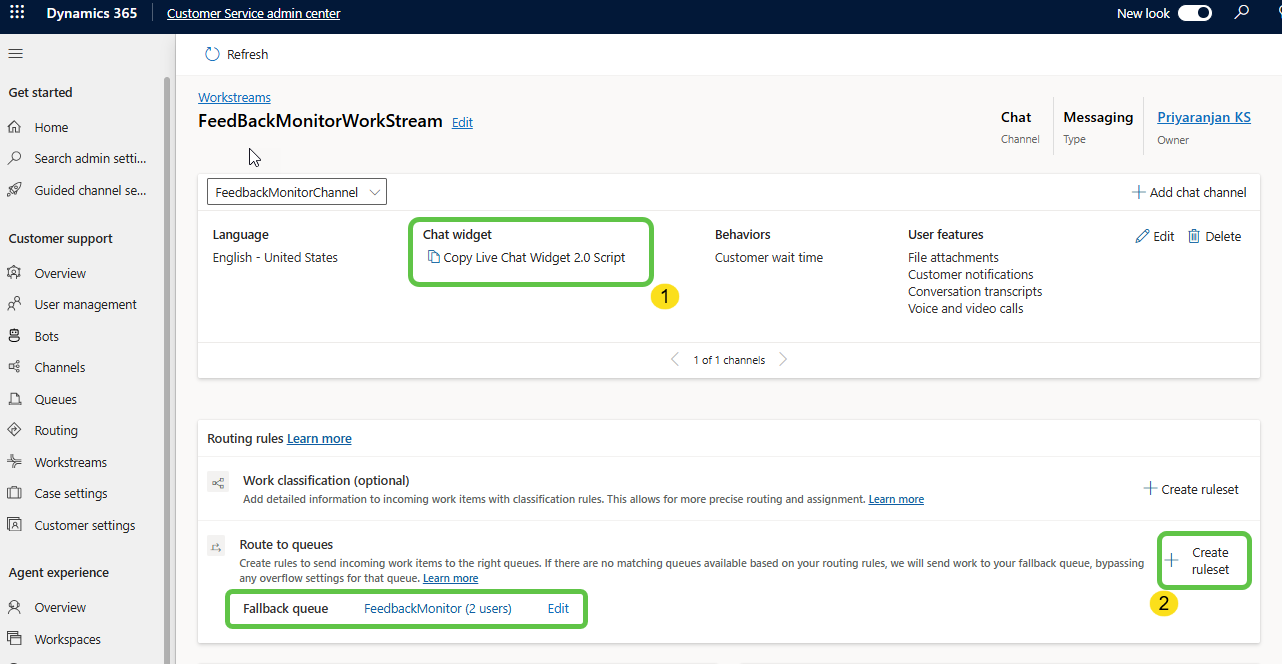
This completes the configuration of the Omnichannel within the Customer Service admin center. We can now go ahead and use the chat widget which embeds the Copilot and handover logic within Power Pages of a restaurant to test it out.
Step 11: Testing in Power Pages
- Embed the chat widget script obtained from the Omnichannel setup into a Power Pages site.
<script v2 id="Microsoft_Omnichannel_LCWidget" src="https://oc-cdn-public-ind.azureedge.net/livechatwidget/scripts/LiveChatBootstrapper.js" data-app-id="4bf2da1c-da35-4f74-a4e1-6ad1cd38" data-lcw-version="prod" data-org-id="2c7dff01-f845-e1-8e4c-002248d5c5d3" data-org-url="https://m-2c7dff01-f845-ef11-8e4c-002248d5c5d3.in.omnichannelengagementhub.com"></script>
The complete HTML Code used in the Power Pages is shared below :
   <meta charset="UTF-8"><meta name="viewport" content="width=device-width, initial-scale=1.0"><title>US Farming Information Hub</title><link rel="stylesheet" href="styles.css">
<div class="container">
  <div class="main-column">
    <header class="header">
      <div class="header-content">
        <img src="/restaurant.png" alt="Header Image" class="header-img">
        <div class="header-text">
          <h1>Gourmet Dining Hub</h1>
          <p>Your one-stop destination for all gourmet dining experiences</p>
        </div>
      </div>
    </header>
    <main class="main-content">
      <section class="card-row">
        <section id="farming-queries" class="card">
          <h2>Our Menu</h2>
          <p>Explore our extensive menu with a variety of dishes curated by our top chefs. Find the best meals to satisfy your cravings.</p>
          <img src="/menu.png" alt="Farming Queries" class="responsive-img">
        </section>
        <section id="weather" class="card">
          <h2>Reservations</h2>
          <p>Book a table at our restaurant easily through our online reservation system. Ensure you have a spot at our popular dining times.</p>
          <img src="/booking.png" alt="Weather" class="responsive-img">
        </section>
      </section>
      <section class="card-row single-card">
        <section id="loans" class="card">
          <h2>Special Offers</h2>
          <p>Discover our special offers and discounts. Enjoy gourmet dining at the best prices with our exclusive deals.</p>
          <img src="/offer.png" alt="Loans" class="responsive-img">
        </section>
      </section>
    </main>
  </div>

  <div class="sidebar">
    <div class="farmerAssistant">
      <h2 class="farmerAssistant-title"></h2>
      <div>
        <script v2 id="Microsoft_Omnichannel_LCWidget" src="https://oc-cdn-public-ind.azureedge.net/livechatwidget/scripts/LiveChatBootstrapper.js" data-app-id="4bf2da1c-da35-4f74-a1-6adfcd38" data-lcw-version="prod" data-org-id="2c7dff01-f845-ef11-8e4c-002248d5c5d3" data-org-url="https://m-2c7dff01-f845-ef11-8e4c-002248d5c5d3.in.omnichannelengagementhub.com"></script>

      </div>
    </div>
  </div>
</div>
<div class="row sectionBlockLayout text-left" style="display: flex; flex-wrap: wrap; margin: 0px; min-height: auto; padding: 8px;">
  <div class="container" style="padding: 0px; display: flex; flex-wrap: wrap;"><div class="col-md-12 columnBlockLayout" style="flex-grow: 1; display: flex; flex-direction: column; min-width: 250px; word-break: break-word;"></div></div>
</div>
The complete CSS used in the Power Pages is shared below :
   body {
    background-color: #f0f0f3;
    font-family: 'Arial', sans-serif;
    margin: 0;
    padding: 0;
    display: flex;
    justify-content: center;
    align-items: stretch; /* Stretch to fill the full height */
    min-height: 100vh;
    height: 100vh; /* Ensure the body takes full height */
}

.container {
    display: flex;
    width: 100%;
    height: 100%;
    background: #e0e0e0;
    box-shadow: 20px 20px 60px #bebebe, -20px -20px 60px #ffffff;
}

.main-column {
    flex: 3;
    display: flex;
    flex-direction: column;
    align-items: center;
    padding: 20px;
}

.sidebar {
    flex: 1;
    display: flex;
    flex-direction: column;
    justify-content: flex-start;
    background: #e0e0e0;
    padding: 20px;
    height: 100%;
}

.header {
    display: flex;
    justify-content: center;
    align-items: center;
    padding: 20px;
    background: #e0e0e0;
    border-radius: 20px;
    box-shadow: inset 10px 10px 20px #bebebe, inset -10px -10px 20px #ffffff;
    width: 100%;
    margin-bottom: 10px;
}

.header-content {
    display: flex;
    align-items: center;
}

.header-text {
    text-align: center;
    margin-left: 20px;
}

.header h1 {
    margin: 0;
    font-size: 2.5em;
    color: #333;
}

.header p {
    margin: 10px 0 0;
    font-size: 1.2em;
    color: #666;
}

.header-img {
    width: 110px;
    height: auto;
    border-radius: 10px;
}

.main-content {
    width: 100%;
    flex-grow: 1; /* Make sure the content takes the remaining space */
}

.card-row {
    display: flex;
    justify-content: space-between;
    width: 100%;
    margin-bottom: 10px;
}

.single-card {
    display: flex;
    justify-content: center;
    width: 100%;
}

.card {
    background: #e0e0e0;
    border-radius: 20px;
    box-shadow: 20px 20px 60px #bebebe, -20px -20px 60px #ffffff;
    padding: 15px;
    width: 48%;
    text-align: center;
    margin-bottom: 10px;
}

.single-card .card {
    width: 50%;
}

.card h2 {
    font-size: 24px;
    color: #333;
    margin-top: 0;
}

.card p {
    font-size: 1.1em;
    color: #666;
}

.responsive-img {
    margin: auto;
    width: 110px;
    height: auto;
    border-radius: 10px;
    margin-top: 10px;
}

.footer {
    display: none;
}

.copilot-container {
    width: 100%;
    height: calc(100vh - 60px); /* Adjust height to fit within the sidebar */
    border-radius: 10px;
    box-shadow: 0 4px 8px rgba(0, 0, 0, 0.1);
}

.farmerAssistant-title {
    font-size: 26px;
    text-align: center;
}

.navbar {
    display: none !important;
}
-
Lets preview the Power Pages Site and interact with the Copilot by submitting a negative feedback
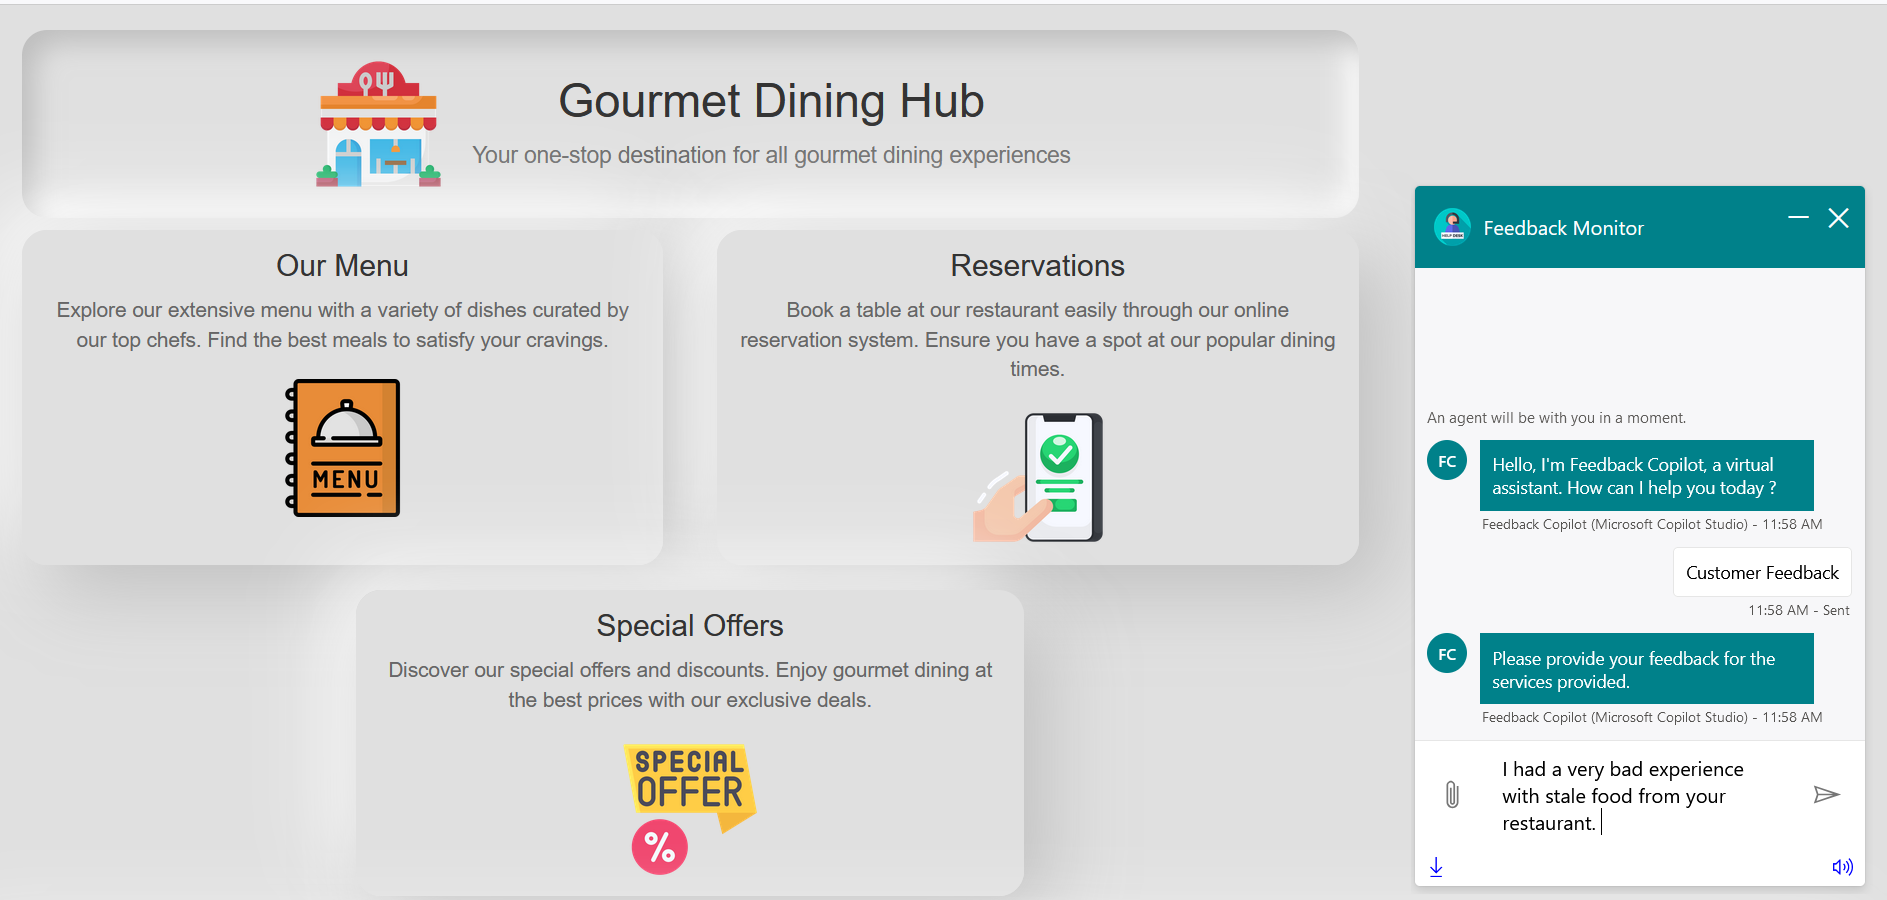
- As we can see the negative feedback has been identified the Azure AI Language Service and has escalated and handed it over to the human agent
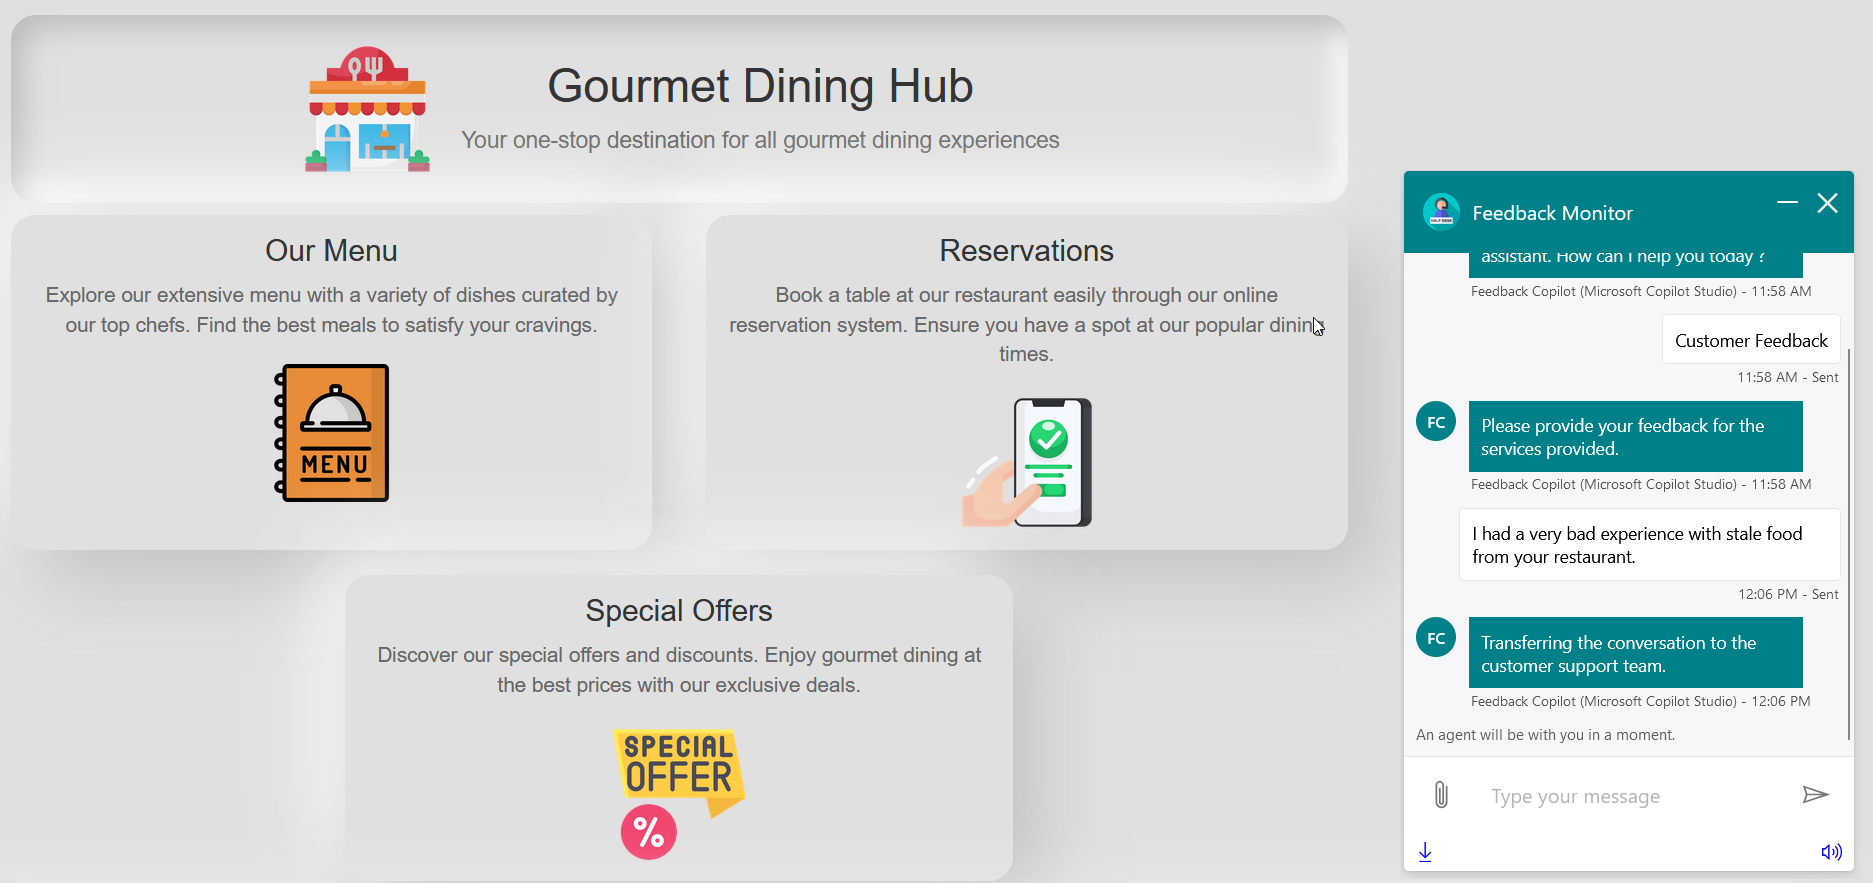
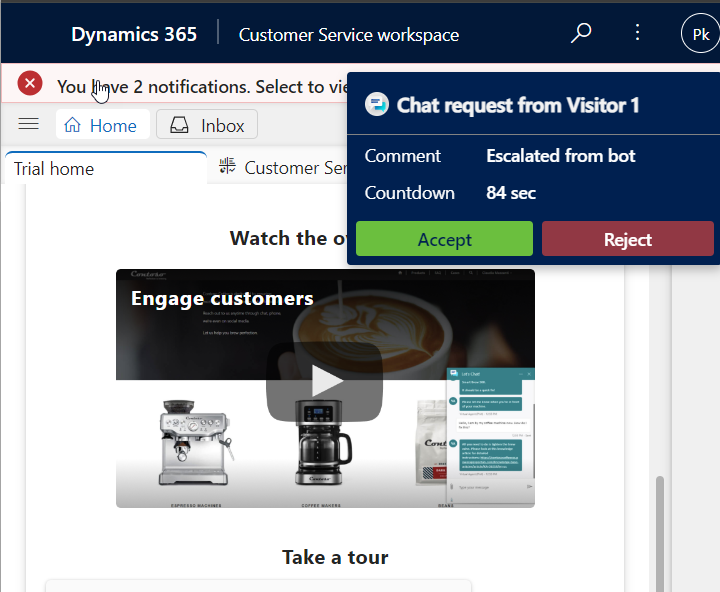
- The human agent will receive the notification in the customer service workspace where he can accept the conversation that has come to his queue.
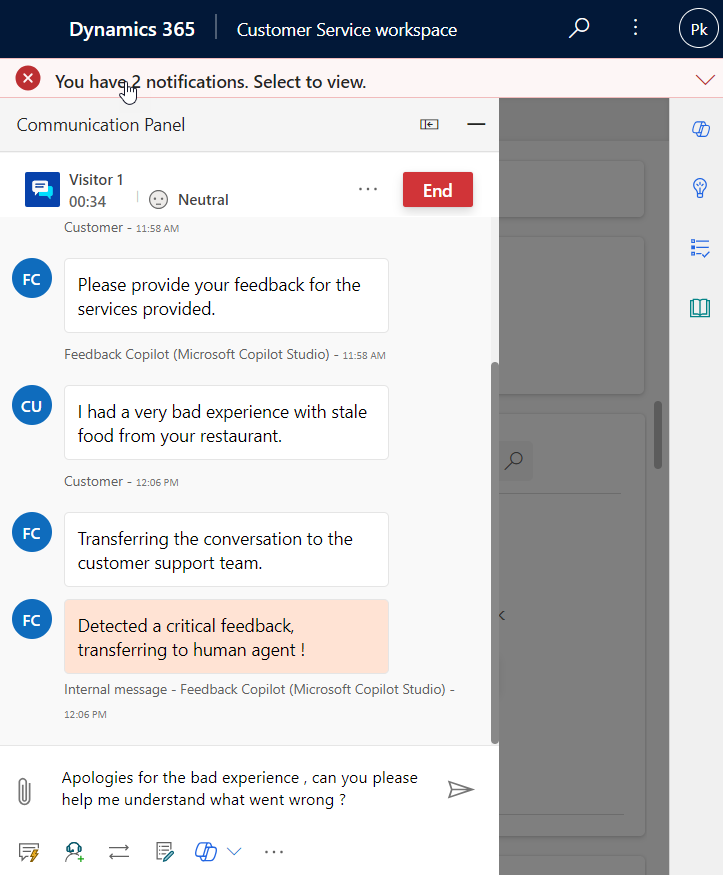
- Human agent can now start conversing with the customer asking for the details of the incident
- The customer can now provide detailed feedback report which will be attended to by the customer executive
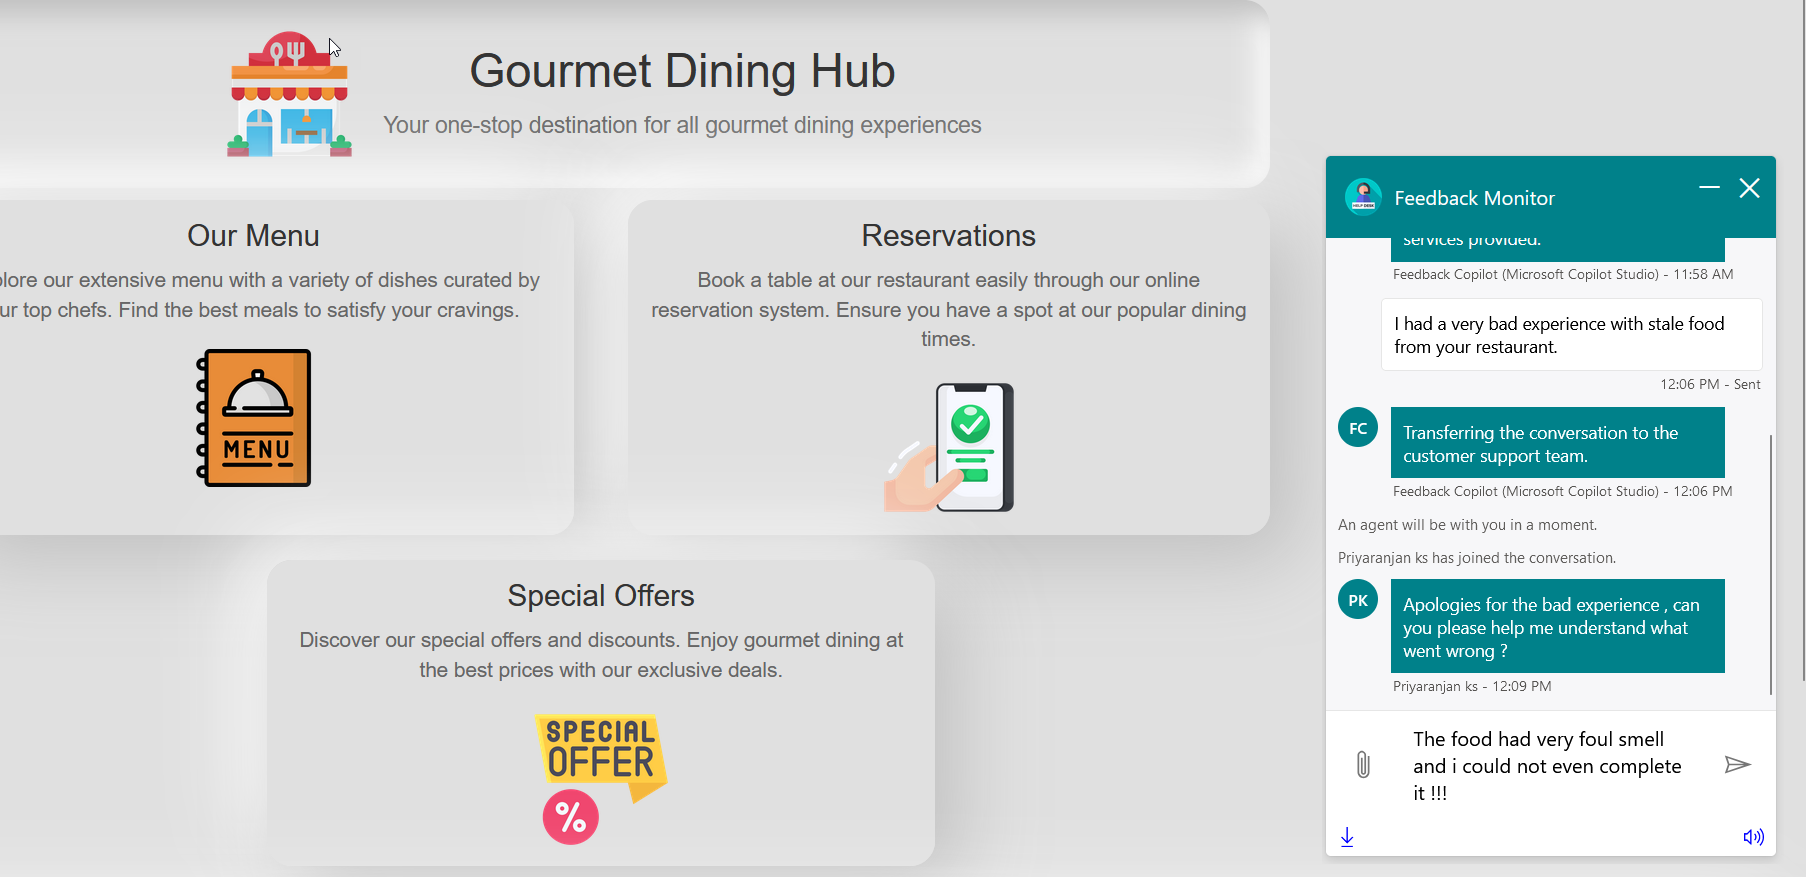
- The customer service center receives all the conversations from the customer in real time and this helps in establishing a proper escalation process in the feedback system

Conclusion
Thus we have successfully created a dynamic customer service Copilot that leverages AI to analyze user feedback and handle it efficiently. This Copilot not only improves customer satisfaction by quickly addressing negative feedback but also streamlines the process of storing positive feedback.


