Table of Contents
- Introduction
- Llama Model
- Understanding the Use Case
- Prerequisites
- Demo
- Step 1: Preparing Your Dataverse Environment
- Step 2: Setting Up Azure AI Studio
- Step 3: Create the Copilot in Copilot Studio
- Step 4: Enable Generative selection of topics
- Step 5 : Create Topics
- Step 6: Add an HTTP Request for Llama Model
- Step 7: Configure the HTTP Request
- Step 8: Add Header Properties
- Step 9: Add the Body to the Request
- Step 10: Display the Generative Answer
- Step 11: Test the Copilot
- Conclusion
Introduction
Integrating cutting-edge AI models, such as the Llama model, with robust platforms like Azure AI Studio and Microsoft Dataverse, offers a sophisticated yet easy to build solution for analyzing sales data. This powerful combination allows businesses to transform raw data into meaningful insights and respond promptly to user queries.
In this blog, we will explore how to leverage the Llama model within Azure AI Studio, alongside Microsoft Copilot, to read and analyze sales data stored in Dataverse. We will guide you through setting up this integration to create a system that efficiently processes user questions and delivers insightful answers directly from your sales data.
Llama Model
Llama (Large Language Model for AI) is a groundbreaking language model from Meta AI designed to understand and generate human-like text. It’s adept at processing natural language inputs and can provide contextually relevant responses. When integrated with Azure AI Studio, Llama becomes a formidable tool for interpreting and analysing data, allowing businesses to address user queries with precision and depth.
Understanding the Use Case
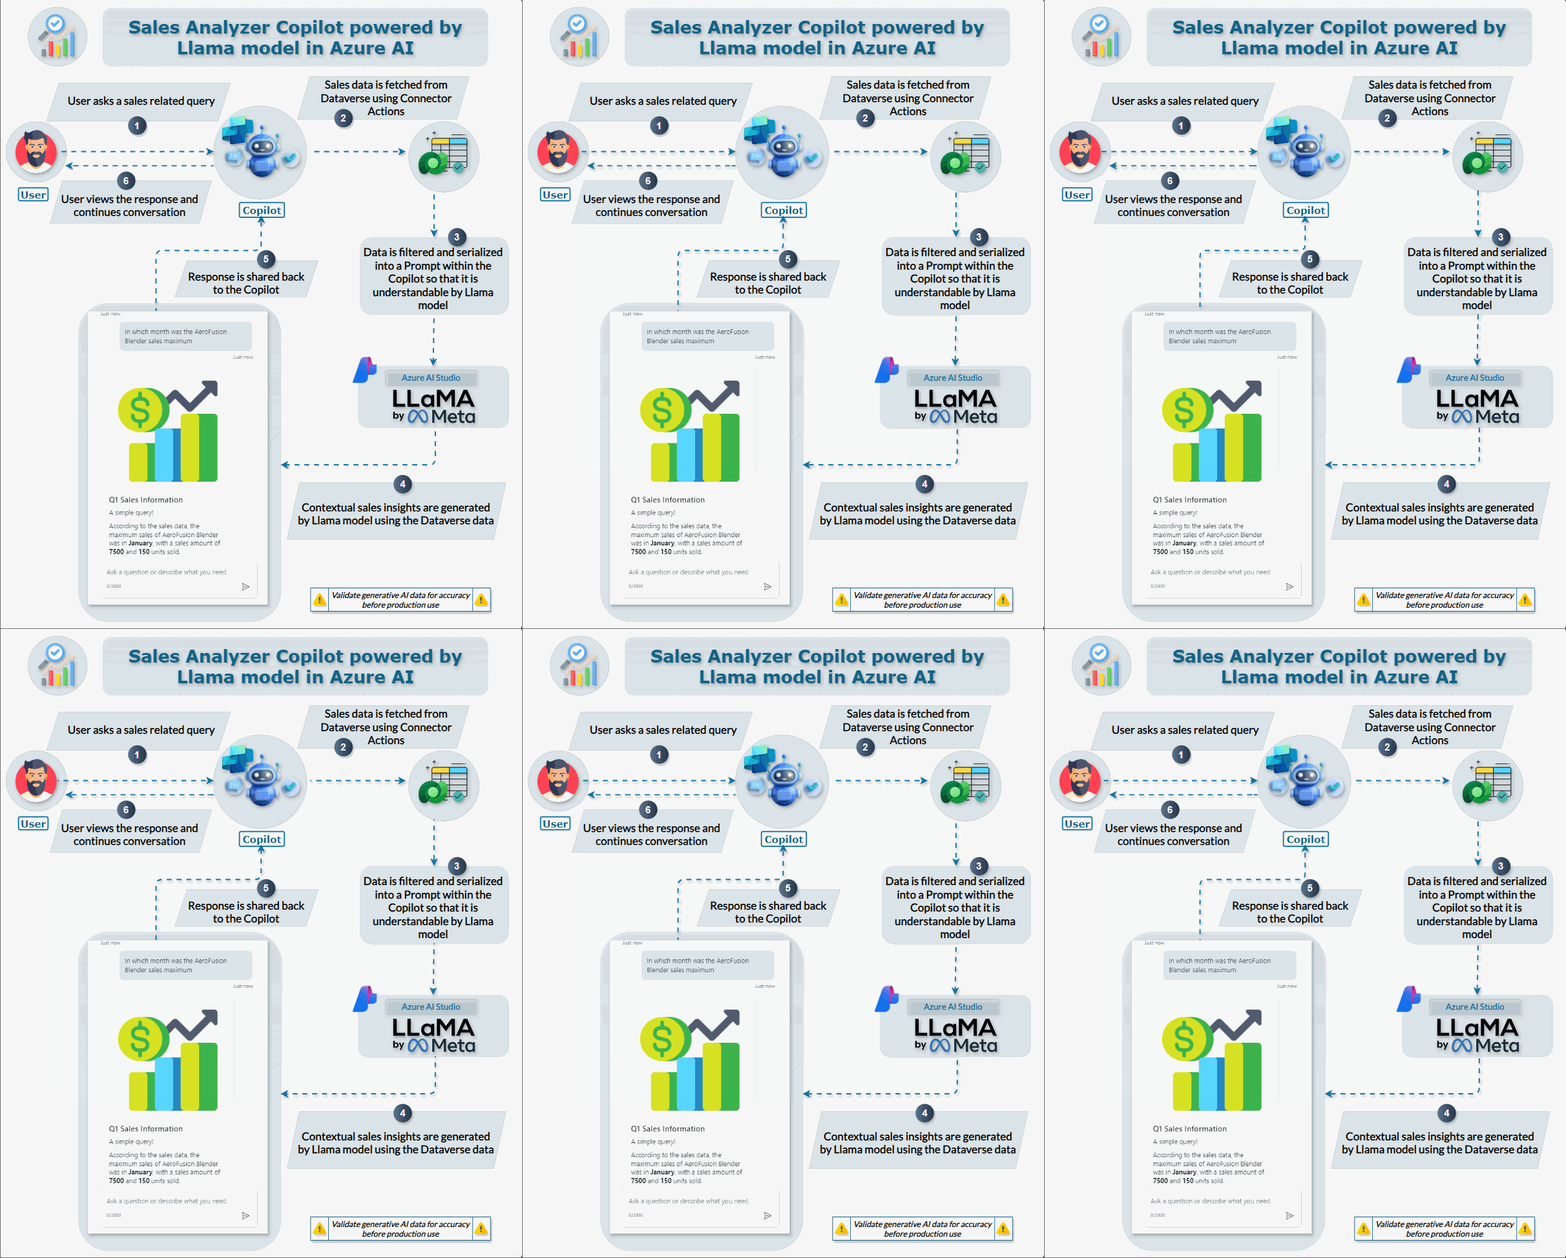
Use Case Overview: We aim to build a system that allows users to query their sales data stored in Dataverse using natural language. This system will utilize the Llama model to understand and process these queries and Microsoft Copilot to facilitate interactive conversations.
The control flow is as follows :
- User Queries: User asks sales-related questions to the Copilot.
- Data Retrieval: Copilot fetches Q1 sales data from the Sales Information Table in Dataverse.
- Llama Model Analysis: Copilot sends the data to the Llama model in Azure AI Studio for analysis.
- Generate Response: Llama model analyzes the data and generates a contextual response.
- Display Answer: Copilot displays the generated response to the user.
Prerequisites
To successfully implement this solution, you will need:
- Azure Subscription: Access to Azure AI for configuring the Llama model.
- Copilot Studio: Access to copilot studio to build custom copilots.
- Dataverse Environment: Structured and accessible sales data within Dataverse.
Demo
Watch the demo video below to see how the Sales Analysis Copilot works.
Step 1: Preparing Your Dataverse Environment
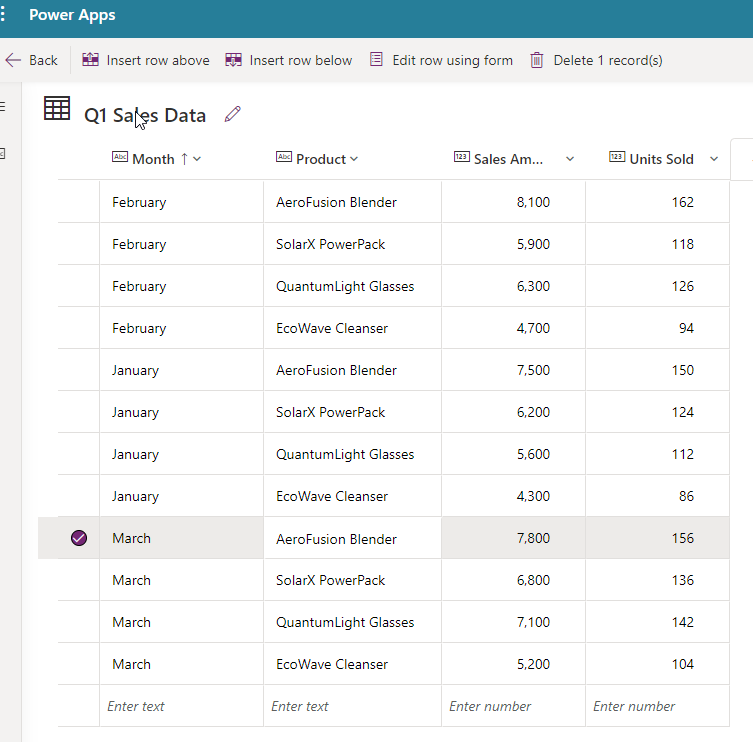
Start by ensuring your sales data is well-structured and available in Dataverse. We have created a table named “Q1 Sales Data” which contains the First quarter sales details for 4 companies .
Step 2: Setting Up Azure AI Studio
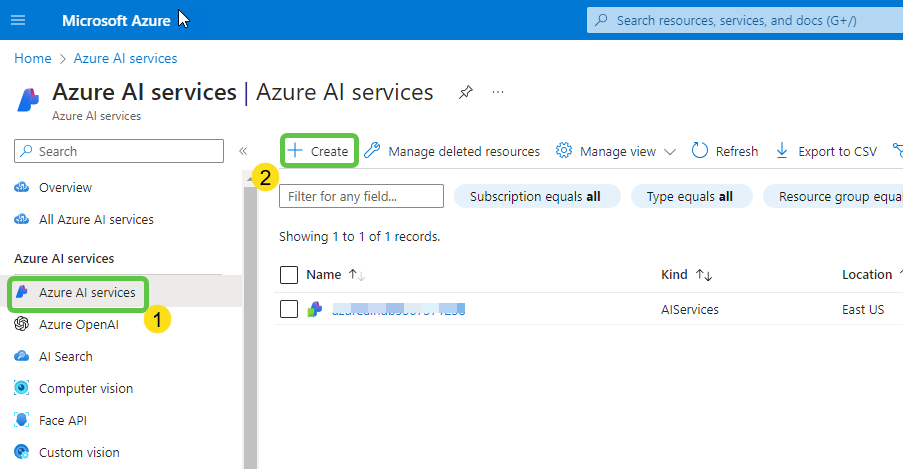
Azure AI Studio will be used to develop, train, and manage the Llama model. So as to work with the AI studio, we need to first create an instance of AI Services which we can do by navigating to the Azure AI Services in the azure portal .
-
Click on Create.
-
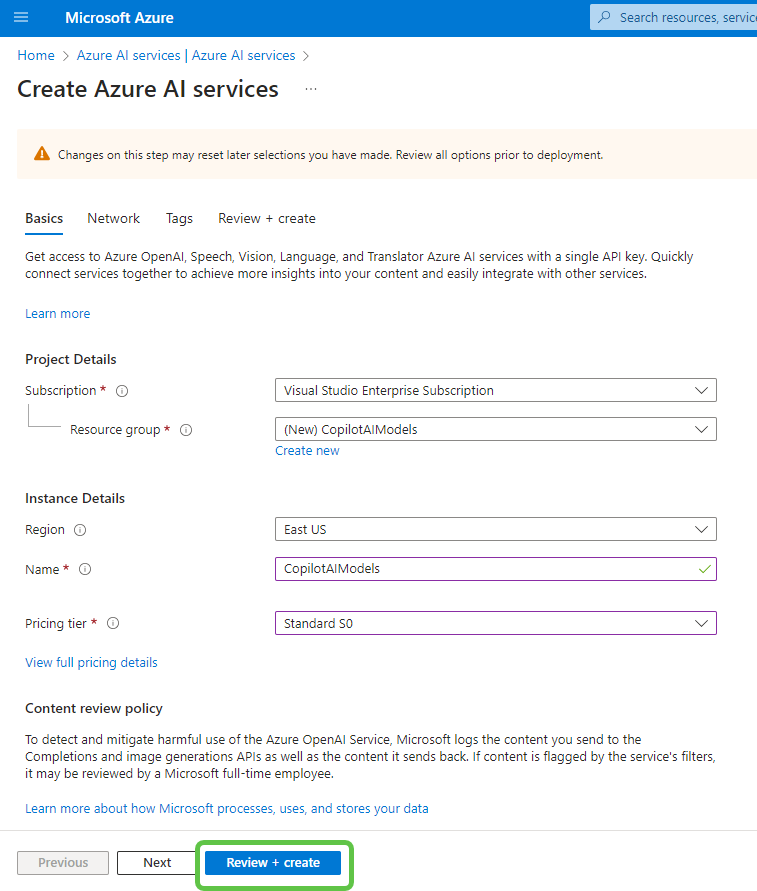
Specify the Resource Group, Name and other details for the AI Services instance . Click on Review+Create which will run the validation and create the AI Services instance for us.
-
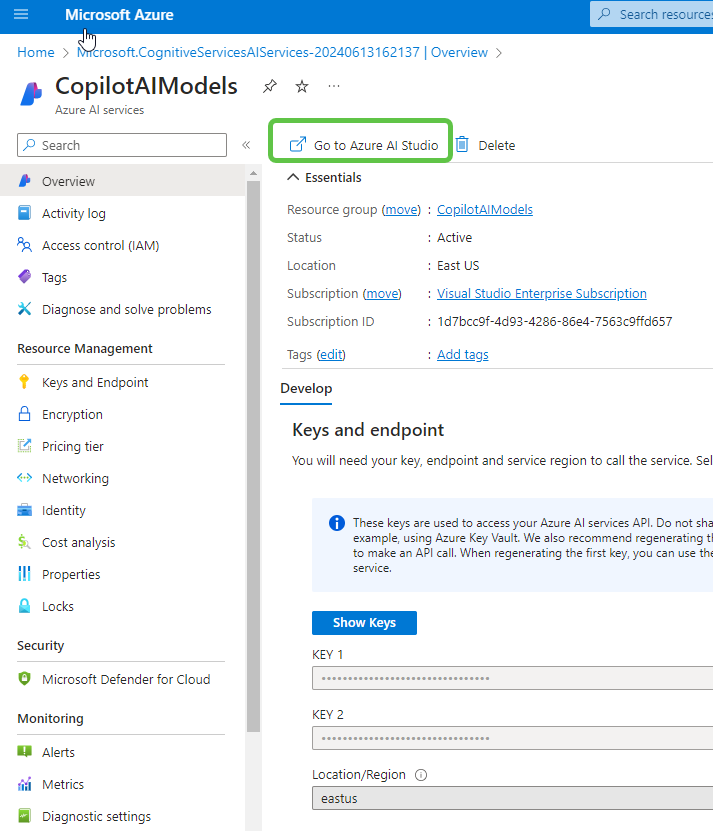
Head over to the newly created Azure AI Services instance and click on Goto Azure AI Studio.
-
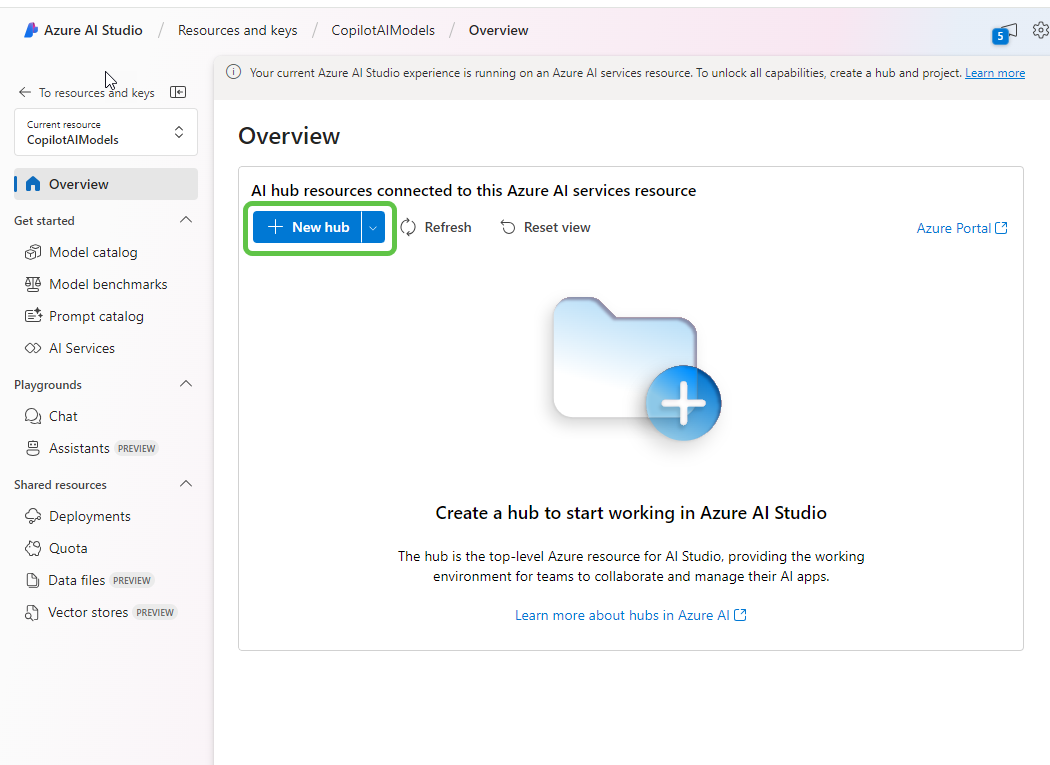
Once we are in Azure AI Studio , we can create an AI Hub which will act as a top level container for all resources created in the AI Studio. Click on New hub.
-
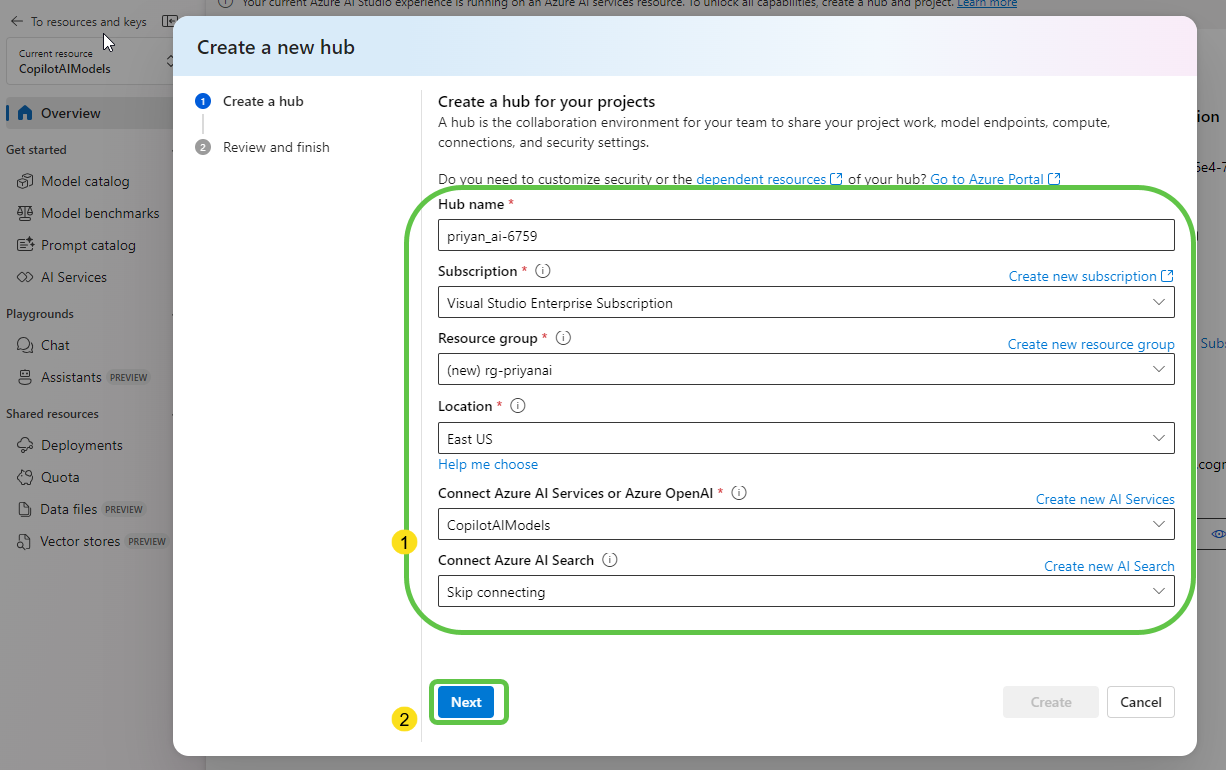
Specify the details like Name, Subscription, Resource group, Location and the AI Service Instance name. Click on Next.
-
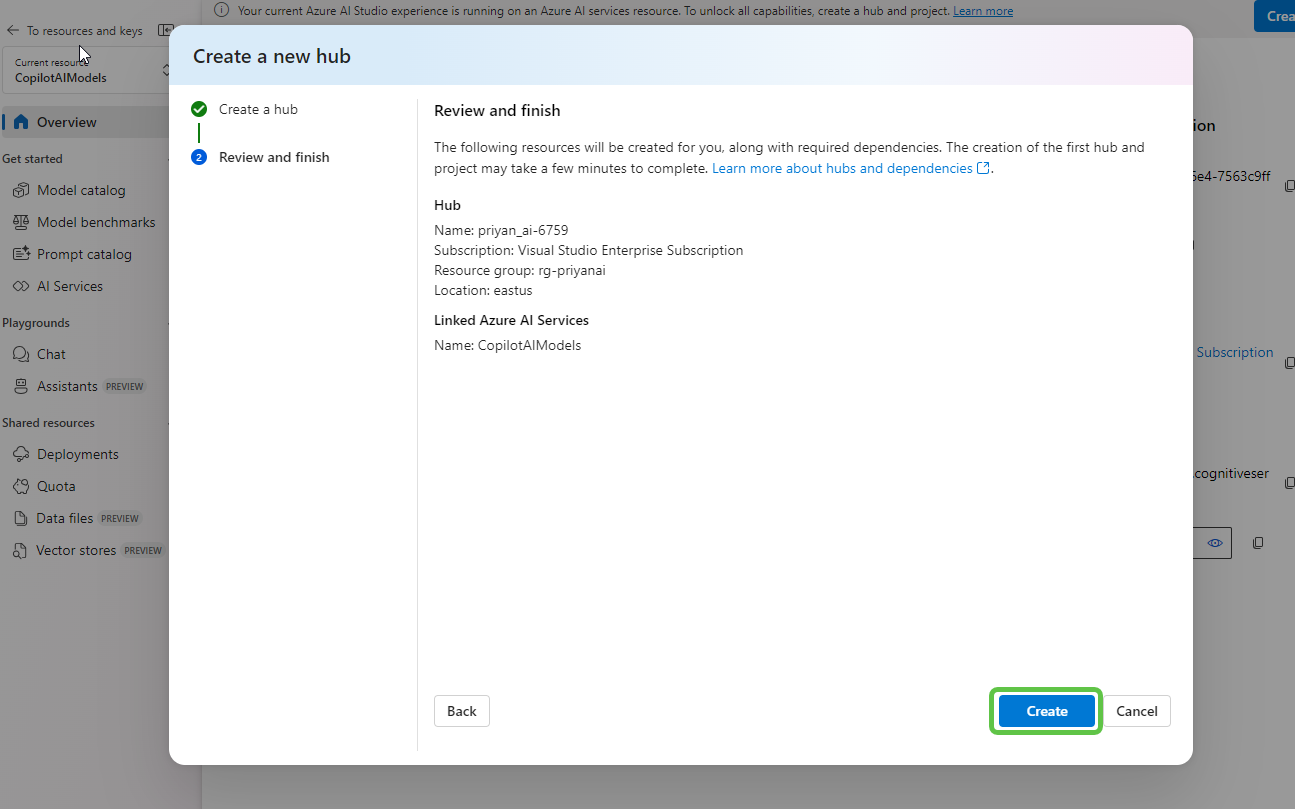
Click on Create to provision the AI Hub.
-
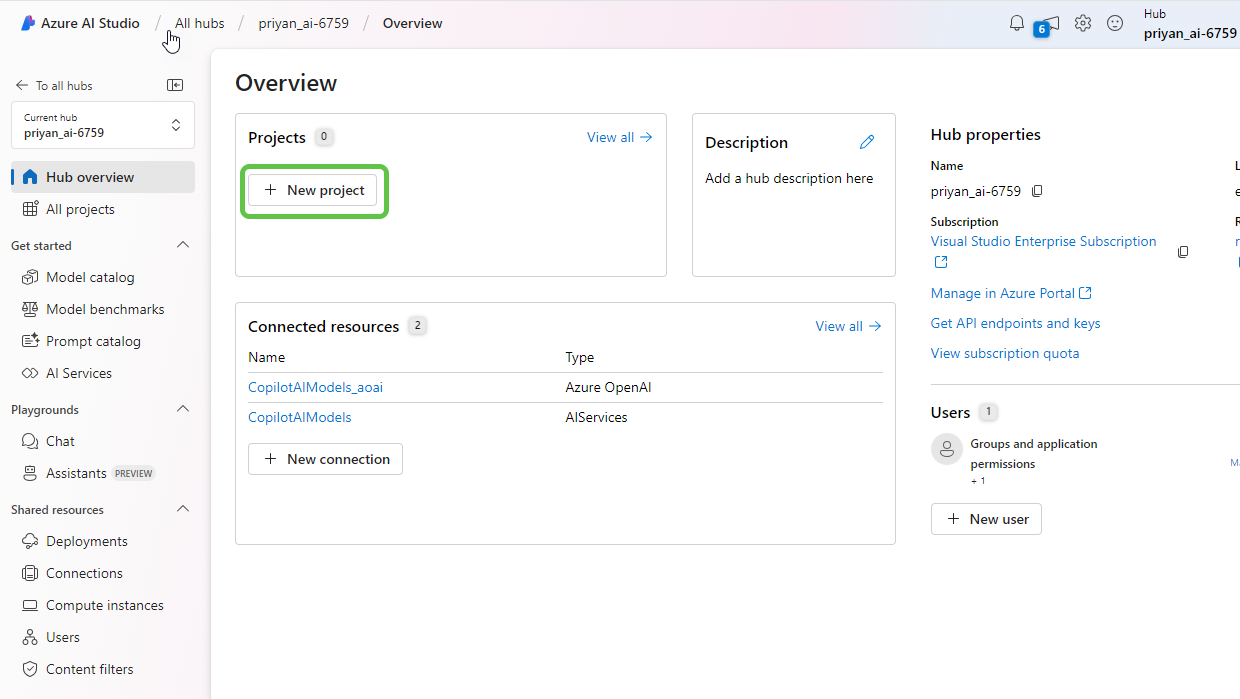
We can see that the AI hub is created, Within the hub lets create a project as well so that we can compartmentalize different model deployments to different projects. Click on New Project.
-
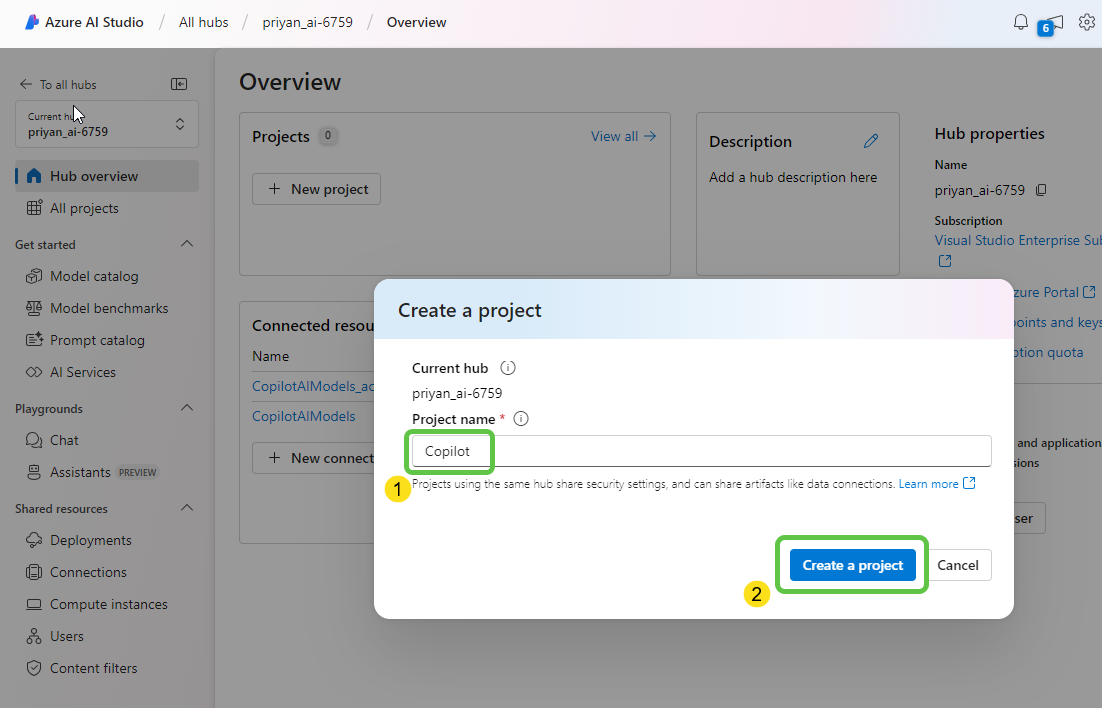
Let’s provide a Project Name and click on Create a Project.
-
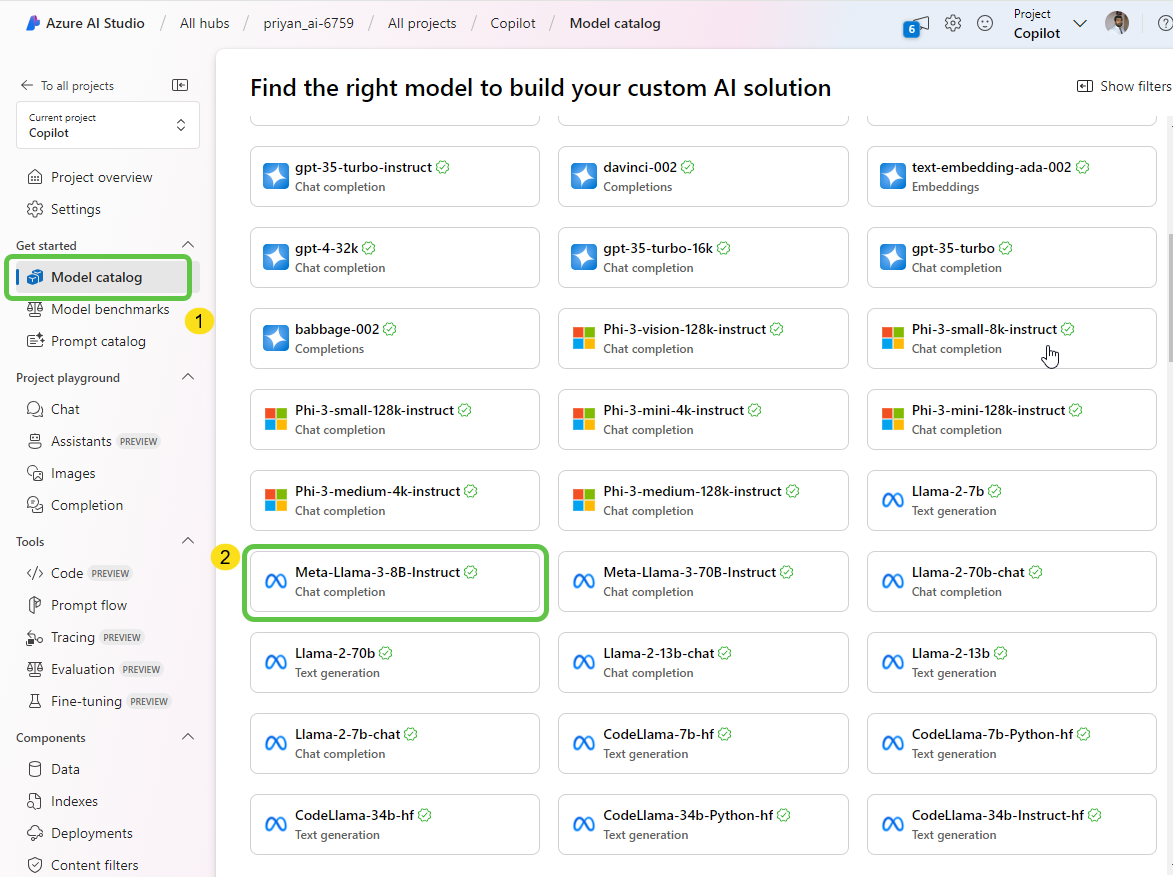
Now that the AI Hub and Project is created , lets select the Model catalog from the left pane. Azure AI Studio offers a diverse range of AI models tailored to meet various business needs and enhance data analysis capabilities.
For this demo, we will be deploying an instance of the Meta Llama 3 - 8 B model where 3 stands for the version number of the model and 8 B refers to the number of parameters in the model, which is 8 billion. Parameters are the components of the model that get adjusted during training to learn patterns from the data. Let’s select this model.
-
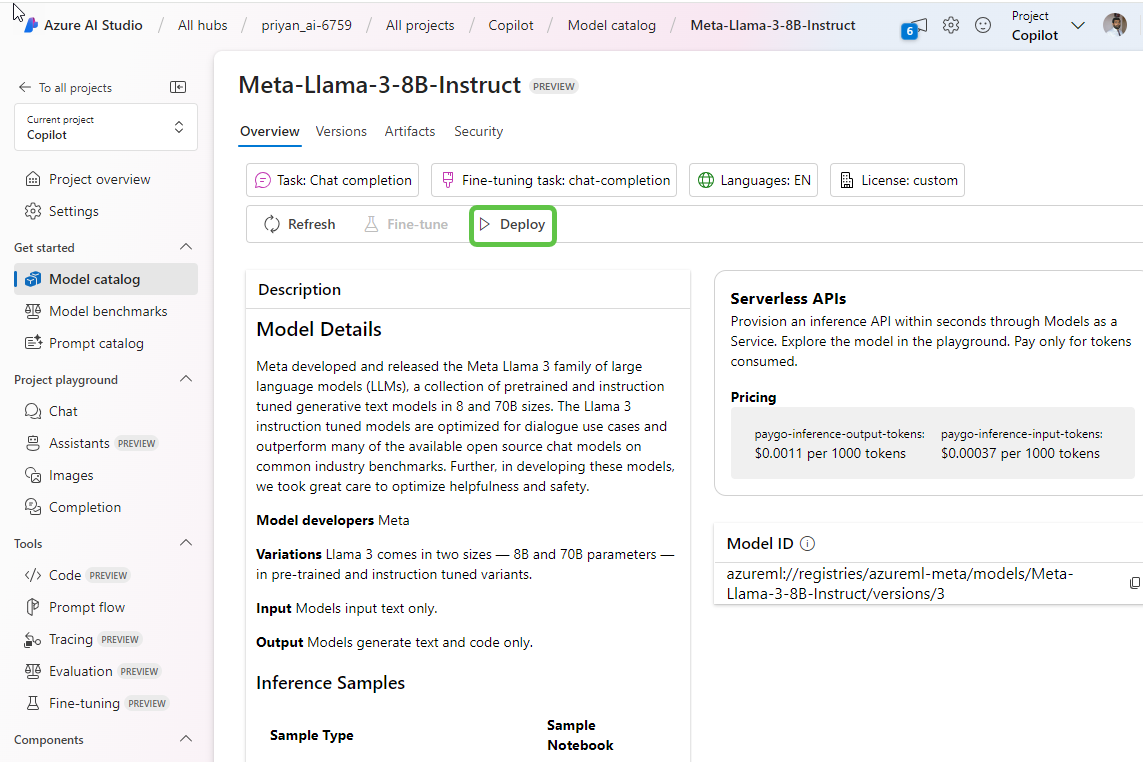
Click on Deploy to create the instance of the selected Llama model.
-
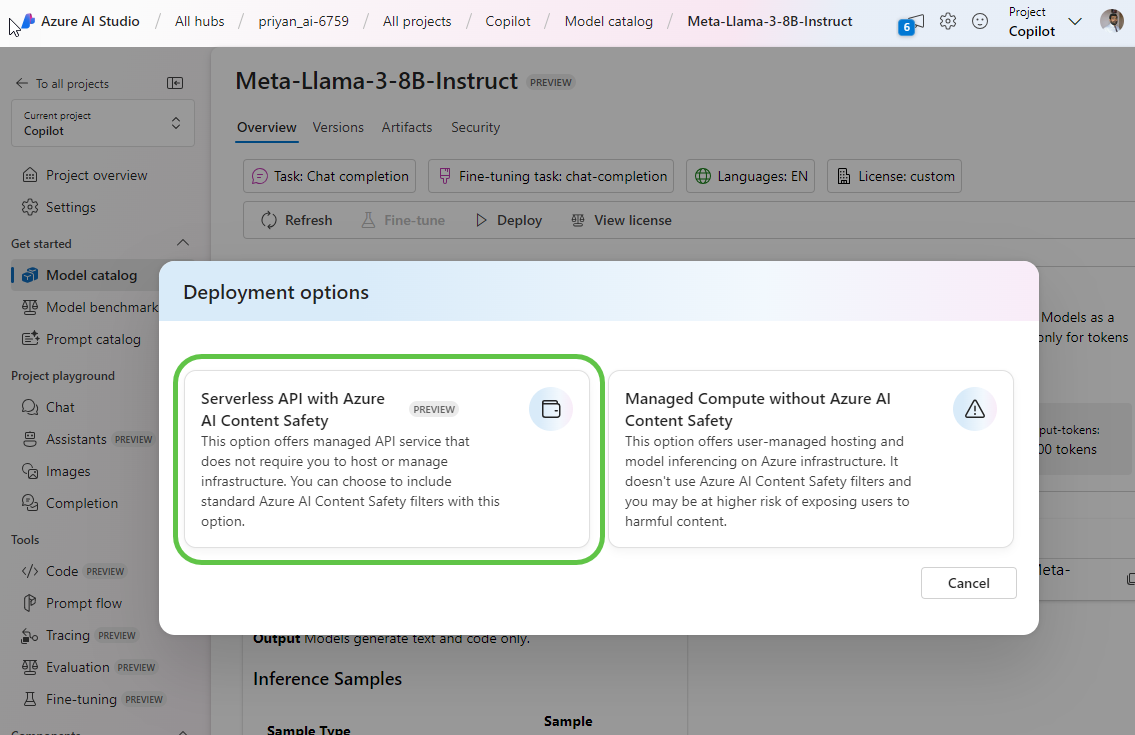
We can choose to have Azure AI Content safety filters along with the model which would incur charges through Azure AI Content Safety services. However, this is optional.
-
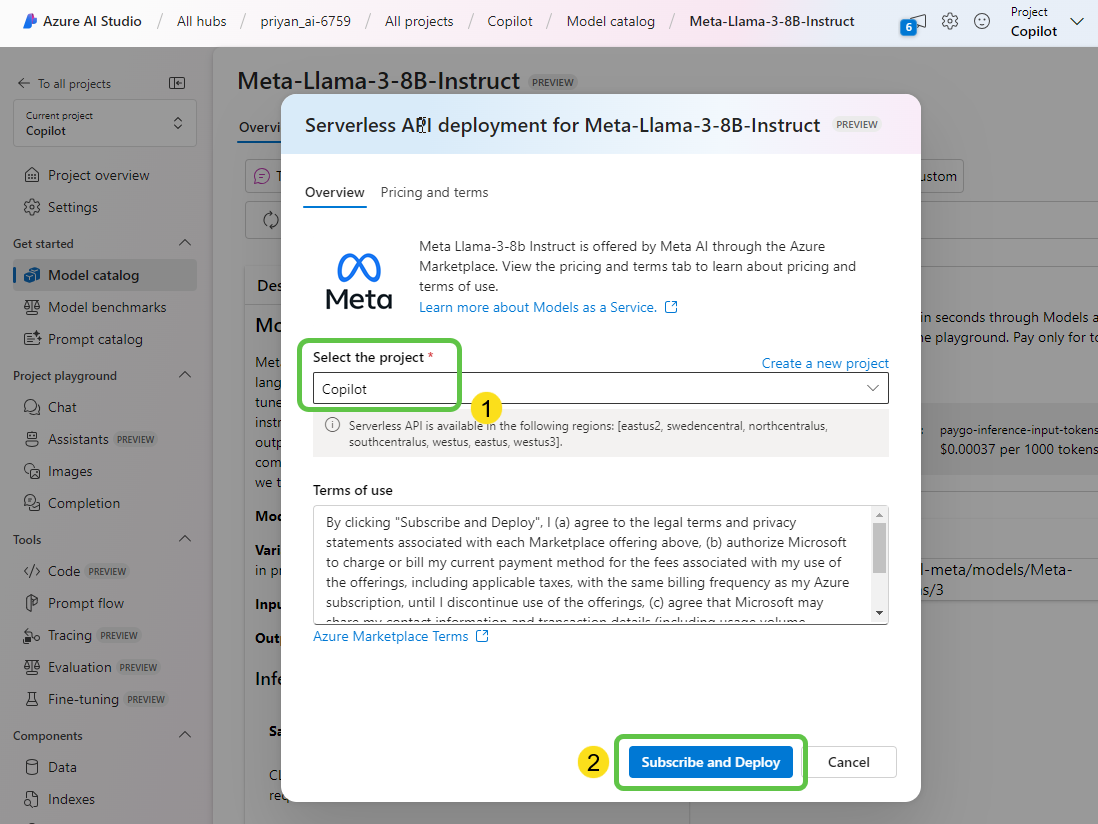
Ensure that you have selected the recently created project , Select Subscribe and Deploy.
-
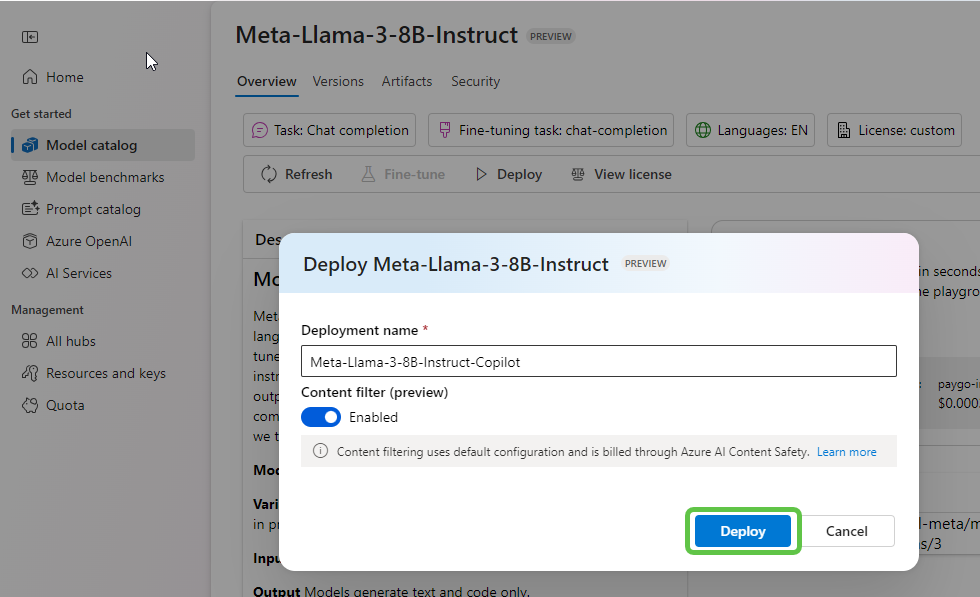
Specify the Deployment name and click on Deploy to finalize the deployment of the model.
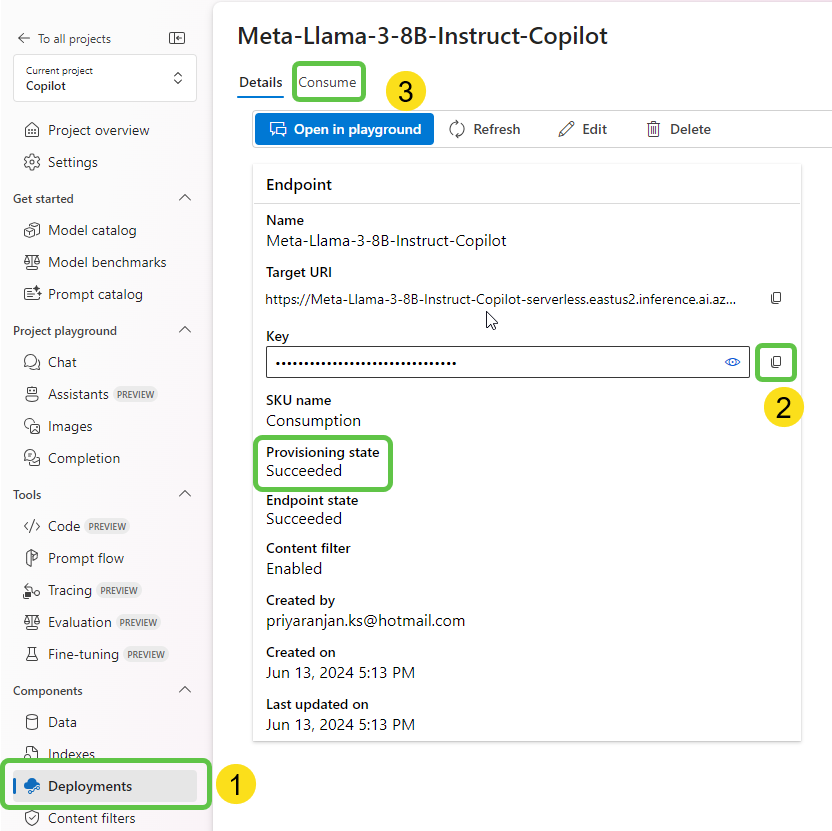
- It would take some time for the model deployment to complete. Once done,
- In the deployments left side pane, we can see that the Provisioning State is succeeded.
- We will copy the Key value as it is needed for authentication from copilot
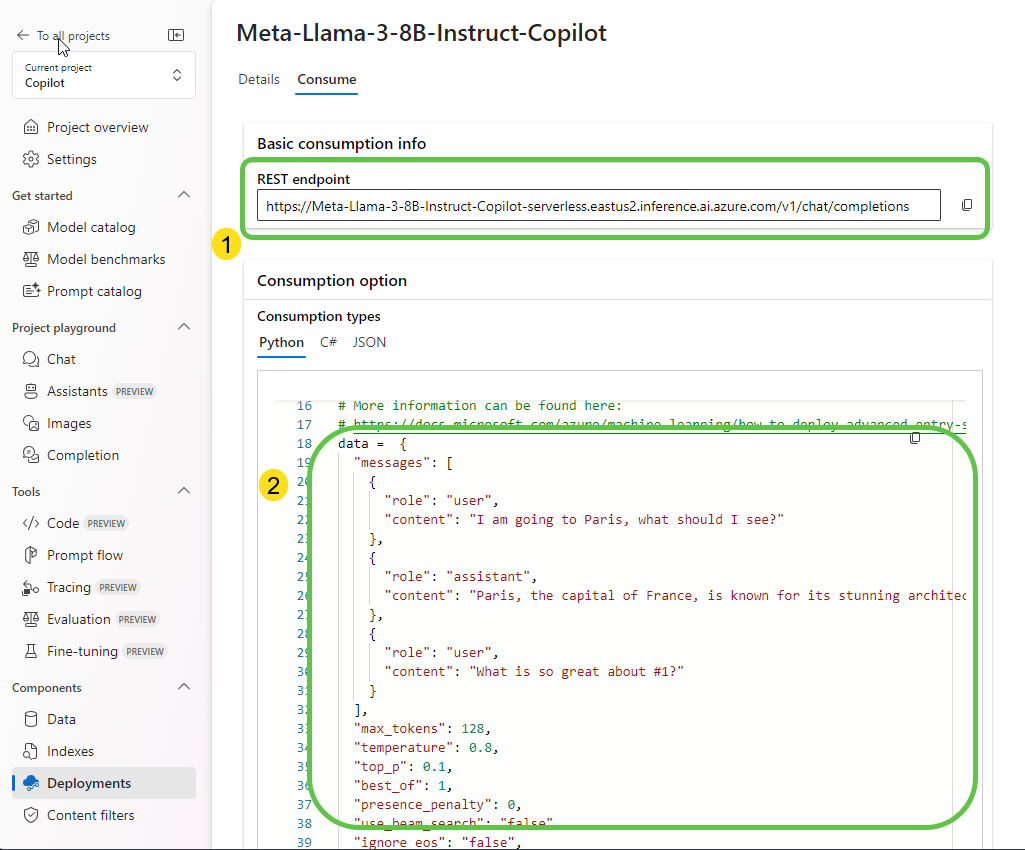
- We will now click on consume tab so as to copy the REST endpoint for this model.
- In the consume tab,
- Copy the REST endpoint which we will use for invoking the model from the copilot.
- There is also samples of how the input prompt for Llama model looks like which we can follow while creating the prompt in copilot.
Step 3: Create the Copilot in Copilot Studio
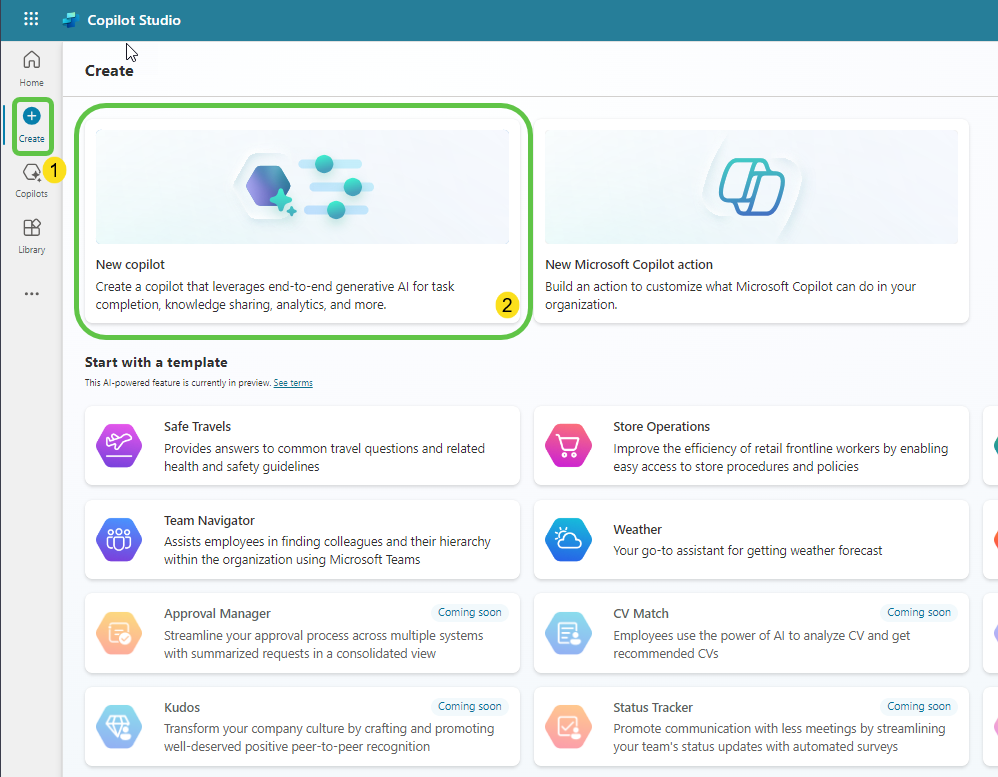
- Head over to Copilot Studio and
- Click on Create.
- This will provide us the option to create a copilot based on an existing template on create a blank copilot from scratch, Lets select New copilot.
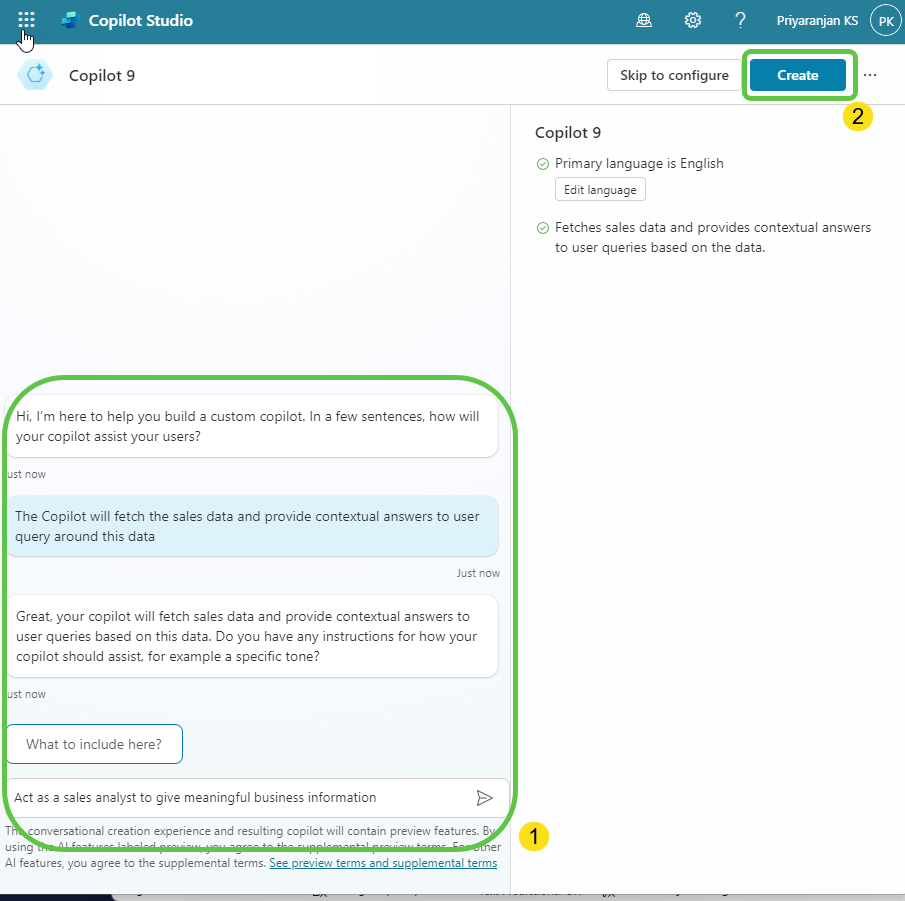
- This will take us to the page where we can
- Describe the copilot functionality and provide any specific instructions to the copilot.
- Once done, click on Create to provision the copilot.
Step 4: Enable Generative selection of topics
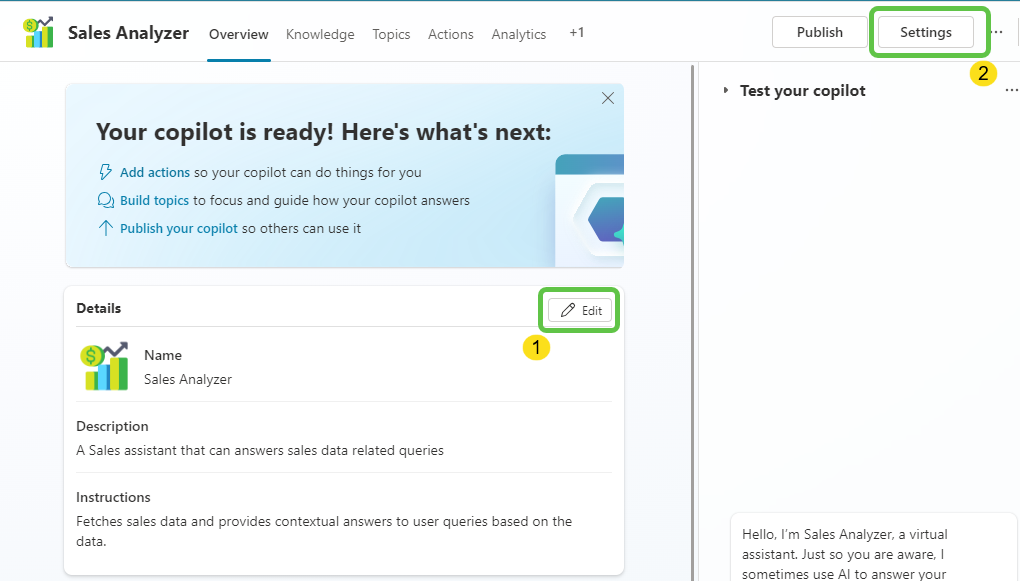
- The copilot is now created. We can then make the needed configuration changes
- Click on Edit, edit the copilot details like name, icon and description.
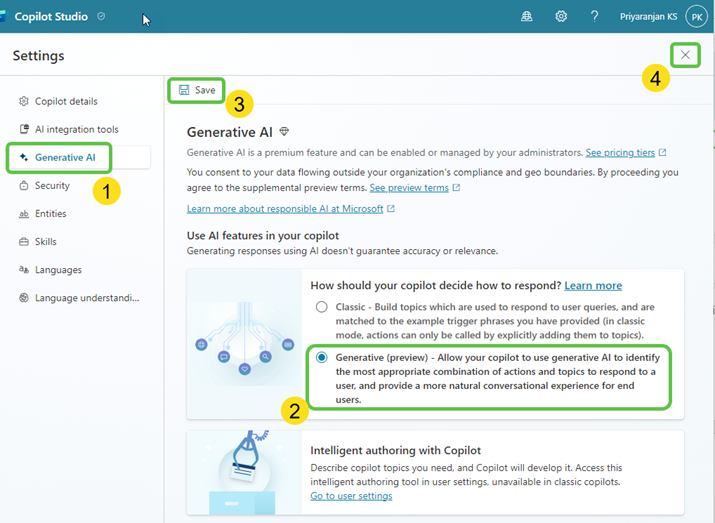
- Click on Settings to enable the Generative selection of topics so that without relying on triggers, the topics will be auto selected based on user conversation resulting in a much smoother user experience.
- To enable the automatic detection of topics from user interaction:
- Click on Generative AI.
- Select Generative(preview).
- Click on Save to update the settings.
- Click on Close icon to go back to the home page of this custom copilot.
Step 5 : Create Topics
- Now let’s go ahead and create the topics that will automatically redirect the conversation flow to appropriate topics based on the question user posts.
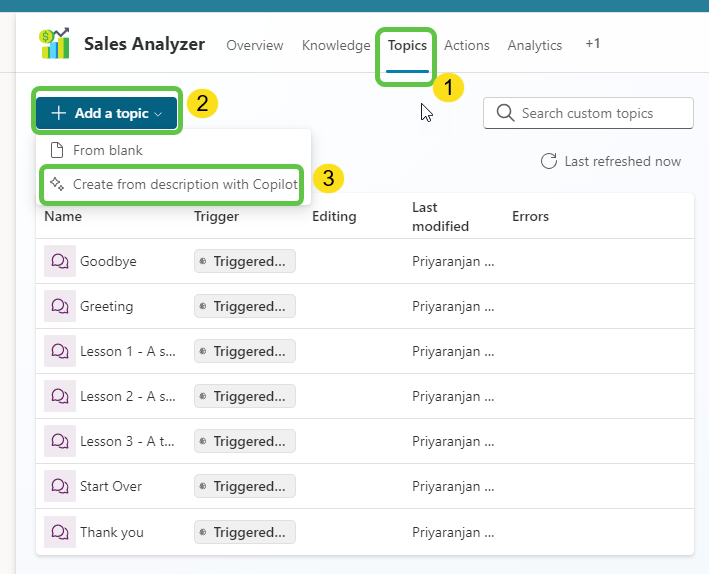
- Click on Topics from the navigation menu.
- To add the topic, we can either go with the option to create a blank topic or use Copilot to create the topic with initial set of prepopulated conversation nodes based on the topic description that we provide.
- Let’s Click on Add a Topic and
- Select Create from description with Copilot.
-
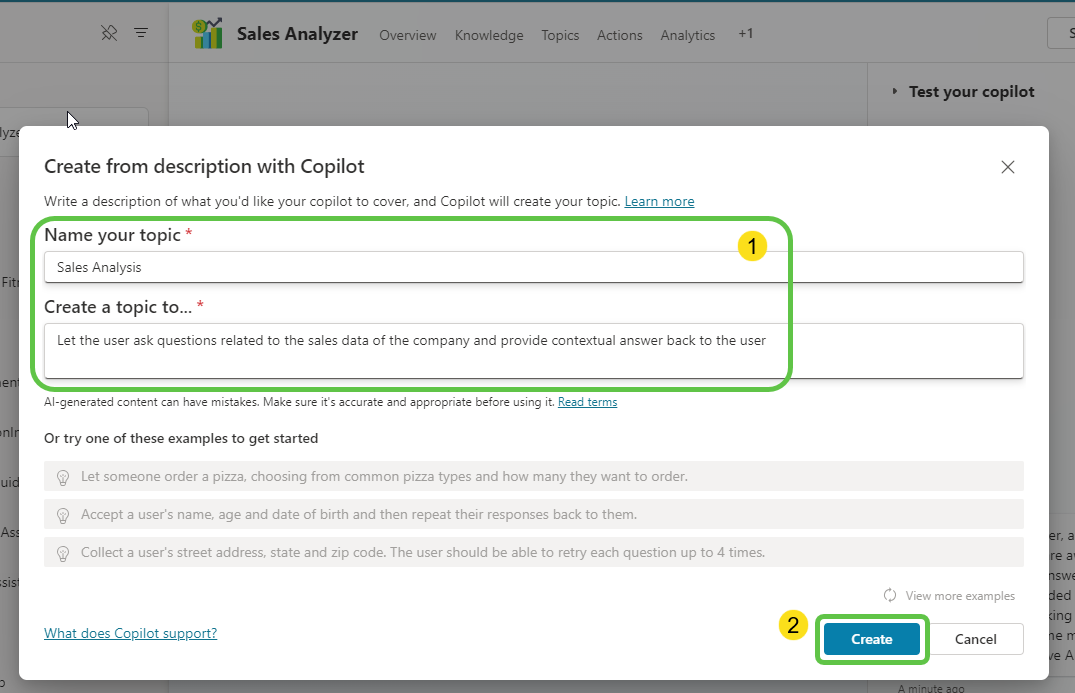
Let’s provide the below topic description details in the pop up that opened when we clicked the Add topic button previously. Then, Click on Create, which will provision the topic skeleton based on the provided description.
-
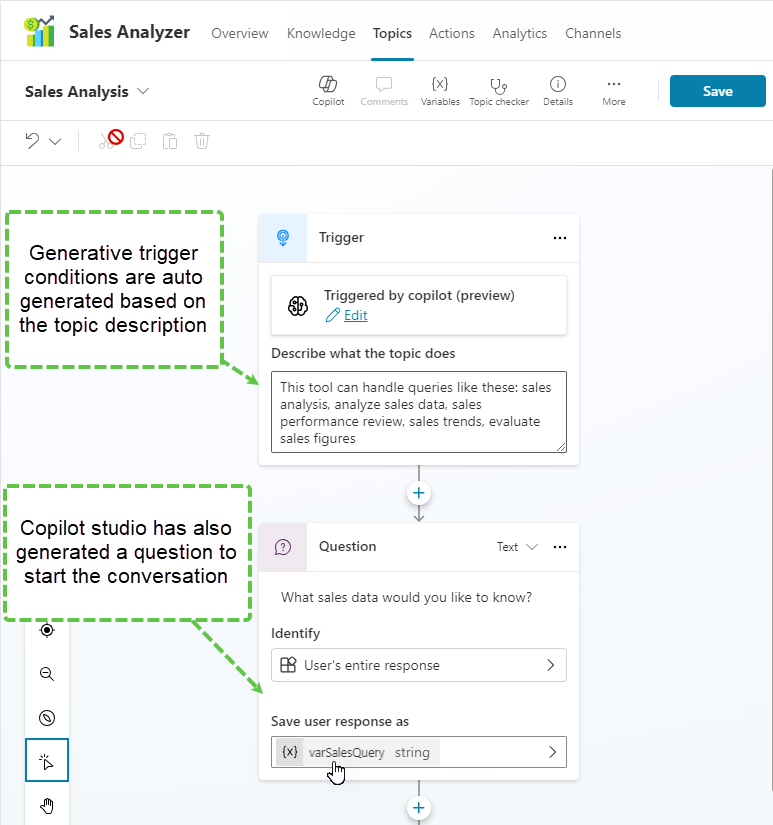
Thus, we have the basic topic created with an automatic trigger as well as a question to the user which are generated using the description provided.
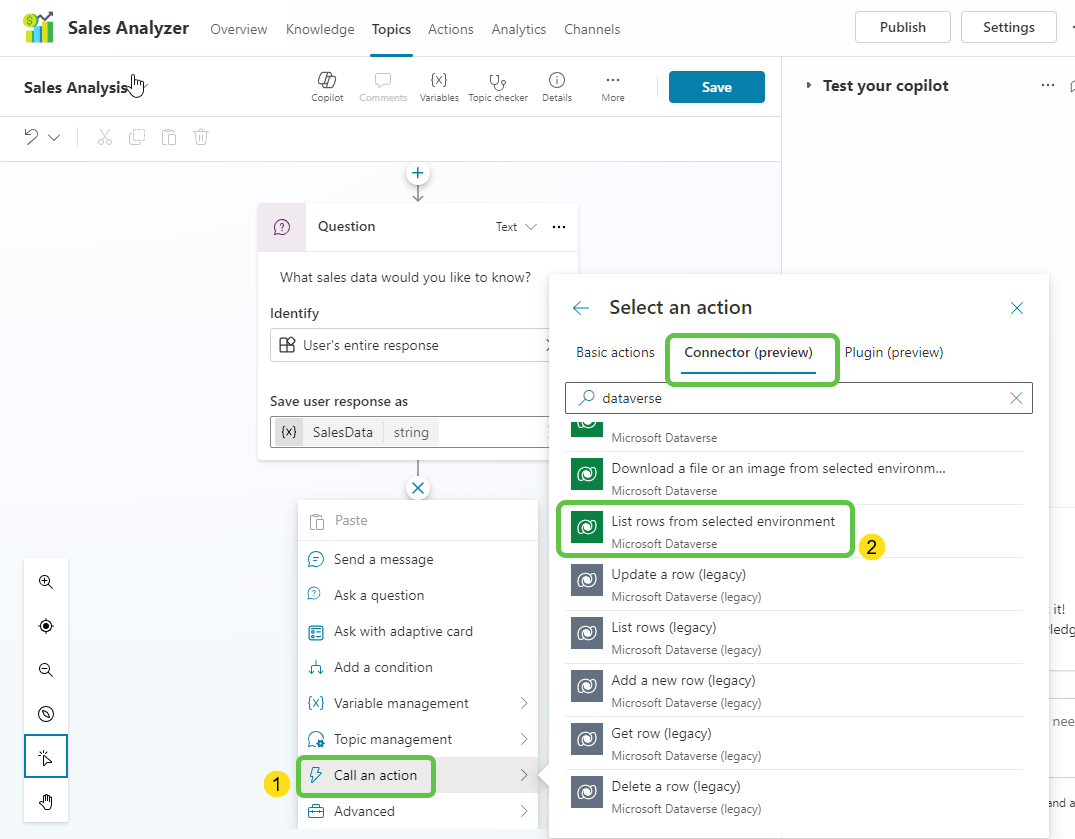
- Now lets add the dataverse connector action which will fetch the Q1 Sales data information from the table.
- Select Call an action.
- From the Connector tab, select List rows from selected environment.
-
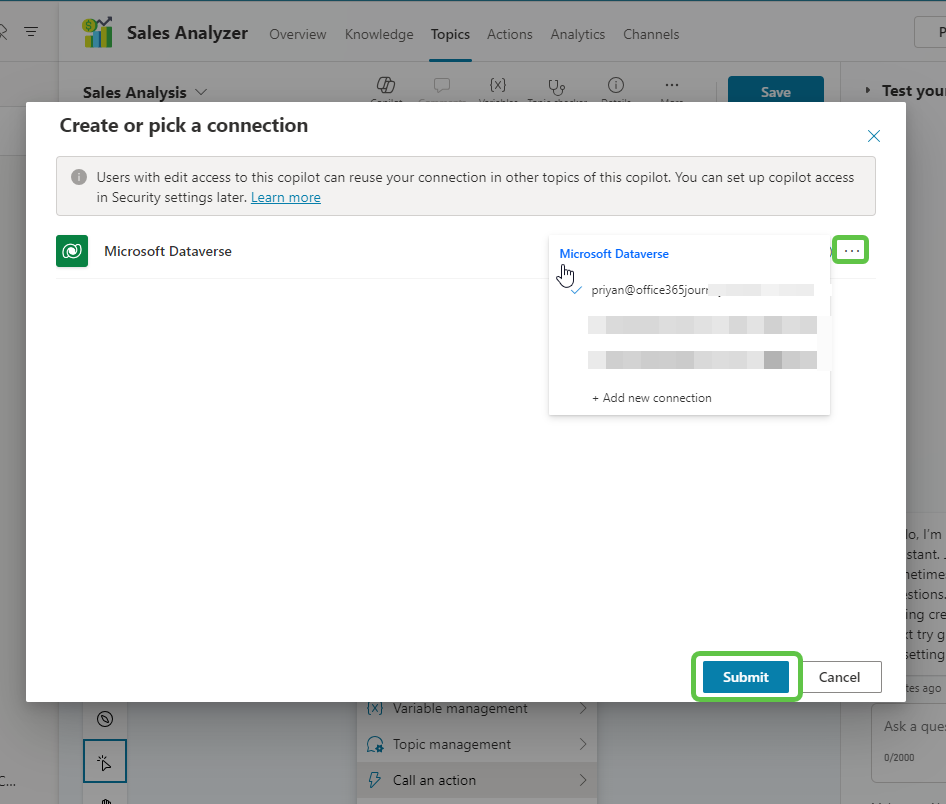
Create the connection and Click on Submit.
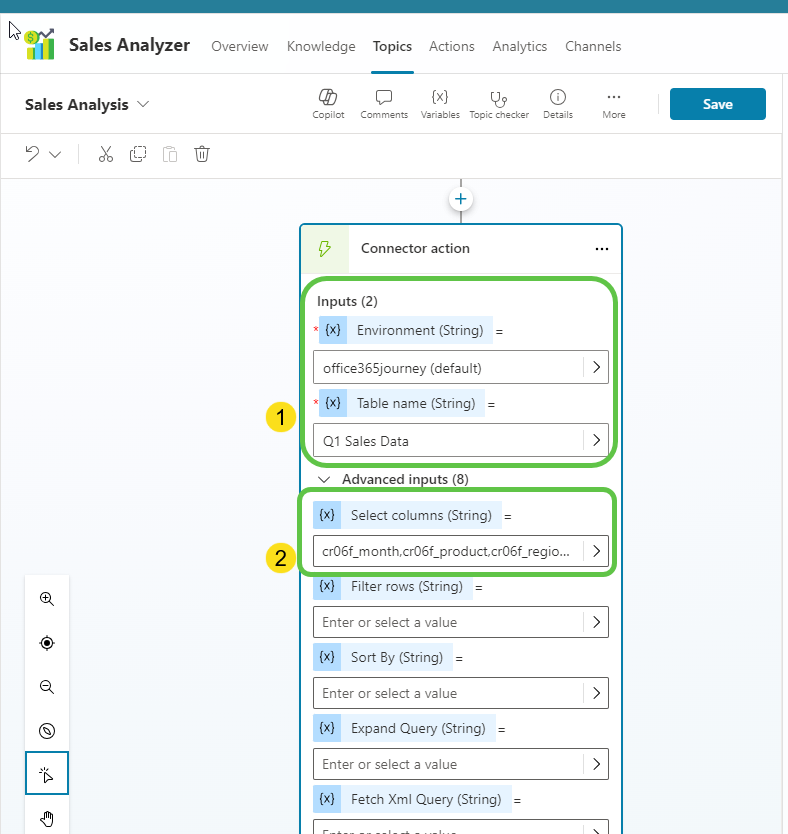
- We can now configure the Dataverse connection by
- Selecting the Environment and Table.
- Mention the logical name of the columns to be retrieved.
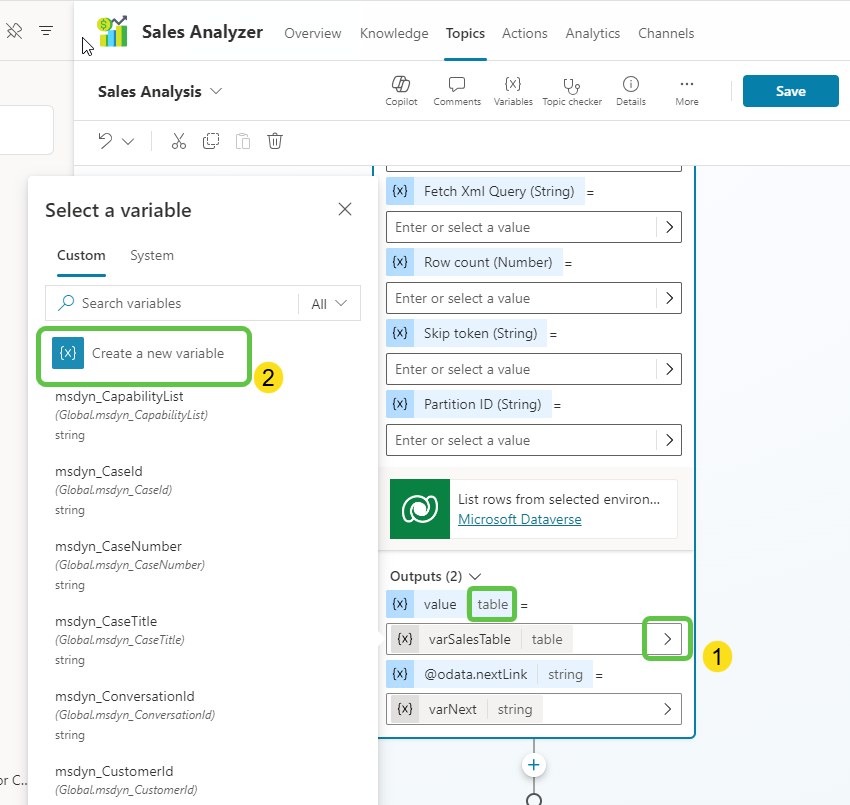
- We can see that the output of the Dataverse connector action is a table, and we need to define a variable to hold the table data. For this we will
- Select the right arrow against the value field and
- Click on Create a new variable and name it as varSalesTable.
-
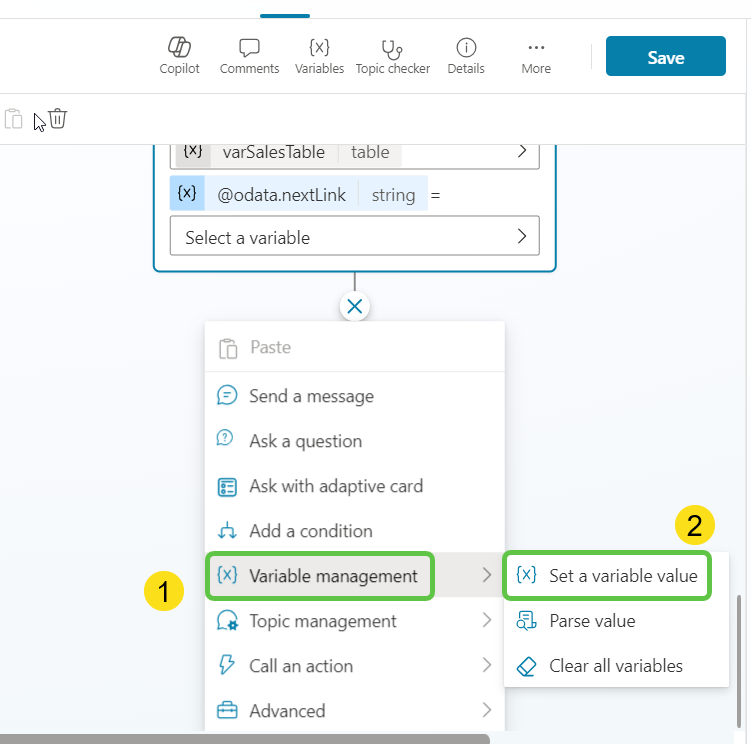
The output of the Dataverse Table Connector(varSalesTable) will contain lots of system columns as well . We will need to format the table to filter and ensure only the needed columns are present. To do this let’s initialize a variable(varSalesDetails) to hold the new filtered output of the Dataverse connector.
-
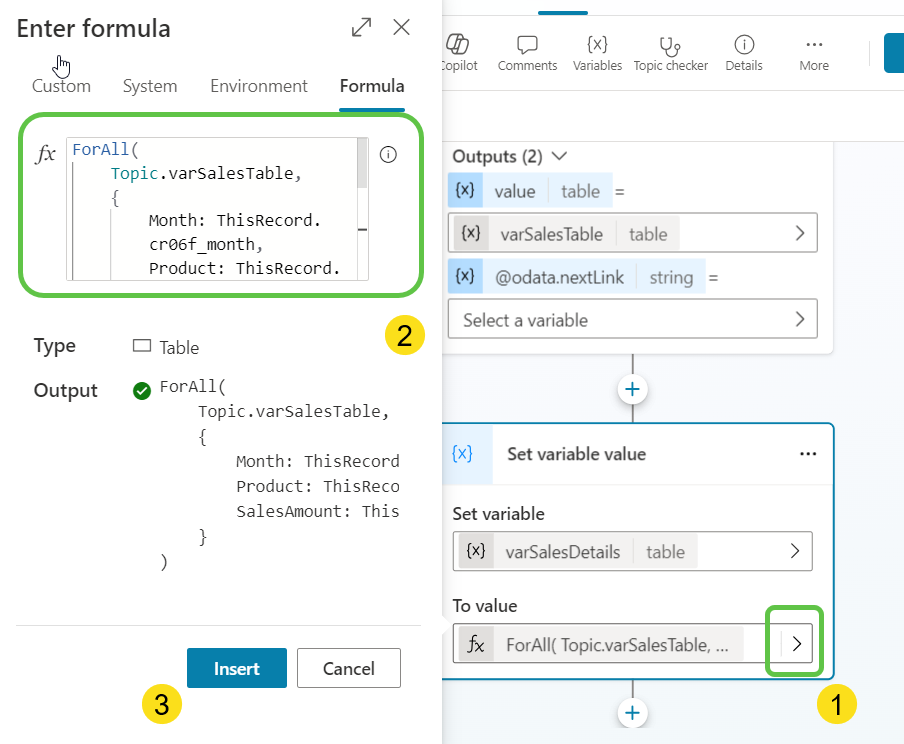
We will then add the below formula which will filter the output to create a subset of the table and store it in the variable. It does this by looping through the previous Dataverse connector output and fetching only the columns that we have mentioned in the expression.
ForAll(
    Topic.varSalesTable,
    {
        Month: ThisRecord.cr06f_month,
        Product: ThisRecord.cr06f_product,
        SalesAmount: ThisRecord.cr06f_salesamount
    }
    )
-
If we were to test and output this variable(varSalesDetails) value in the test pane, we will get the table output as :
[{“Month”:“January”,“Product”:“AeroFusion Blender”,“SalesAmount”:7500},
{“Month”:“January”,“Product”:“SolarX PowerPack”,“SalesAmount”:6200},
{“Month”:“January”,“Product”:“QuantumLight Glasses”,“SalesAmount”:5600}]
We will do one more formatting of this output to serialize this table into a string readable format as shown below < Month >: < Product >: < Sales Amount > . The reason for doing this is because the LLM input should be a string and hence the table has to be serialized to the string format.
January:AeroFusion Blender:7500,
January:SolarX PowerPack:6200,
January:QuantumLight Glasses:5600,
January:EcoWave Cleanser:4300,
February:AeroFusion Blender:8100,
February:SolarX PowerPack:5900,
February:QuantumLight Glasses:6300,
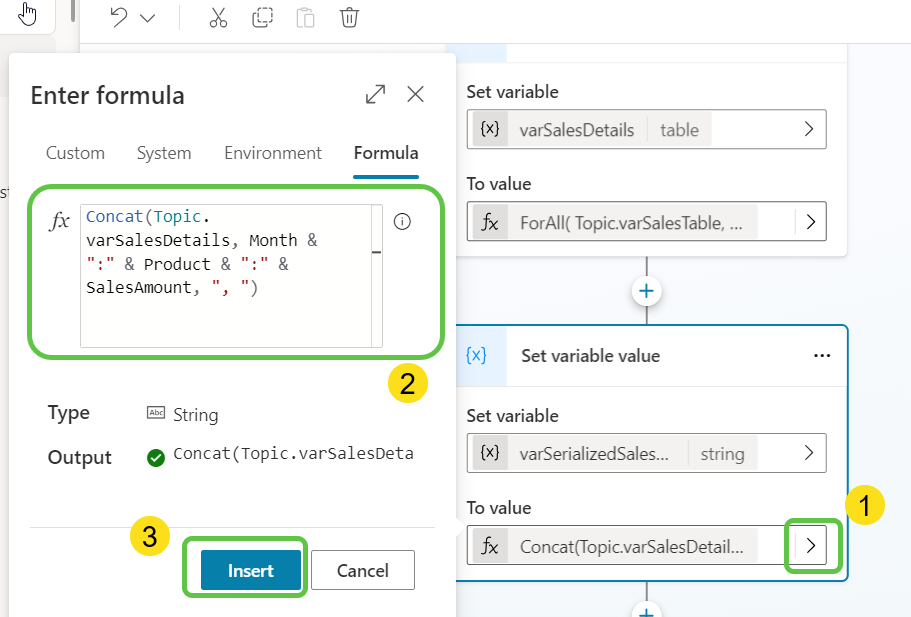
To do this, lets add another variable(varSerializedSalesData) and set its formula to
Concat(Topic.varSalesDetails, Month & ":" & Product & ":" & SalesAmount, ", ")This way, from the previous filtered table, we will concat the Product and sales details in the readable string format which can be shared as an input to the Llama Prompt
Step 6: Add an HTTP Request for Llama Model
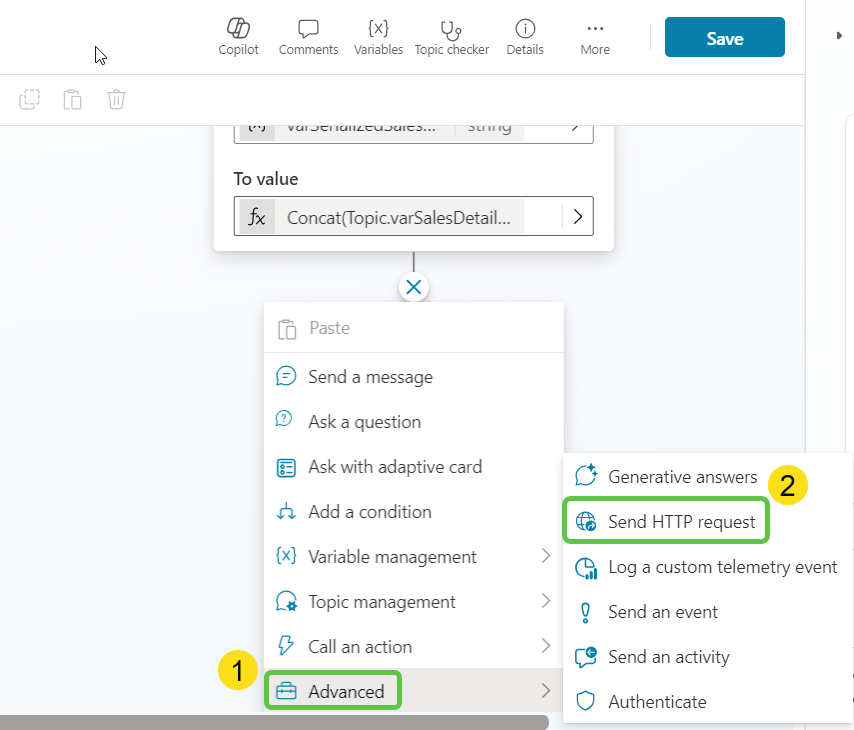
Now let’s add an HTTP Request so that we can call the Llama deployment endpoint in Azure AI Studio.
Step 7: Configure the HTTP Request
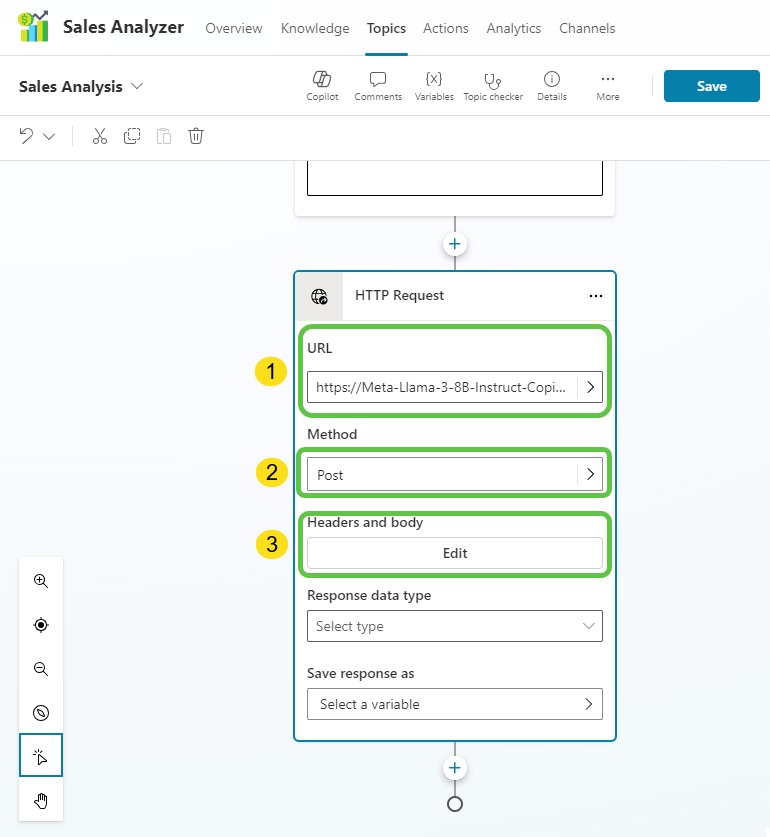
- Paste the REST URL we copied from azure ai studio to the URL field.
- Change the Method to POST.
- Click on Edit to update the Header and Body.
Step 8: Add Header Properties
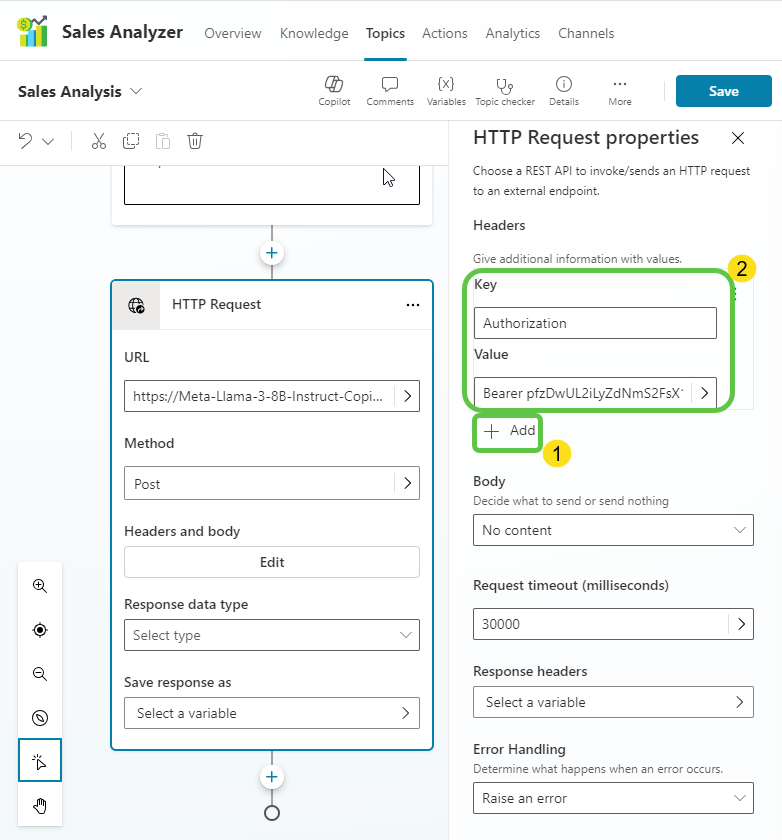
- This will open up the HTTP Request Properties pane where :
- We will click on Add so that it adds a Key Value Pair field section
- Add the Authorization text to the Key and Bearer {Key copied from Azure AI Studio} to the value field
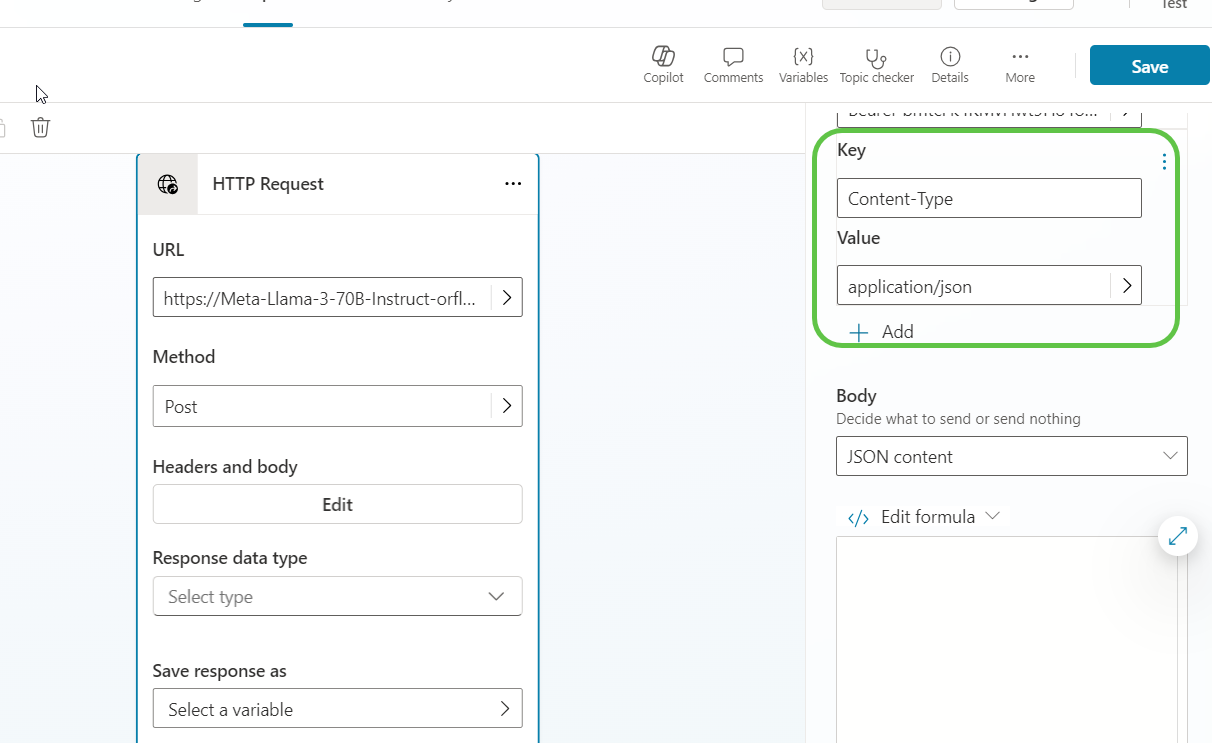
- We have to add one more header property
- Click on Add once again so that we can add the next Key Value Pair
- Add the Content-Type text to the Key and application/json to the value field
Step 9: Add the Body to the Request
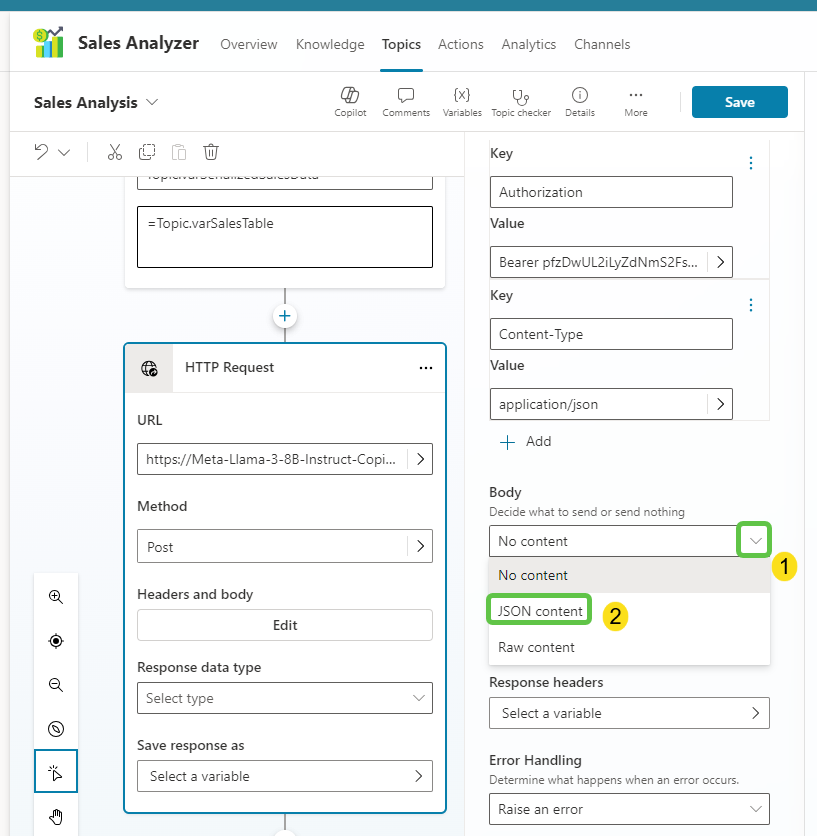
- Now we have to add the Body which is the Llama prompt to the Request for which we will
- Click on the Body field and
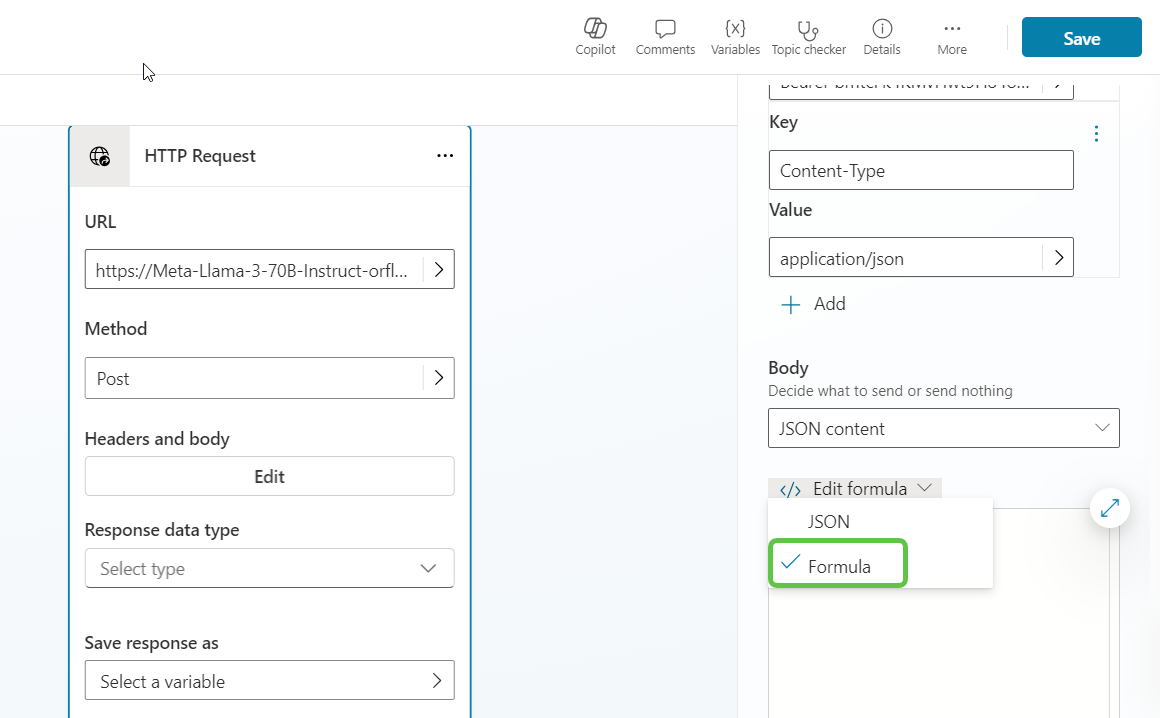
- Select JSON Content.
-
This will open up the JSON/Formula box just below the body field. If we were sending a static text as body, we could have selected JSON. But since, we need to dynamically pass the user query as well into the prompt,we will select Formula.
-
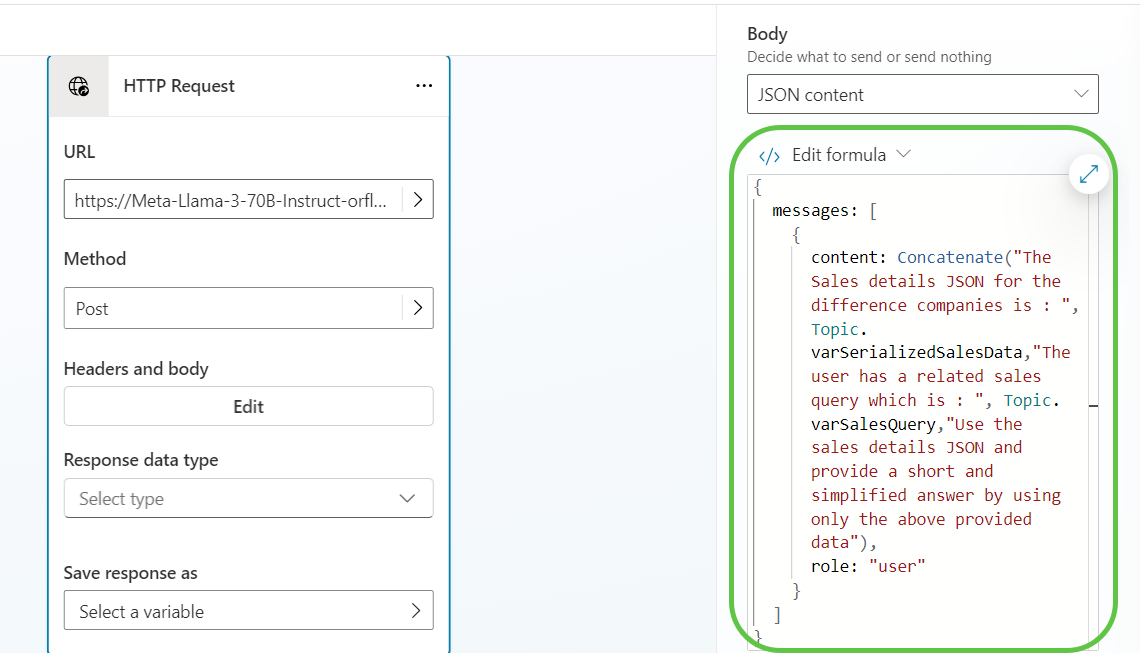
We can now add the prompt by concatenating the User query along with the Dataverse table sales data and passing it to the content attribute of the prompt. The role attribute indicates that this message is an input from the user. Thus we have created the prompt as expected by Llama. Now lets head back to the copilot designer and define the response data type.
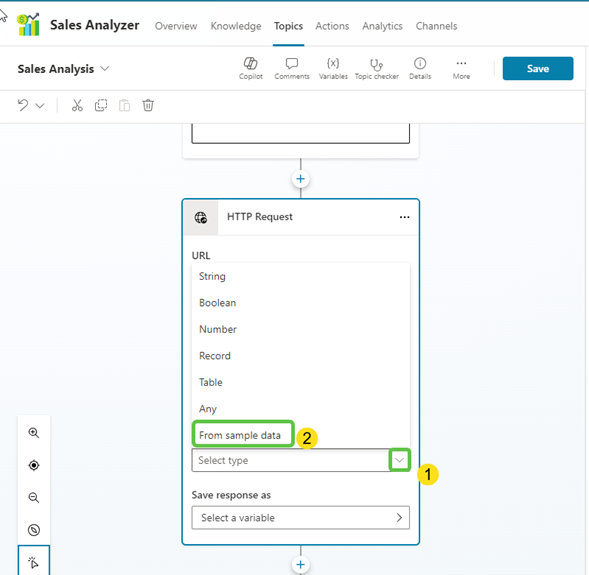
- We will now configure the response data type field by :
- Clicking the right arrow and
- Select From sample data.
In general the output of Llama 3 would look like below:
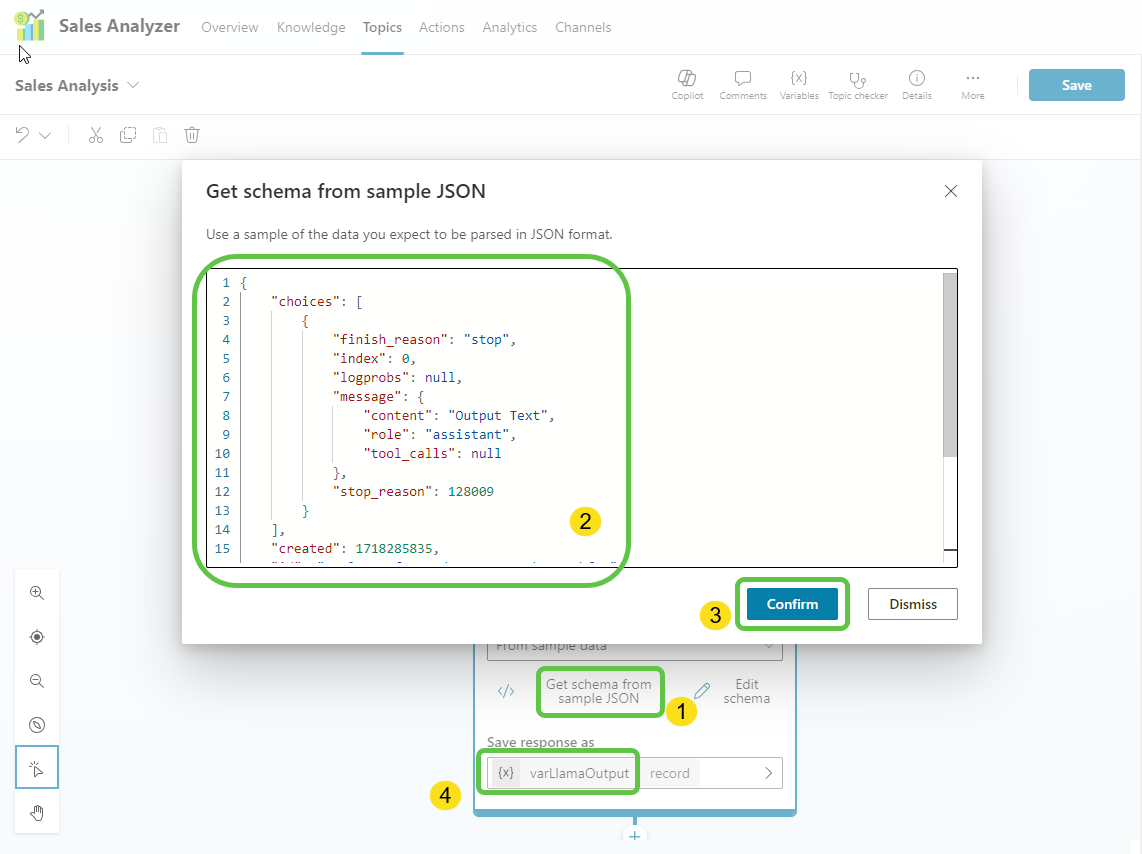
{ "choices": [ { "finish_reason": "stop", "index": 0, "logprobs": null, "message": { "content": "Output Text", "role": "assistant", "tool_calls": null }, "stop_reason": 128009 } ], "created": 1718285835, "id": "cmpl-7443f01686d24a52924850b34655bf22", "model": "Meta-Llama-3-8B-Instruct", "object": "chat.completion", "usage": { "completion_tokens": 108, "prompt_tokens": 51, "total_tokens": 159 } } - Lets add this sample output data by clicking on Getting schema from sample JSON.
- Paste the above JSON Output content and
- Click on Confirm.
- We will add a variable named varLlamaOutput to hold the returned output value which is of record datatype.
Step 10: Display the Generative Answer
Finally lets show the generative answer result from the Llama model as a basic card. As we can see in the output schema, the generative answer will be present in the content key value pair which is nested within the choice and message parent . We will get this output using the Power Fx formula:
First(Topic.varLlamaOutput.choices).message.content
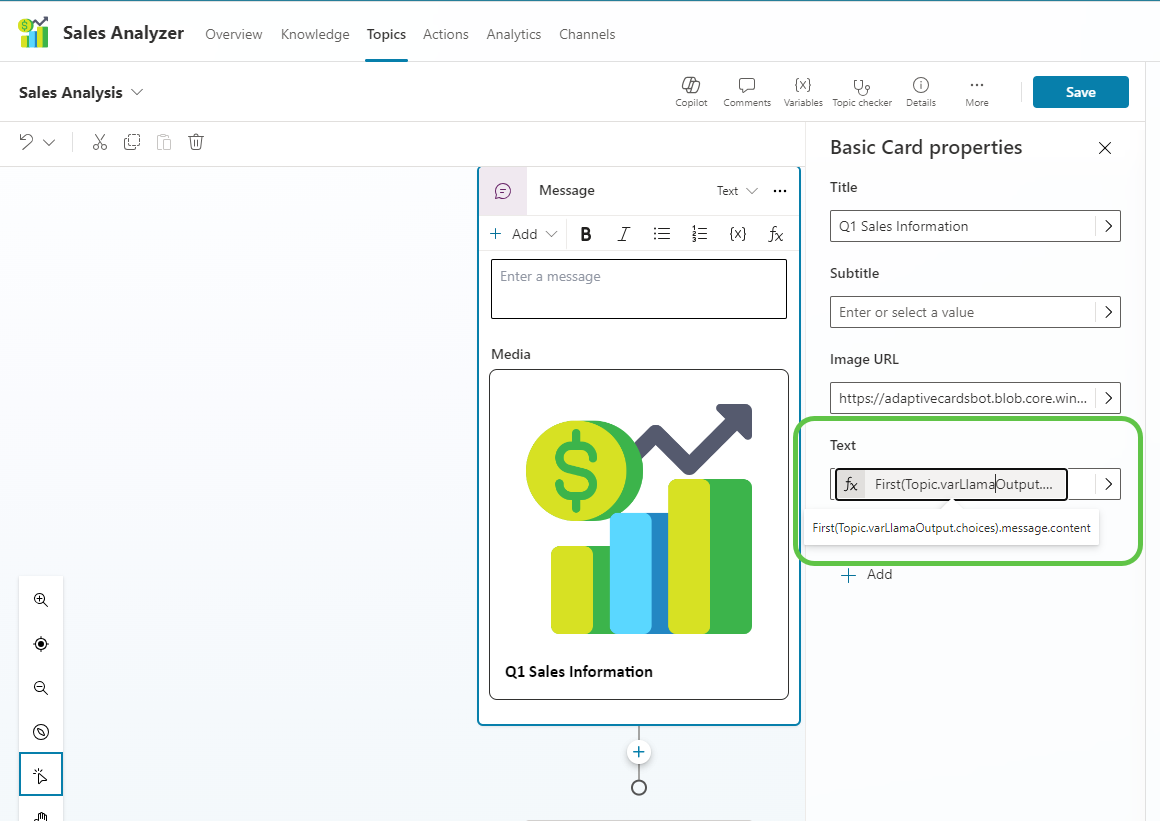
Thus we have completed the creation of the copilot which will invoke Llama model to helps us derive meaningful insights from the Q1 Sales Data present in the dataverse table.
Step 11: Test the Copilot
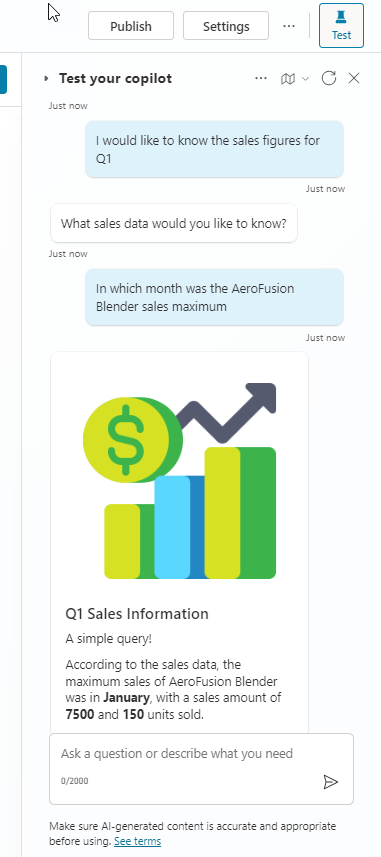
Lets test the copilot by initiating the conversation. We will ask few sales related questions to the copilot.
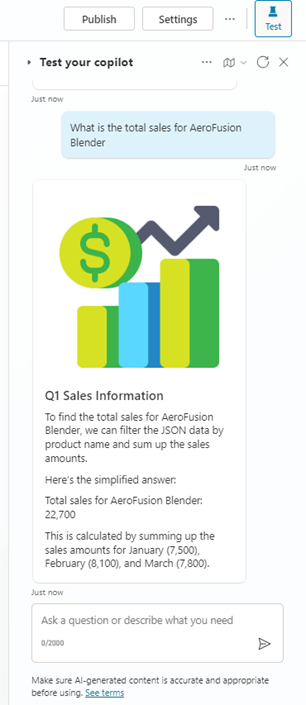
We will also try to ask a bit more complex question which involves calculating the cumulative sales across different records and we can see that Llama has intelligently provided us back with the contextual response.
Conclusion
By following these steps, you can successfully leverage the Llama model within Azure AI Studio and Microsoft Dataverse to create a system that efficiently processes user questions and delivers insightful answers from your sales data. This integration not only enhances data analysis capabilities but also provides a seamless and interactive user experience through Microsoft Copilot. With the power of AI, businesses can now make informed decisions based on real-time data insights, driving growth and innovation.


