Table of Contents
Introduction
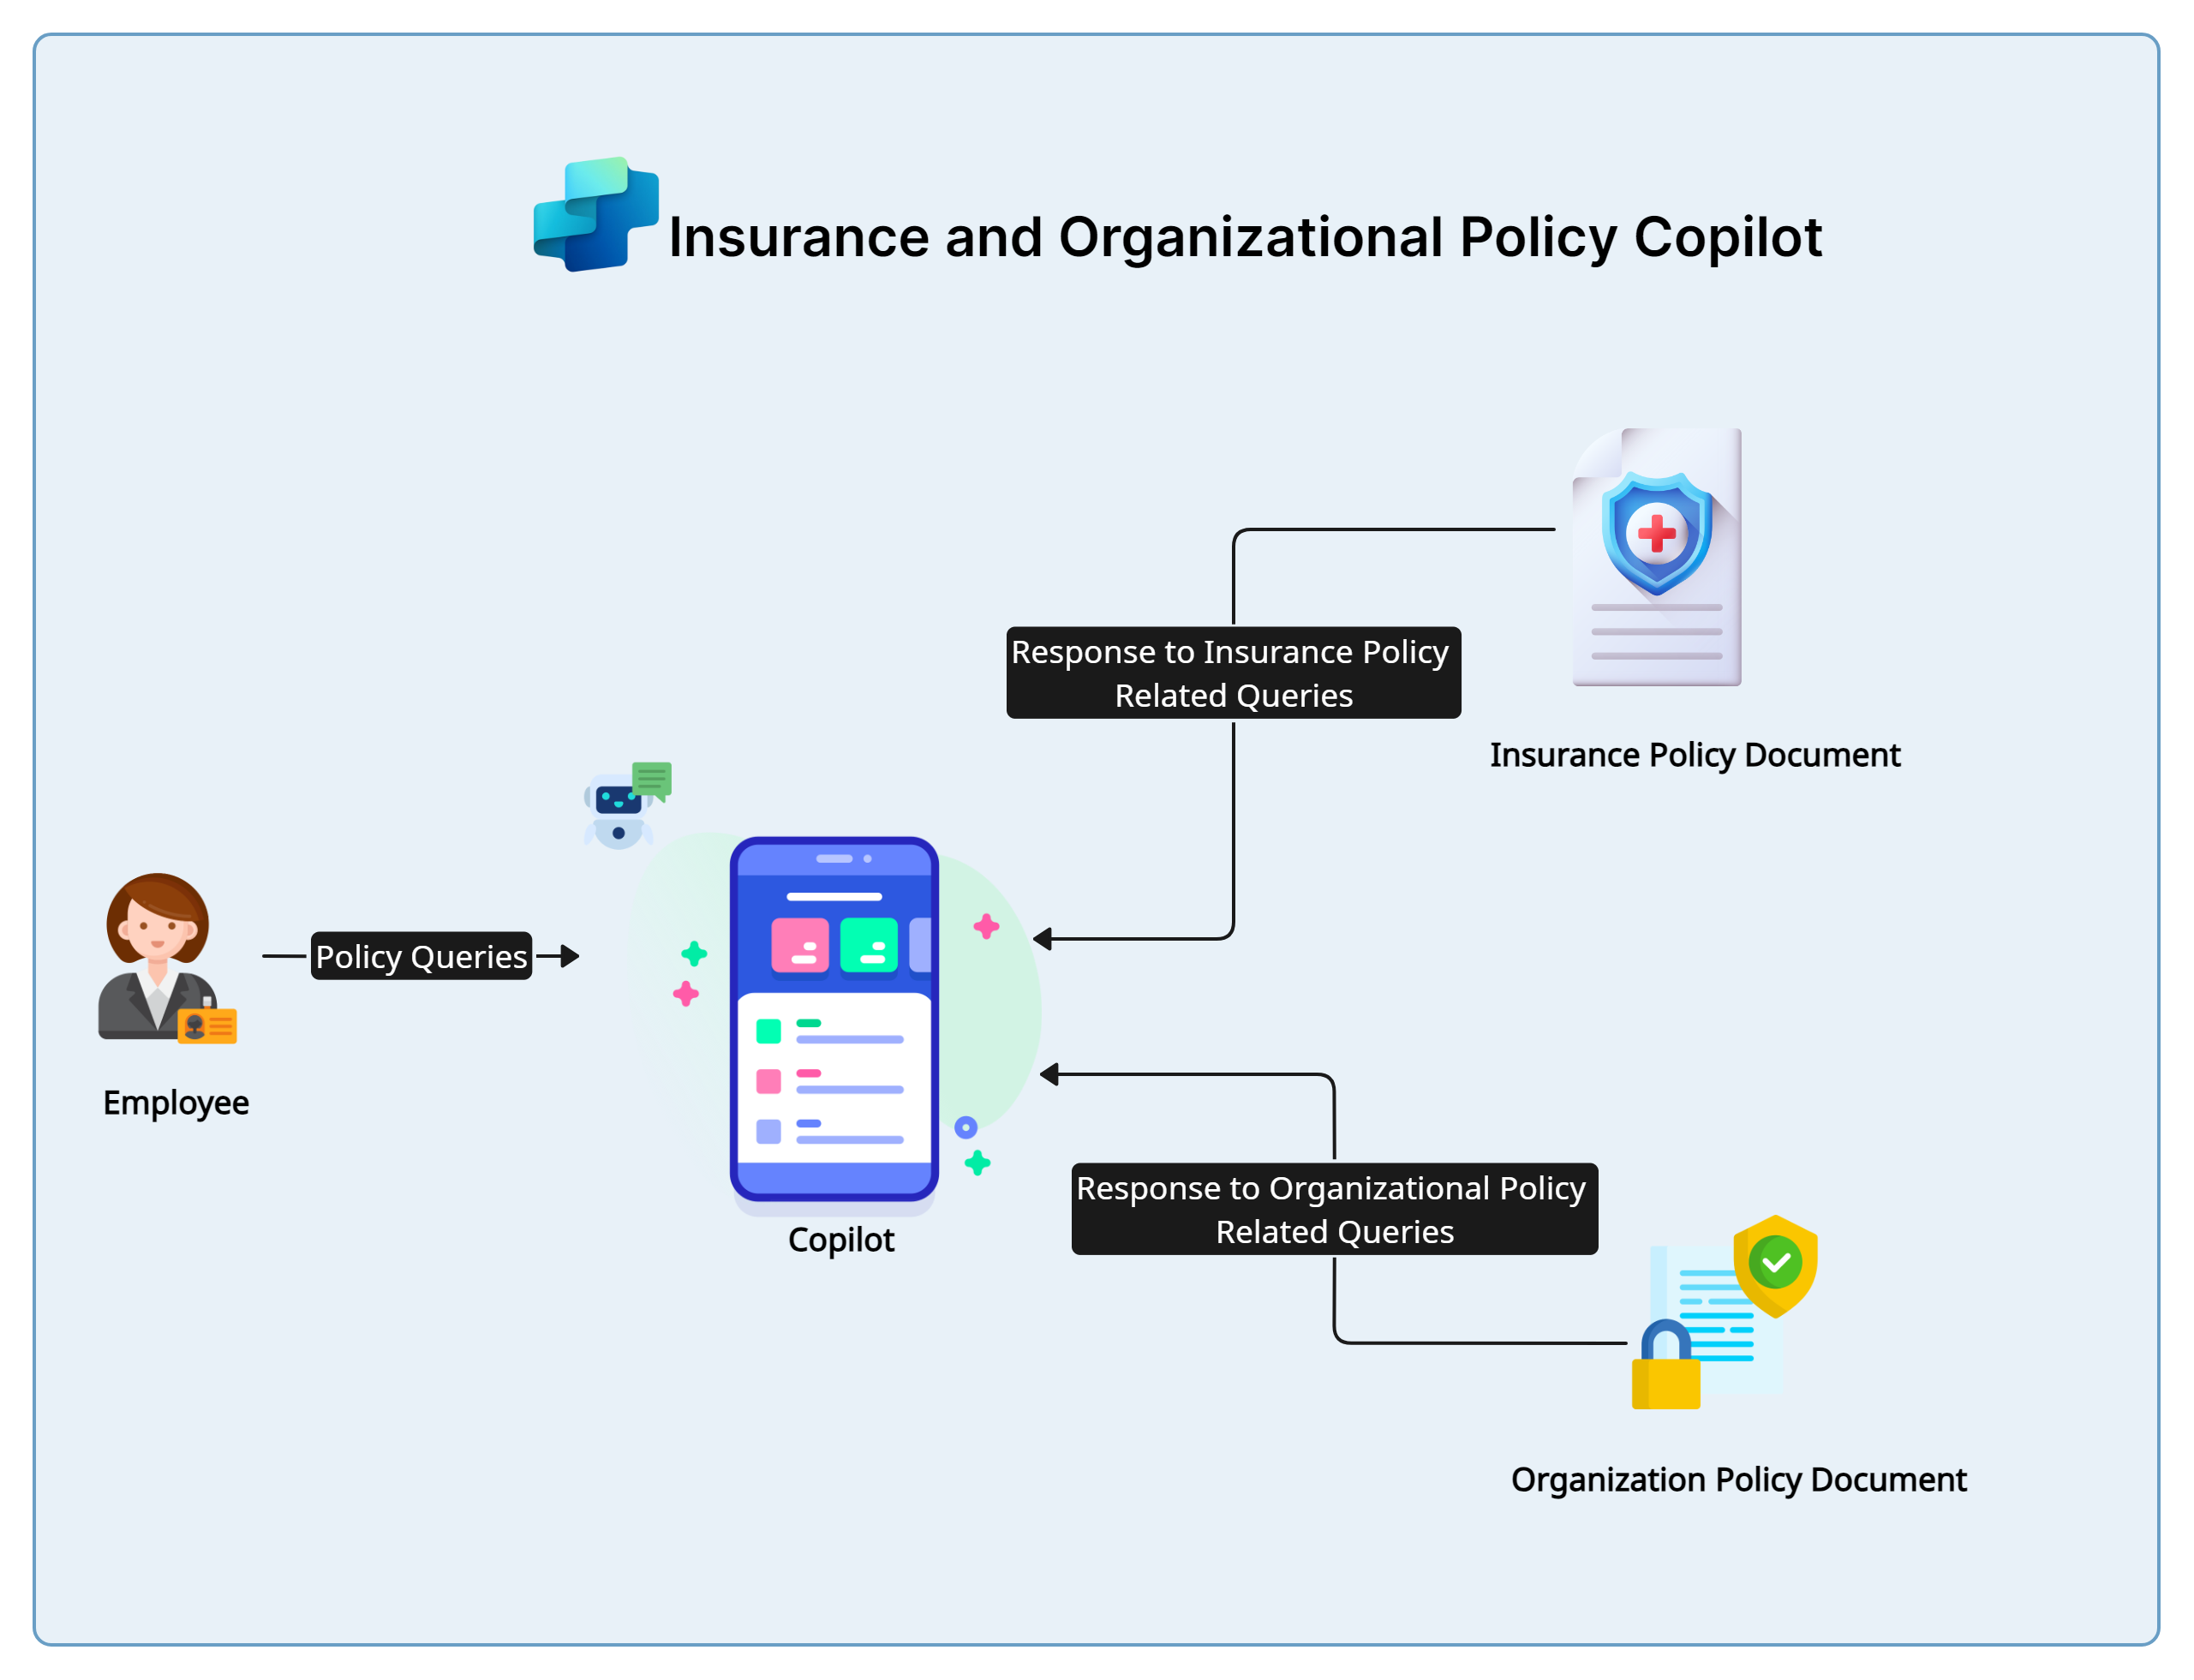
Instant access to information regarding organizational and insurance policies is of prime importance in any organization. Envision a chatbot that can fetch relevant information from policy documents directly uploaded during its build process and provide intelligent responses to users. Microsoft’s Copilot Studio, in conjunction with Generative AI, enables the creation of such a versatile bot.
In this blog, we will explore how to build a Copilot Studio bot that leverages generative AI to answer user queries related to organizational and insurance policies using multiple policy documents as the knowledge source.
Demo
Watch the demo video below to see how the Copilot assistant helps with policy queries in real-time scenarios.
Step-by-Step Guide to Creating the Copilot Studio Bot
Step 1: Setting Up Your Environment
Before we begin building the bot, ensure you have the following prerequisites:
- Microsoft Copilot Studio access.
- Digital copies of your organizational and insurance policy documents.
Step 2: Preparing Your Policy Documents
- Collect your policy documents, categorize them into general organizational policies and insurance policies, and ensure they are in digital format (e.g., PDF, Word).
- Maintain a consistent format in each document with clear headings and sections to facilitate better AI parsing and retrieval.
Step 3: Create Custom Copilot from Copilot Studio
Head over to Copilot Studio and click on Create.
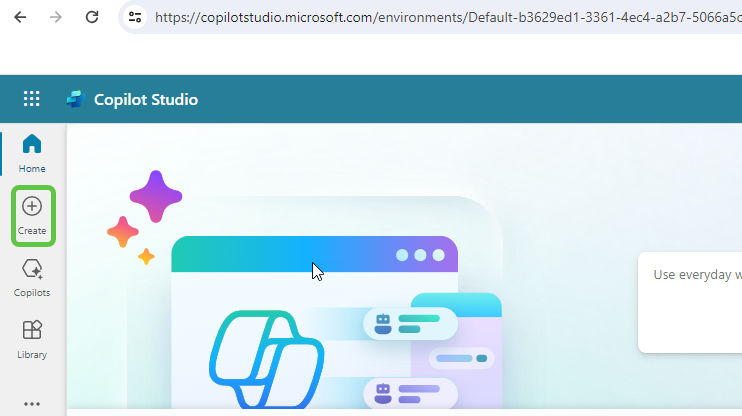
This will provide us the option to create a copilot based on an existing template or create a blank copilot from scratch. Let’s select New copilot.
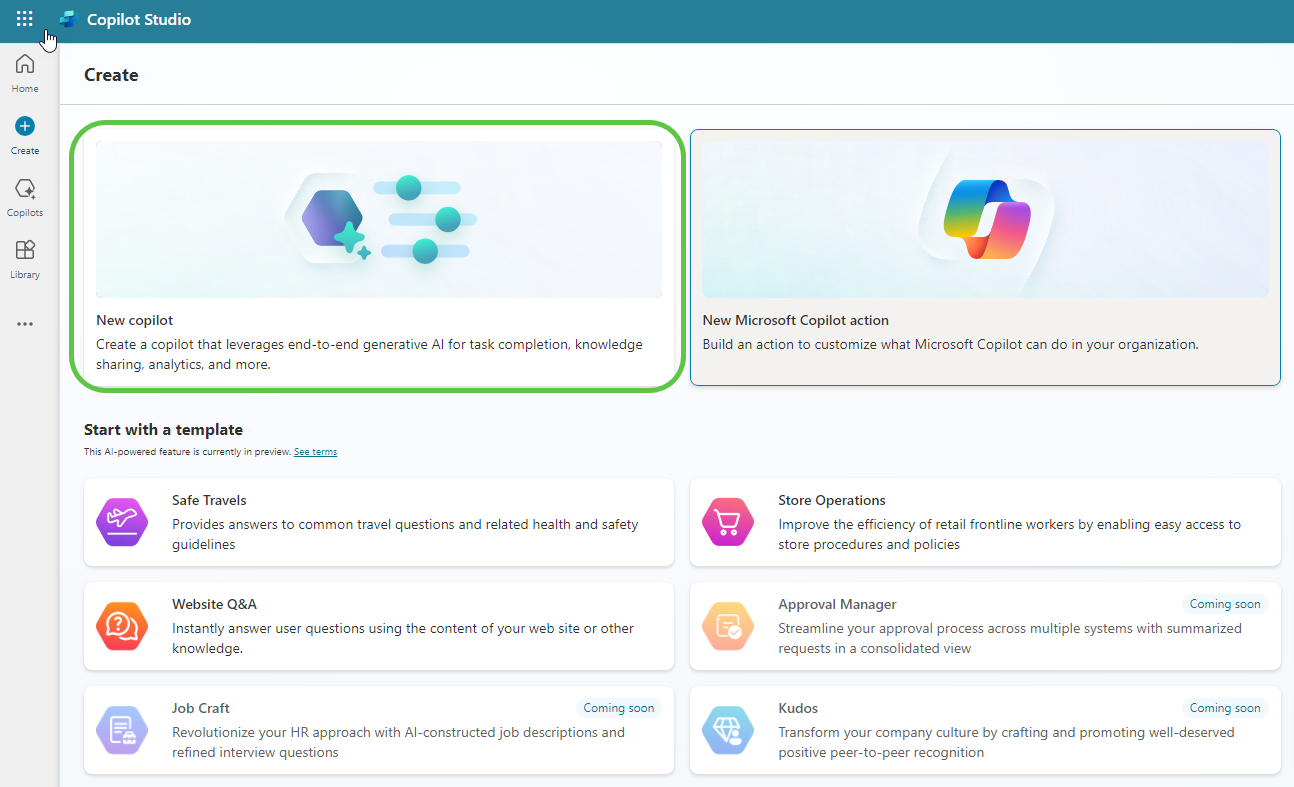
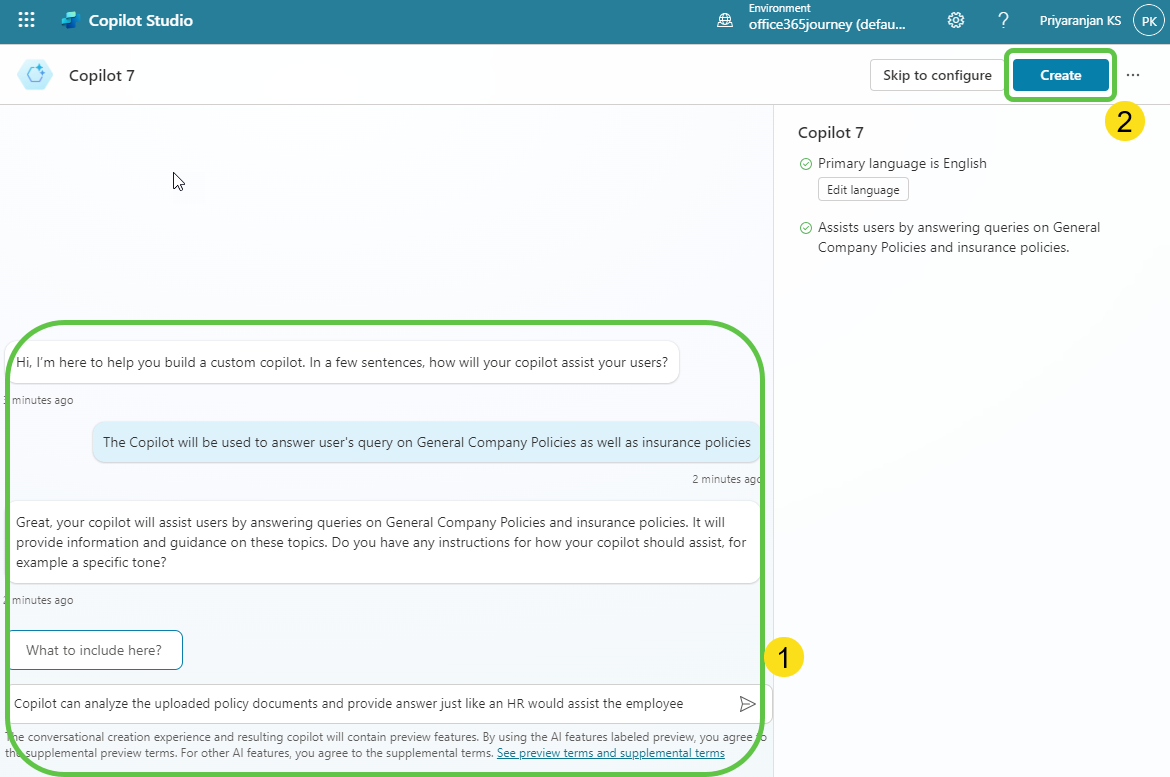
This will take us to the page where we can:
- Describe the copilot functionality and provide any specific instructions to the copilot.
- Once done, click on Create to provision the copilot.
Step 4: Enable Generative Selection of Topics
The copilot is now created. We can then make the needed configuration changes.
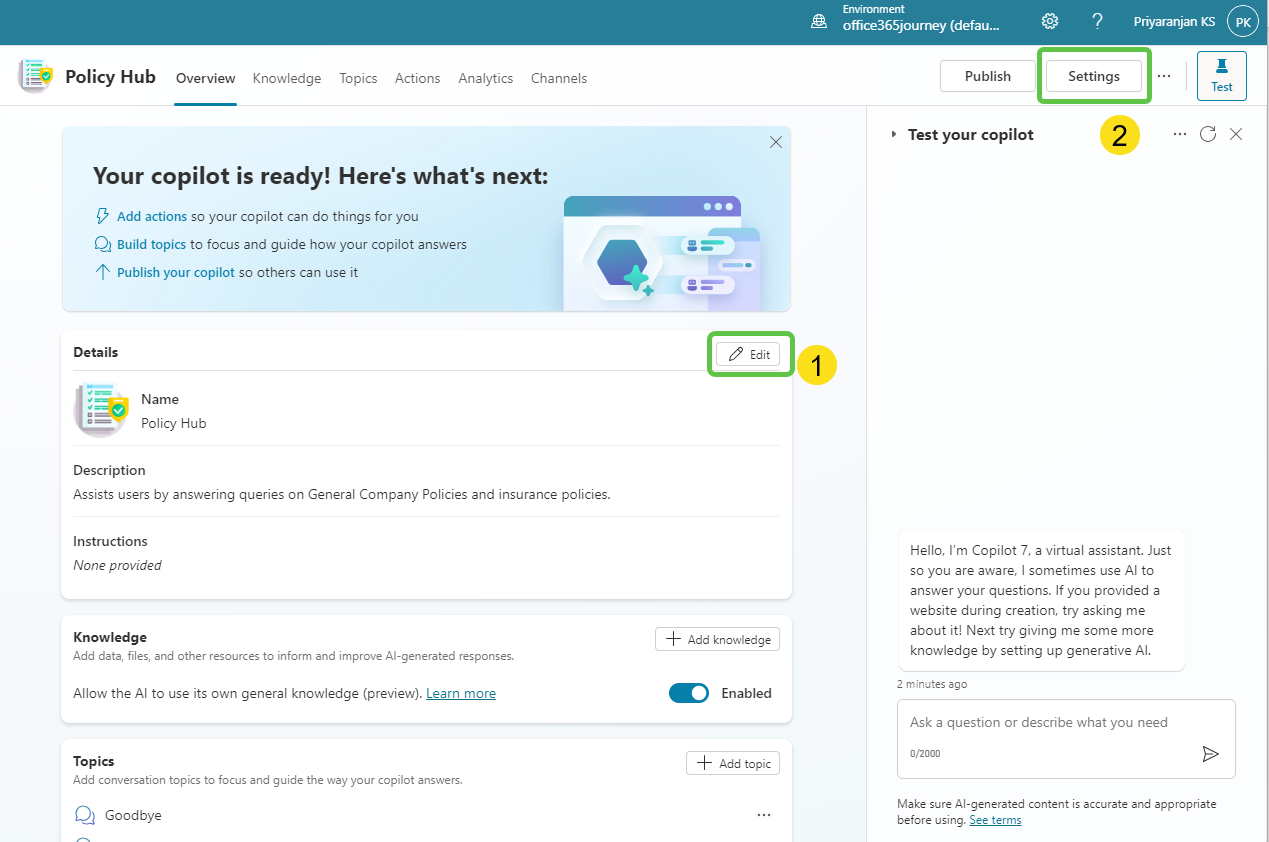
- Click on Edit, edit the copilot details like name, icon, and description.
- Click on Settings to enable the Generative selection of topics so that without relying on triggers, the topics will be auto-selected based on user conversation, resulting in a much smoother user experience.
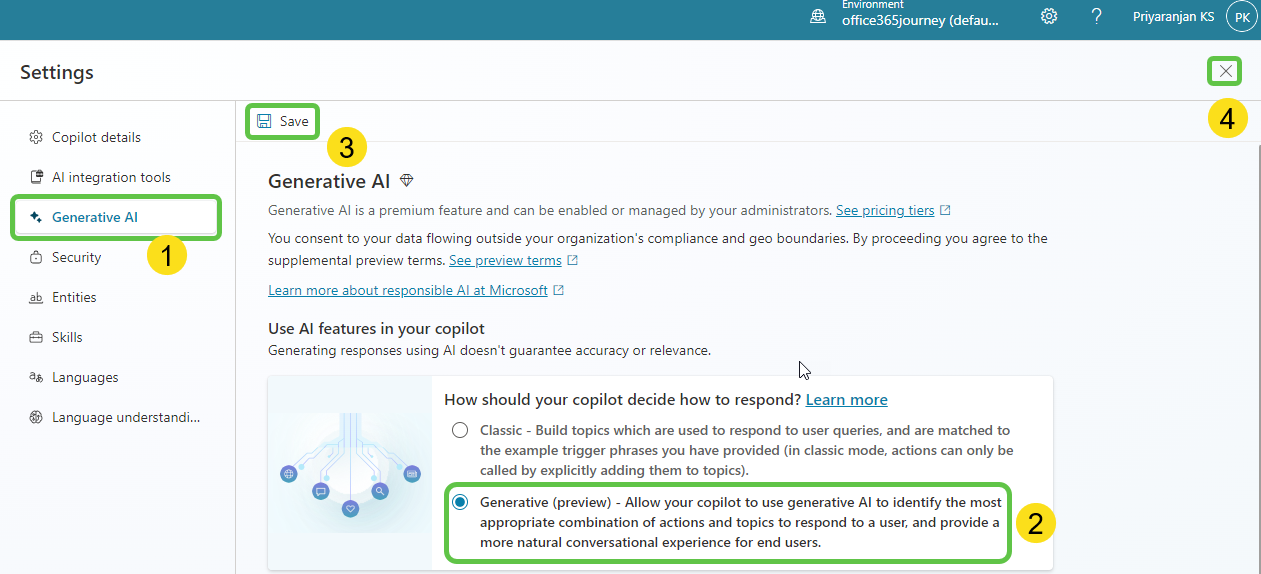
To enable the automatic detection of topics from user interaction:
- Click on Generative AI.
- Select Generative (preview).
- Click on Save to update the settings.
- Click on the Close icon to go back to the home page of this custom copilot.
Step 5: Create Topics
Now let’s go ahead and create the topics that will automatically redirect the conversation flow to appropriate topics based on the user’s question. To do this, we will create a topic with the below 2 documents as Knowledge Source:
- General Company Policy: This document will provide the user with information about general company policies.
- Insurance Policy: This document will provide contextual answers back to the user for insurance-related queries.
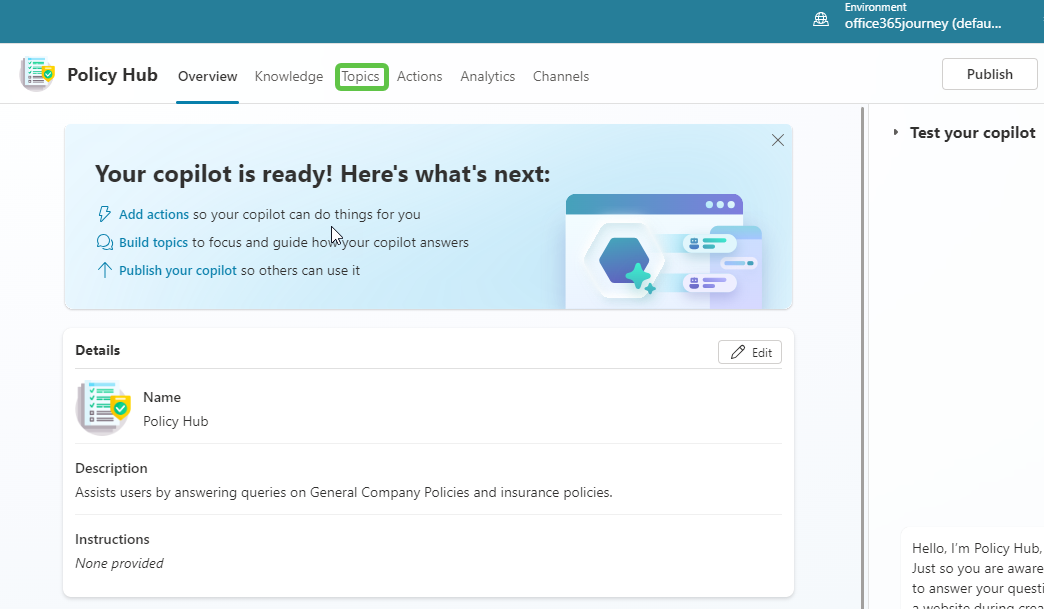
Select Topic from the top bar navigation menu.
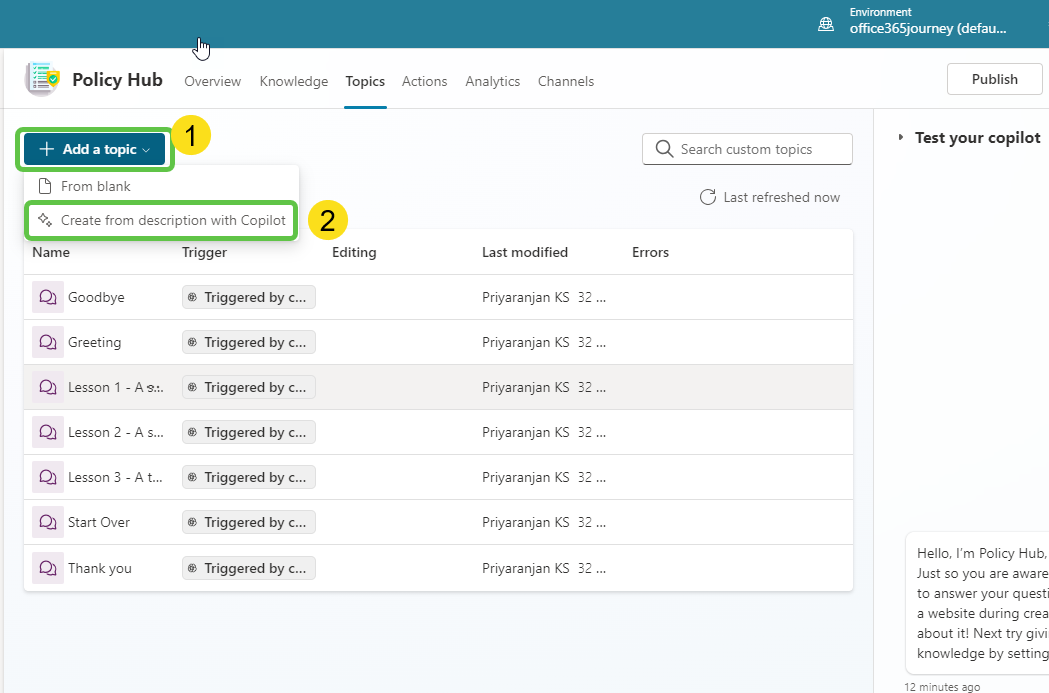
To add the topic, we can either go with the option to create a blank topic or use Copilot to create the topic with an initial set of prepopulated conversation nodes based on the topic description that we provide.
- Click on Add a Topic.
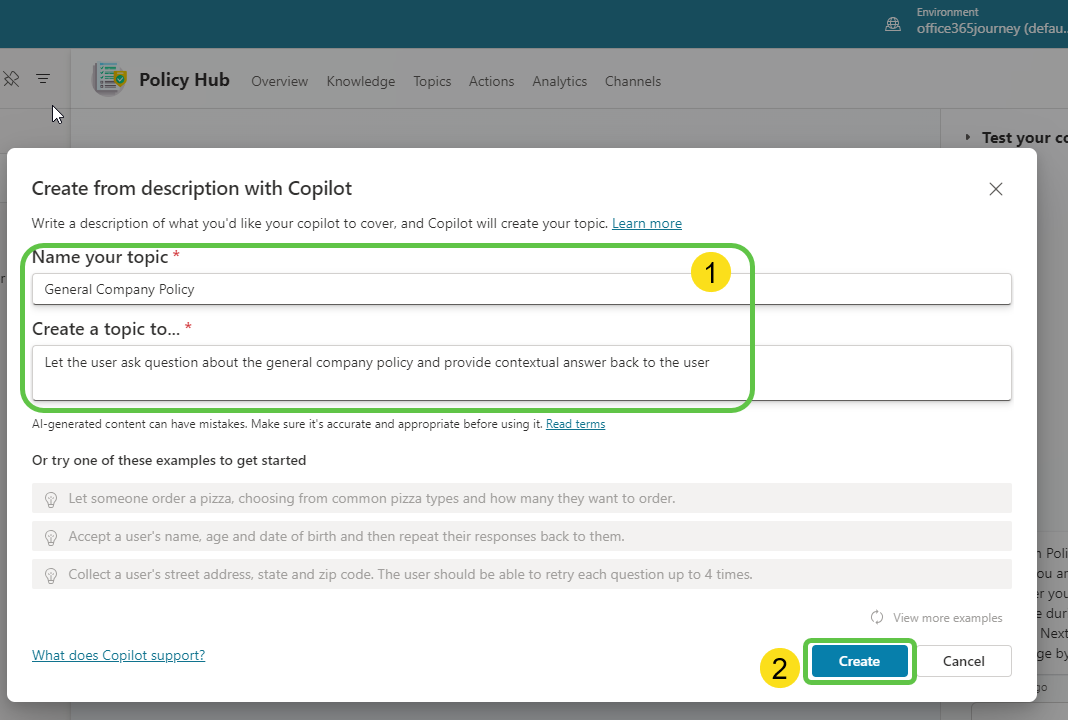
- Select Create from description with Copilot.
When the user asks questions regarding the policy, we need a topic that will take the user query and ground the Policy document to provide the contextual answer back to the user. To do this, provide the below topic description details in the pop-up that opened when we clicked the Add topic button previously.
Click on Create, which will provision the topic skeleton based on the provided description.
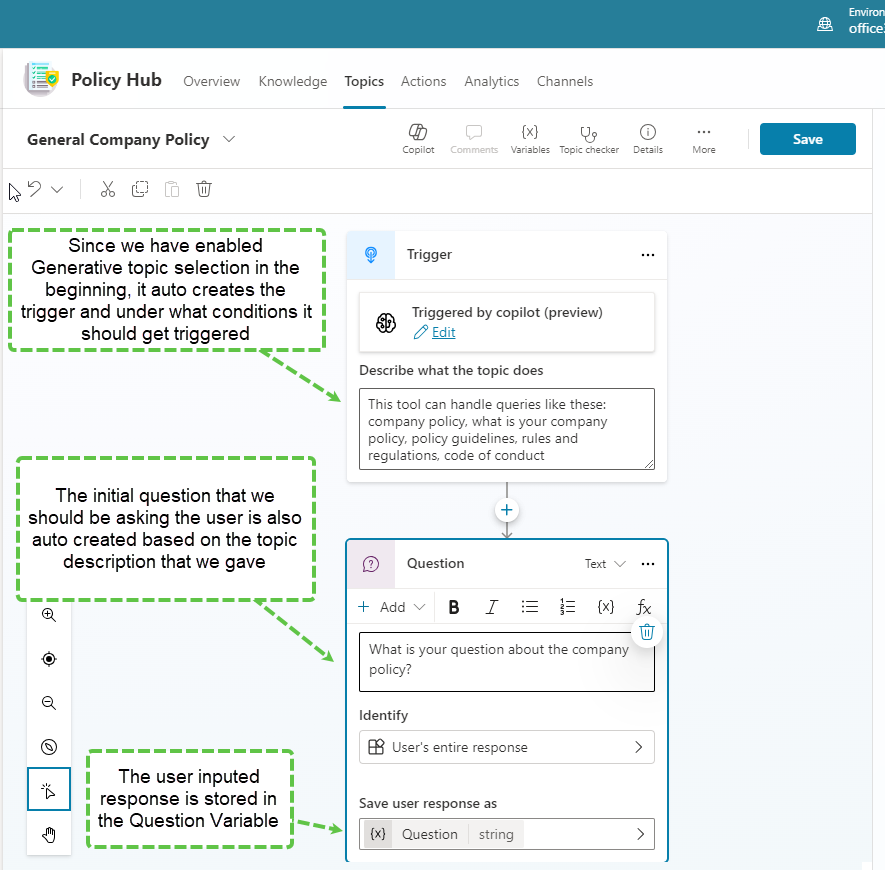
Based on the topic description, Copilot has created the trigger and initial questions to be asked to the user.
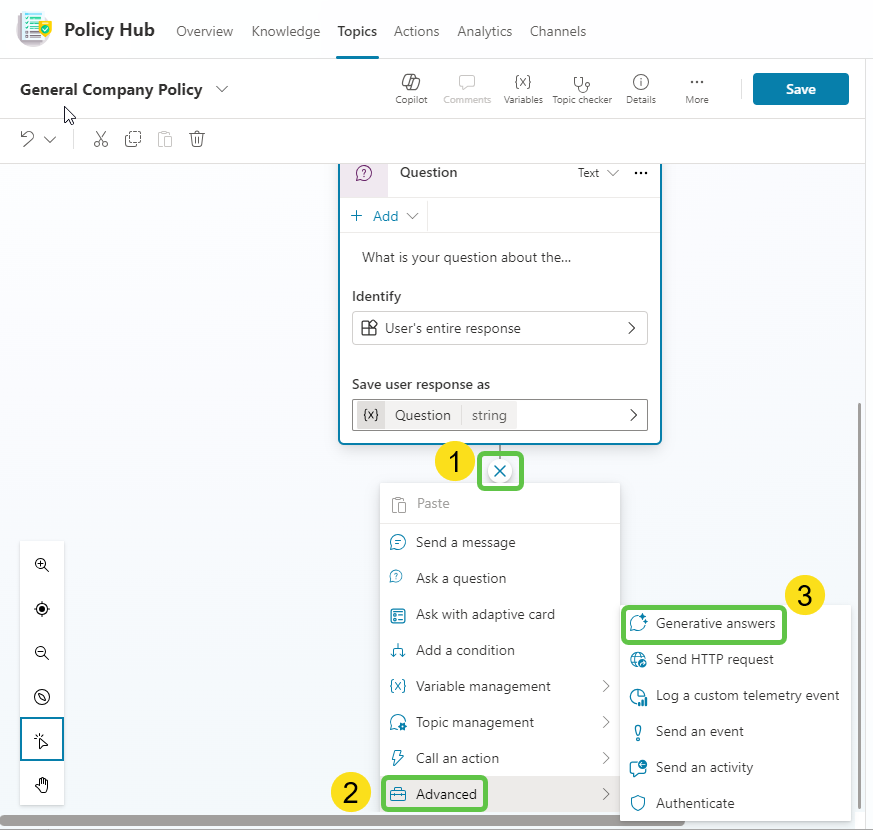
Once we have asked the question and the user inputs the query for which they are seeking a response, it is saved to the Question variable. Now let’s add the Generative Answers node by:
- Selecting the + Sign.
- Clicking on Advanced.
- Selecting Generative Answers.
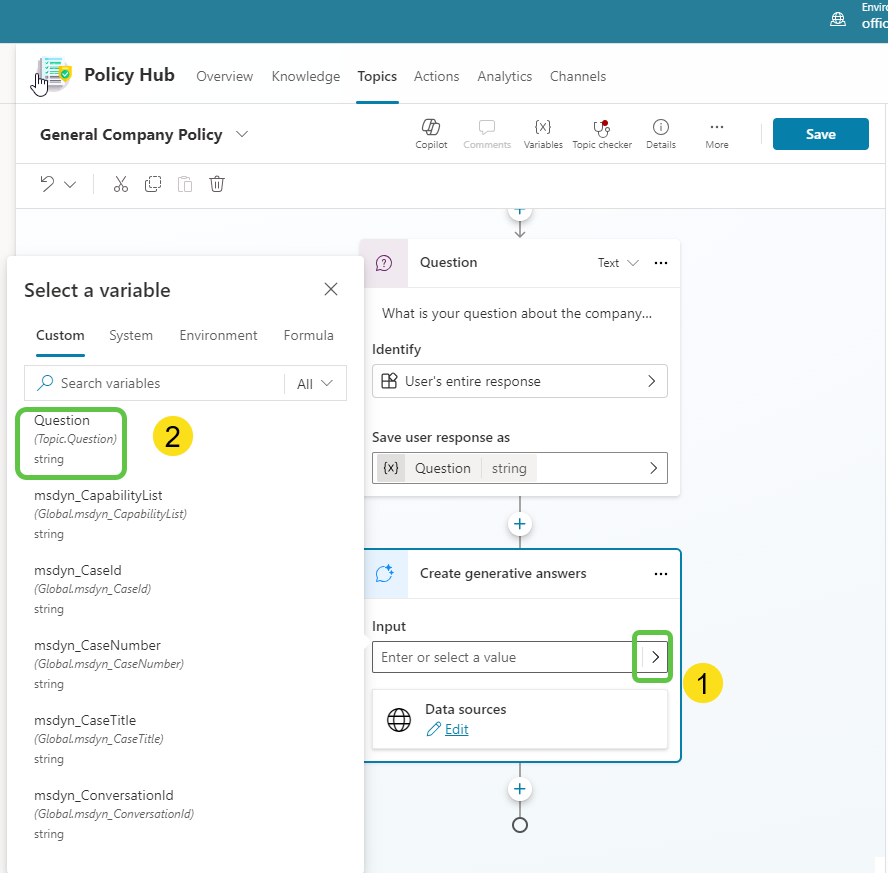
We can now configure the Generative answers node by:
- Selecting the right arrow, which will open the pop-up to select the input to be passed to this action.
- Select the Question variable which contains the user inputted query on the company policy.
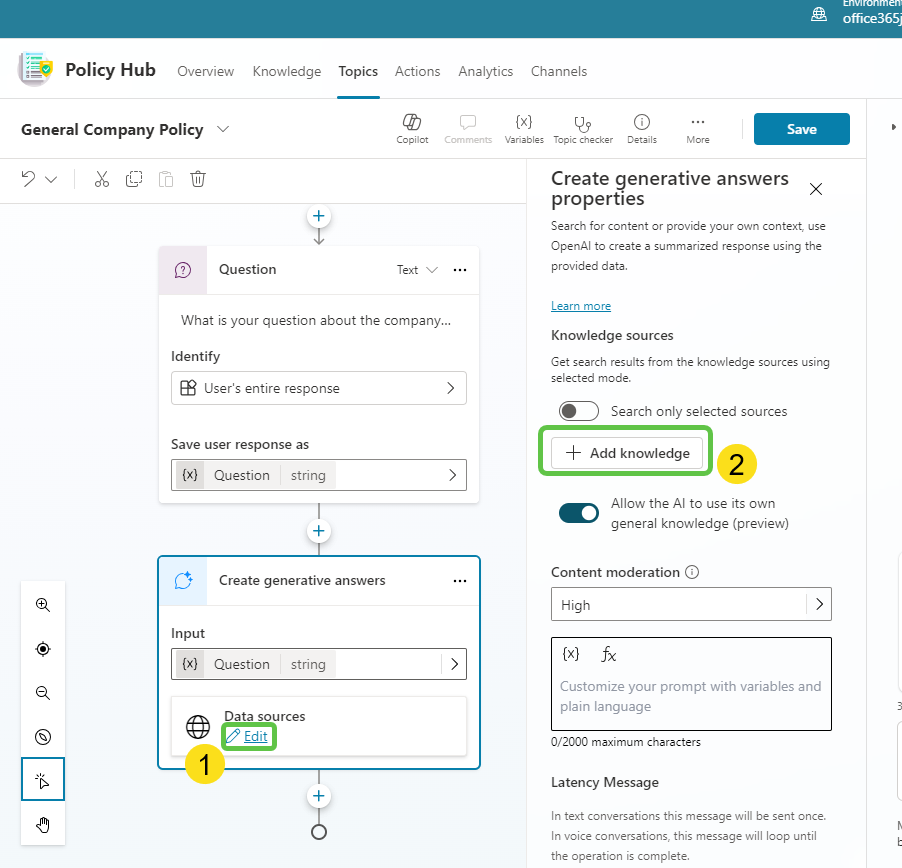
Now let’s configure the data source for the Generative answers node:
- Click on Edit.
- Select Add Knowledge.
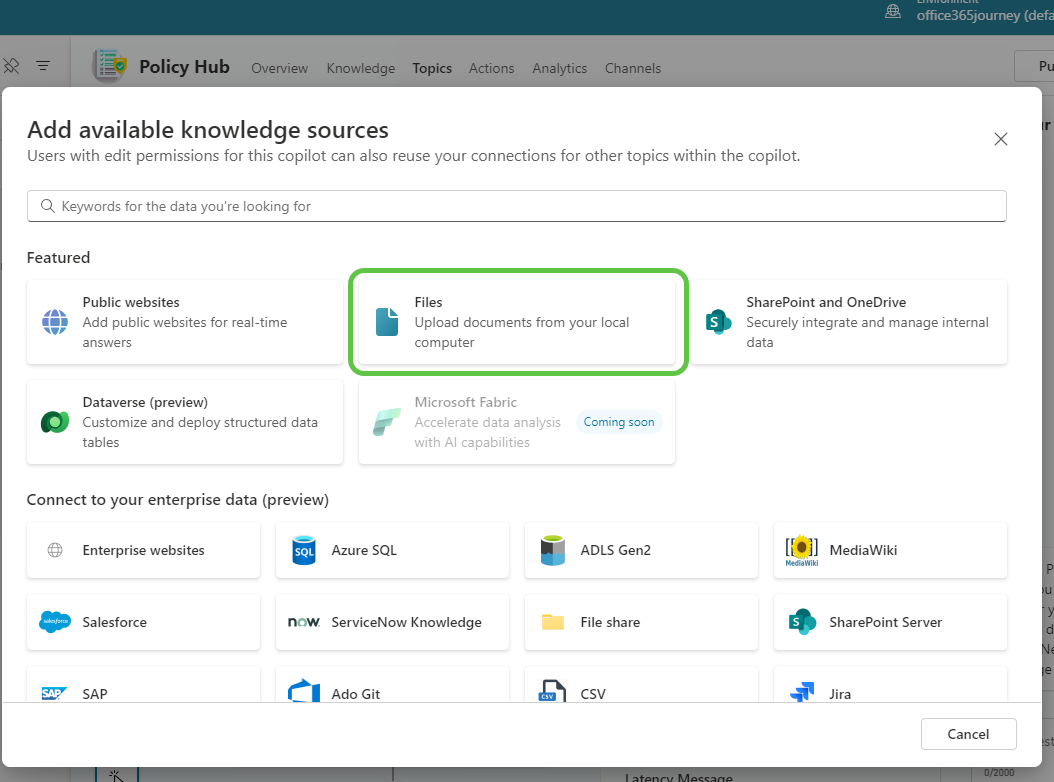
In the Add available knowledge sources pop-up, select Files.
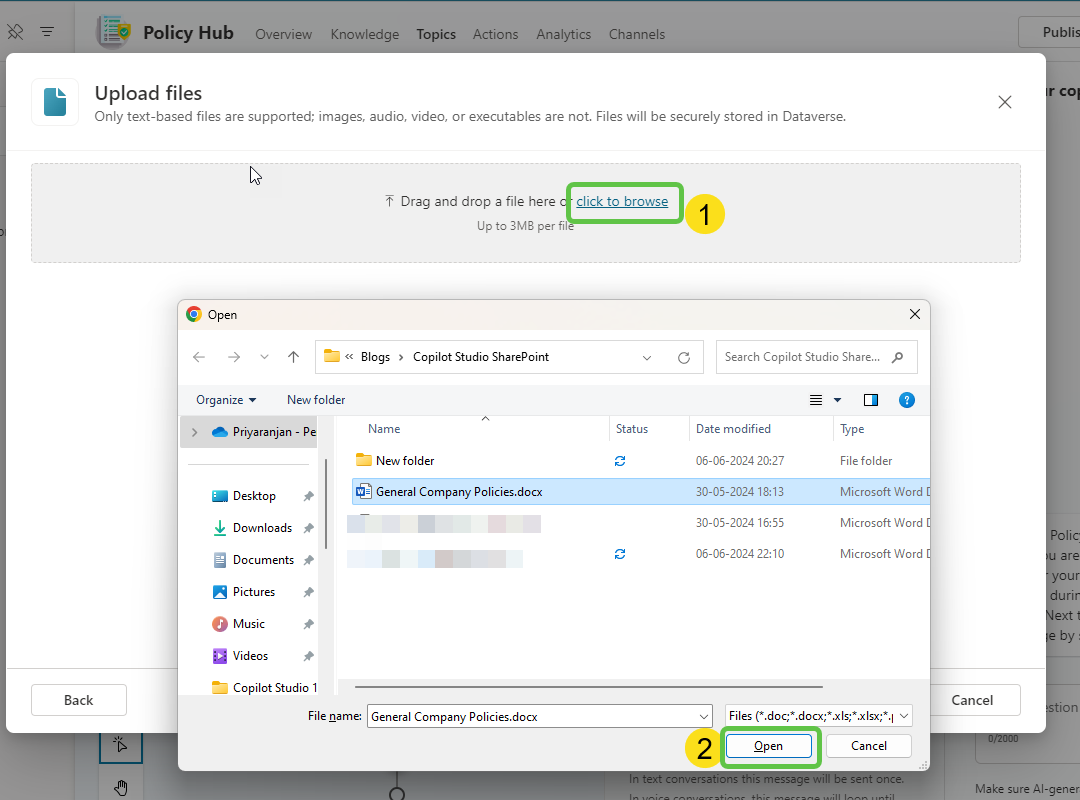
This will allow us to browse for a file from our local computer. Select the General Policy document and click on Open.
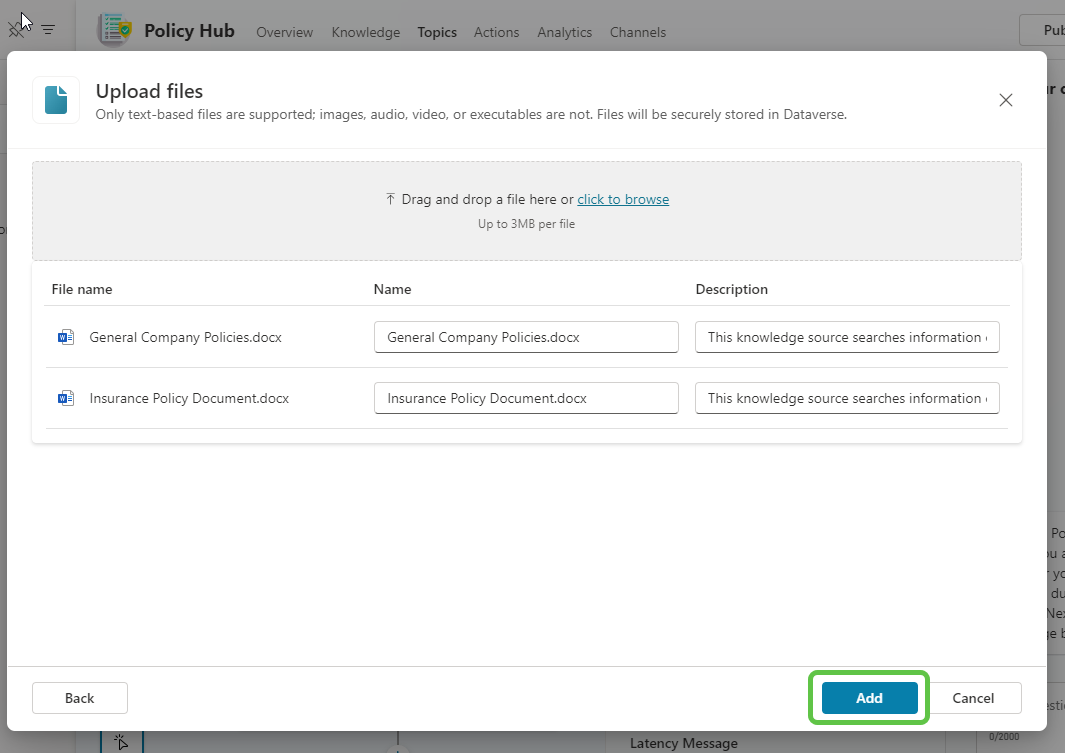
Now let’s upload the Insurance document as well by browsing the local computer.
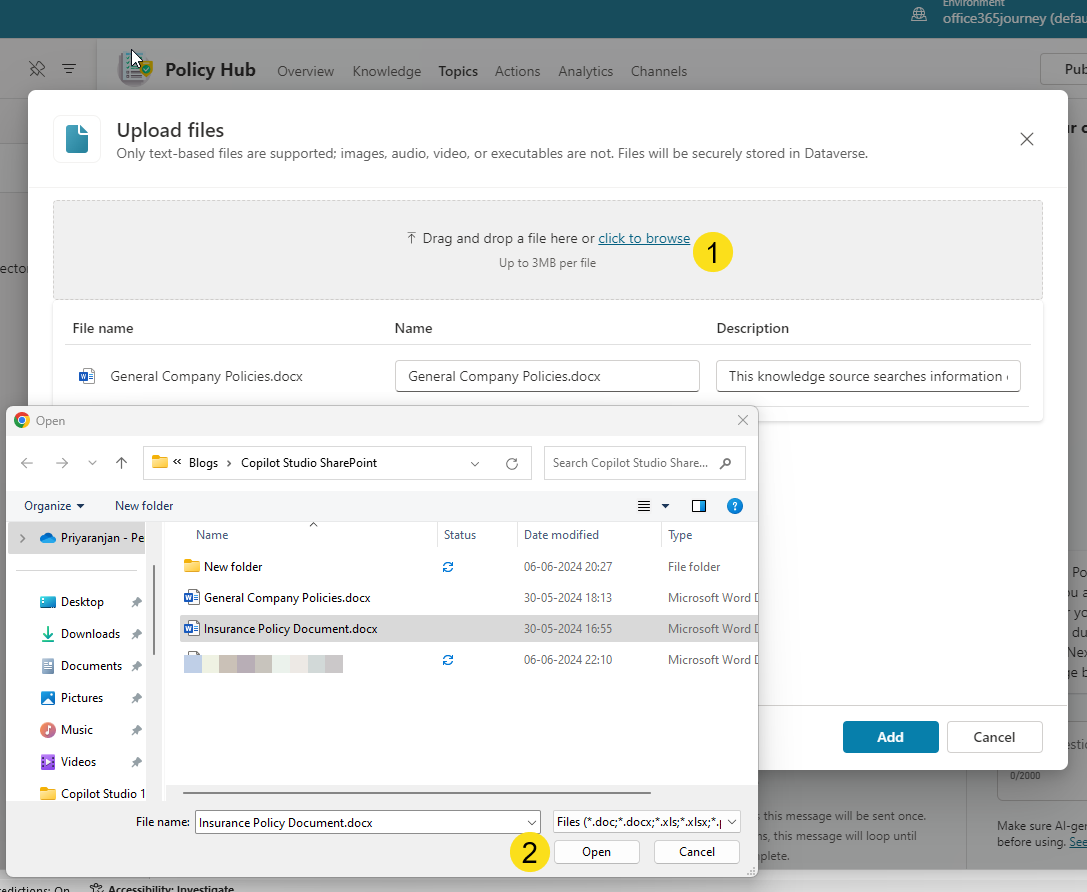
Both the policy documents are uploaded. Click on Add.
To ensure that the questions are grounded only with the uploaded document, we can:
- Once again, click on Edit data sources.
- Toggle Search only selected sources.
- Check the uploaded documents.
- Click on Save.
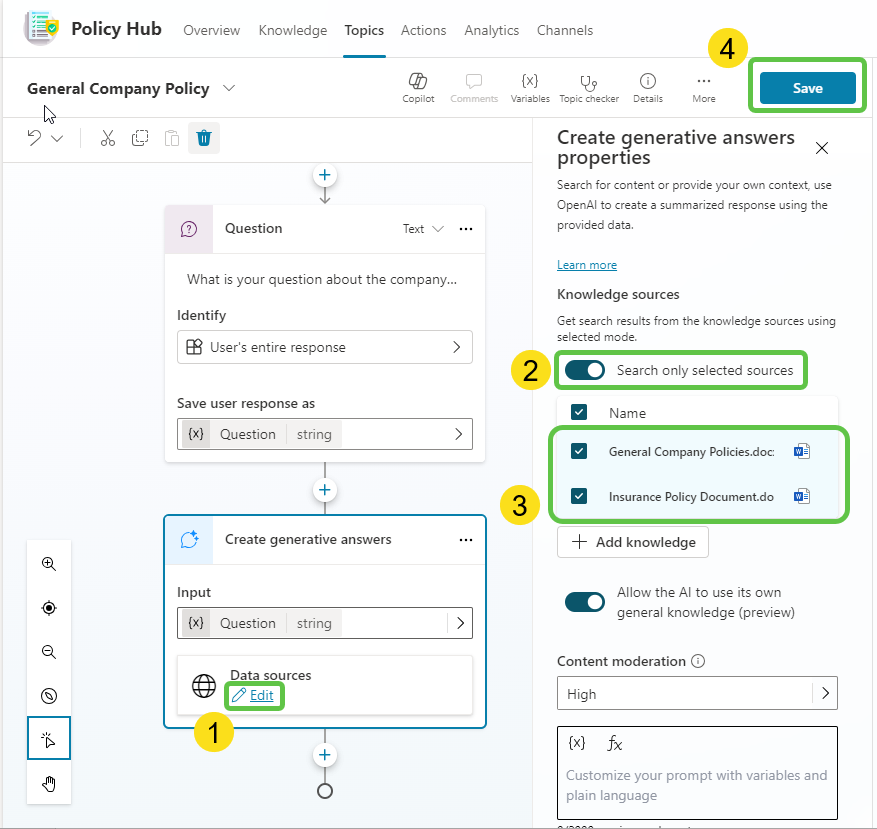
Thus, we have completed the creation of the topics which will use generative AI and ground the uploaded documents to provide contextual answers back to the user.
Step 6: Test the Copilot
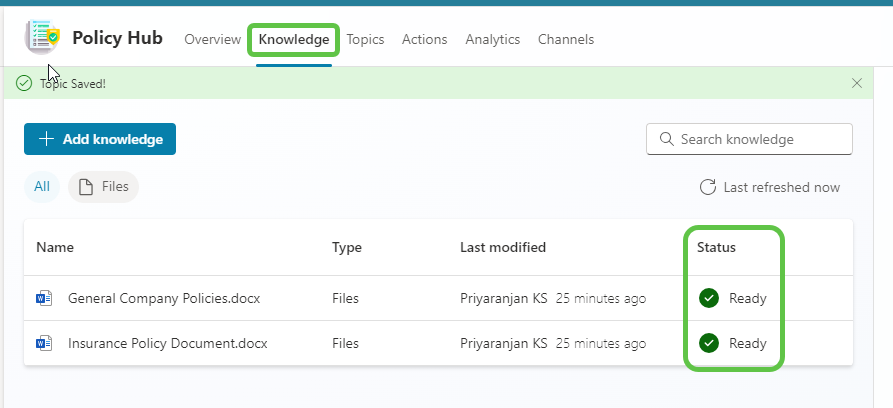
Before we proceed with the testing, ensure that the documents have been preprocessed by going to the knowledge tab of the copilot.
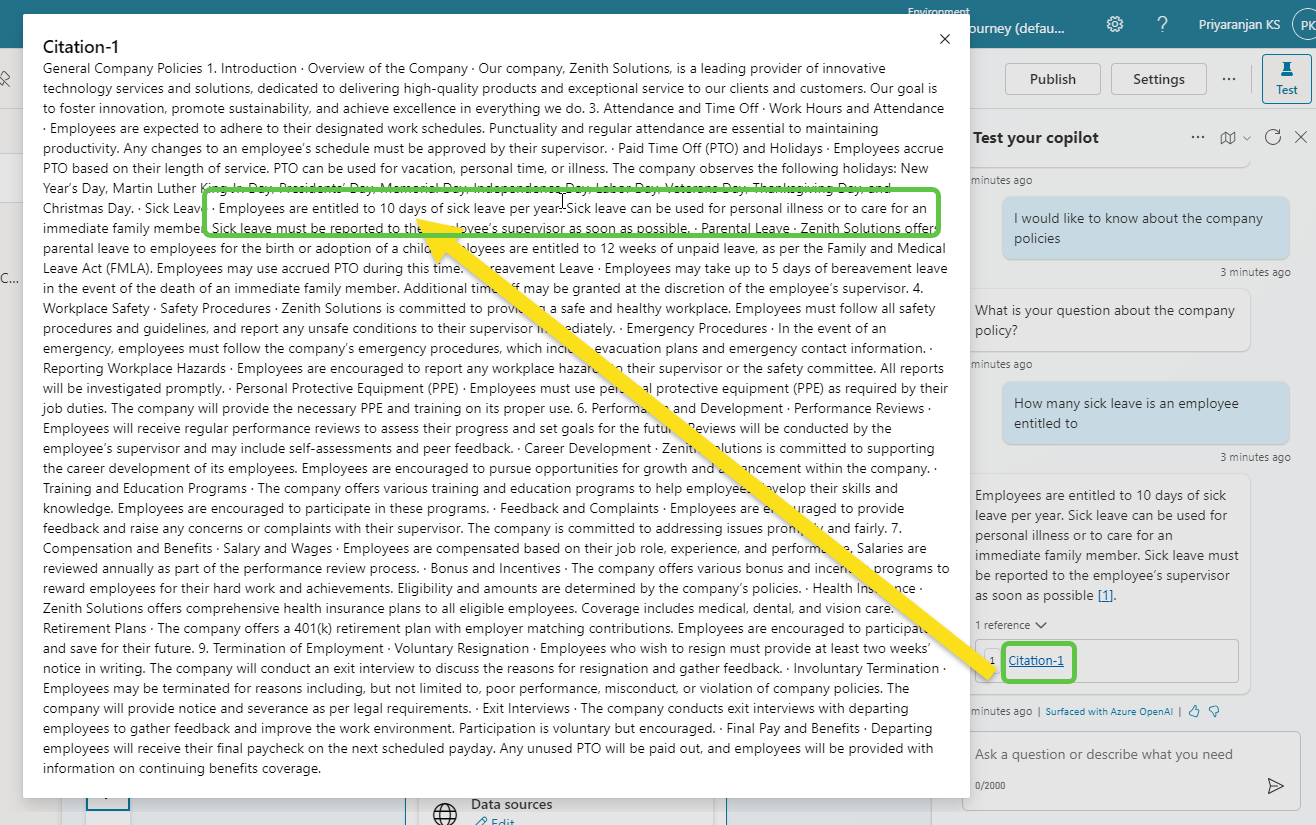
Now let’s test the copilot in the test pane by asking a policy-related question. First, we will ask a general policy question like “How many sick leaves is an employee entitled to?”. We can see that it searches the document and provides us with the answer that the employee is entitled to 10 days of sick leave.
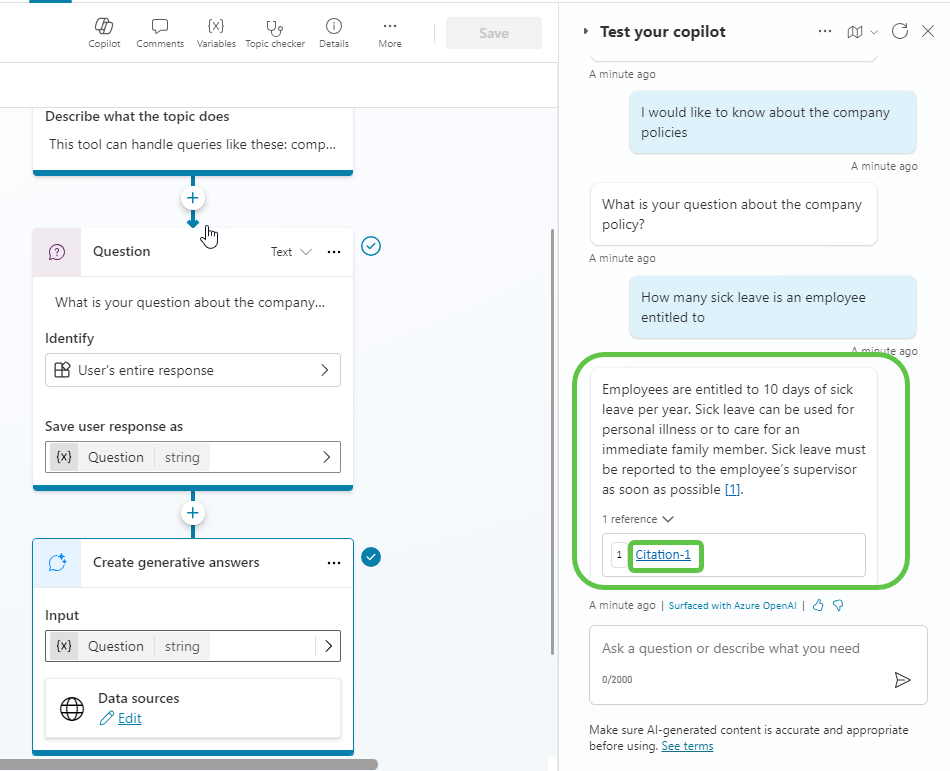
We can also see that there is a citation that points to the exact location in the document from which the answer was picked. Clicking on the citation, we can see that it opens up in a pop-up.
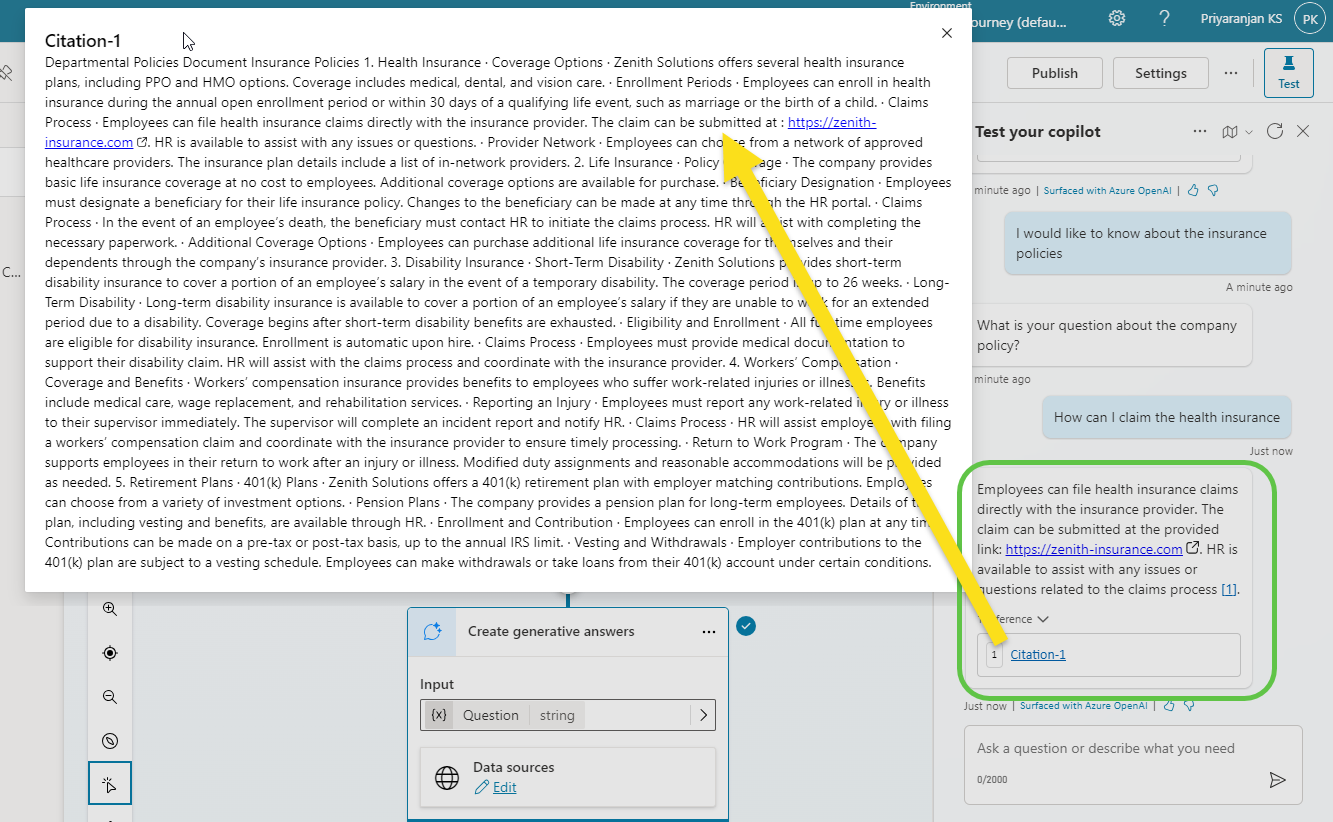
Now let’s ask a question about the insurance claim process, and we can see that it has picked the information from the relevant document and provided the details with a citation.
Step 7: Publish the Copilot
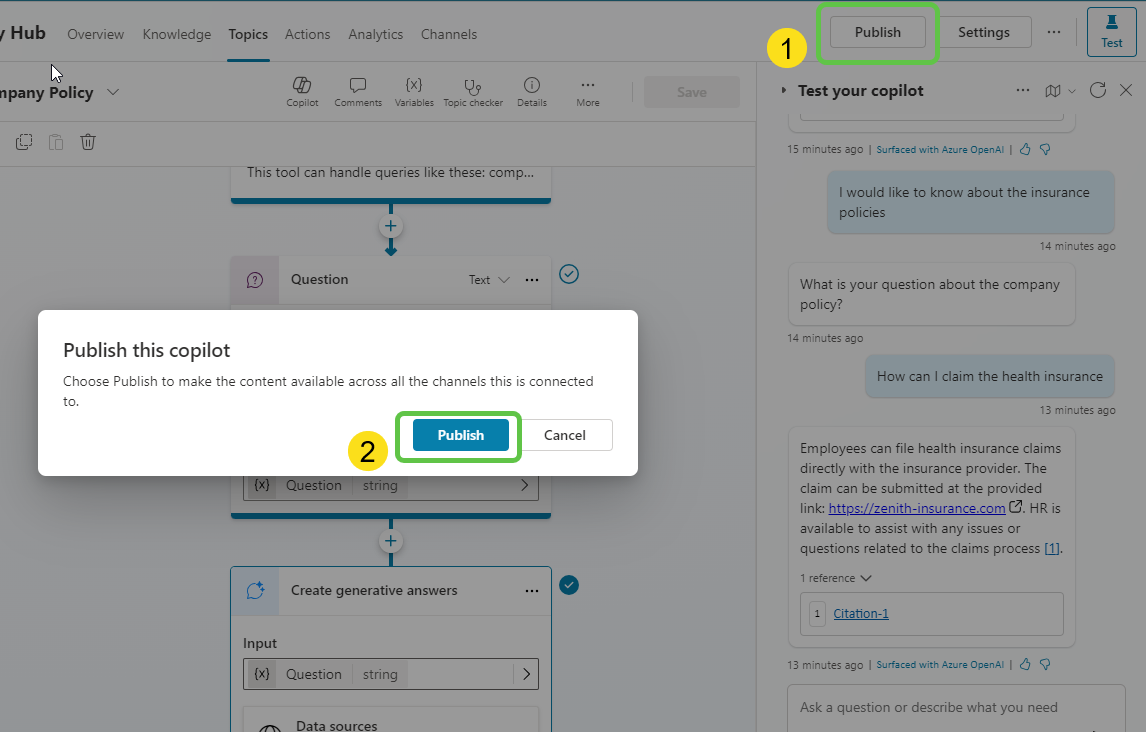
Now that the copilot development is completed, let’s publish it so that it becomes available for use in different channels by clicking on the Publish button.
Step 8: Add to Power Apps
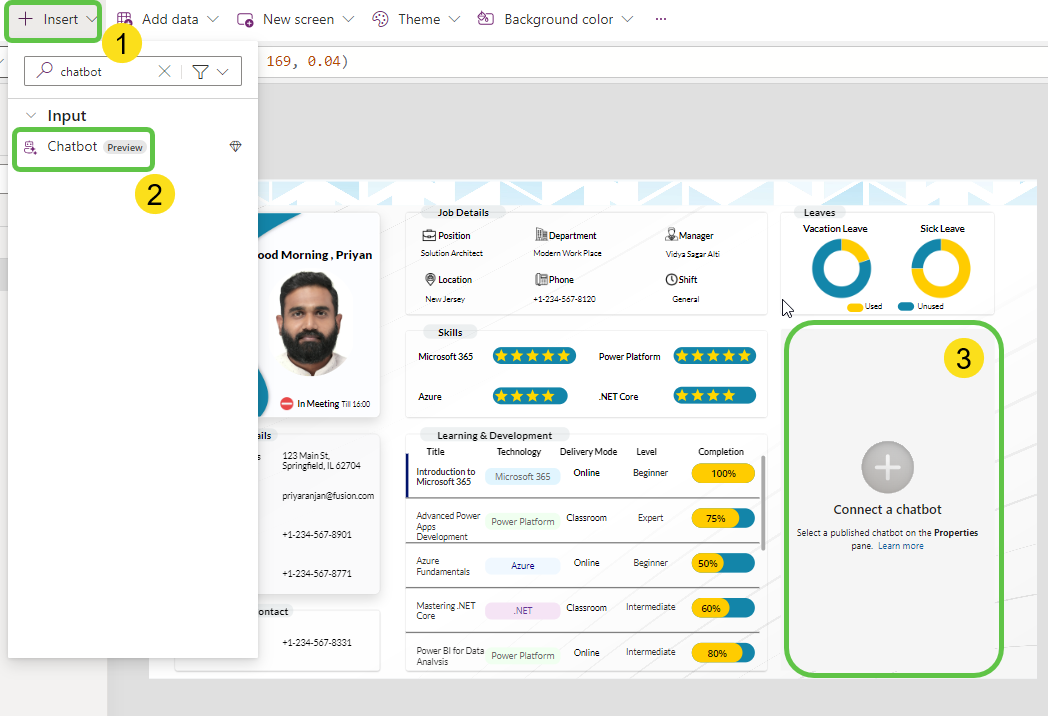
Now let’s add the copilot to Power Apps using the chatbot component which is currently in preview at the time of writing of this blog.
Head over to your Power Apps and from the Insert menu, select the Chatbot component which will add it to the canvas.
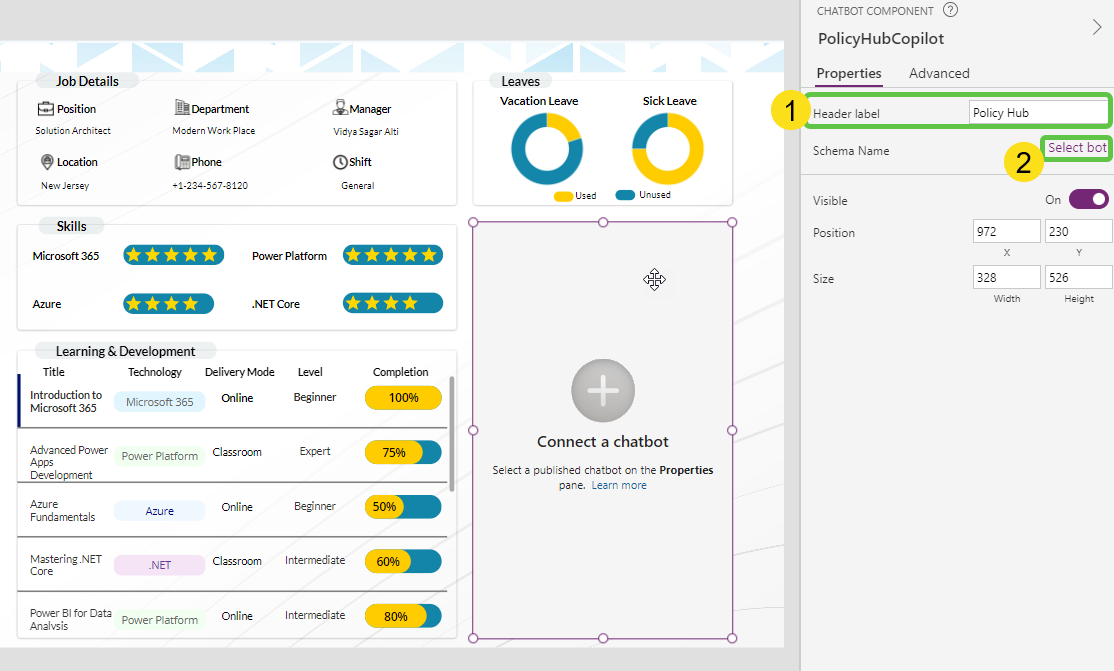
Now let’s configure the chatbot component to show the recently created copilot.
- Specify the header label for the bot.
- Click on Select bot to choose the recently published copilot.
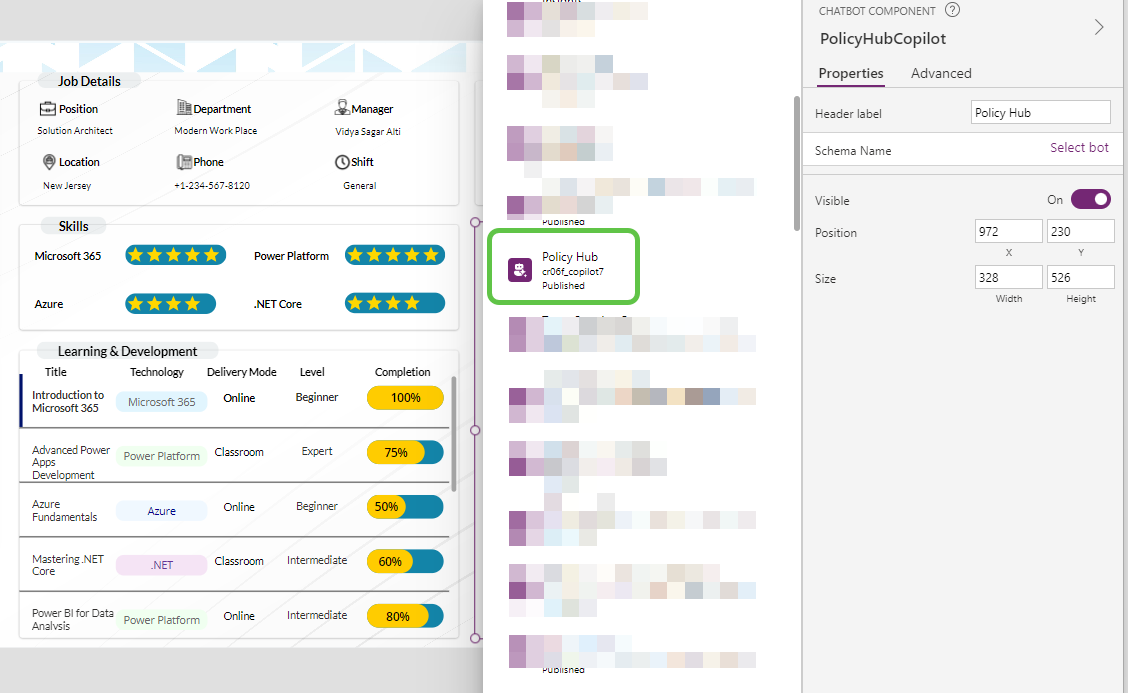
Select the Policy Hub copilot.
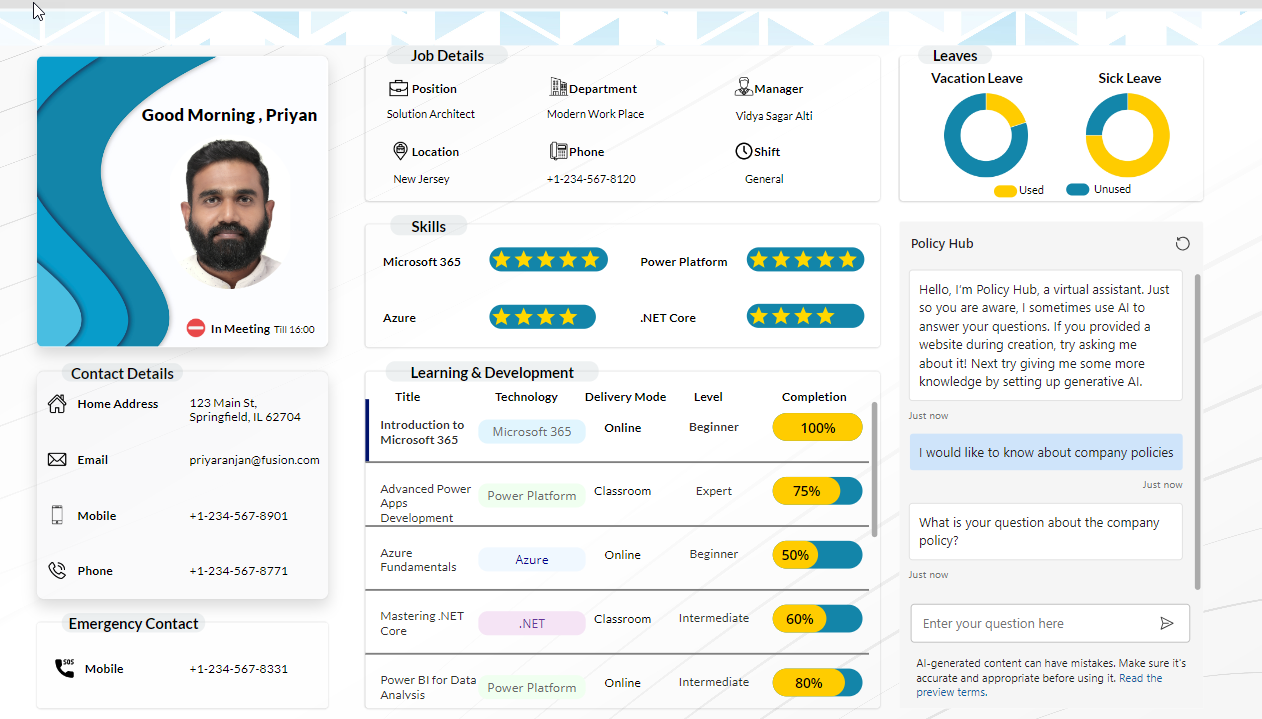
And we can now see that the copilot has been connected to the chatbot component and it will work just like how we saw in the testing phase.
Conclusion
Creating a Copilot Studio bot that utilizes generative AI to answer queries from uploaded policy documents offers a powerful solution for managing information in organizational documents. By enabling dynamic topic selection, the bot provides users with precise, context-aware responses without the need for predefined triggers. This streamlined approach not only enhances user experience but also ensures that employees and stakeholders have quick access to critical information, improving efficiency and decision-making across the organization.


