Table of Contents
- Introduction
- Process Overview
- Demo
- Step-by-Step Guide to Building the Multilingual Copilot
- Test Multilingual Copilot
- Conclusion
Introduction
Microsoft Copilot Studio allows us to create Copilots that can interact with users in their preferred language. In this blog, we will walk you through building a multilingual Copilot that helps users book doctor appointments for different departments in their preferred language of English or French. The Copilot will also save these appointments in a Dataverse table for easy management and follow-up.
Process Overview
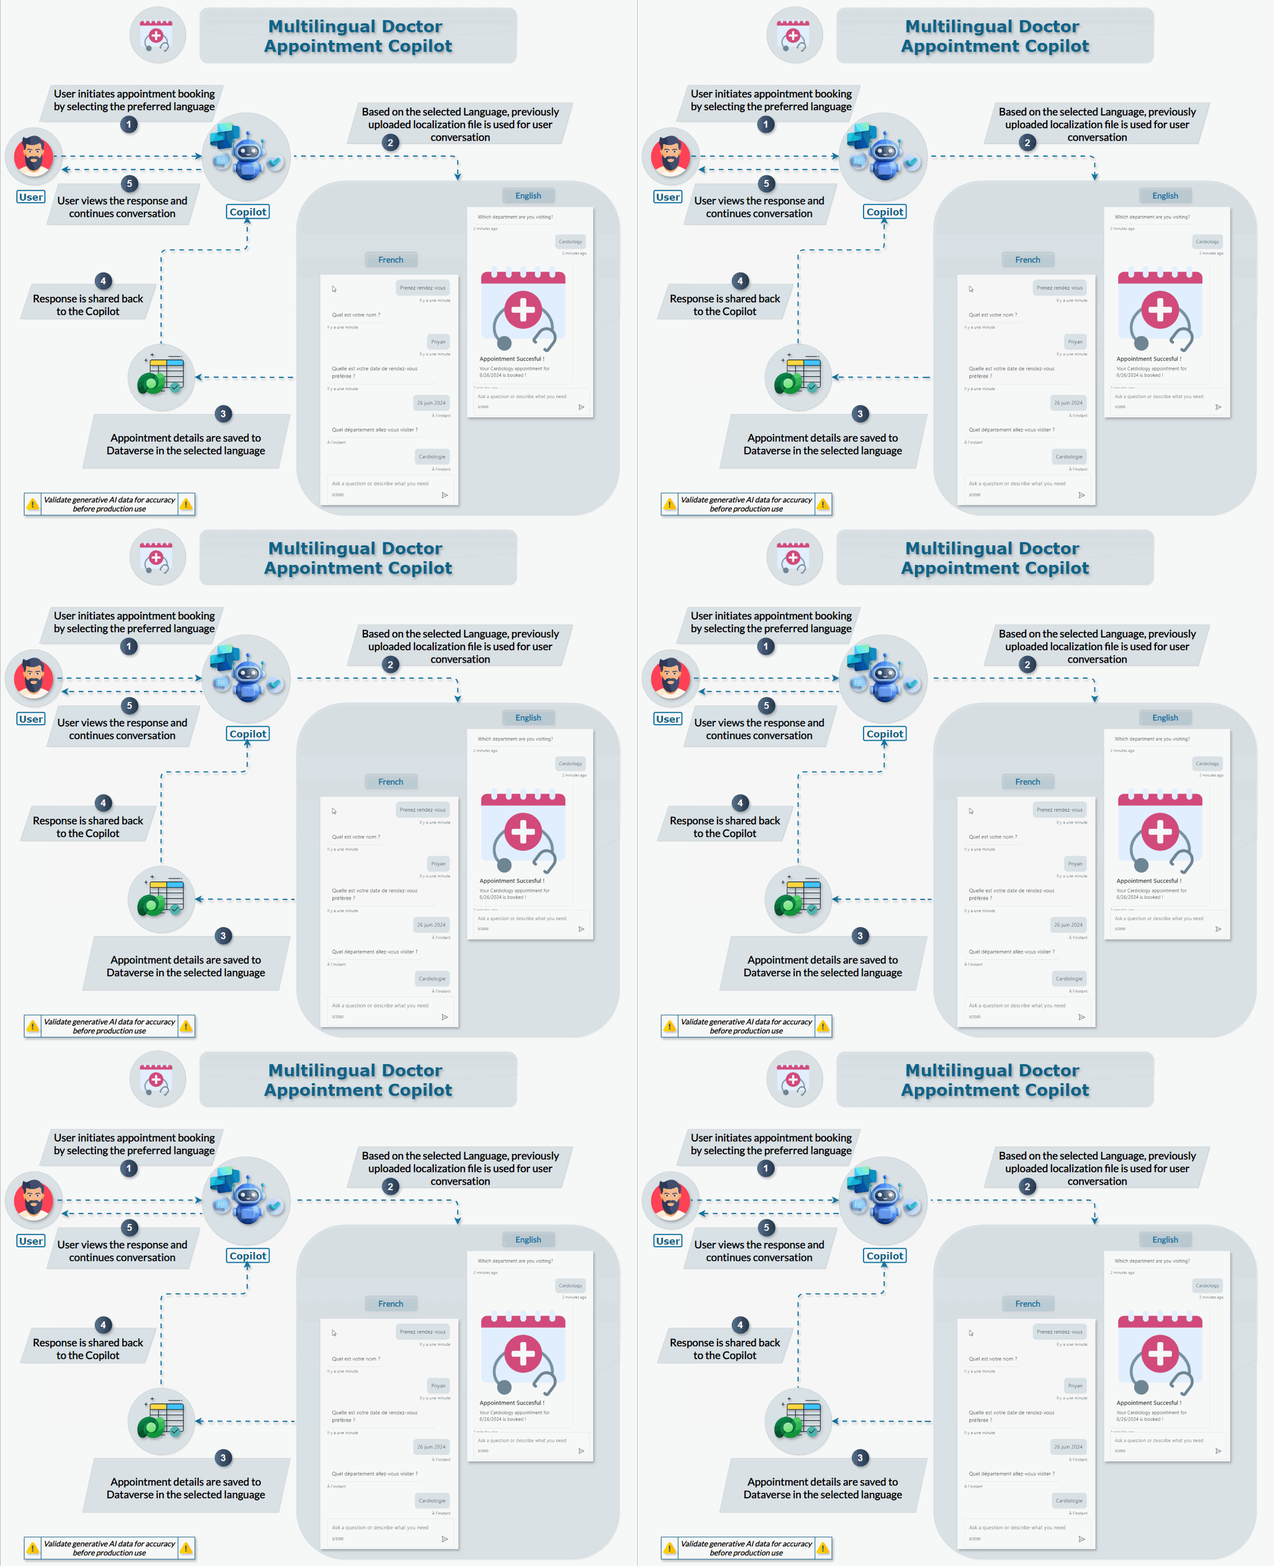
Our multilingual Copilot will:
- Interact with users in multiple languages (e.g., English and French).
- Facilitate booking appointments for different medical specialties: Cardiology, Orthopedics, and Dentistry.
- Save appointment details to a Dataverse table for tracking and management.
Demo
Watch the demo video below to see how the Copilot assistant helps with doctor appointment booking in both English and French seamlessly.
Step-by-Step Guide to Building the Multilingual Copilot
Step 1: Create a Dataverse Table
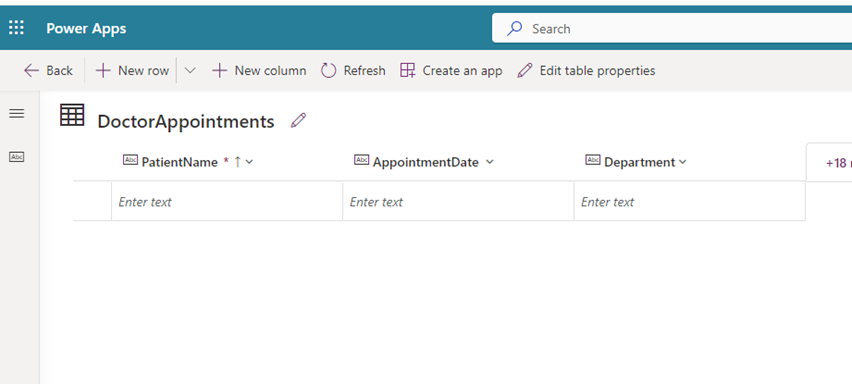
Create a new Dataverse table named DoctorAppointments with the following columns:
- PatientName
- AppointmentDate
- Department
Step 2: Creating the Copilot in Copilot Studio
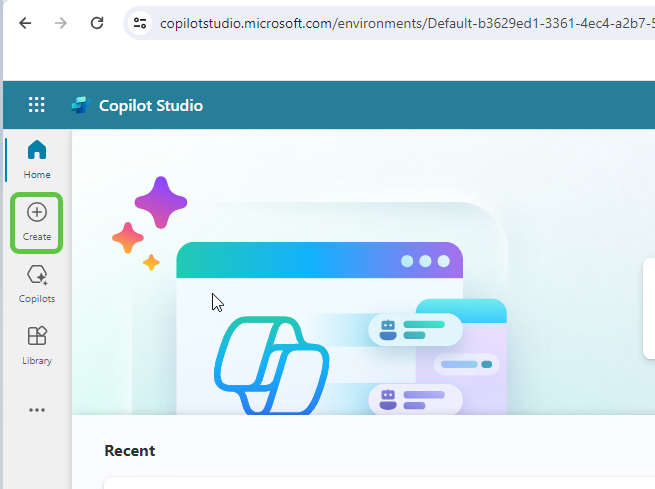
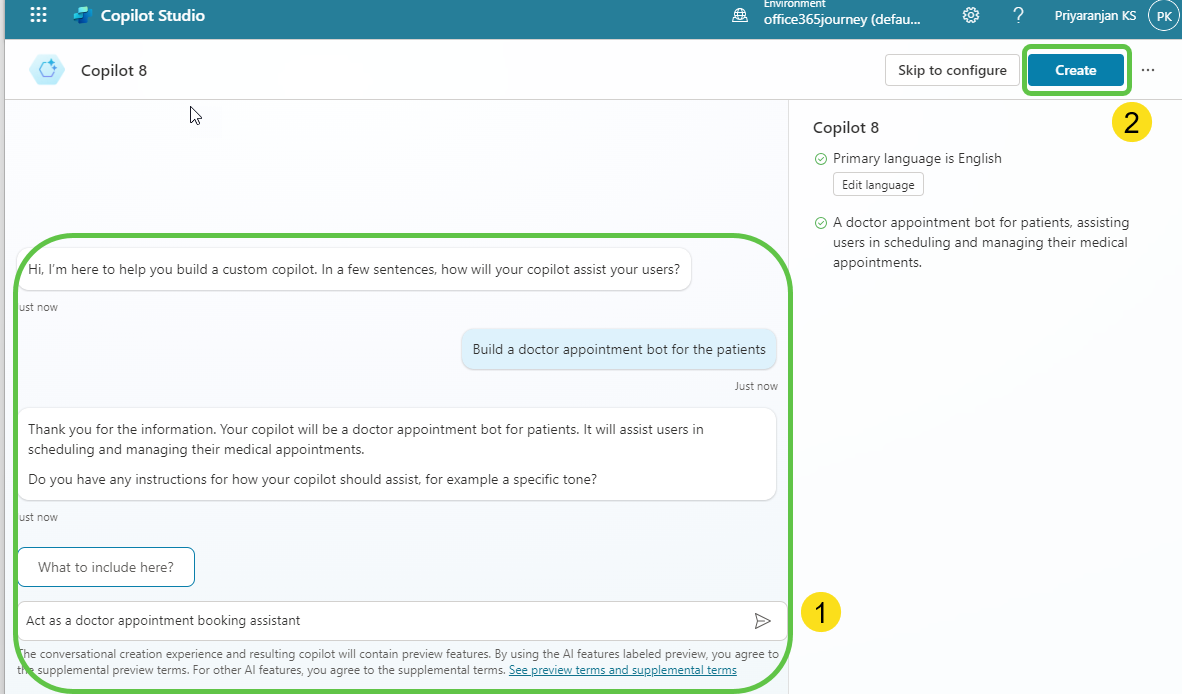
Head over to Copilot Studio and click on Create.
This will provide us the option to create a Copilot based on an existing template or create a blank Copilot from scratch. Let’s select New Copilot.
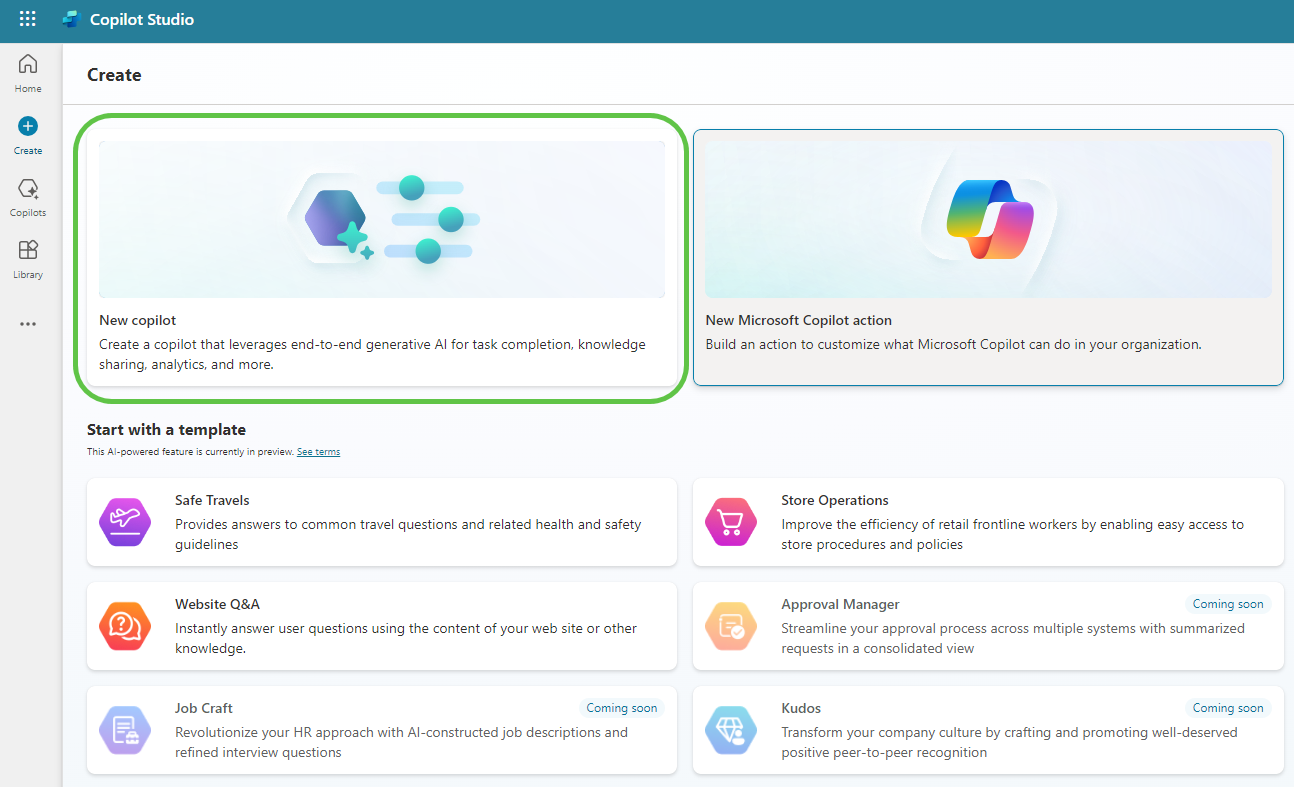
This will take us to the page where we can:
- Describe the Copilot functionality and provide any specific instructions to the Copilot.
- Once done, click on Create to provision the Copilot.
Enable Generative Selection of Topics
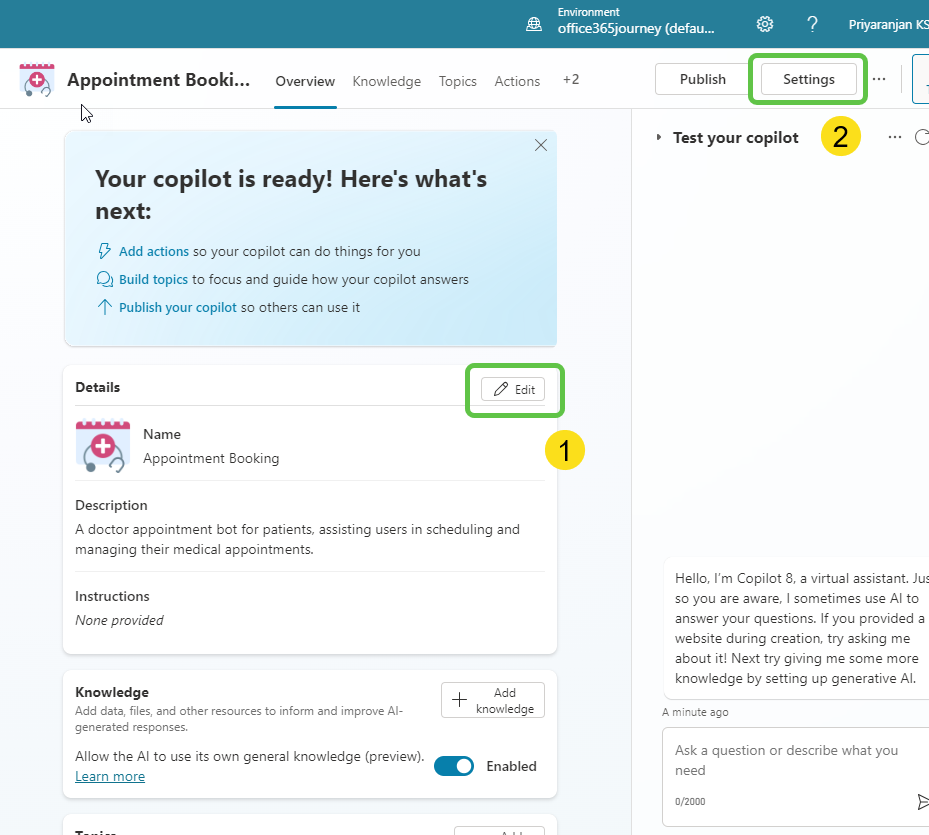
The Copilot is now created. We can then make the needed configuration changes:
- Click on Edit, edit the Copilot details like name, icon, and description.
- Click on Settings to enable the Generative selection of topics so that without relying on triggers, the topics will be auto-selected based on user conversation resulting in a much smoother user experience.
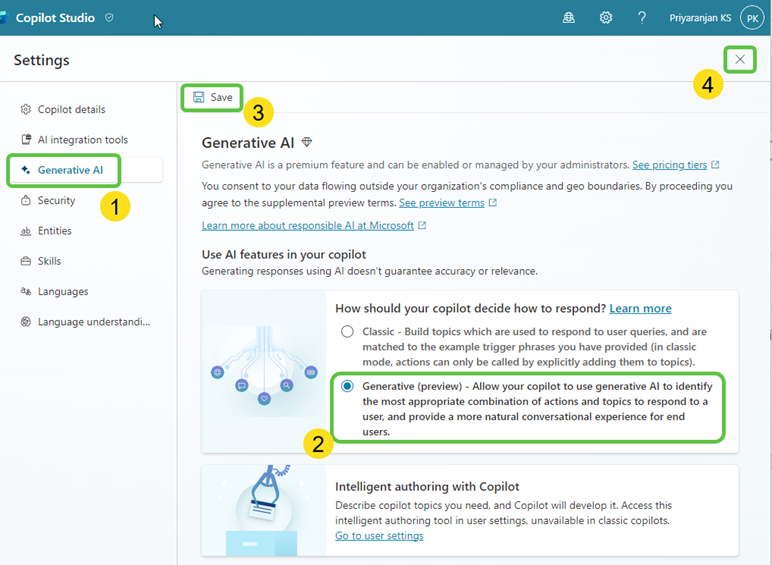
To enable the automatic detection of topics from user interaction:
- Click on Generative AI.
- Select Generative (preview).
- Click on Save to update the settings.
- Click on Close icon to go back to the home page of this custom Copilot.
Step 3: Create Topics
Now let’s go ahead and create the topics that will automatically redirect the conversation flow to appropriate topics based on the user’s questions:
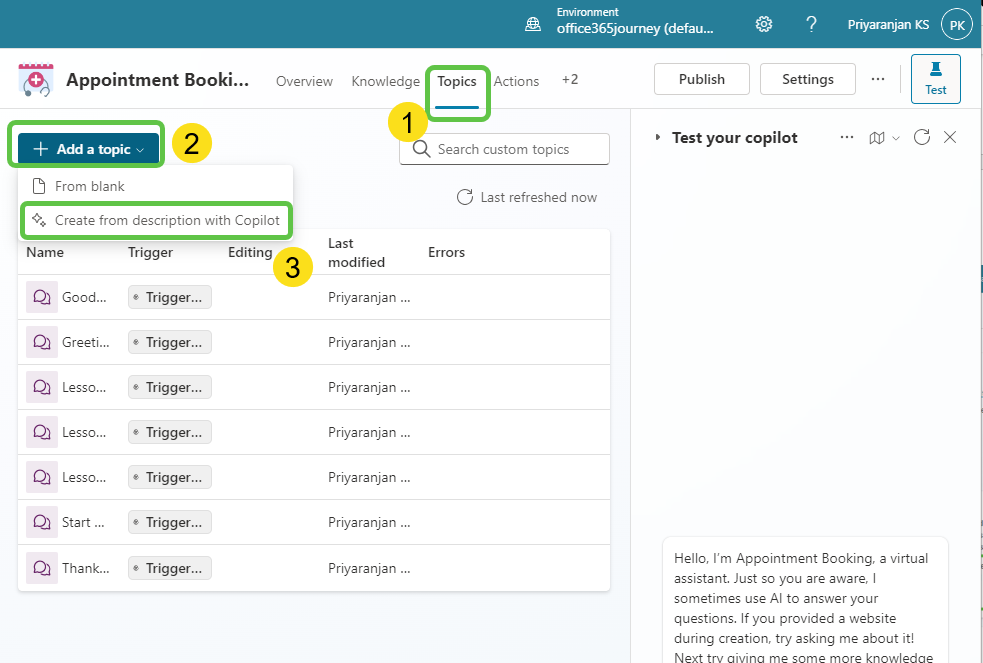
- Click on Topics from the navigation menu.
- To add the topic, we can either go with the option to create a blank topic or use Copilot to create the topic with an initial set of prepopulated conversation nodes based on the topic description that we provide.
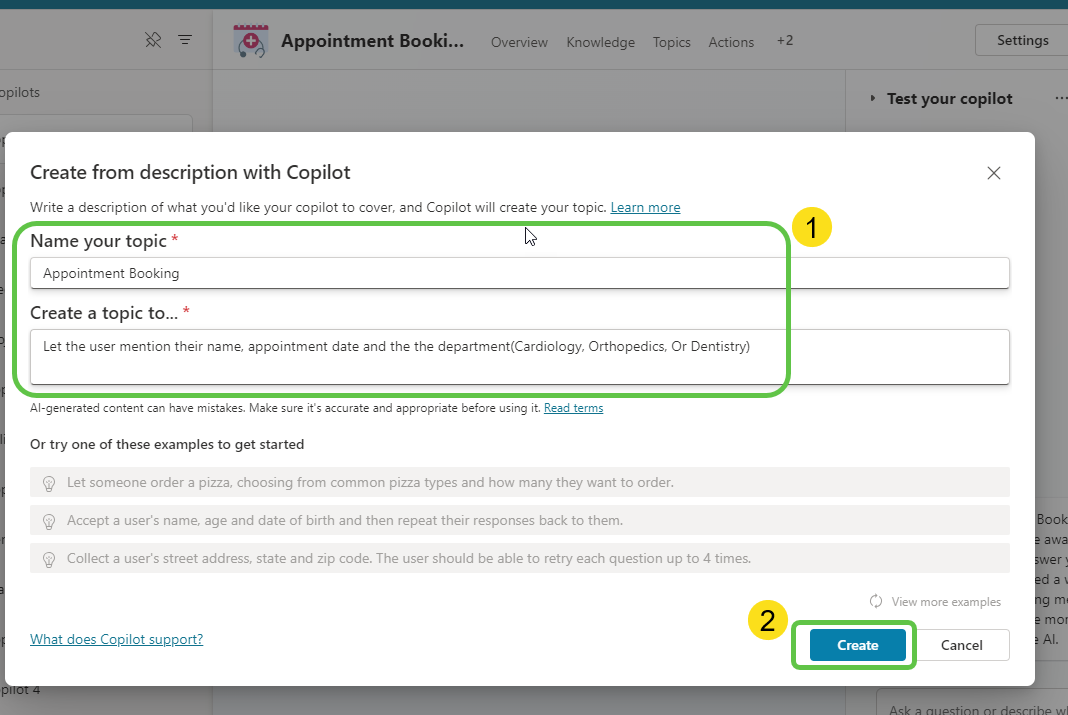
- Click on Add a Topic and select Create from description with Copilot.
Provide the below topic description details in the pop-up that opened when we clicked the Add topic button previously. Then, click on Create, which will provision the topic skeleton based on the provided description.
Copilot studio has auto-generated the trigger as well as the conversational questions that will ask for the patient’s name, appointment date, and the doctor department for which booking is needed.

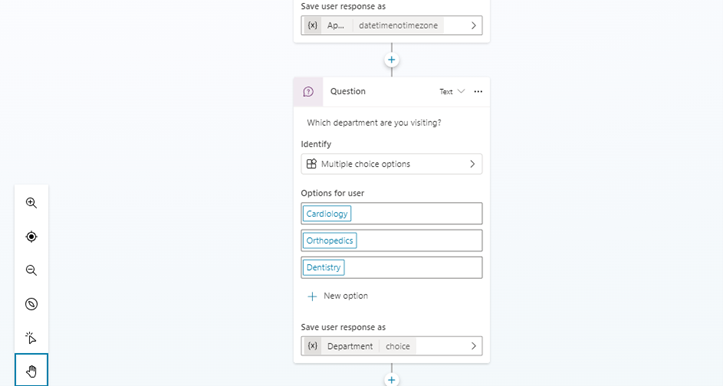
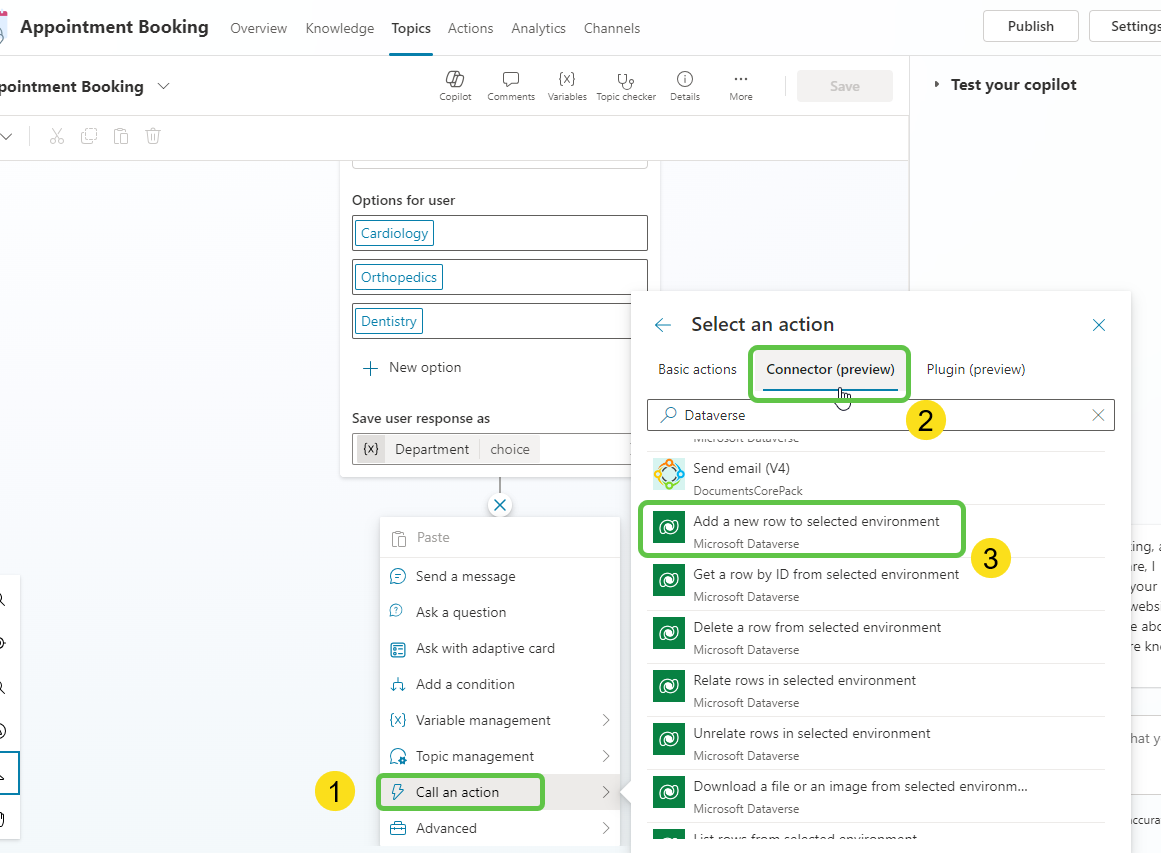
As we can see for each node, the user input is being stored in respective variables. Now let’s save these details which the user inputs to Dataverse. For this, we will add the Dataverse Connector action.
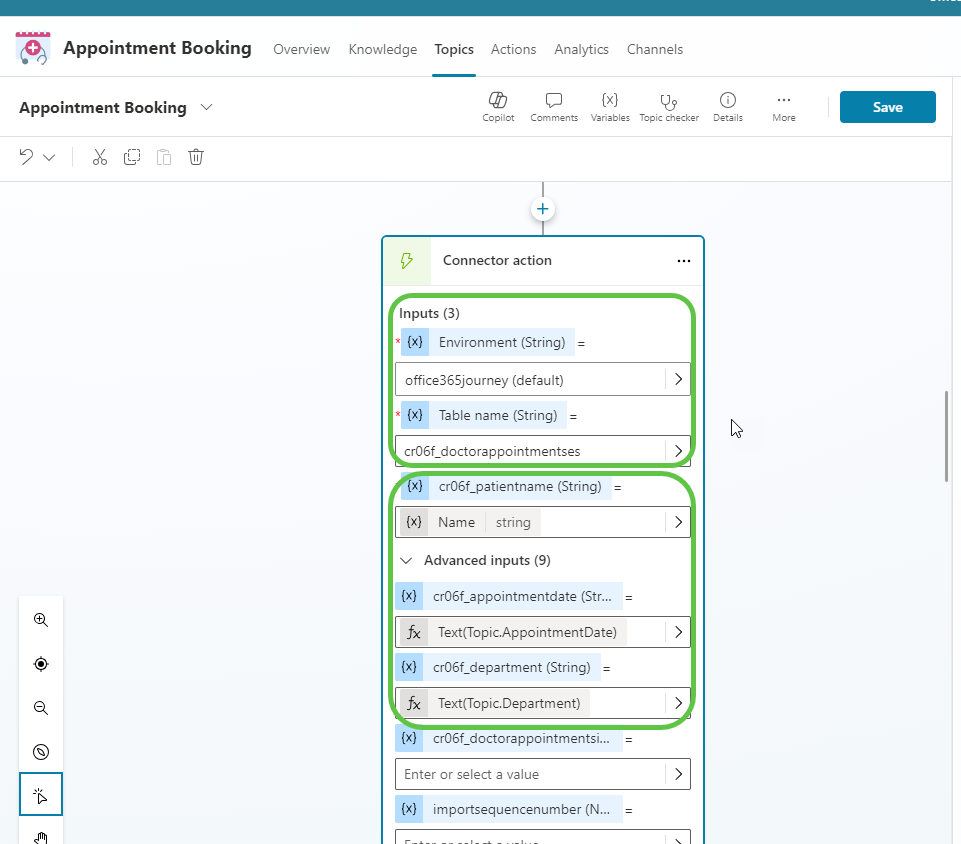
Let’s configure the connector by mentioning the environment name and Dataverse table along with the PatientName, AppointmentDate, and Department.
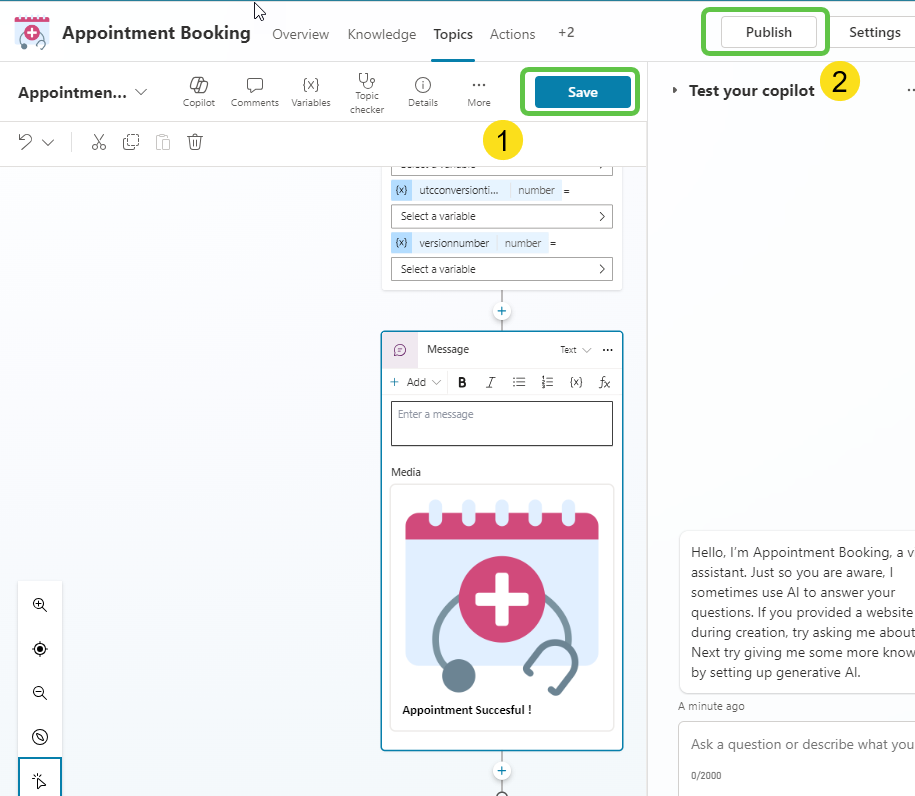
We have also added a basic card that indicates the success of the booking. Thus, we have completed the Copilot creation. Let’s save and publish it.
Step 4: Enable Multilingual Capability
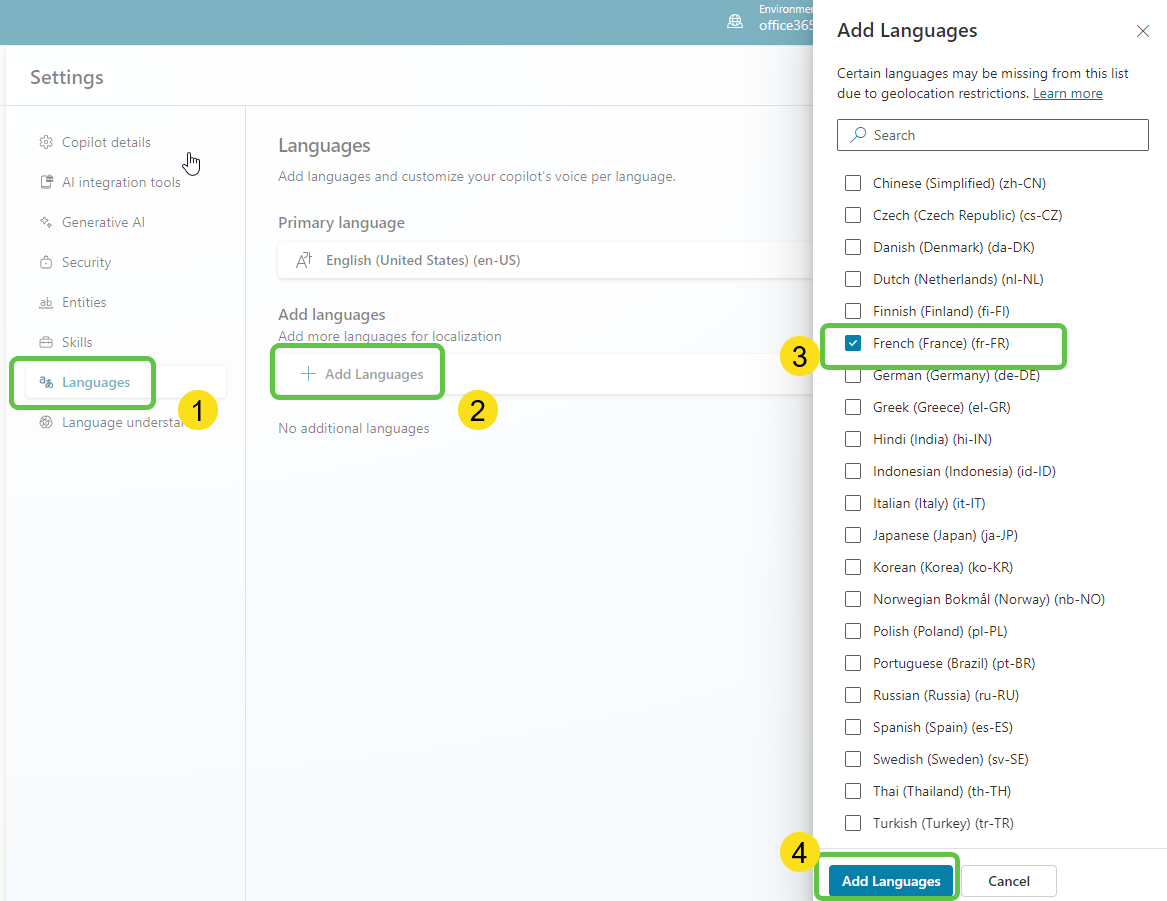
Now that the topic and conversation nodes are created, it’s time to make the Copilot multilingual. For this, click on Copilot Settings. Within the settings page, select Language and click on Add languages.
This should ideally allow us to add the different languages that the Copilot should support. However, as we had previously enabled Generative Topic selection capability, we will not be able to proceed.
As of writing of this blog, Generative Topic Selection does not work hand in hand with the Multilingual Copilot capability
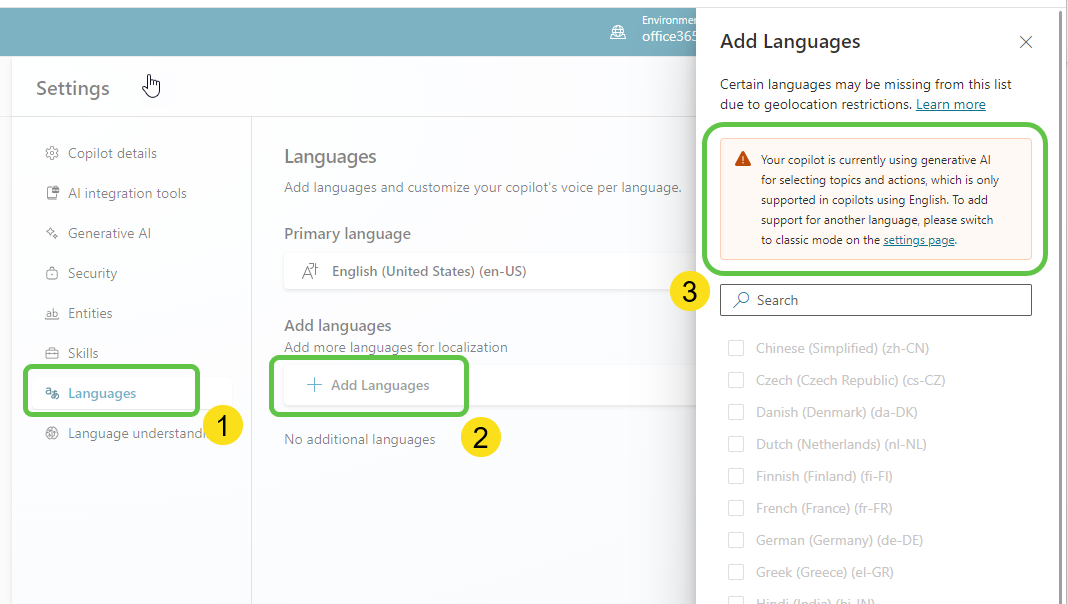
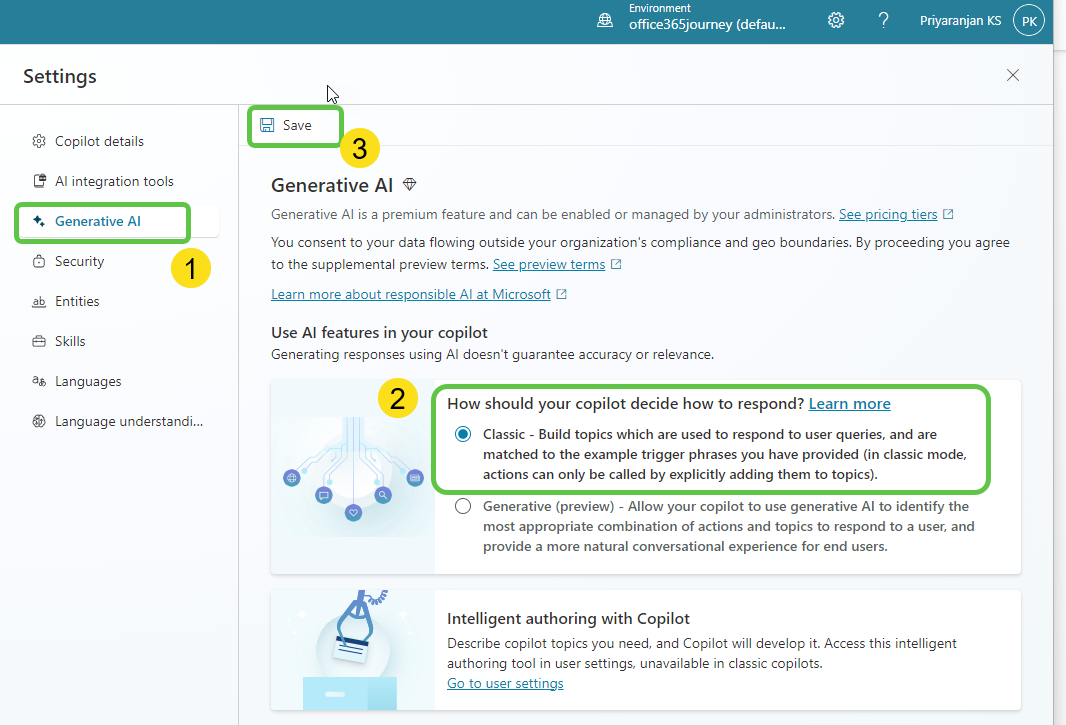
Hence, we will have to switch back to Classic Mode. So, let’s do this from the same settings page:
- Select Generative AI.
- Select Classic option.
- Save the settings.
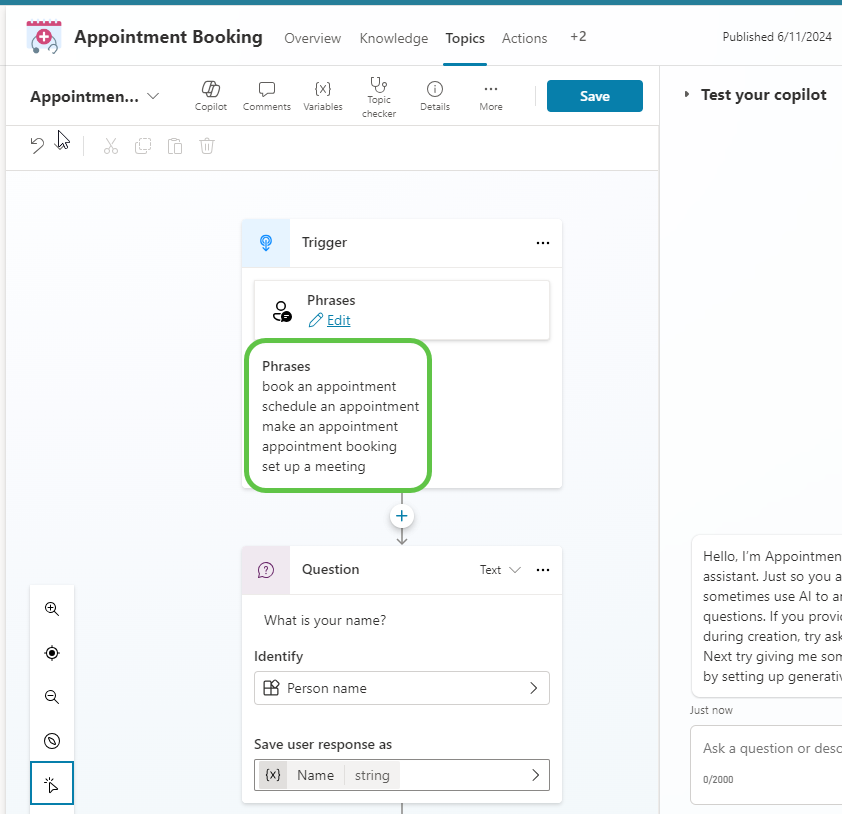
Now if we head to the previously created topic, we can see that the Generative nature of the trigger where the topic is automatically triggered by Copilot is replaced with trigger phrases and hence we will have to ensure that all the potential phrases for triggering the topic are added in here.
Heading back to the Language Settings, we will again try to add the additional language and we can now see that we are able to add new languages. Let’s select French and click on Add Languages.
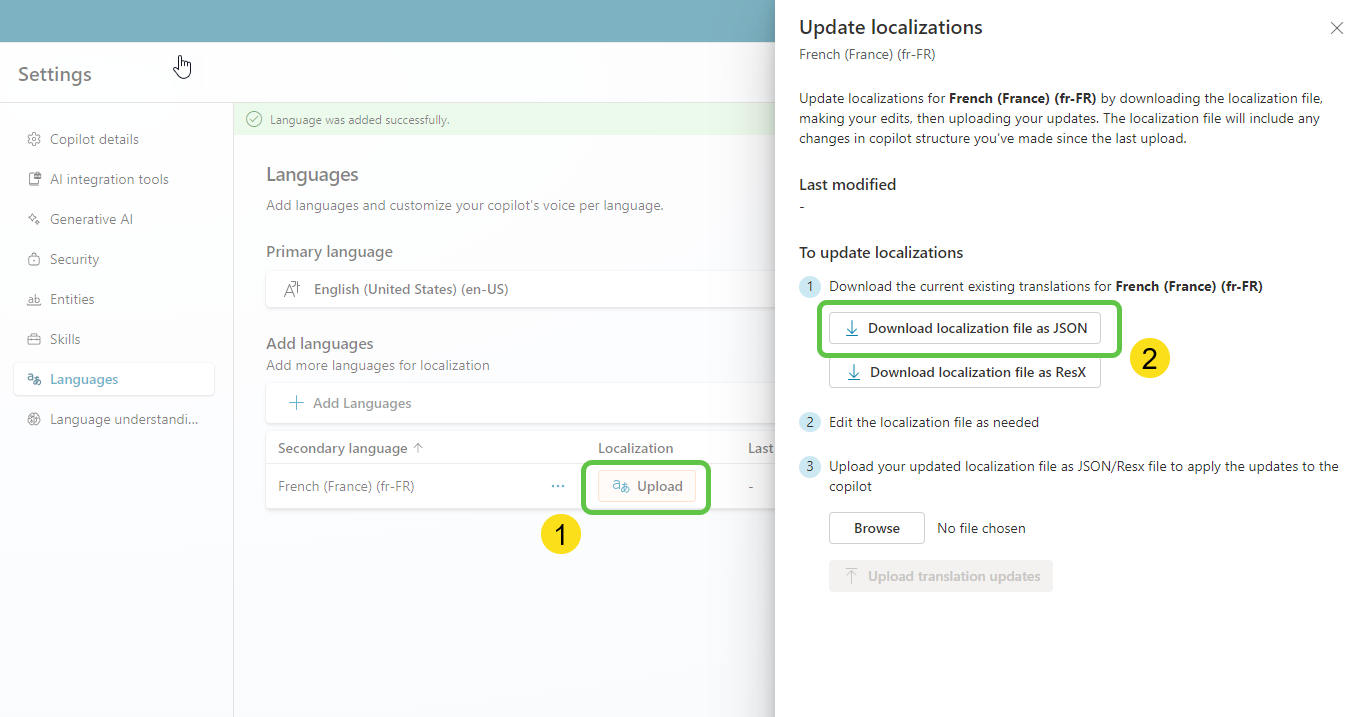
We can now see a new section called Secondary language has come up and it shows the newly added French Language. Click on the Upload button which will open up a right side pane. It contains the localization files for the French Language. Click on Download localization file as JSON. You can also try with ResX which is more of an XML-based resource file but since JSON is easier to edit, we will download the JSON file.
The downloaded initial JSON file will look like below which contains the English version of all the conversation nodes across all the existing system and custom topics in the Copilot.
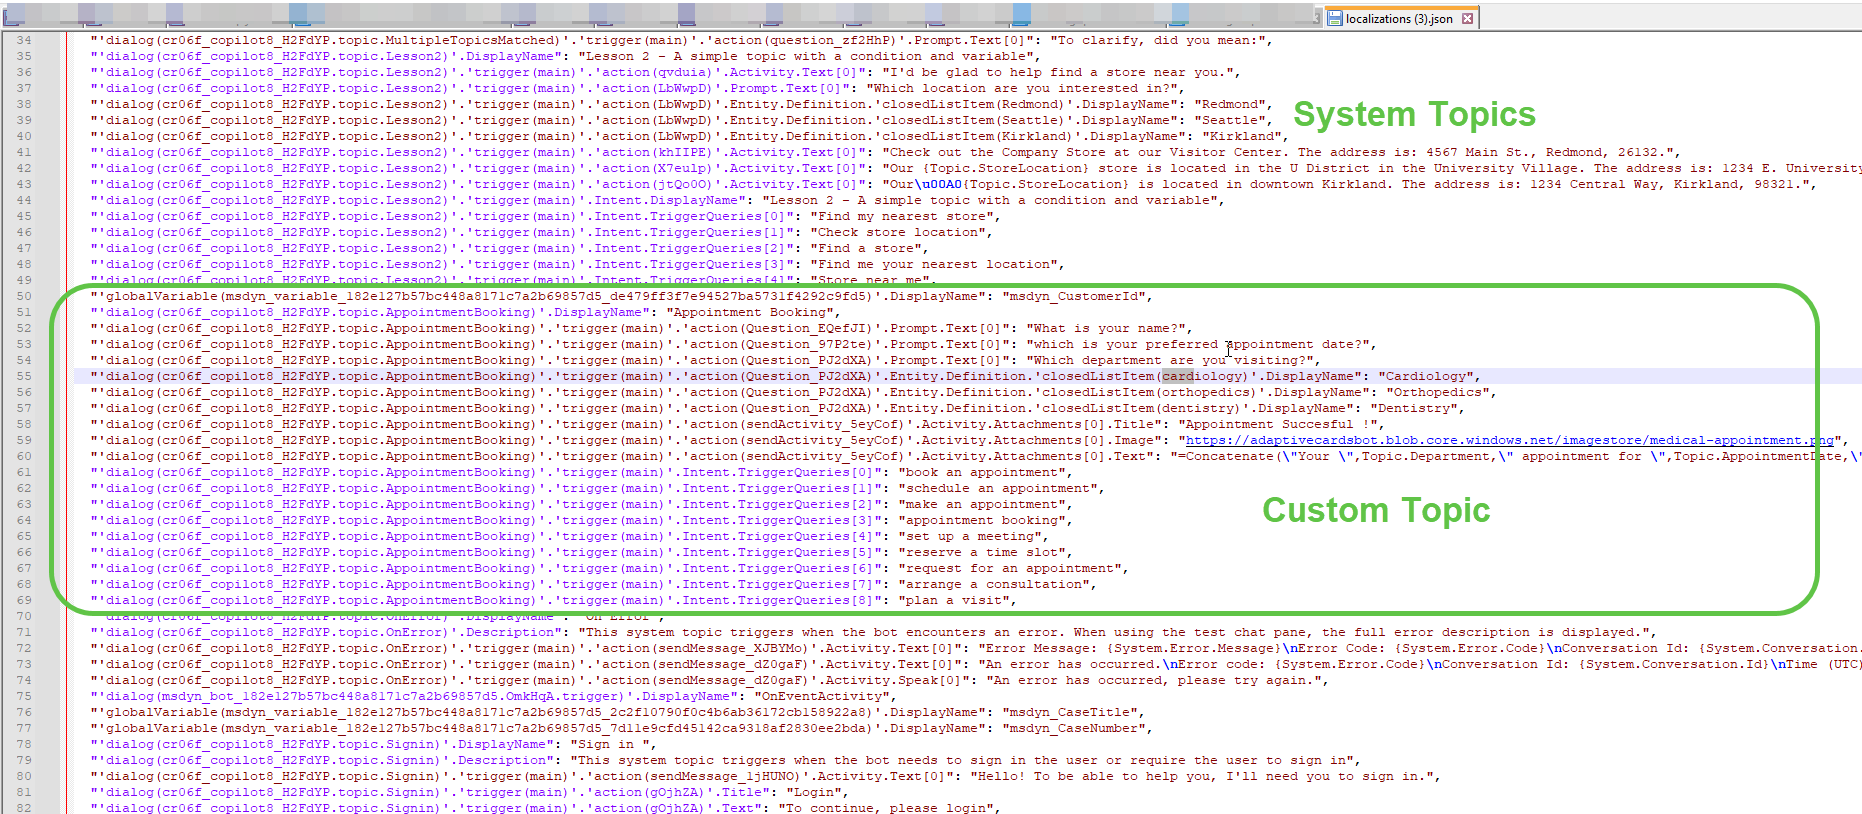
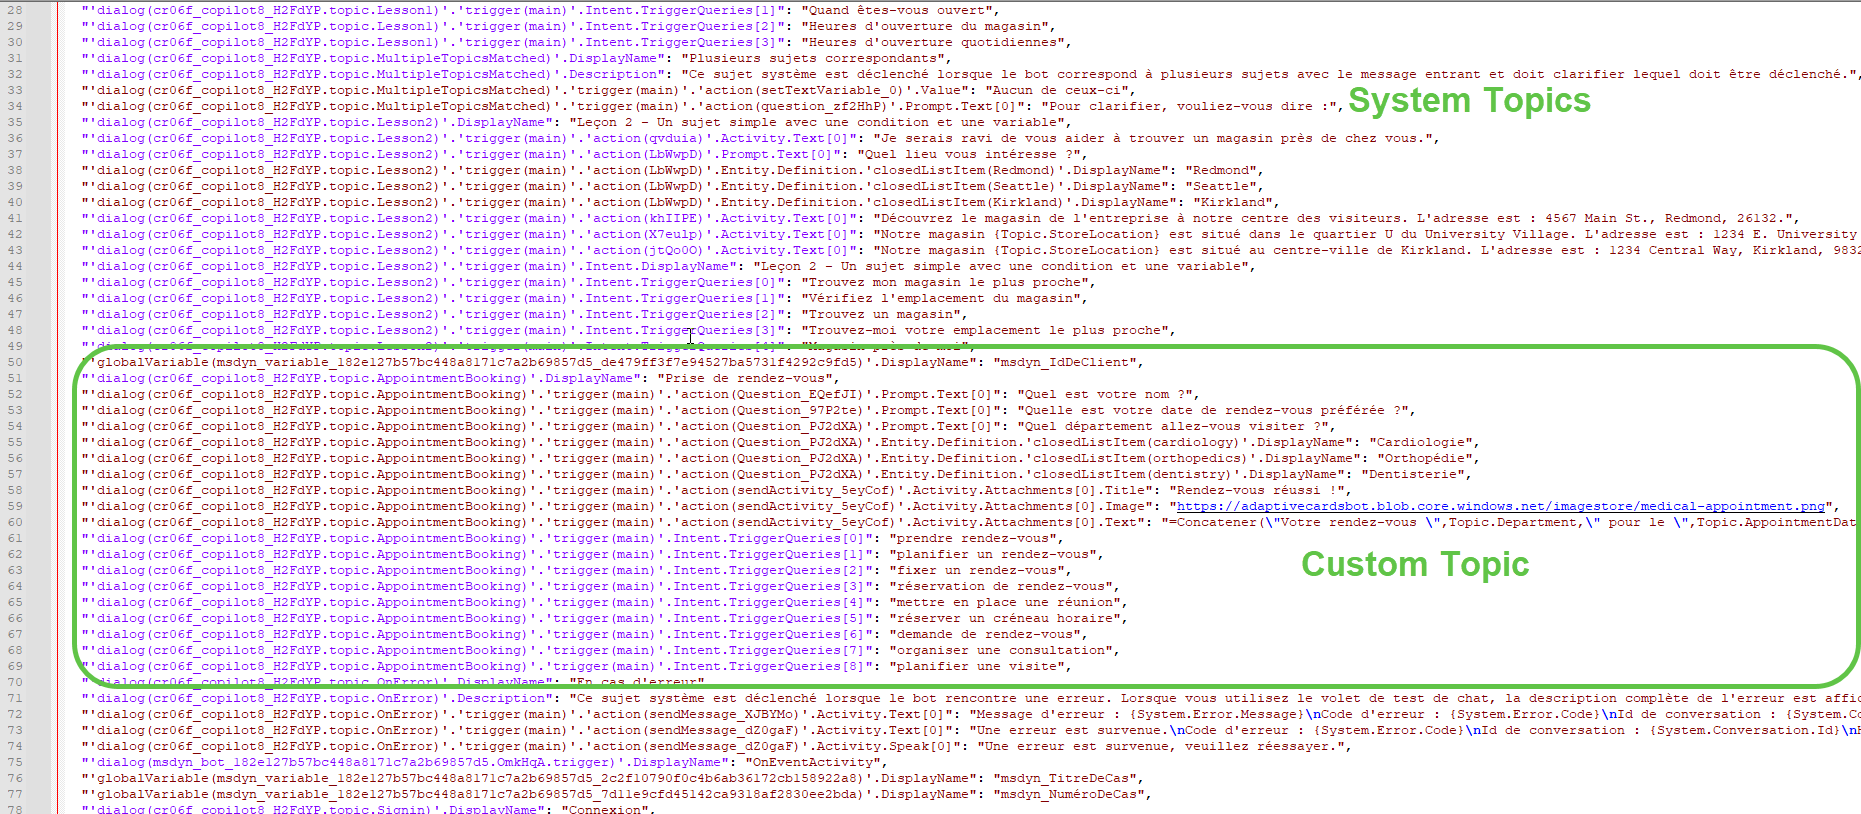
We can see that the data is stored as a key-value pair in JSON. To make the Copilot multilingual, we have to translate each of the values of the key-value pair into French. We can either use the Google translate function or even copy and paste the entire content into ChatGPT and ask it to convert the values into French.
The translated French localization file would look like below:
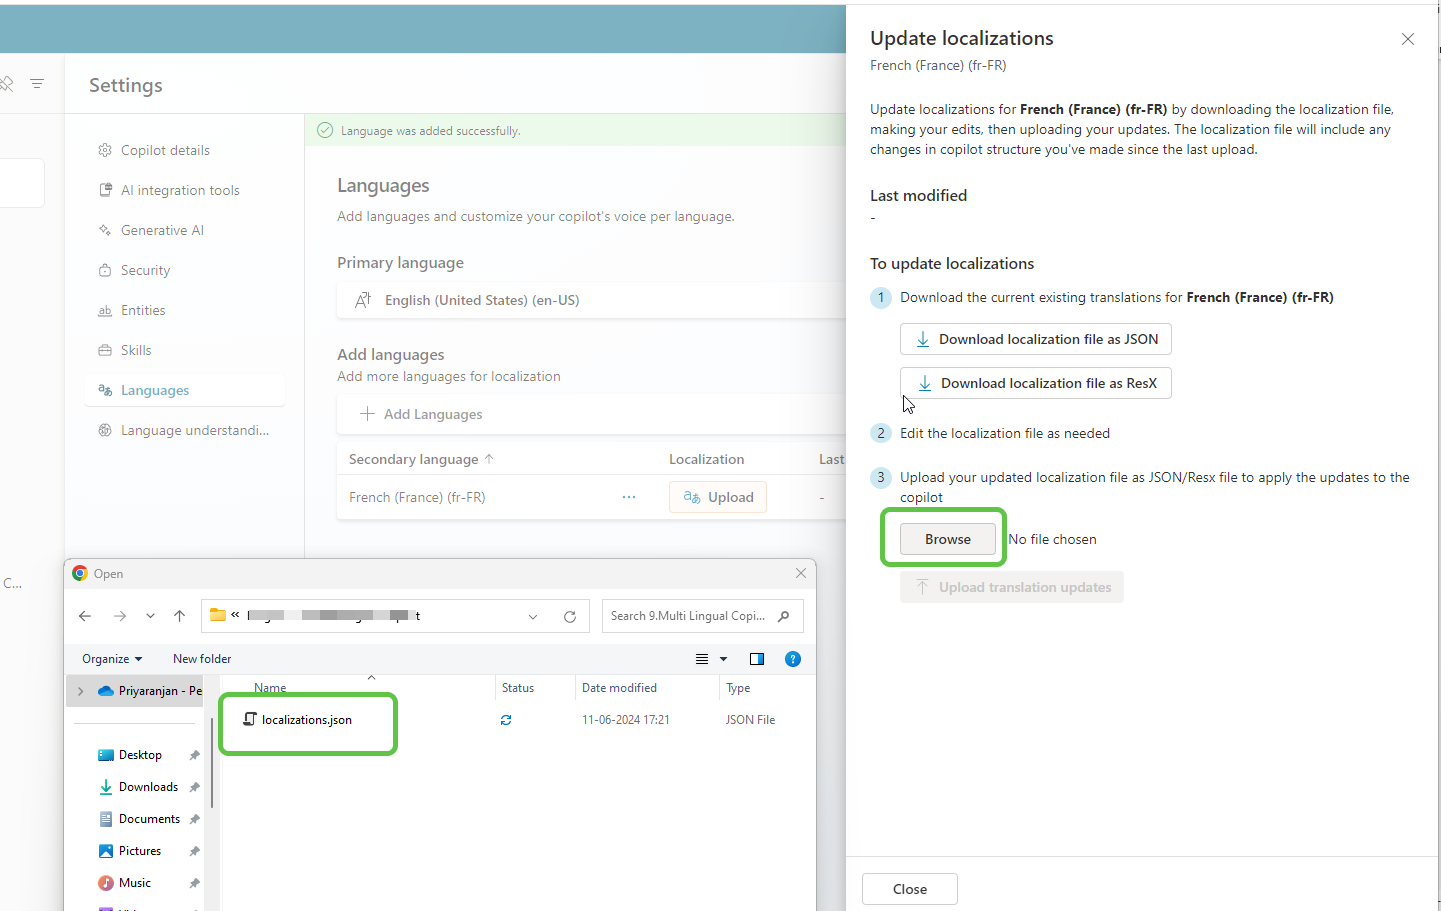
Now let’s upload the French translated JSON back to the Copilot by clicking on the Browse button in the Localizations pane.
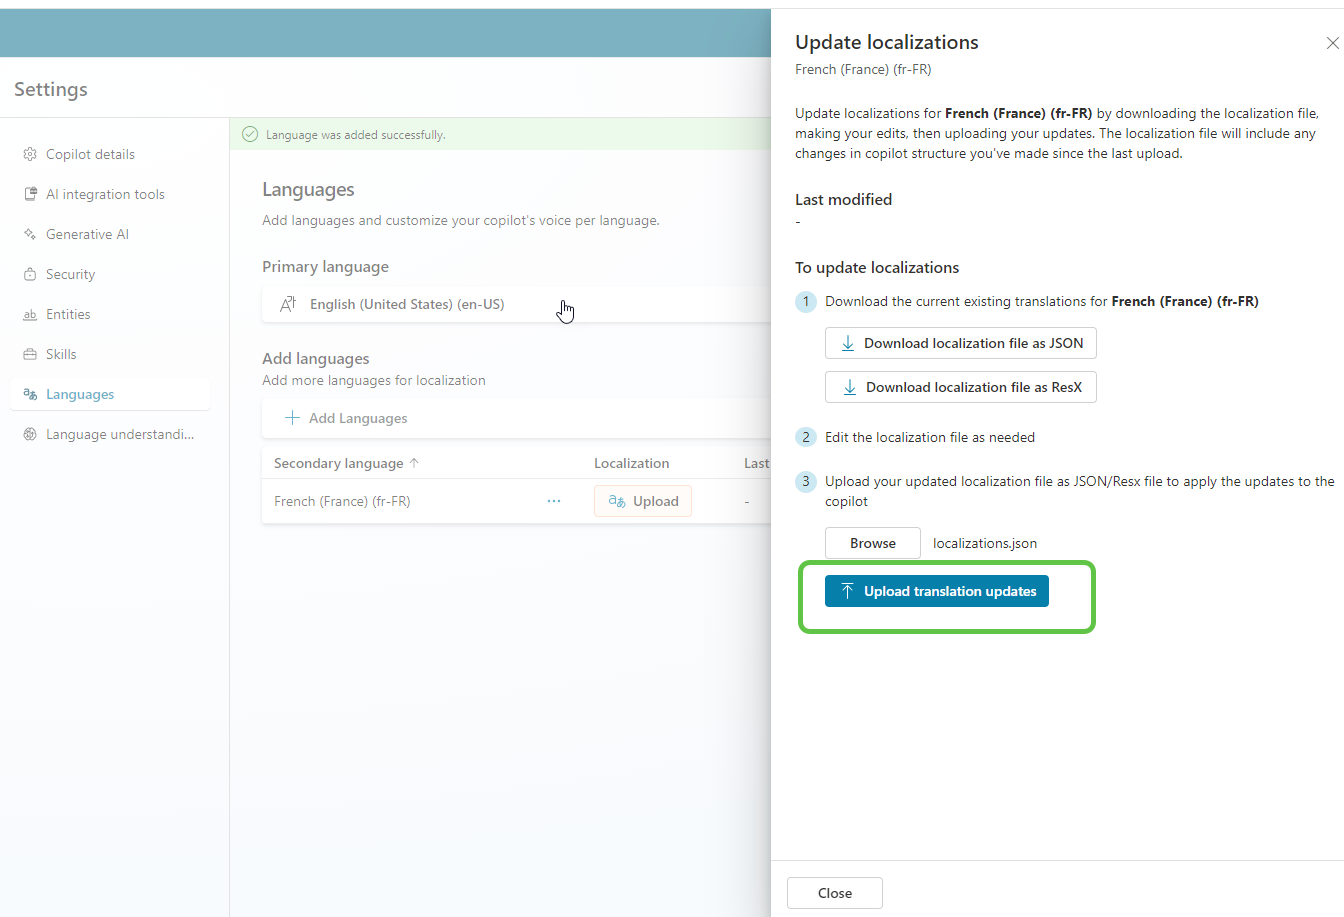
Click on Upload translation updates to make the French translation available to the Copilot.
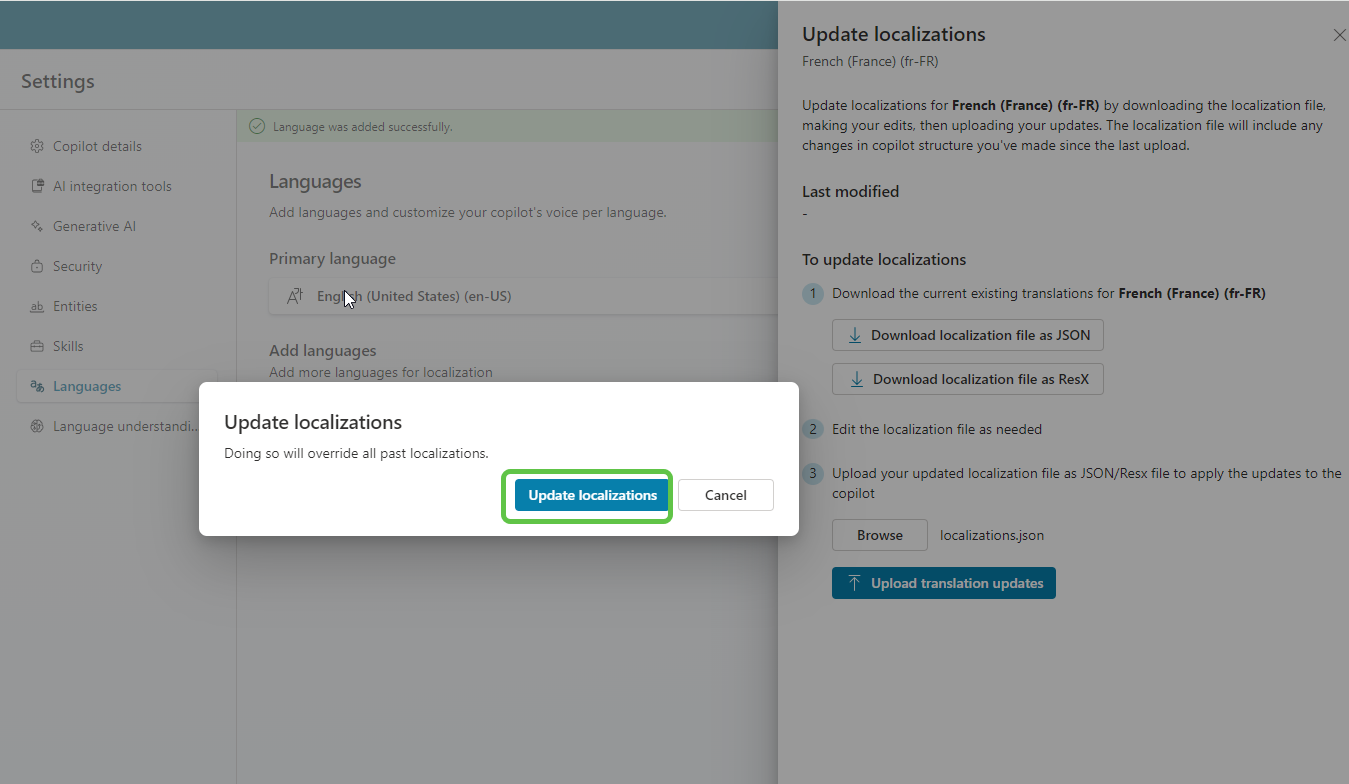
Click on Update localizations to overwrite all past localization that you have done for this Copilot.
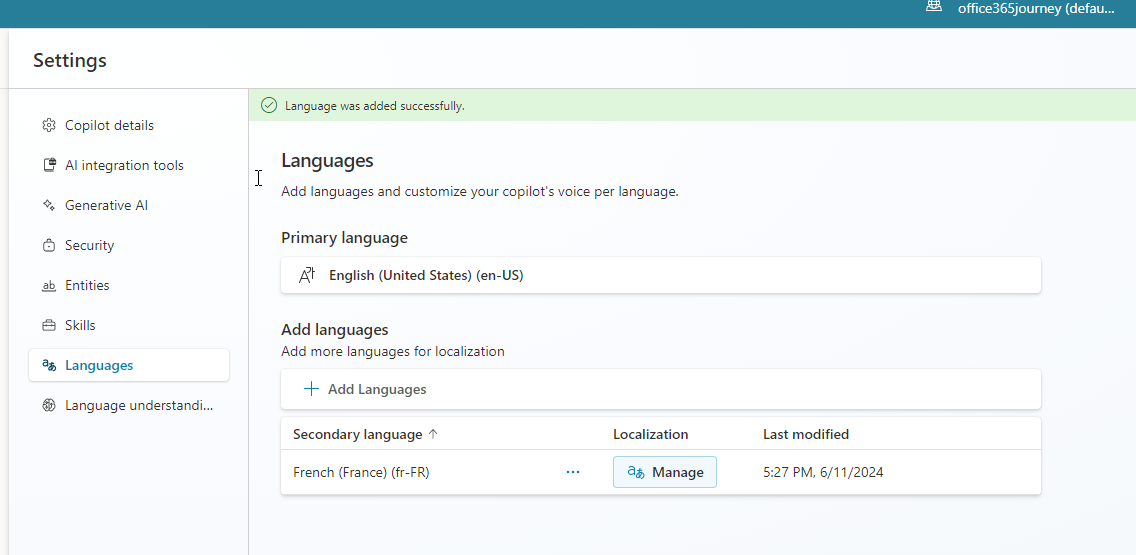
Thus, we have successfully added a new French language to the Copilot. Let’s test the functionality in the test pane.
Test Multilingual Copilot
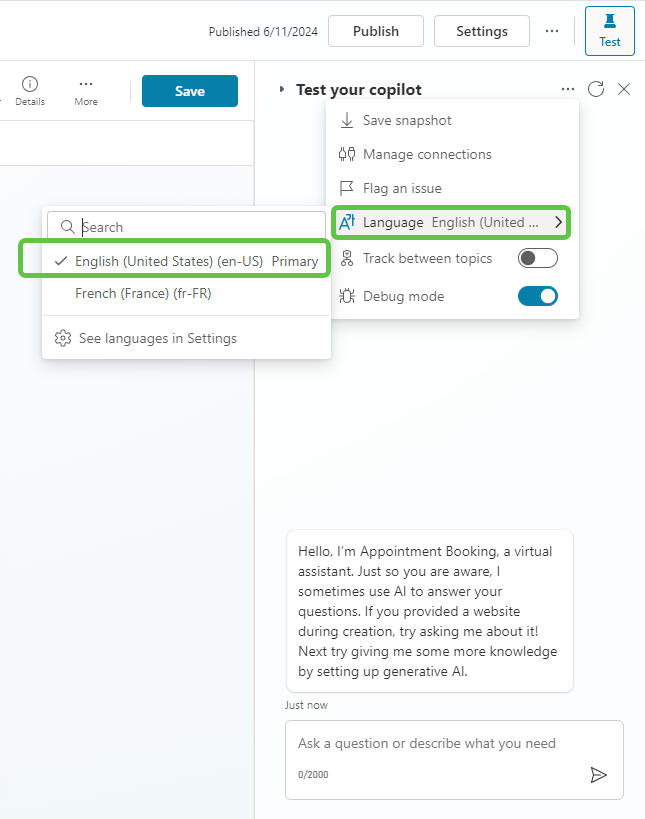
We can switch the language from the test pane. We will first test with the English language.
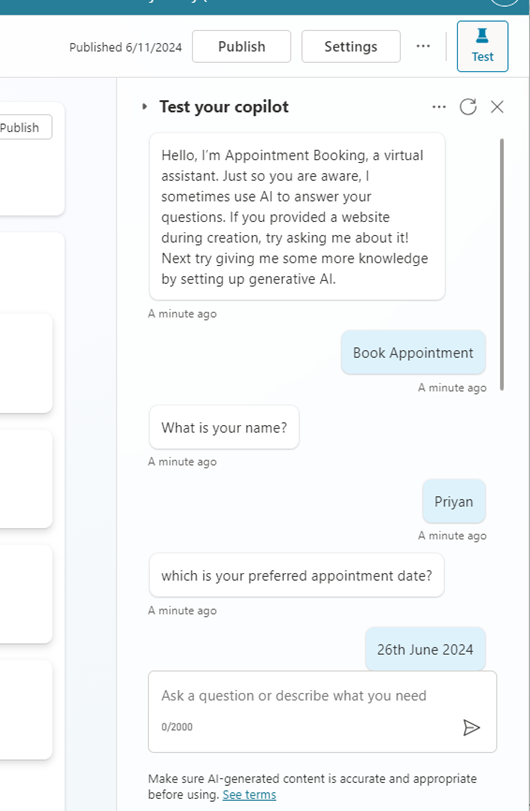
We will initiate the conversation with a trigger and provide the name and appointment date.
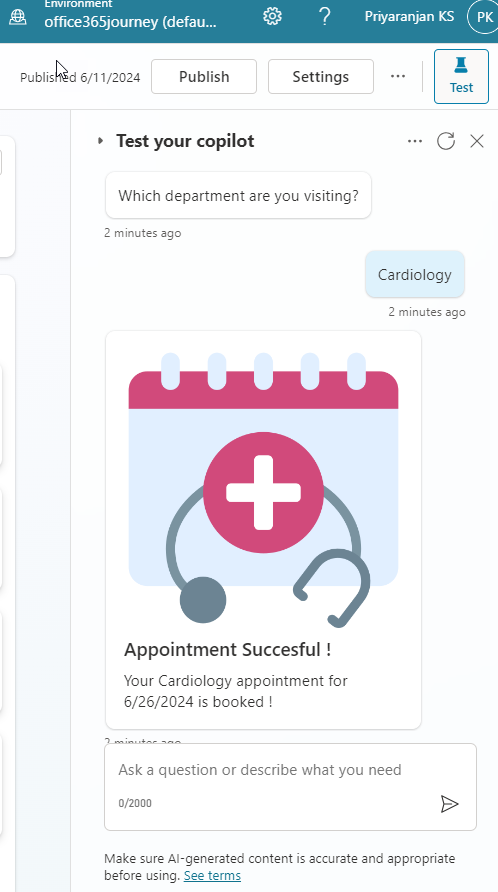
We have also provided the department for consultation and we get a success message indicating the appointment booking.
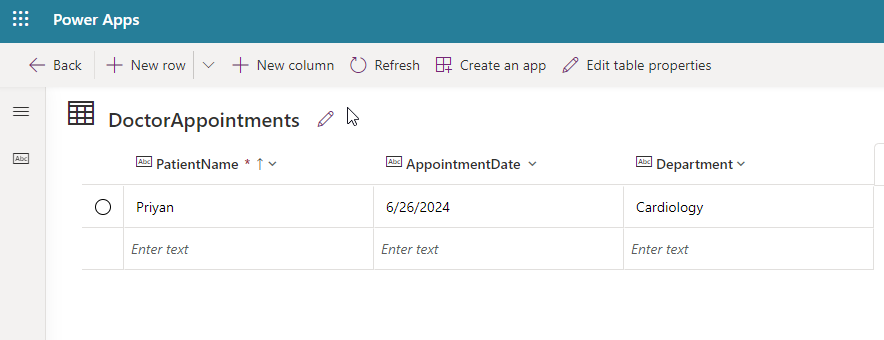
Checking the backend Dataverse, we can see that the appointment record has been created as well.
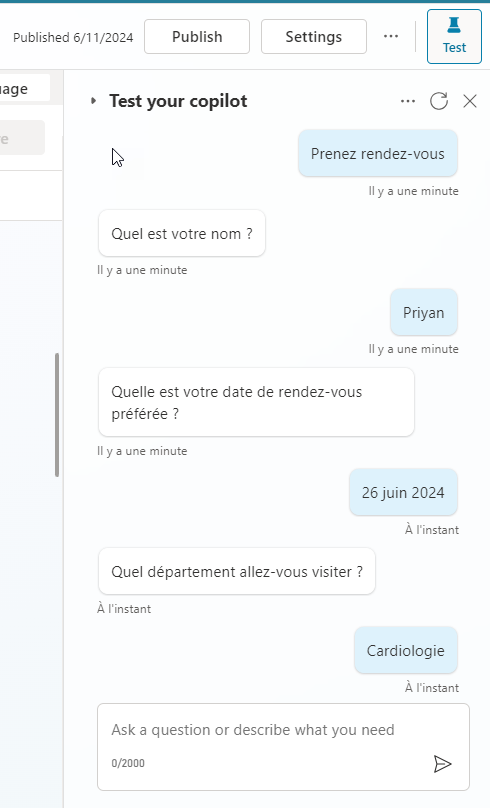
Now let’s change the language to French and test the Copilot.
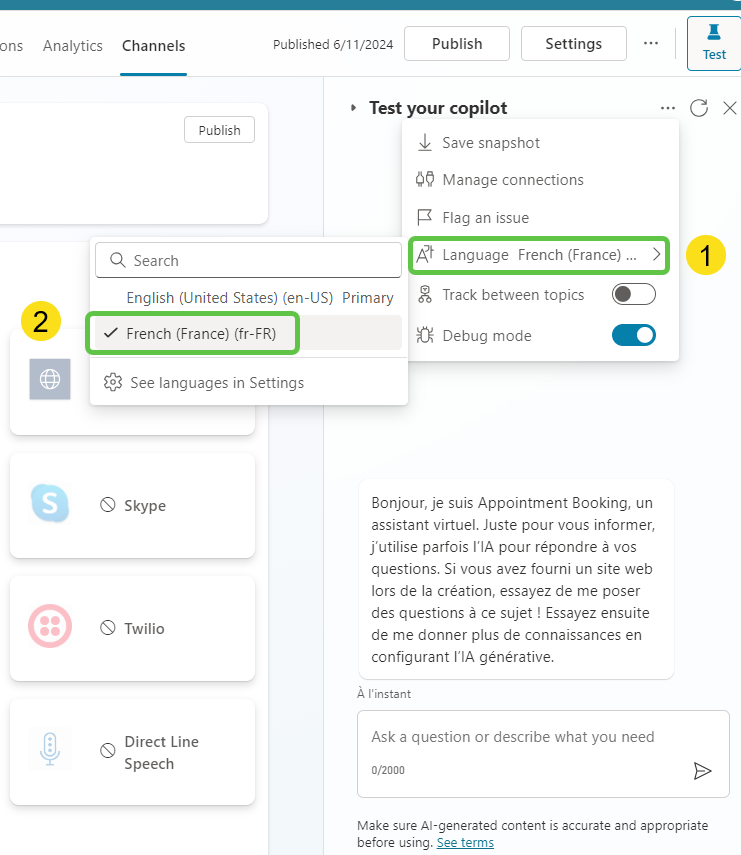
Now we are able to switch the conversation completely to French as shown below:
Conclusion
Creating a multilingual Copilot with Microsoft Copilot Studio empowers you to provide a seamless and personalized experience for users across different languages. By following the steps outlined, you can efficiently set up a Copilot that not only facilitates booking appointments in various medical departments but also integrates with Dataverse to manage these appointments effectively. This approach not only enhances user engagement by catering to language preferences but also streamlines backend operations, ensuring all relevant data is systematically stored and accessible.


