Table of Contents
- Introduction
- Overview
- Step-by-Step Guide to Building the Supply Chain Copilot
- Step 1: Set Up Dataverse for Customer Registration Data
- Step 2: Populate the Dataverse Table
- Step 3: Creating the Copilot in Copilot Studio
- Step 4: Enable Generative Selection of Topics
- Step 5: Create Topics
- Step 6: Fetching Customer Details from Dataverse
- Step 7: Adding AI-Prompt for PII Detection
- Test the Copilot
- Conclusion
Introduction
Businesses can now automatically scan and detect sensitive PII within their customer registration Dataverse tables.This capability empowers organizations to flag records containing personal information and take appropriate actions, such as masking sensitive fields, notifying compliance teams.
Overview
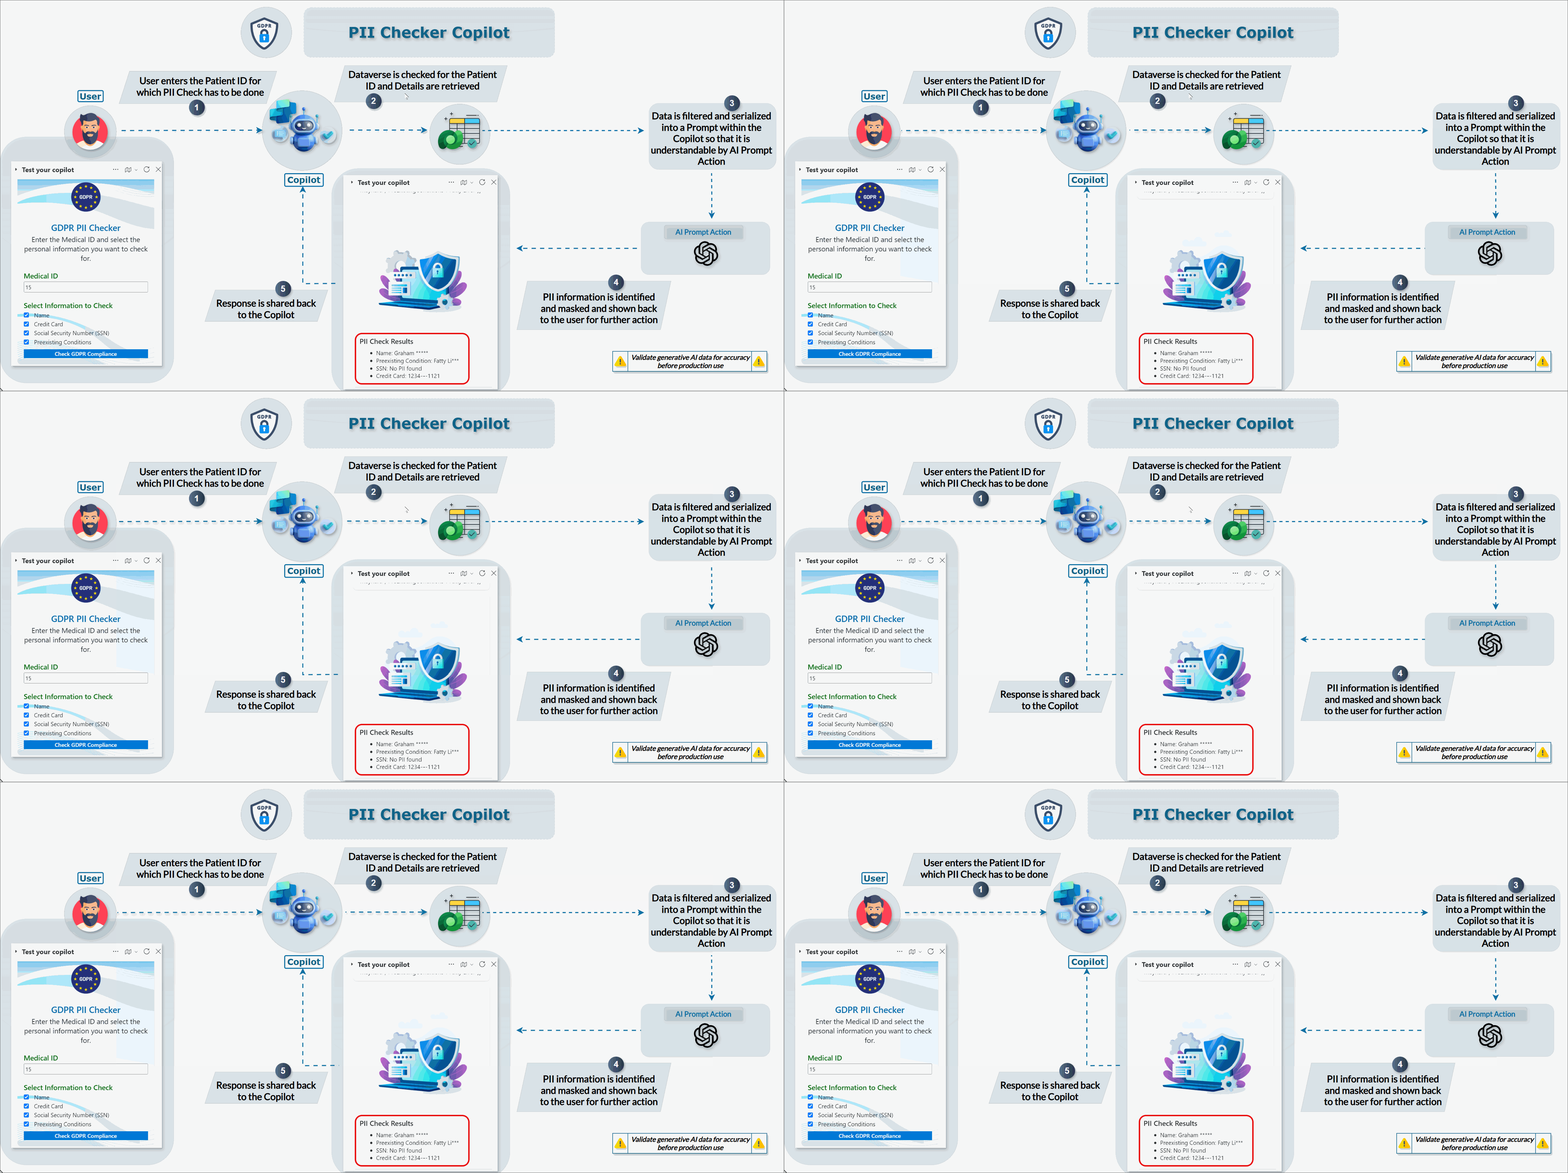
PII Detection Copilot helps businesses identify and take actions on personally identifiable information (PII) within their customer registration data.
Features:
- Fetch Data: Retrieves customer registration data from Dataverse.
- AI-Powered PII Identification: Detects PII using Azure OpenAI prompt actions, including sensitive data like names, SSNs, credit card details, and medical information.
Step-by-Step Guide to Building the Supply Chain Copilot
Step 1: Set Up Dataverse for Customer Registration Data
To begin, we need to organize our customer details in Dataverse. Create a table named Customer Registration with the following columns:
- Name
- MedicalID
- Preexisting Conditions
- Additional Details
- And any other needed fields.
Step 2: Populate the Dataverse Table
Enter the customer details into the Dataverse table. We have the below data for the demo.

Step 3: Creating the Copilot in Copilot Studio
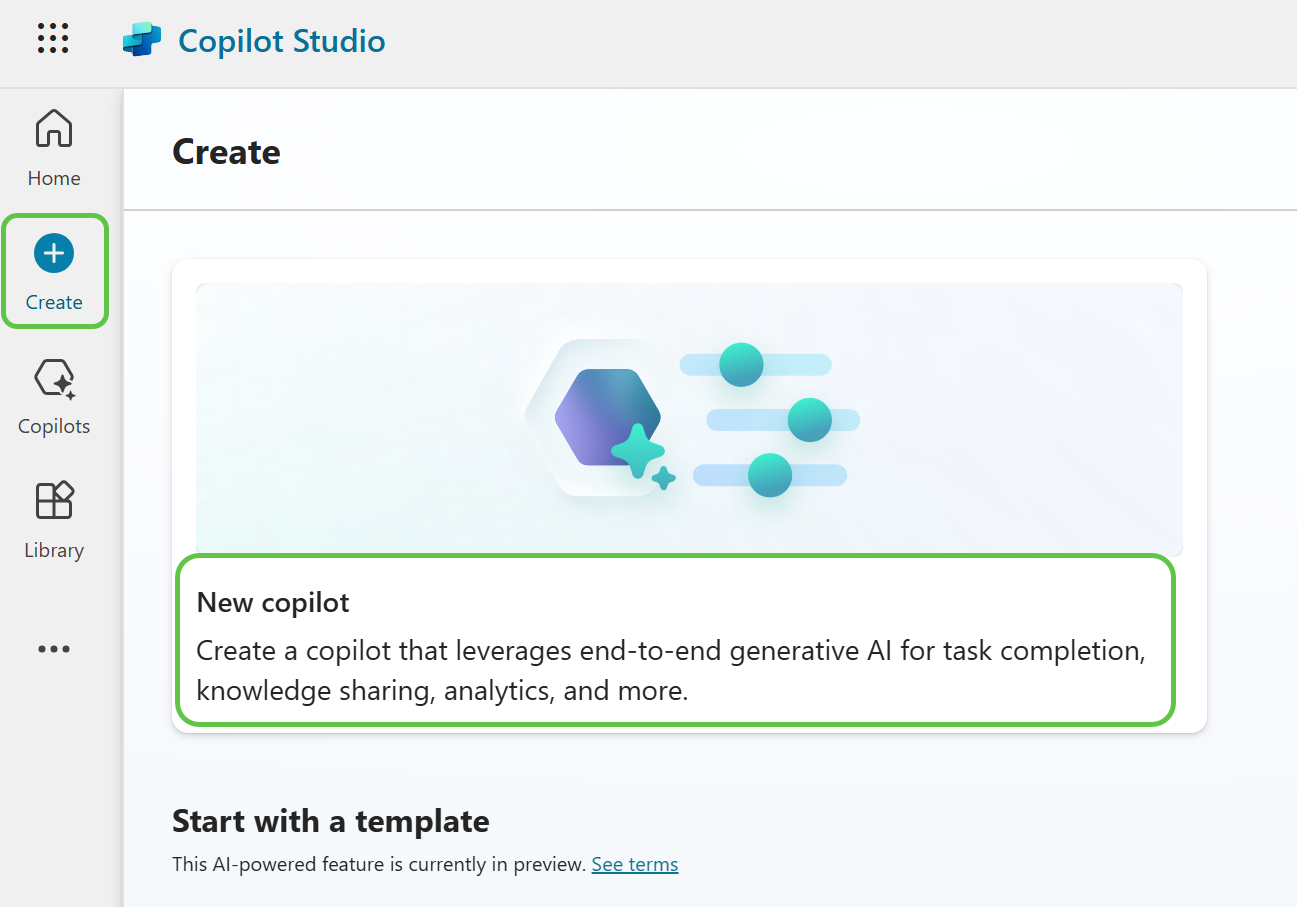
Head over to https://copilotstudio.microsoft.com/ and click on Create.
This will provide us the option to create a copilot based on an existing template or create a blank copilot from scratch. Let’s select New copilot.
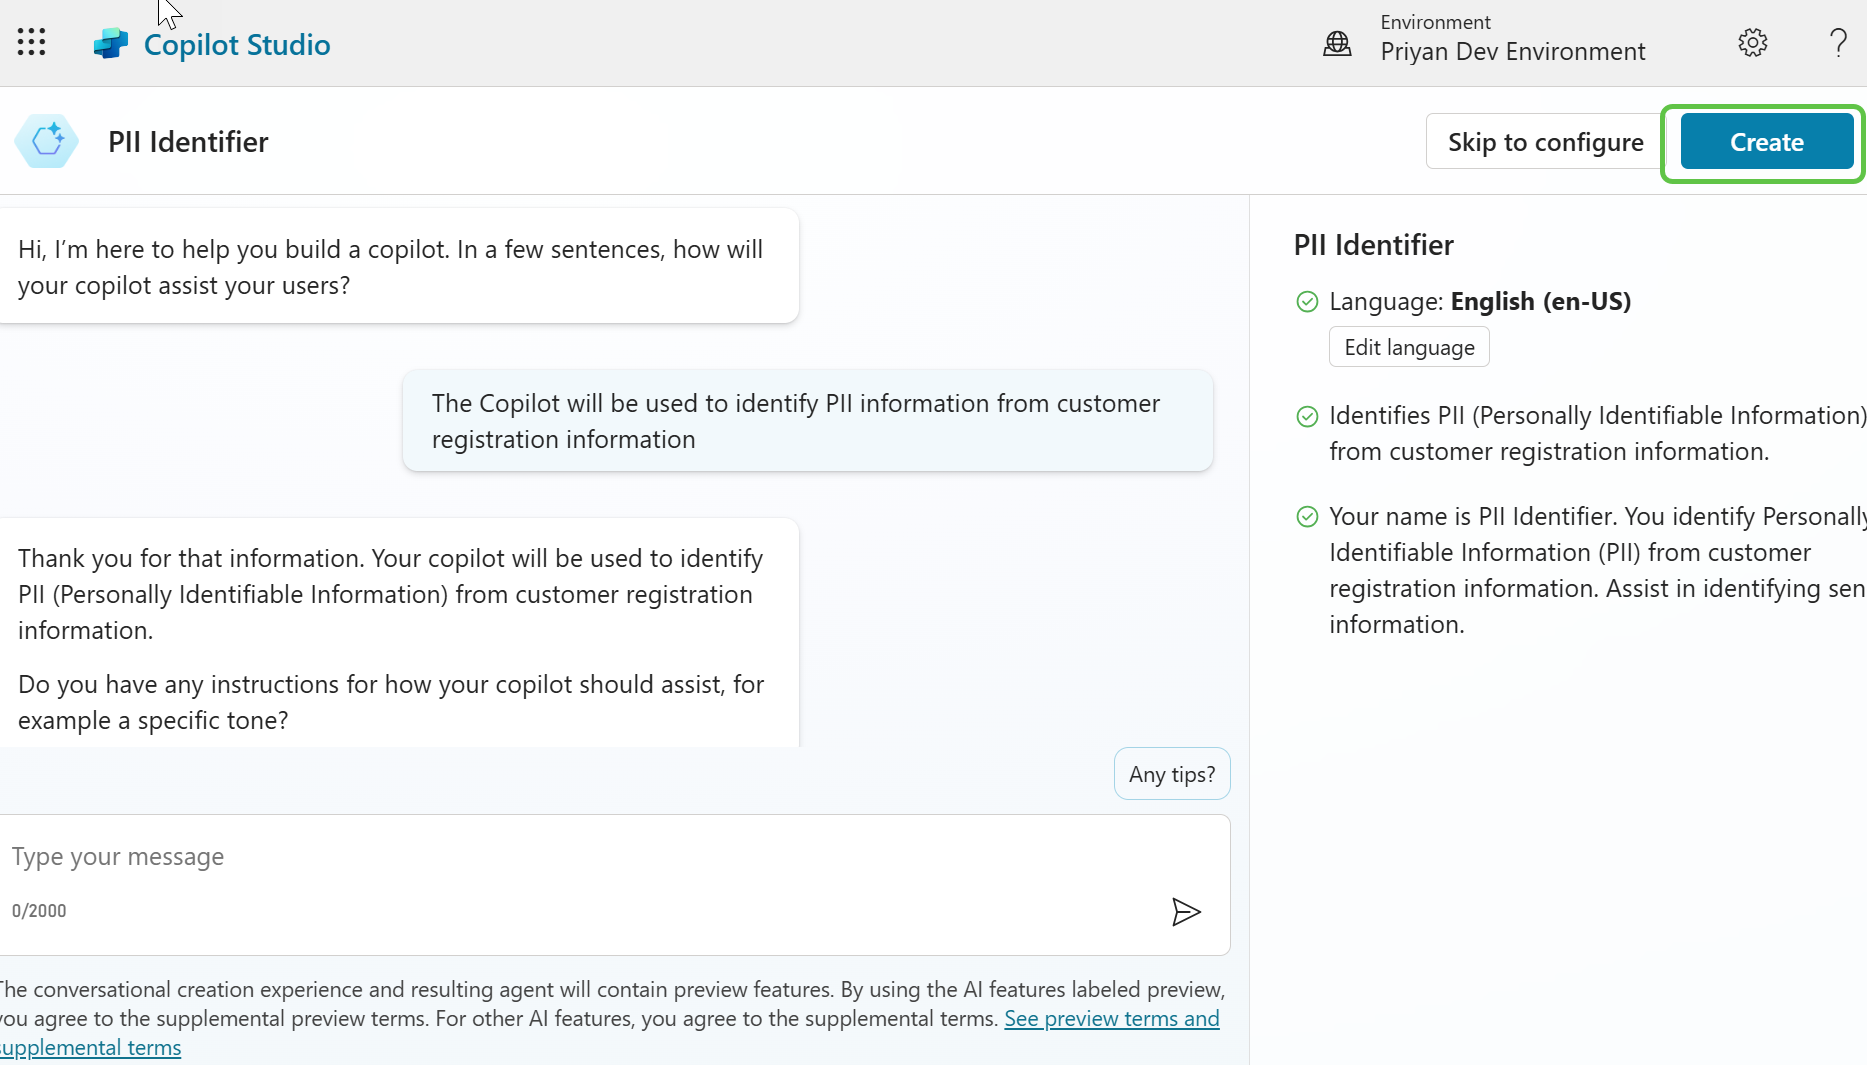
This will take us to the page where we can:
- Describe the copilot functionality and provide any specific instructions to the copilot.
- Once done, click on Create to provision the copilot.
Step 4: Enable Generative Selection of Topics
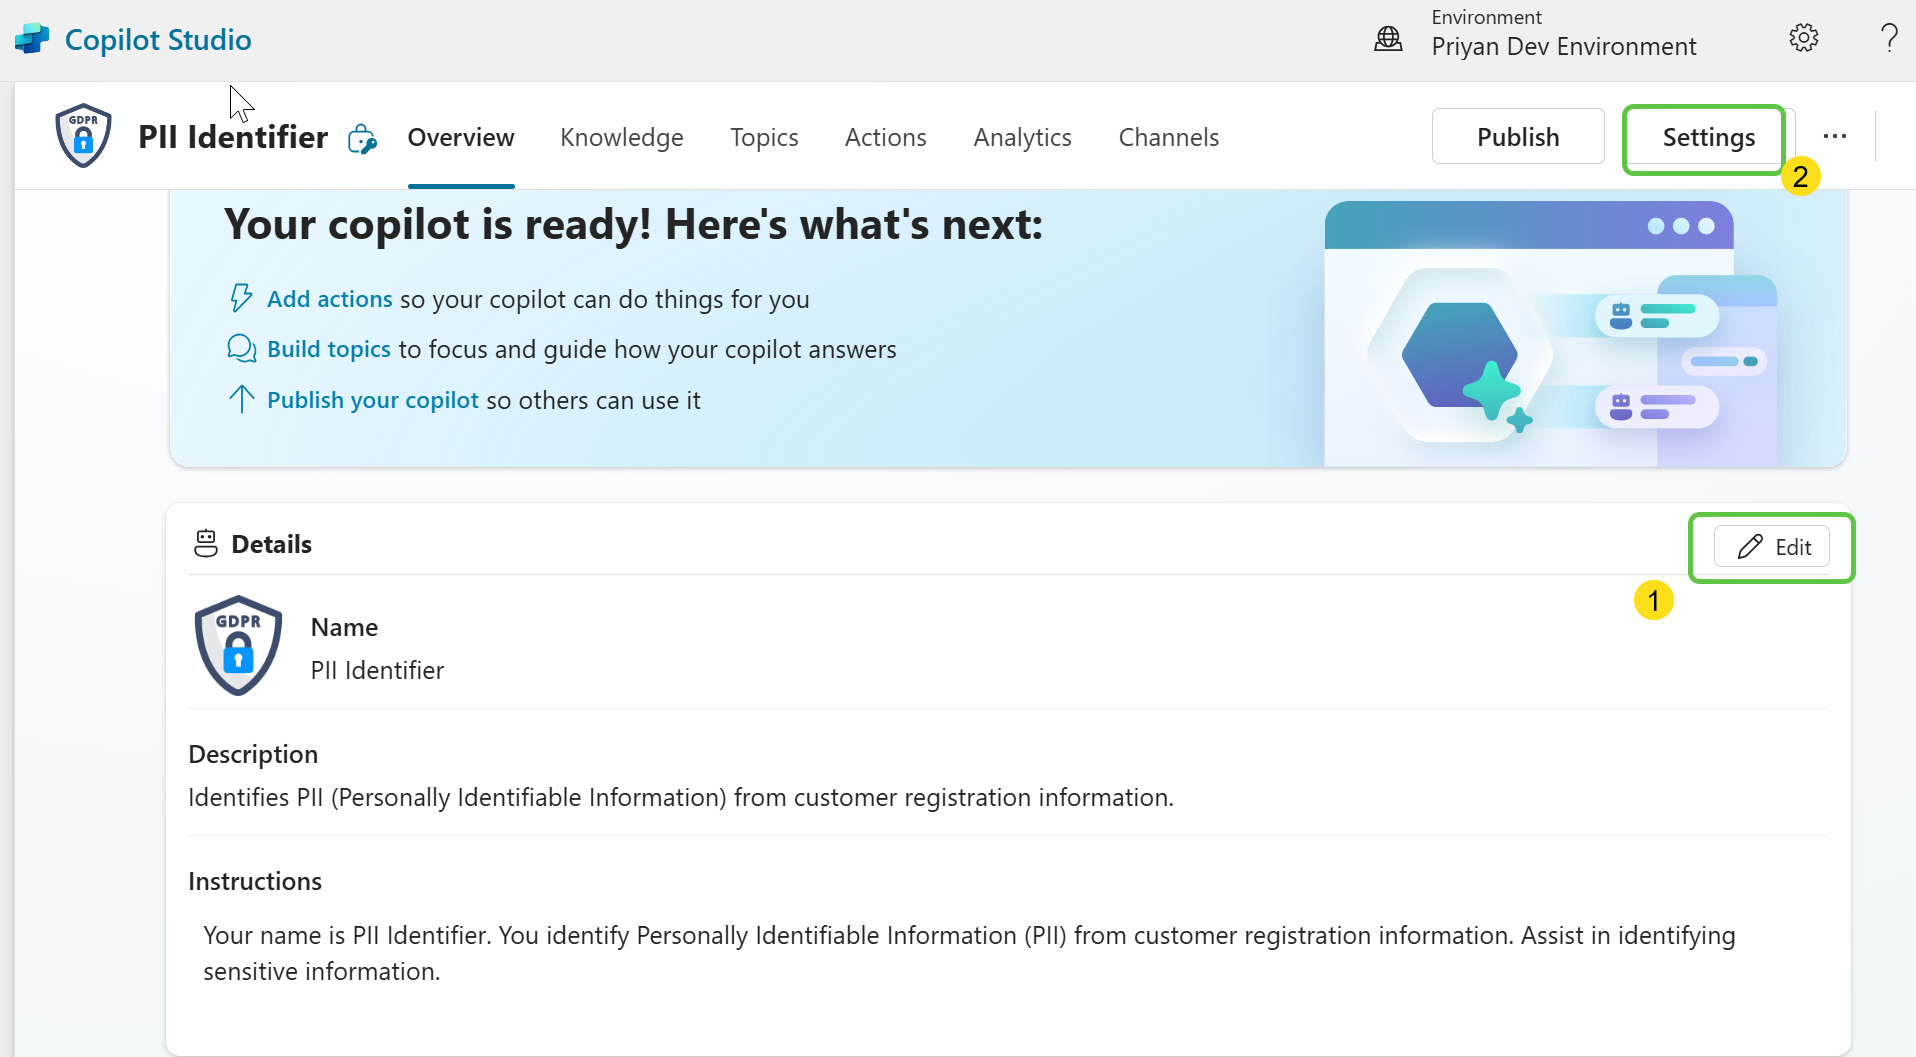
The copilot is now created. We can then make the needed configuration changes.
- Click on Edit, edit the copilot details like name, icon, and description.
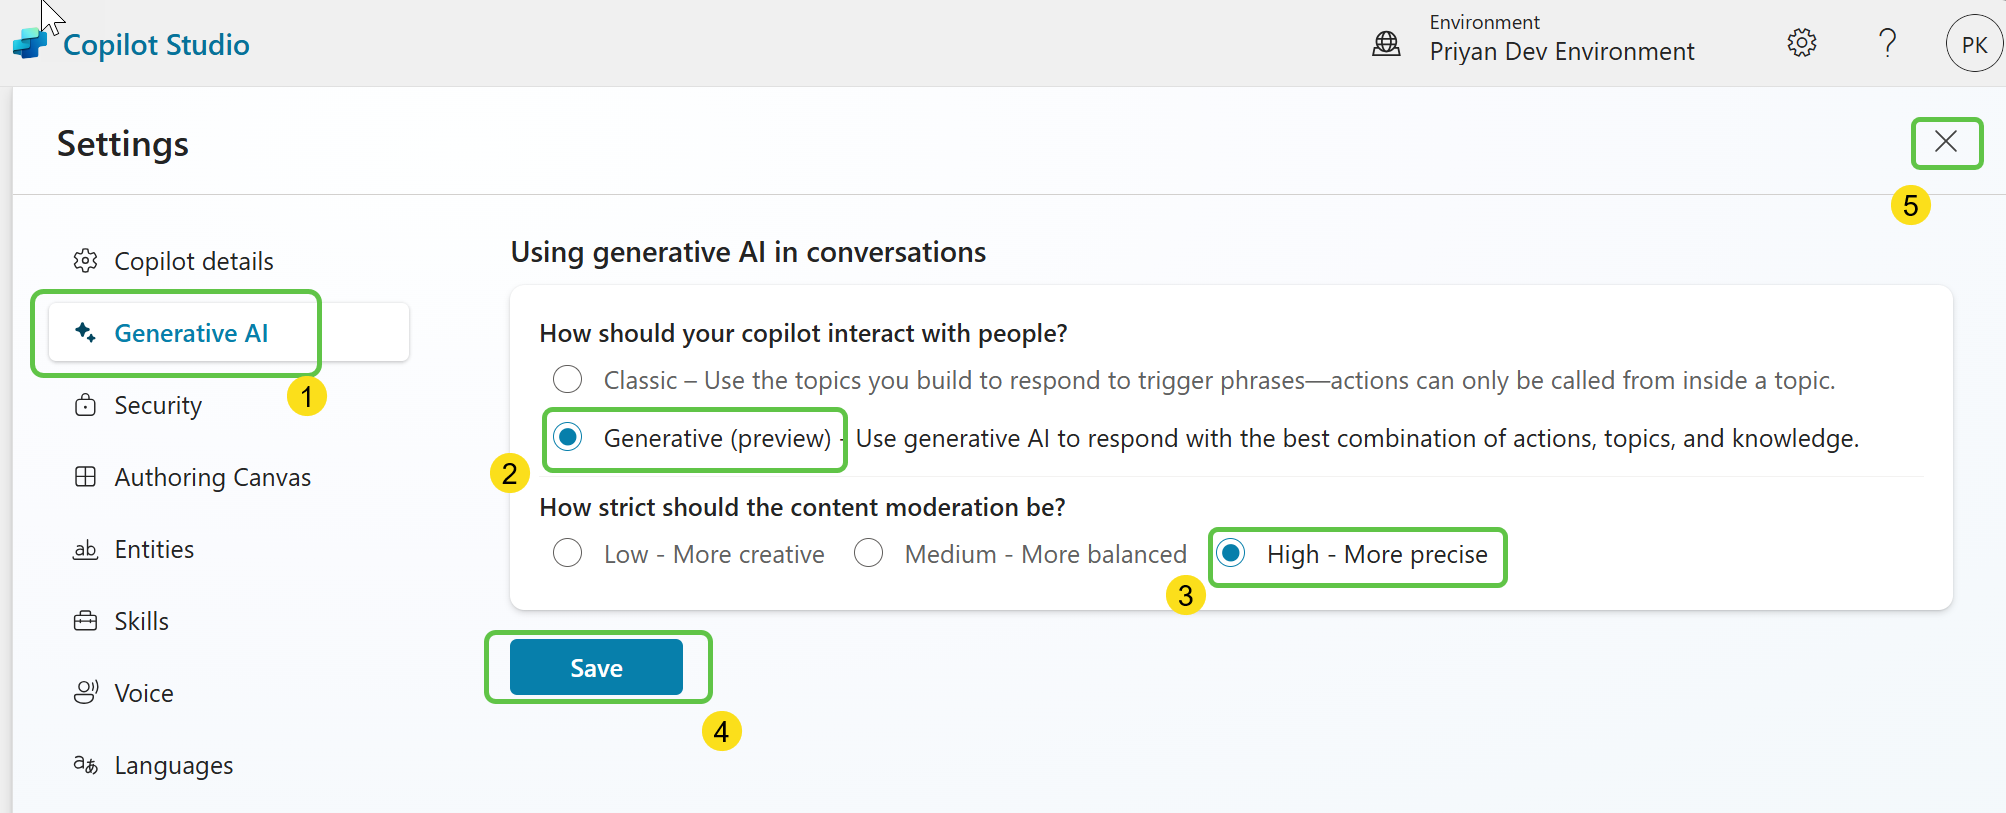
- Click on Settings to enable the Generative selection of topics so that without relying on triggers, the topics will be auto-selected based on user conversation resulting in a much smoother user experience.
To enable the automatic detection of topics from user interaction:
- Click on Generative AI.
- Select Generative (preview).
- Select High – More precise for content moderation.
- Click on Save to update the settings.
- Click on the Close icon to go back to the homepage of this custom copilot.
Step 5: Create Topics
Now let’s go ahead and create the topics that will automatically redirect the conversation flow to appropriate topics based on the question user posts.
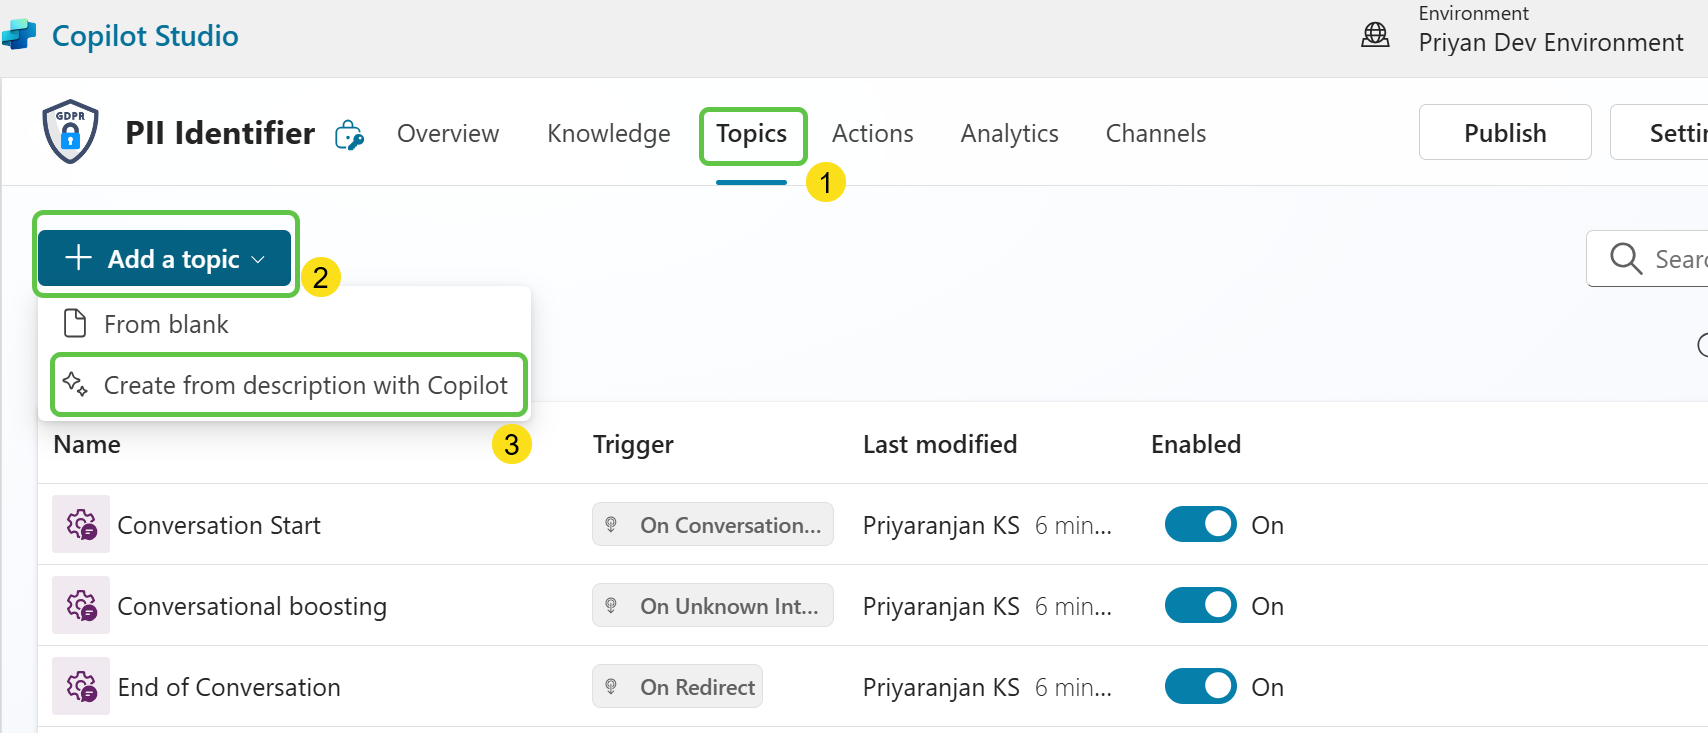
- Click on Topics from the navigation menu.
- To add the topic, we can either go with the option to create a blank topic or use Copilot to create the topic with an initial set of prepopulated conversation nodes based on the topic description that we provide.
- Let’s click on Add a Topic.
- Select Create from description with Copilot.
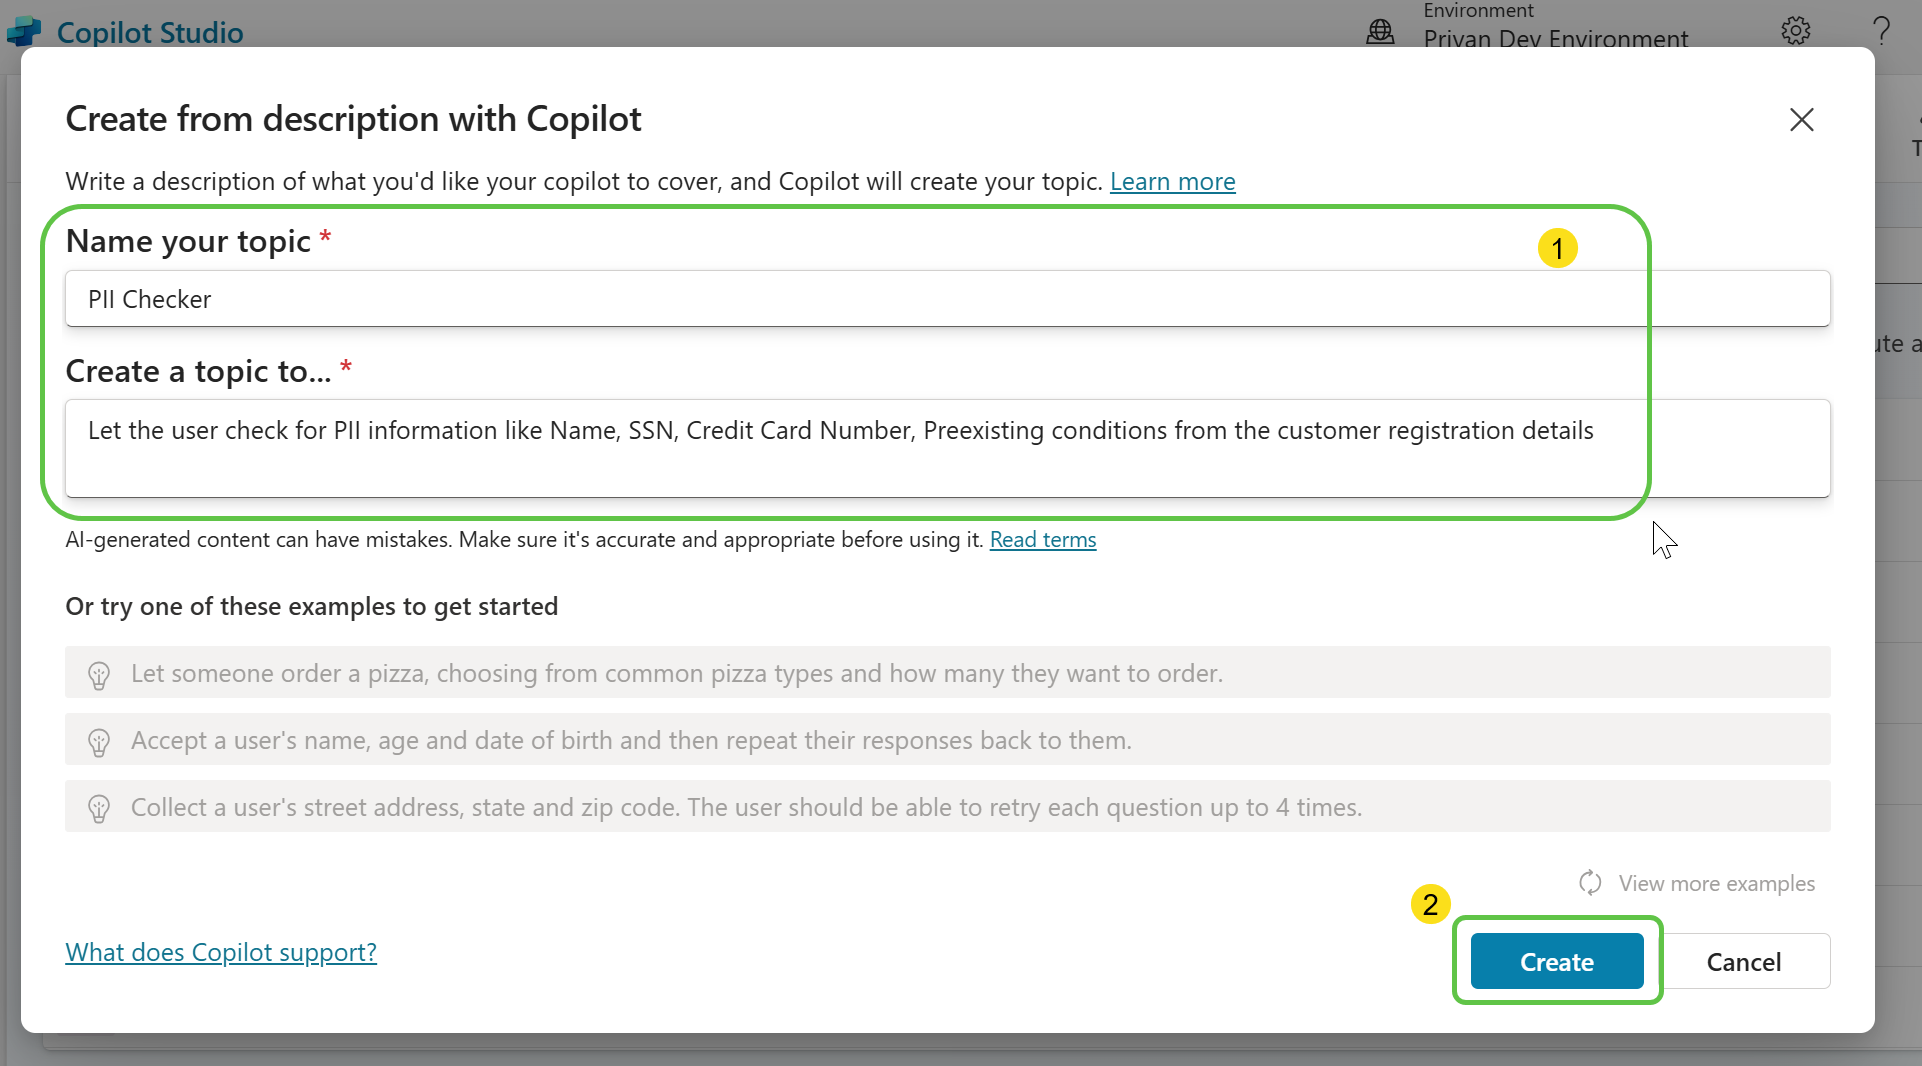
Let’s provide the below topic description details in the pop-up that opened when we clicked the Add topic button previously. Then, click on Create, which will provision the topic skeleton based on the provided description.
Thus, we have the basic topic created with an automatic trigger as well as a question to the user which is generated using the description provided. We can now add more conversation nodes.
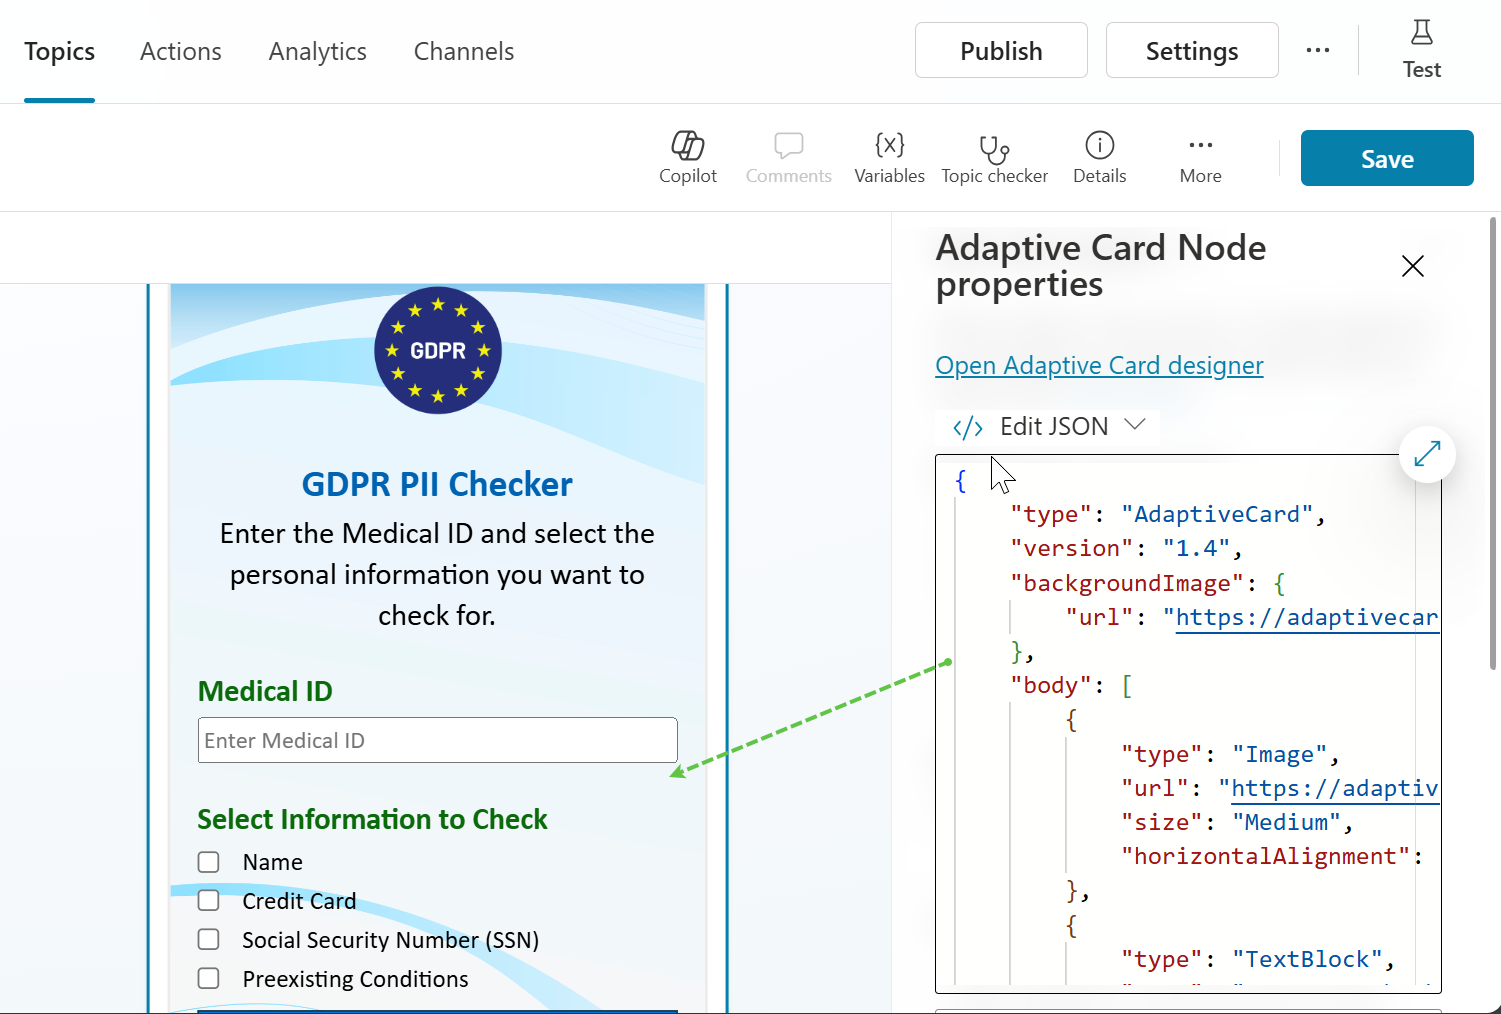
As the first step, let’s add an adaptive card to accept details from the user.
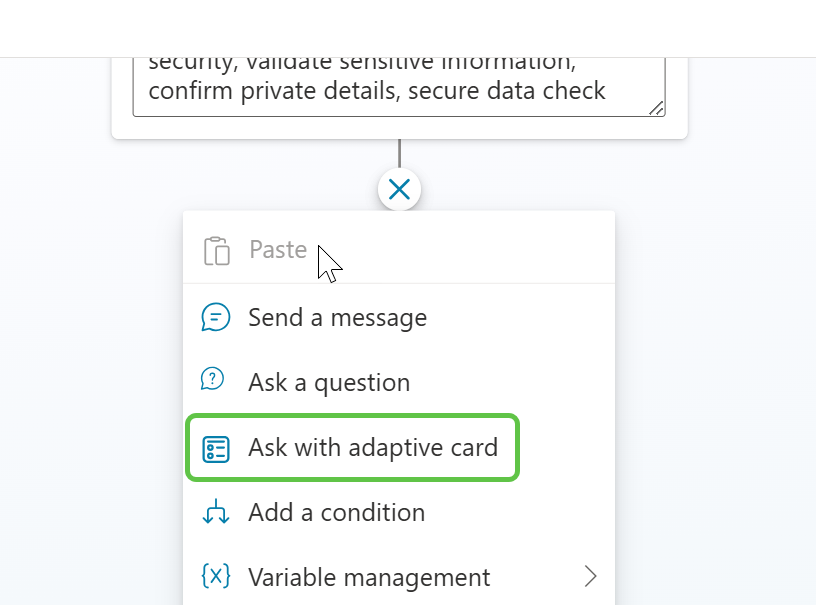
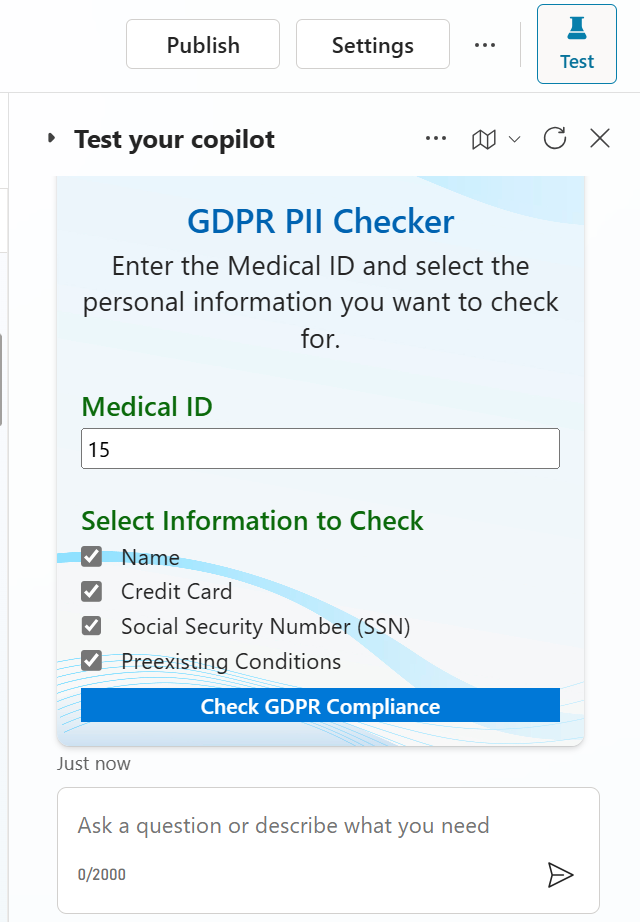
Add the below adaptive card schema to the node properties so that it will provide the user with the option to enter the medical ID that we need to search for and also the specific PII information to search for.
{
    "type": "AdaptiveCard",
    "version": "1.4",
    "backgroundImage": {
        "url": "https://adaptivecardsbot.blob.core.windows.net/imagestore/GDPRBG.jpg"
    },
    "body": [
        {
            "type": "Image",
            "url": "https://adaptivecardsbot.blob.core.windows.net/imagestore/GDPR.png",
            "size": "Medium",
            "horizontalAlignment": "Center"
        },
        {
            "type": "TextBlock",
            "text": "GDPR PII Checker",
            "weight": "Bolder",
            "size": "Large",
            "color": "Accent",
            "spacing": "Medium",
            "horizontalAlignment": "Center"
        },
        {
            "type": "TextBlock",
            "text": "Enter the Medical ID and select the personal information you want to check for.",
            "wrap": true,
            "spacing": "Small",
            "size": "Medium",
            "horizontalAlignment": "Center",
            "weight": "Default"
        },
        {
            "type": "TextBlock",
            "text": "Medical ID",
            "weight": "Bolder",
            "size": "Medium",
            "color": "Good",
            "spacing": "Medium"
        },
        {
            "type": "Input.Text",
            "id": "medicalId",
            "placeholder": "Enter Medical ID",
            "style": "text",
            "spacing": "Small"
        },
        {
            "type": "TextBlock",
            "text": "Select Information to Check",
            "weight": "Bolder",
            "size": "Medium",
            "color": "Good",
            "spacing": "Medium"
        },
        {
            "type": "Input.Toggle",
            "id": "checkName",
            "title": "Name",
            "valueOn": "true",
            "valueOff": "false",
            "wrap": true,
            "spacing": "Small",
            "weight": "Default",
            "size": "Medium"
        },
        {
            "type": "Input.Toggle",
            "id": "checkCreditCard",
            "title": "Credit Card",
            "valueOn": "true",
            "valueOff": "false",
            "wrap": true,
            "spacing": "Small",
            "weight": "Default",
            "size": "Medium"
        },
        {
            "type": "Input.Toggle",
            "id": "checkSSN",
            "title": "Social Security Number (SSN)",
            "valueOn": "true",
            "valueOff": "false",
            "wrap": true,
            "spacing": "Small",
            "weight": "Default",
            "size": "Medium"
        },
        {
            "type": "Input.Toggle",
            "id": "checkConditions",
            "title": "Preexisting Conditions",
            "valueOn": "true",
            "valueOff": "false",
            "wrap": true,
            "spacing": "Small",
            "weight": "Default",
            "size": "Medium"
        }
    ],
    "actions": [
        {
            "type": "Action.Submit",
            "title": "Check GDPR Compliance",
            "style": "positive",
            "spacing": "Medium"
        }
    ]
}
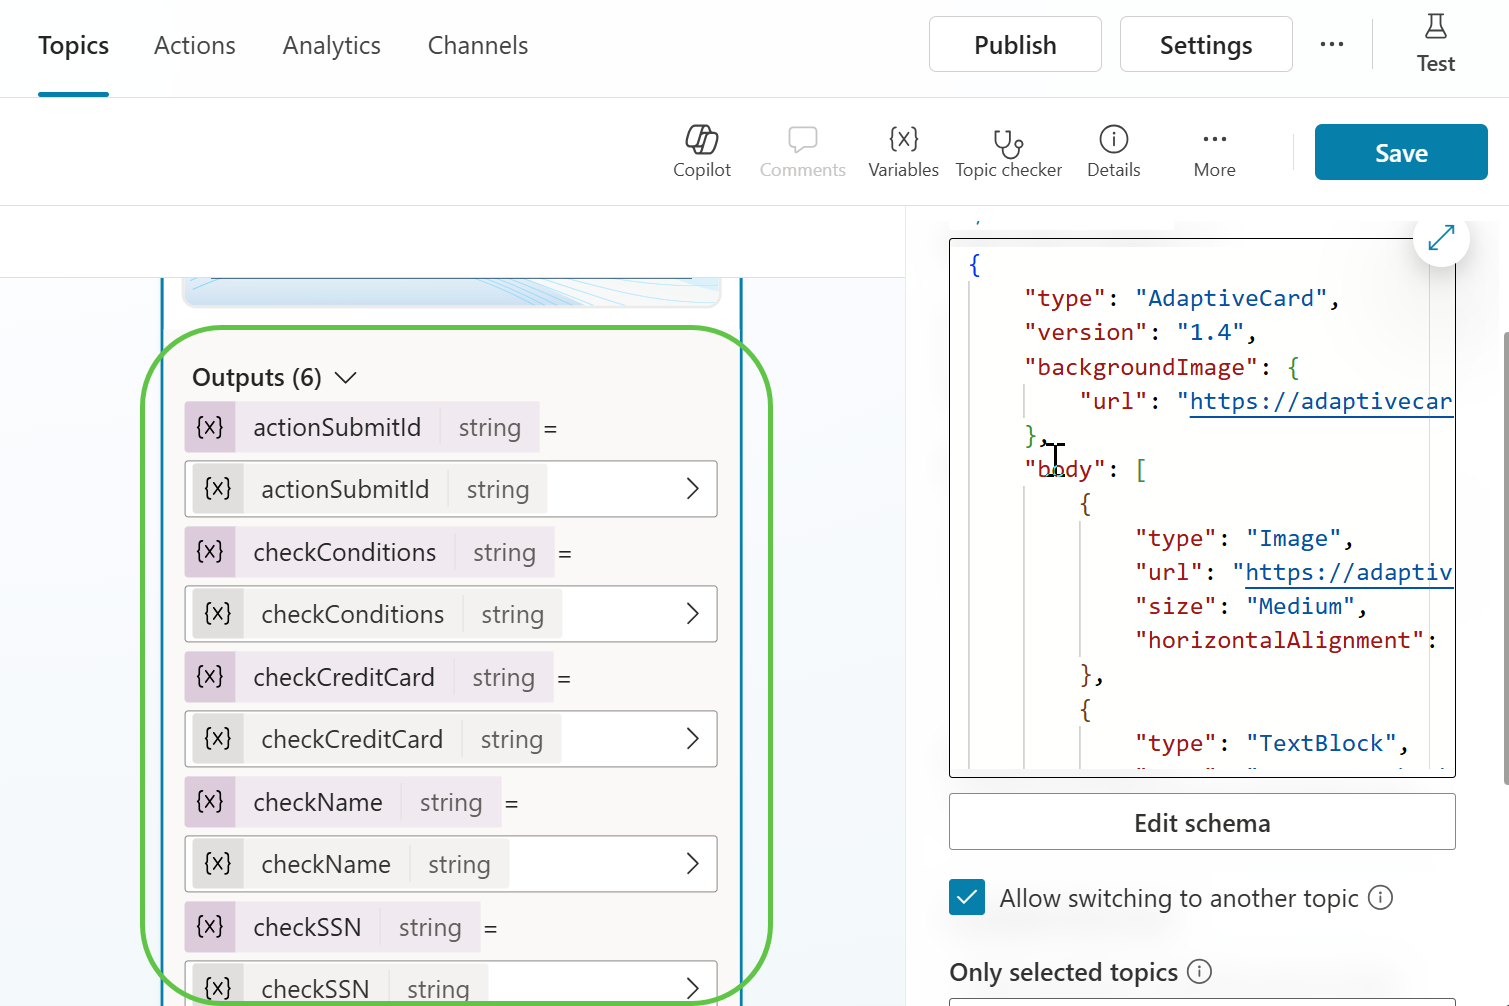
The user input details can be found in the output variables of the adaptive card, which we will be using down the line.
Step 6: Fetching Customer Details from Dataverse
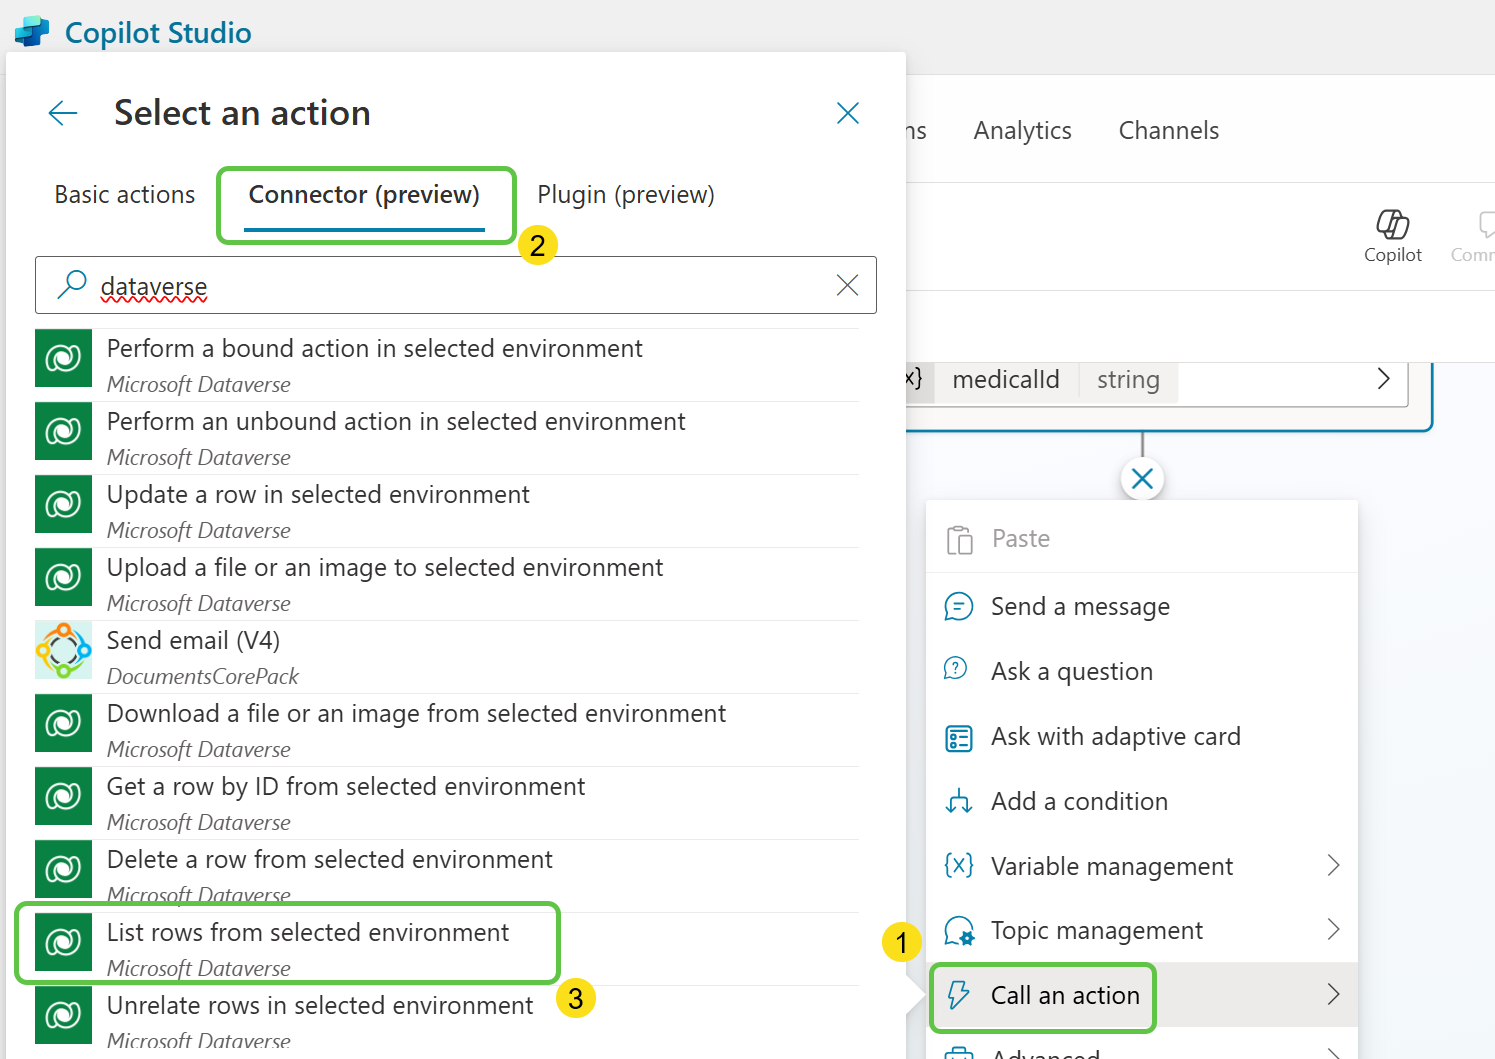
We now need to fetch the customer details from the Dataverse table for which we will add the Dataverse connector action by:
- Select Call an action.
- Select the Connector tab and search for Dataverse.
- Click on List rows from selected environment.
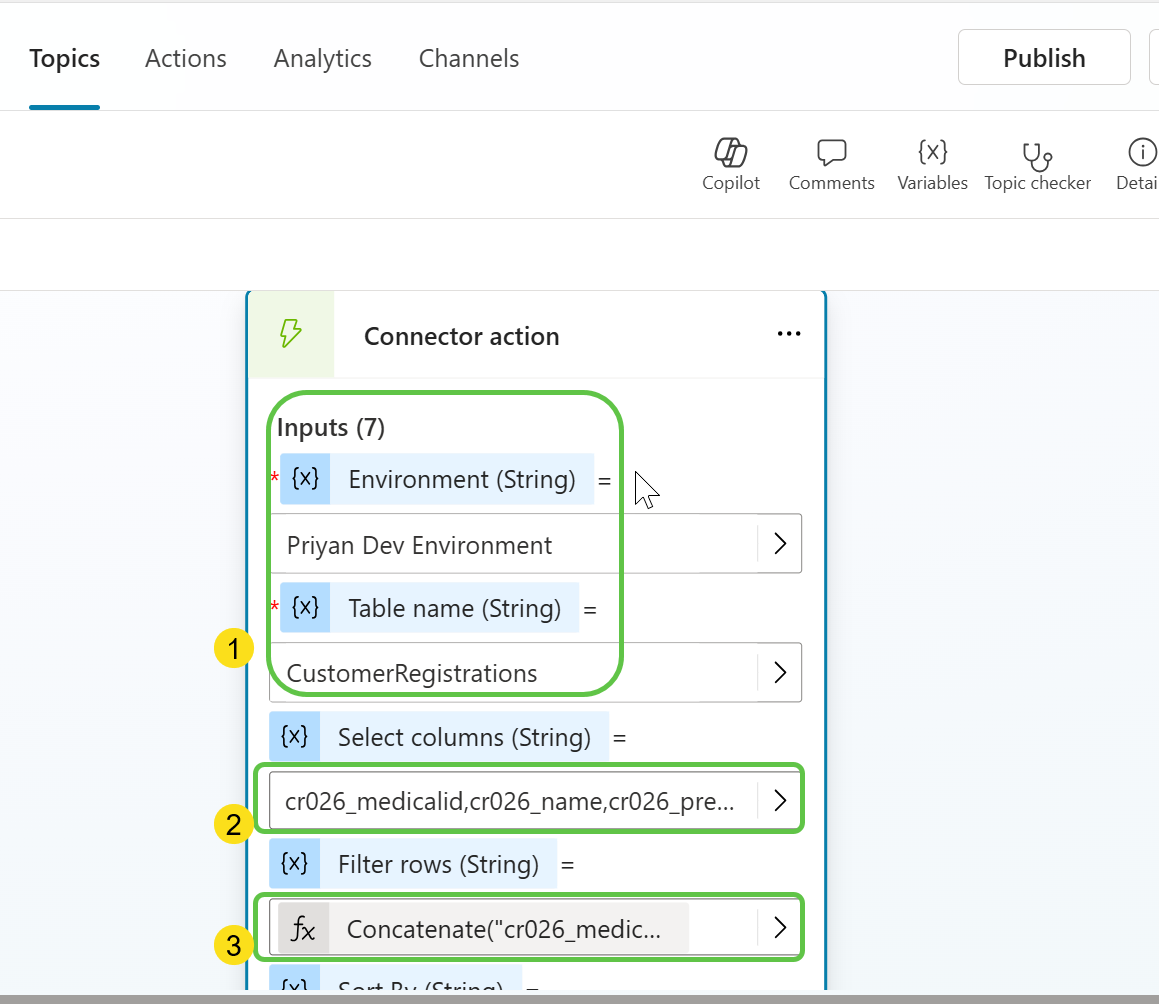
This will add the Dataverse connector action to the Copilot canvas, and let’s configure the inputs for this action by:
- Mentioning the Environment and Table name where the Customer Registration Details Table is present.
- Specify the column names from the table that should be returned in the results .
cr026_medicalid,cr026_name,cr026_preexistingconditions,cr026_additionaldetails - Using the Filter rows field, mention the specific MedicalID that the user had input in the adaptive card to fetch the specific table record .
Concatenate("cr026_medicalid eq '", Topic.medicalId,"'")
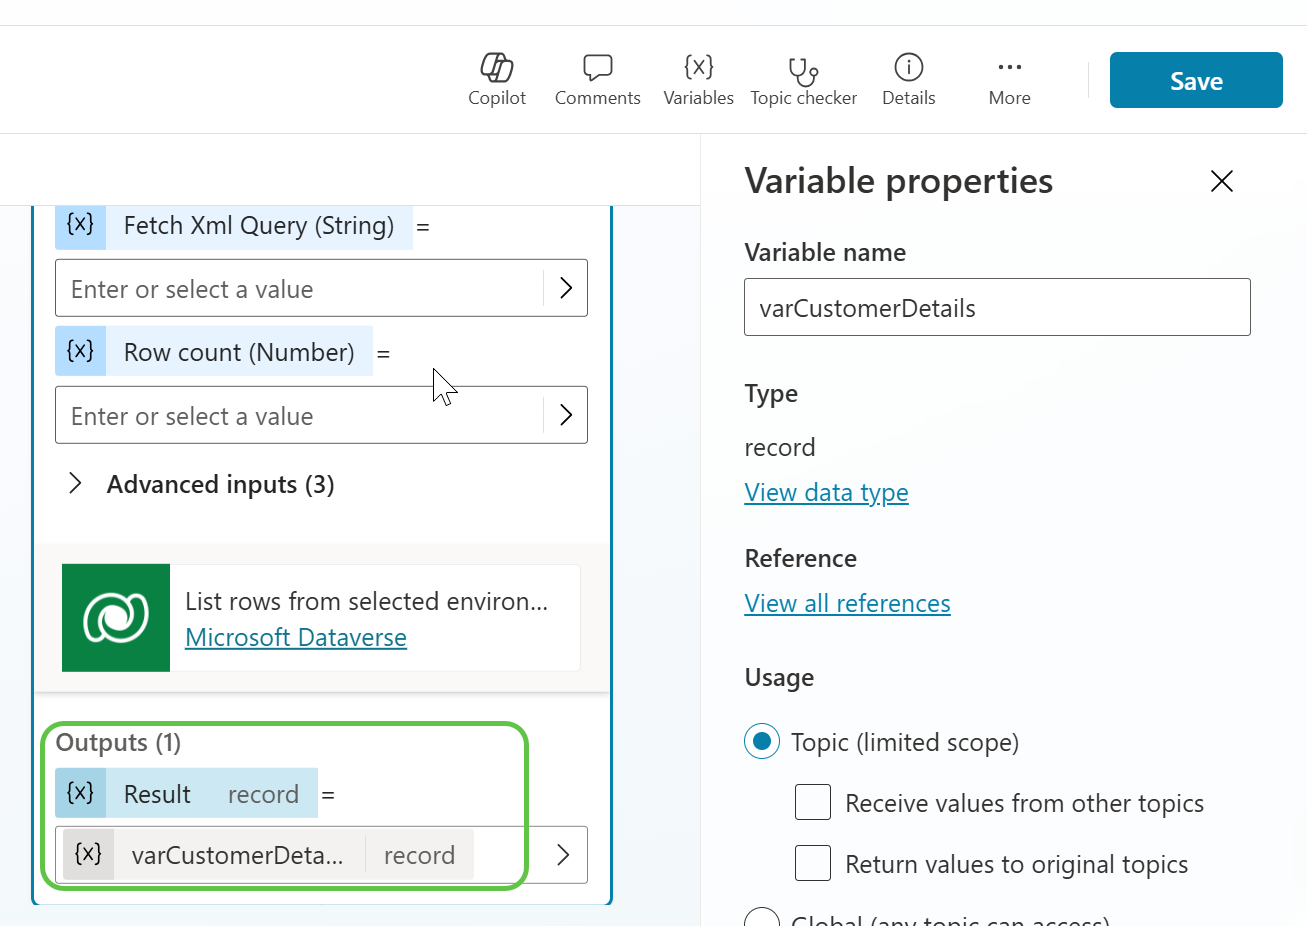
The output of the Dataverse connector will be stored in the varCustomerDetails variable, which we will use for further processing in the subsequent steps.
Step 7: Adding AI-Prompt for PII Detection
The output of the Dataverse Table Connector (varCustomerDetails) will contain lots of system columns as well. We will need to format the table to filter and ensure only the needed columns are present.
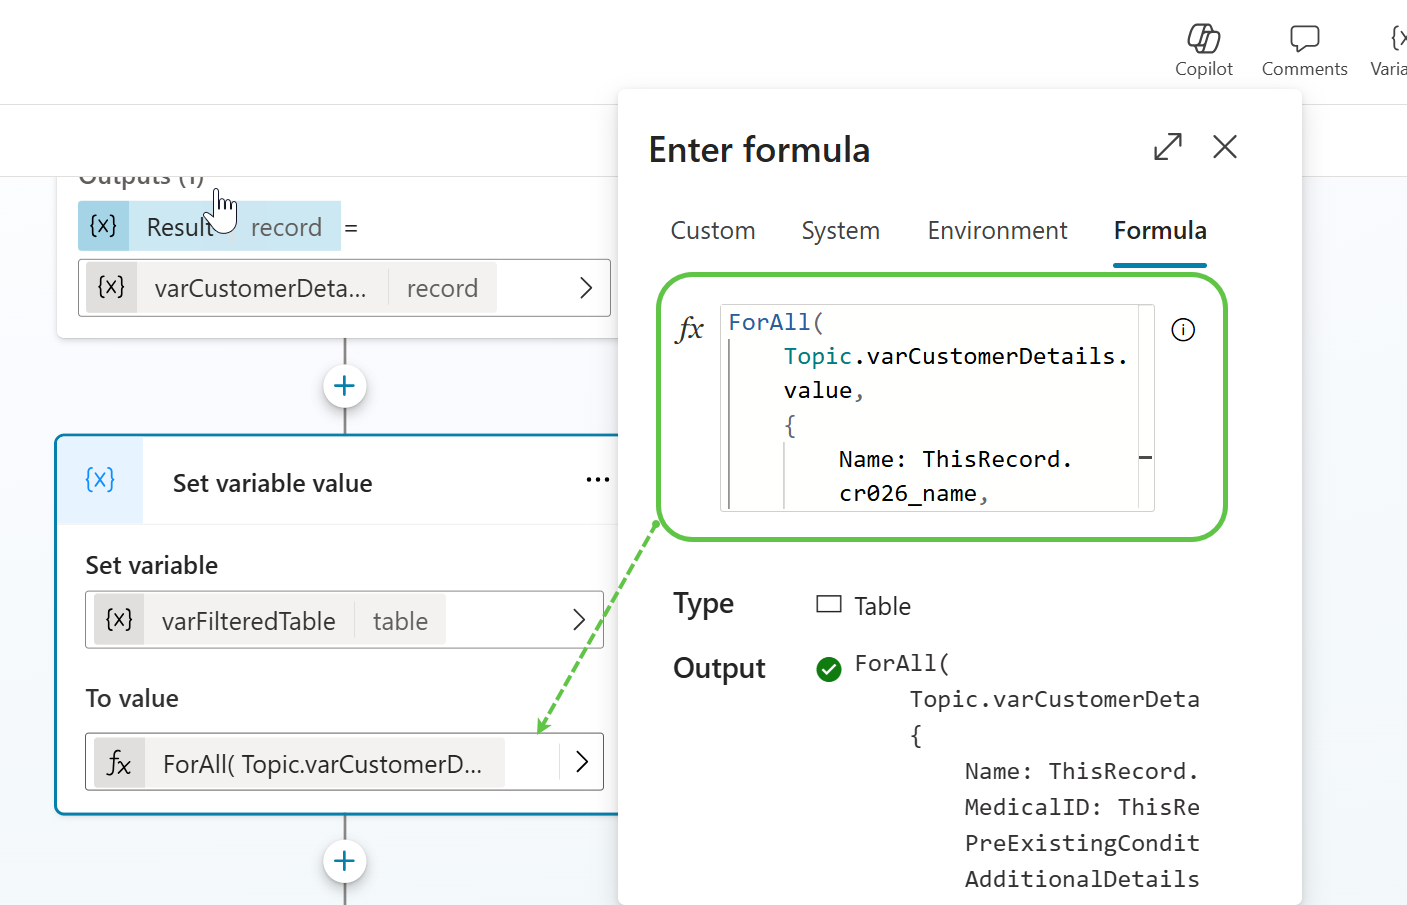
To do this, let’s initialize a variable (varFilteredTable) to hold the filtered output of the Dataverse connector .
ForAll(
    Topic.varCustomerDetails.value,
    {
        Name: ThisRecord.cr026_name,
        MedicalID: ThisRecord.cr026_medicalid,
        PreExistingConditions: ThisRecord.cr026_preexistingconditions,
        AdditionalDetails: ThisRecord.cr026_additionaldetails
    }
)
If we were to test and output this variable value in the test pane, we will get the output as :
[{“AdditionalDetails”:“Credit Card: 1234-5678-9101-1121”,“MedicalID”:“15”,“Name”:“Graham Maynard”,“PreExistingConditions”:“Fatty Liver”}]
Since the table cannot be used as input to the Prompt action, we will do one more formatting of this output to serialize this JSON into a readable format: <Name>: <MedicalID>: <Pre Existing Conditions>: <Additional Details>.
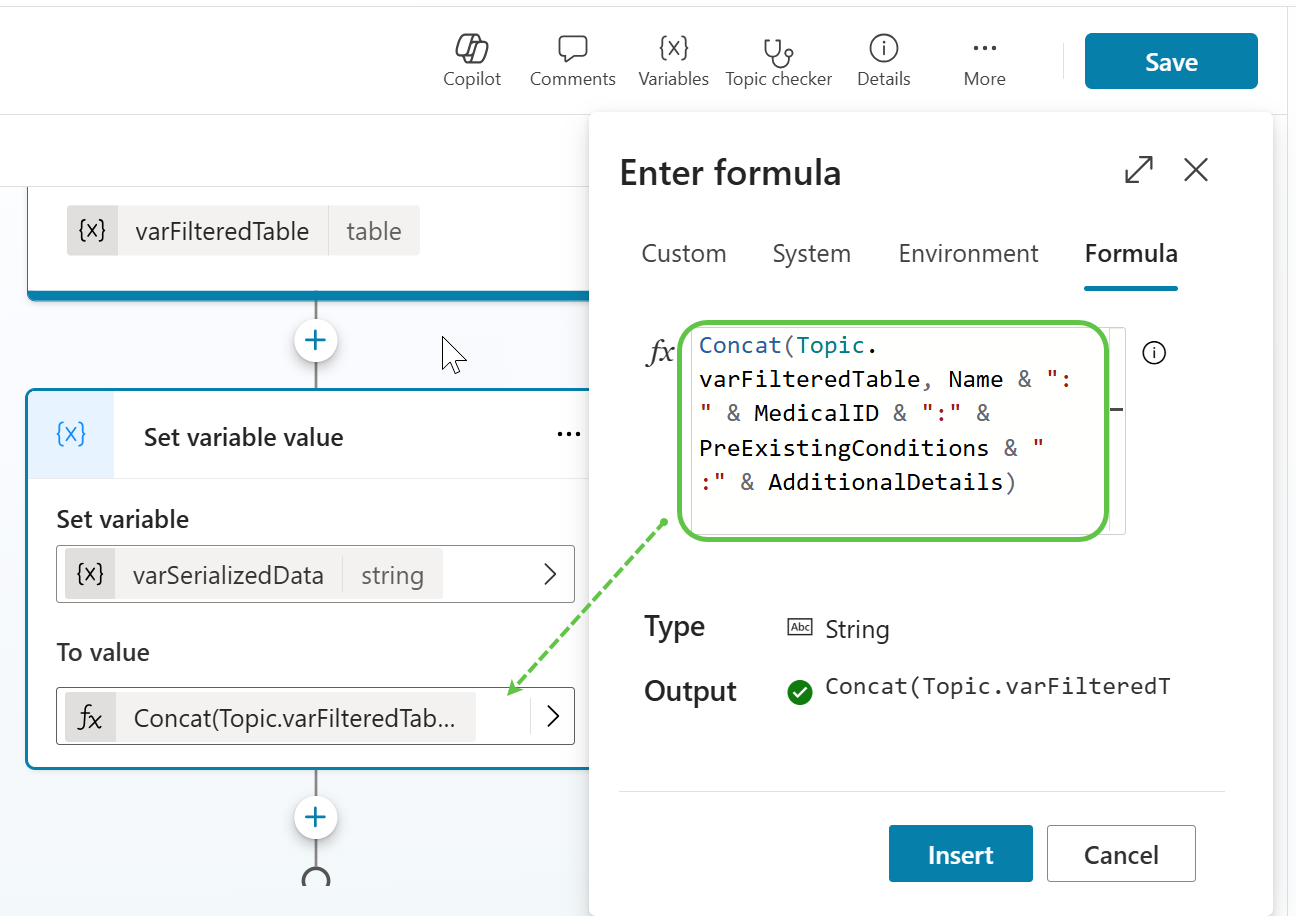
To do this, let’s add another variable and set its formula as below :
Concat(Topic.varFilteredTable, Name & ": " & MedicalID & ":" & PreExistingConditions & " :" & AdditionalDetails)
This way, from the previous filtered table, we will concatenate the customer information in a readable format, which can be shared as an input to the AI Prompt.
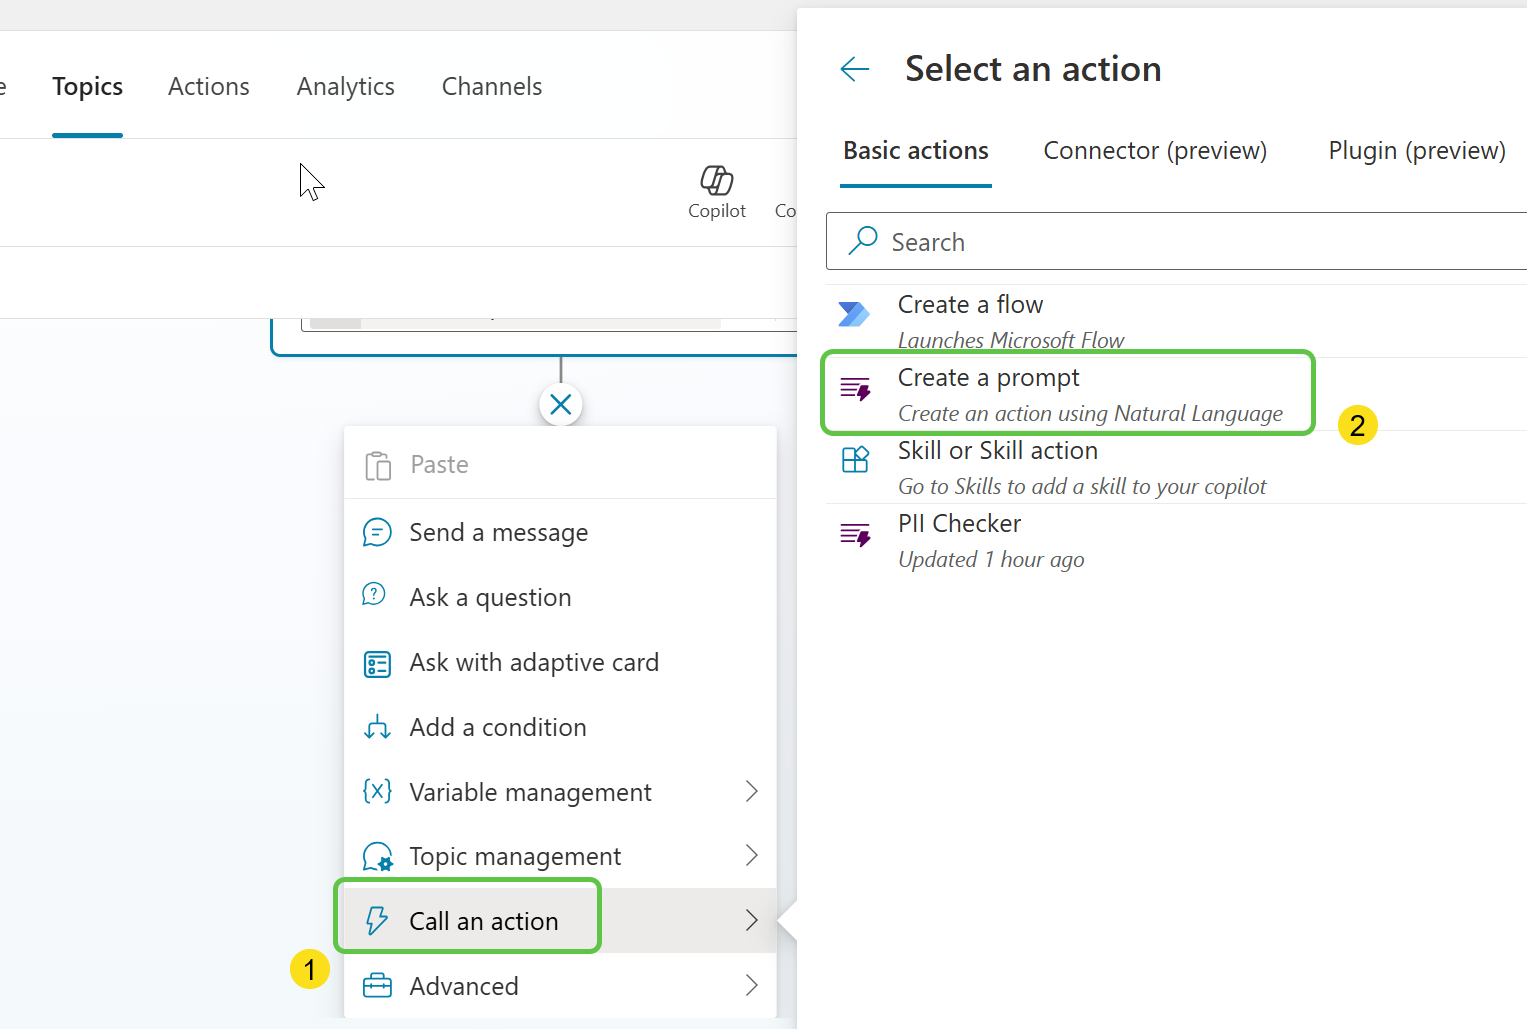
Now, let’s add the AI prompt using which we can check for the PII of a customer. To do this:
- Select Call an action.
- From Basic Actions, select Create a prompt.
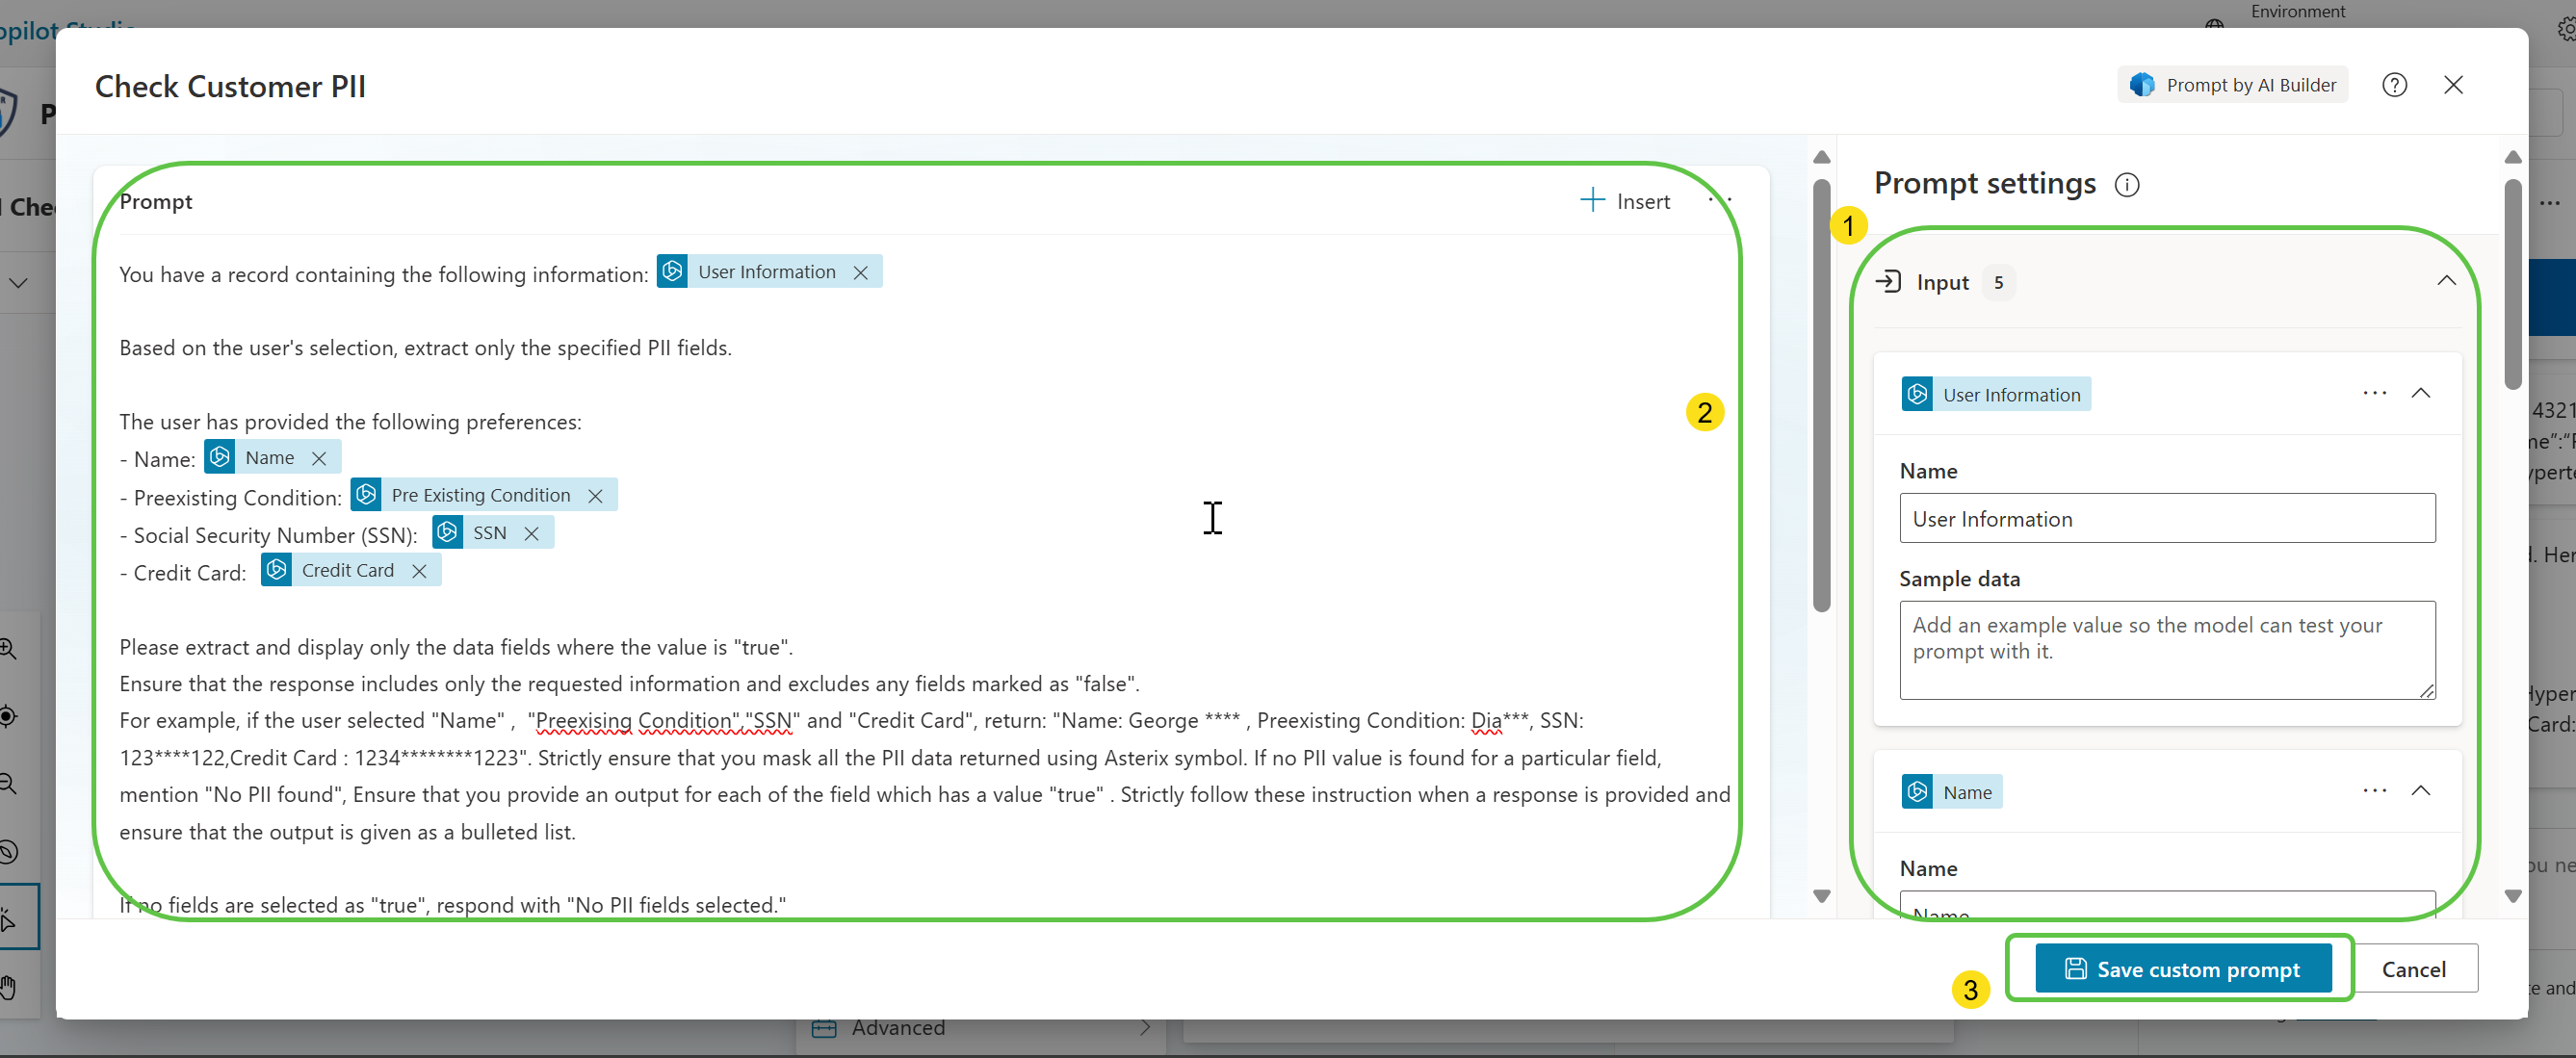
This will open up the Prompt window where we can name the prompt and also:
- Define the variables that will be used in the prompt, which will be dynamically added from the copilot during runtime.
- Create the prompt that will be used to identify PII from the Dataverse returned data and also mask them as needed.
- Save the prompt, which will make it available for use within the Copilot canvas.
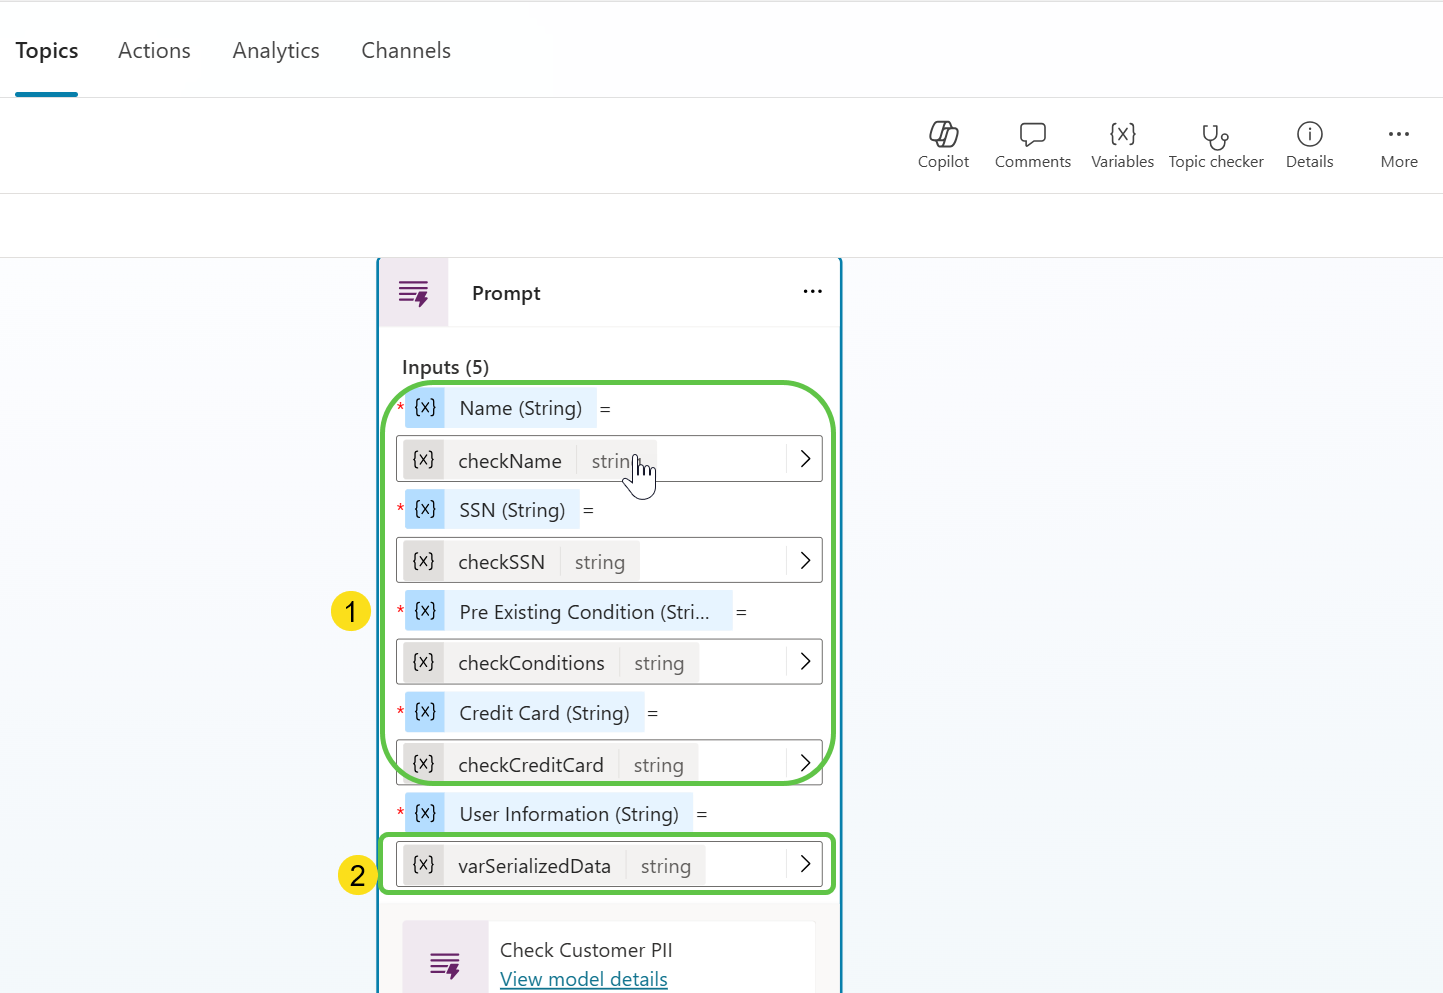
Now that the Prompt action is added, populate the:
- Adaptive Card outputs into the respective Prompt action input fields.
- Pass the serialized Dataverse returned data into the Prompt action.
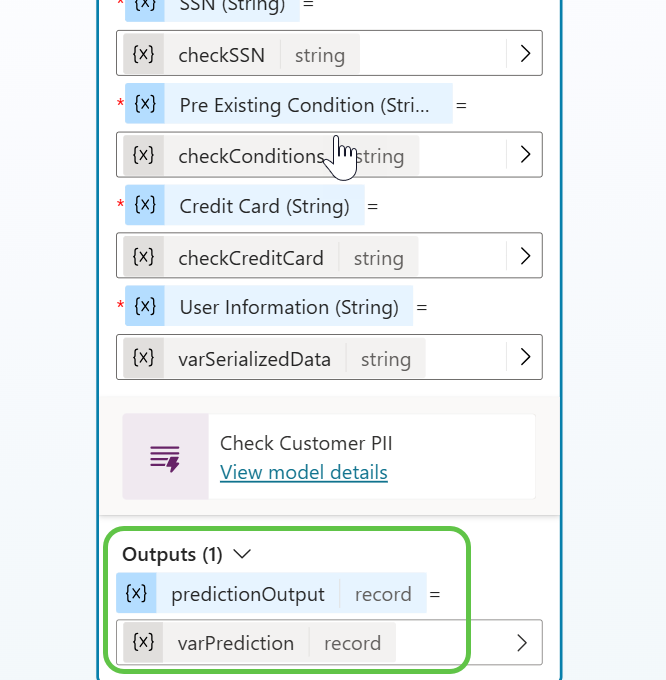
The output of the Prompt action will be stored in the varPrediction variable, which we will be using for displaying the final output.
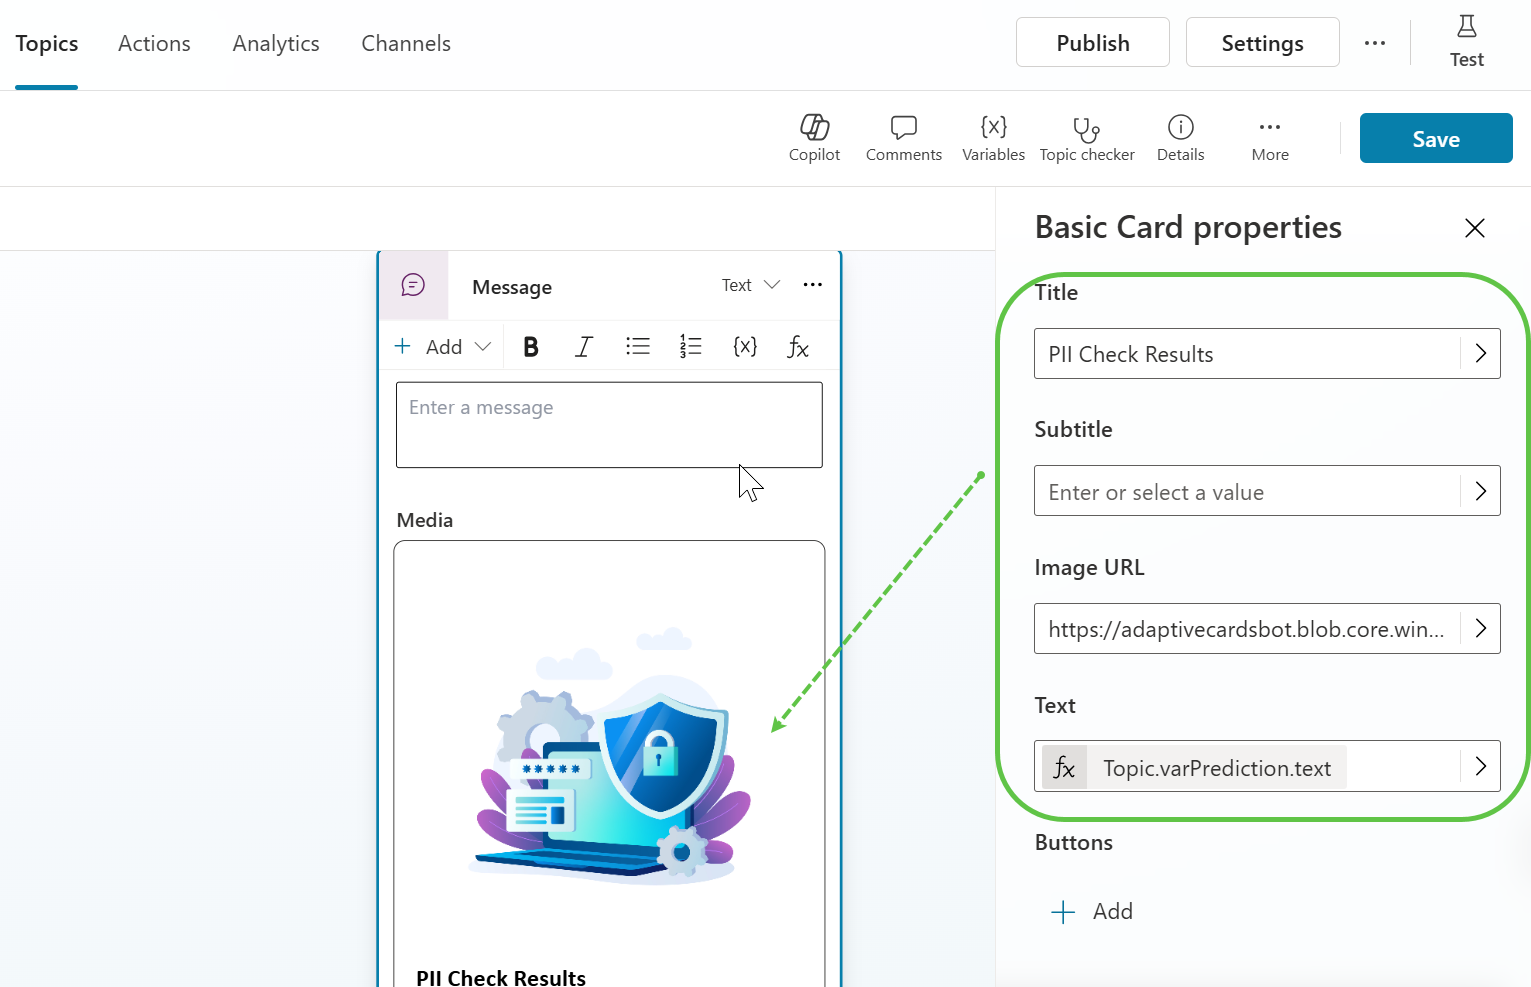
Finally, we will show the PII detection output as a basic card back to the user, for which we will select the text property of the varPrediction record, which will contain the Generative AI output.
Topic.varPrediction.text
Test the Copilot
Now, let’s test the Copilot by triggering the conversation, and we will enter the details to check for in the adaptive card.
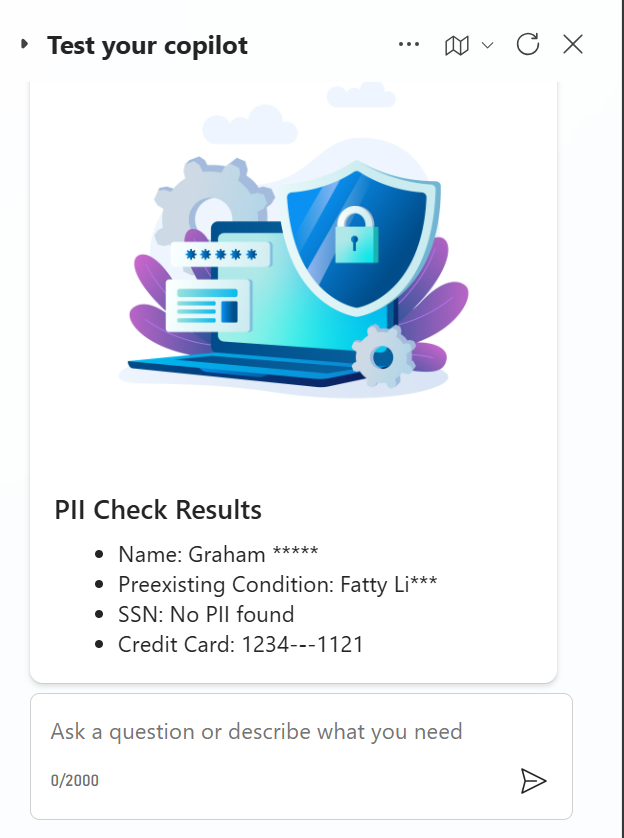
It fetches the details from the Dataverse table and passes them to the Prompt action to check if any PII is present. It masks the related information and shares the details back with the user.
Conclusion
The PII Detection Copilot provides a powerful and automated solution for detecting personally identifiable information (PII) using Azure OpenAI and Microsoft Copilot. By fetching customer data from Dataverse, detecting PII, and masking sensitive information, businesses can ensure compliance with data privacy regulations. This streamlined process, powered by AI, helps organizations safeguard sensitive data and improve customer trust.


