Table of Contents
- Introduction
- Prerequisites
- Technologies Used
- Why Use SharePoint with Copilot ?
- Demo
- Step-by-Step Process to Create the Copilot
- Conclusion
Introduction
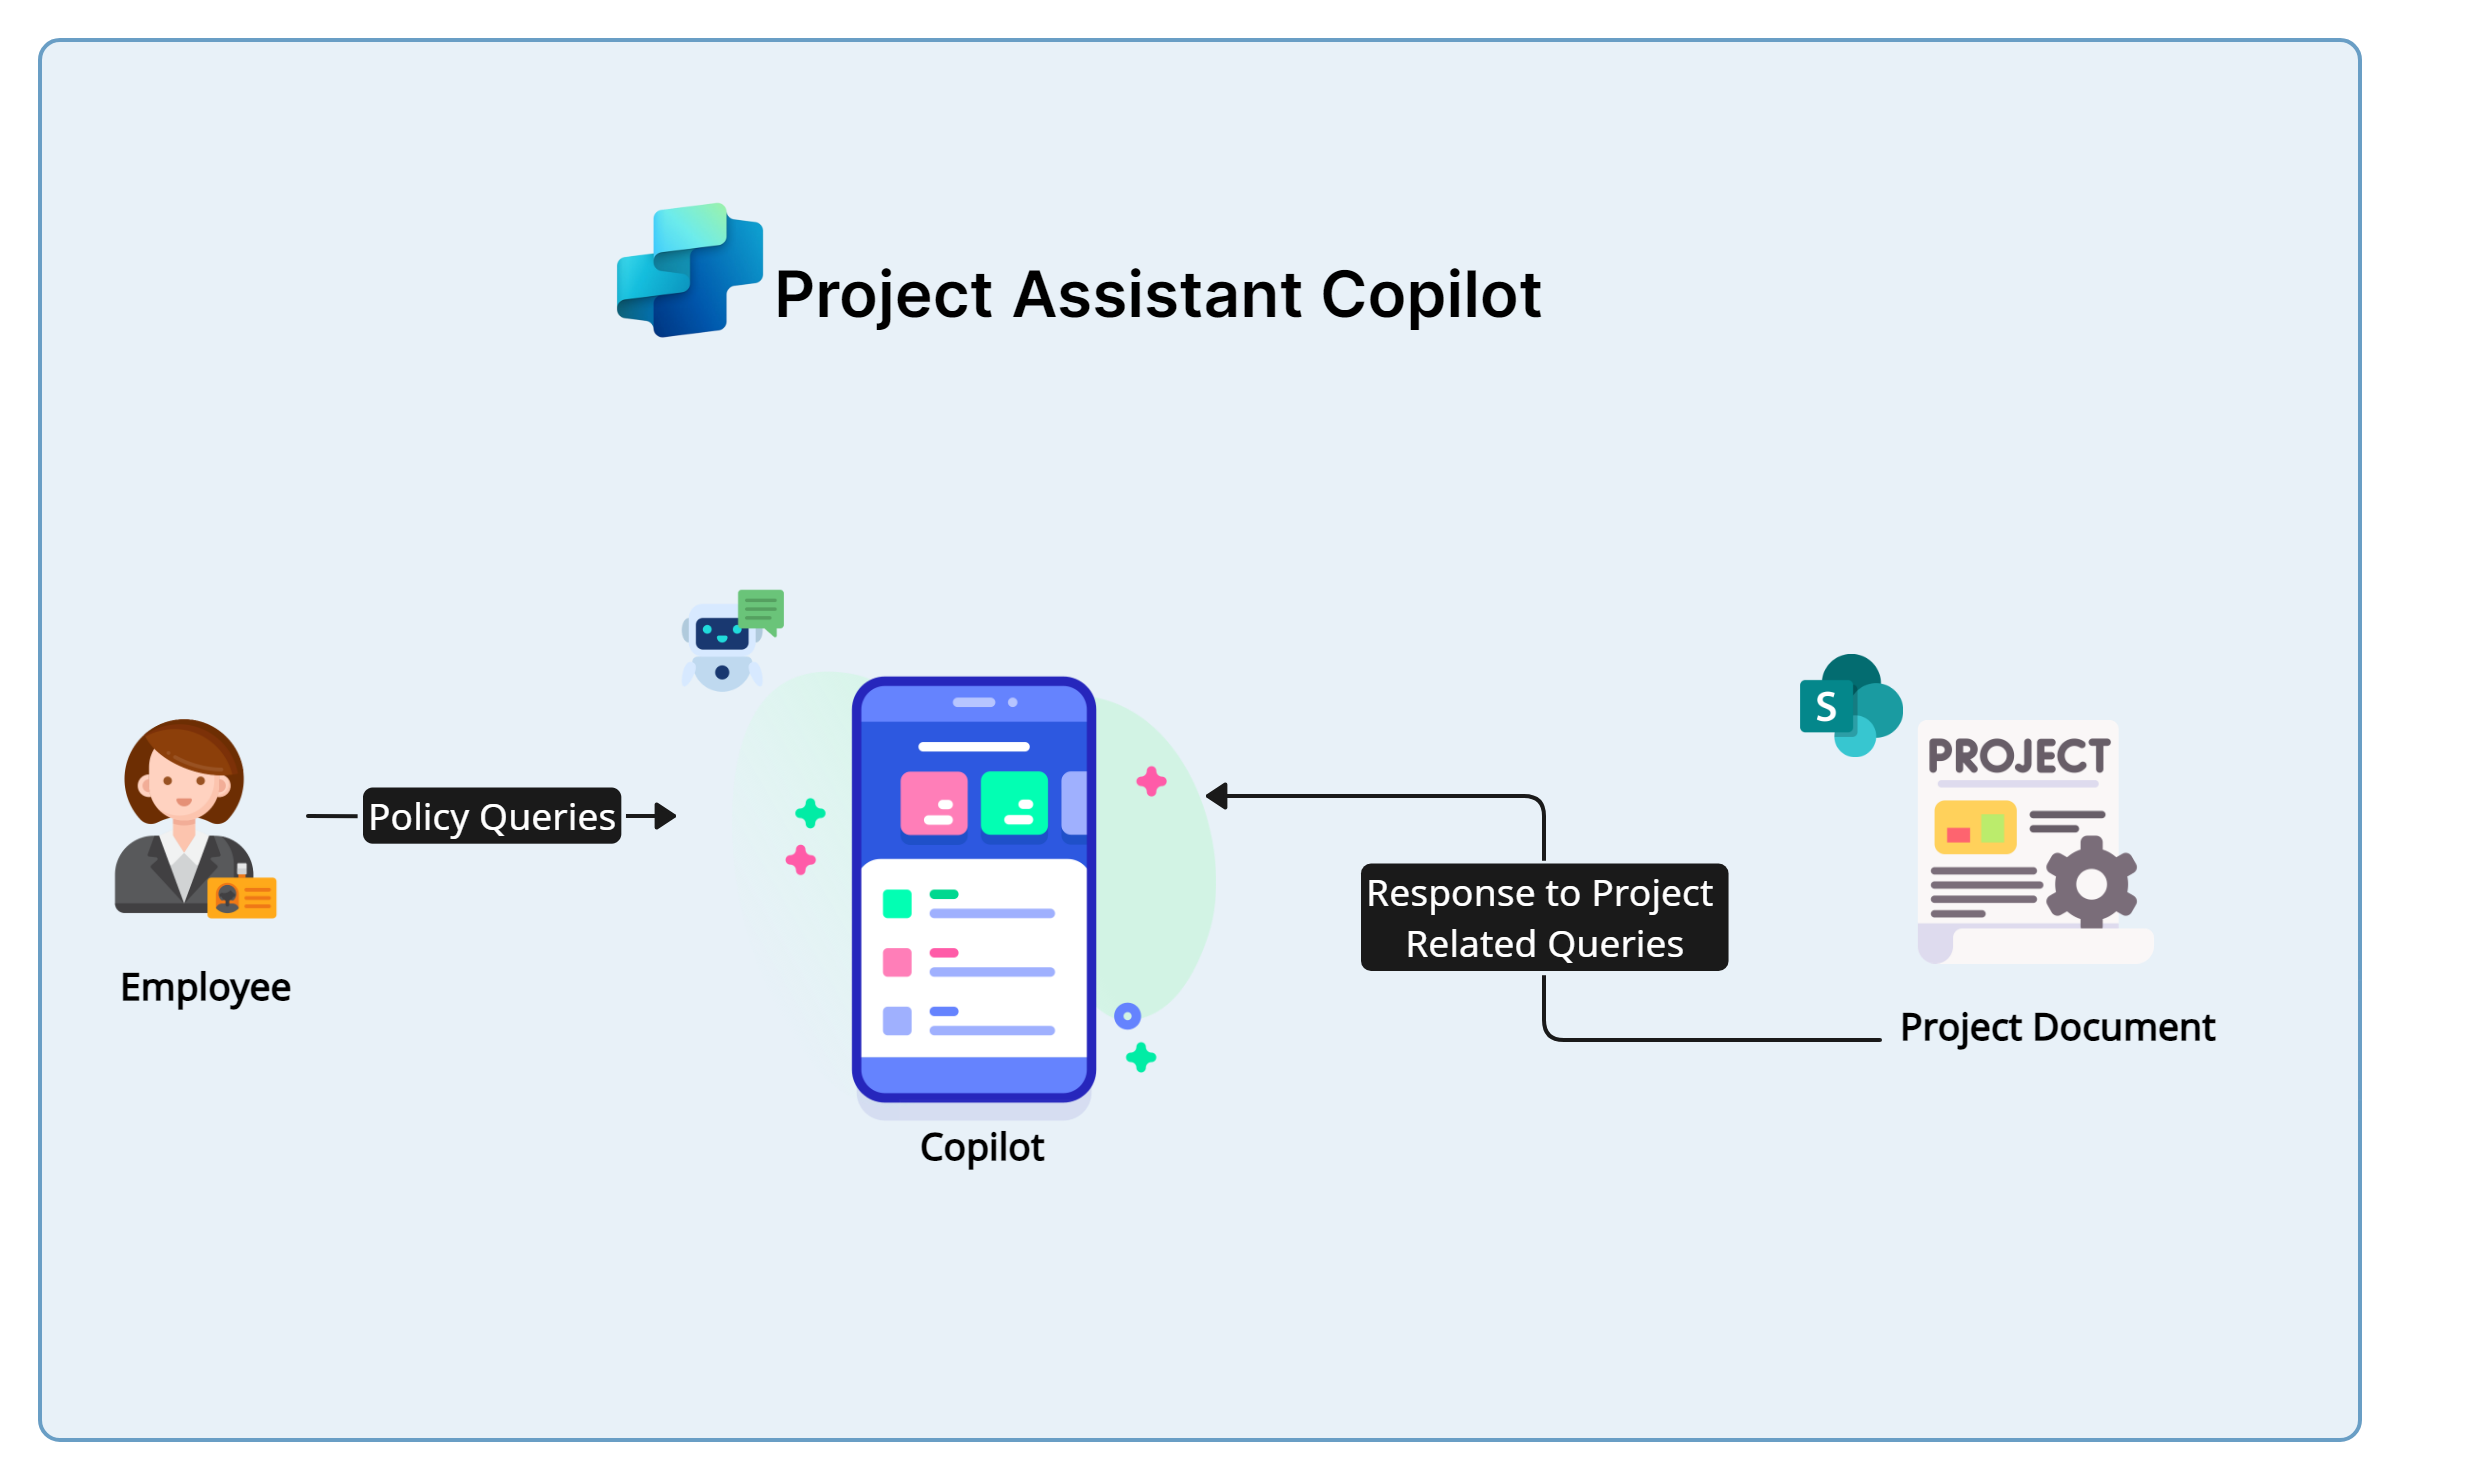
Having instant access to project information is crucial for effective project management and decision-making. Think of having a copilot that can fetch detailed project estimates, milestones, and other key details stored in documents on SharePoint, and provide contextual answers to user queries. This blog will guide you through the process of creating such a copilot using Microsoft Copilot Studio, leveraging documents stored in SharePoint and utilizing manual authentication for secure access. For ease of access, we will also be embedding the Copilot within a SharePoint page so that the employees can access it seamlessly.
Prerequisites
Before you begin implementing, ensure you have the following:
- Access to Microsoft Copilot Studio
- A SharePoint site to host project documents
- Azure account for creating app registration
- Project documents ready for upload
Technologies Used
- Microsoft Copilot Studio: Creating the Project Assistant Copilot
- SharePoint: Hosting project documents as well as the created Copilot
- Azure App Registration: Manual authentication setup for securely accessing SharePoint Documents
Why Use SharePoint with Copilot ?
SharePoint is a powerful platform for storing and managing documents, making it an ideal choice for hosting project-related information. By integrating SharePoint with Microsoft Copilot Studio, we can create a bot that can access and interpret these documents to provide precise answers to user queries. This integration ensures that users have quick, reliable access to up-to-date project information directly through the copilot. Moreover, any updates to the document can be made directly in SharePoint and the updated contents will be used for grounding and providing contextual answers back to the Copilot resulting in lesser maintenance going forward.
Demo
Watch the demo video below to see how the Copilot assistant helps with project related queries in real-time scenarios.
Step-by-Step Process to Create the Copilot
Step 1: Preparing Your Project Documents
Collect and Organize Documents:
- Gather all relevant project documents, such as estimates, timelines, milestones, and other key details.
- Ensure that the document is well-structured, with clear sections and headings to facilitate easier parsing by the copilot.
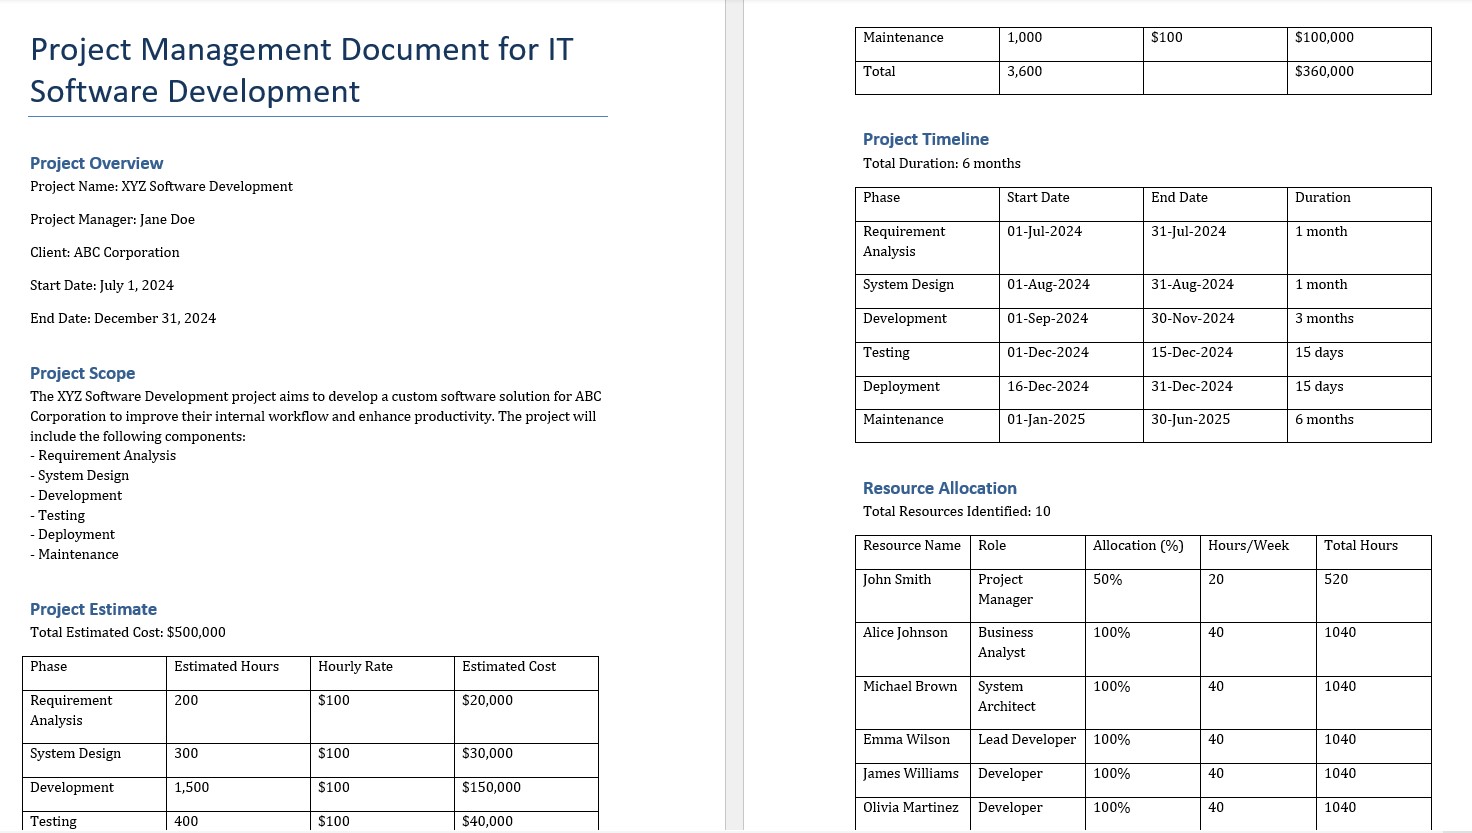
In our case, we have a software development project document which contains the estimates and key timelines for the project.
Upload Documents to SharePoint:
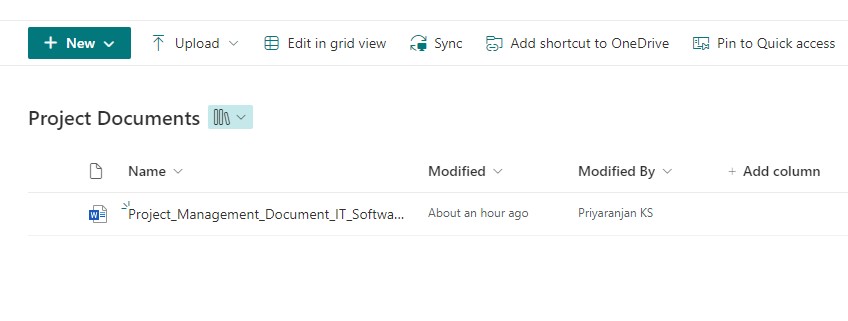
- Create a dedicated document library in SharePoint for your project files.
- Upload the collected documents to this library.
Step 2: Create the Custom Copilot
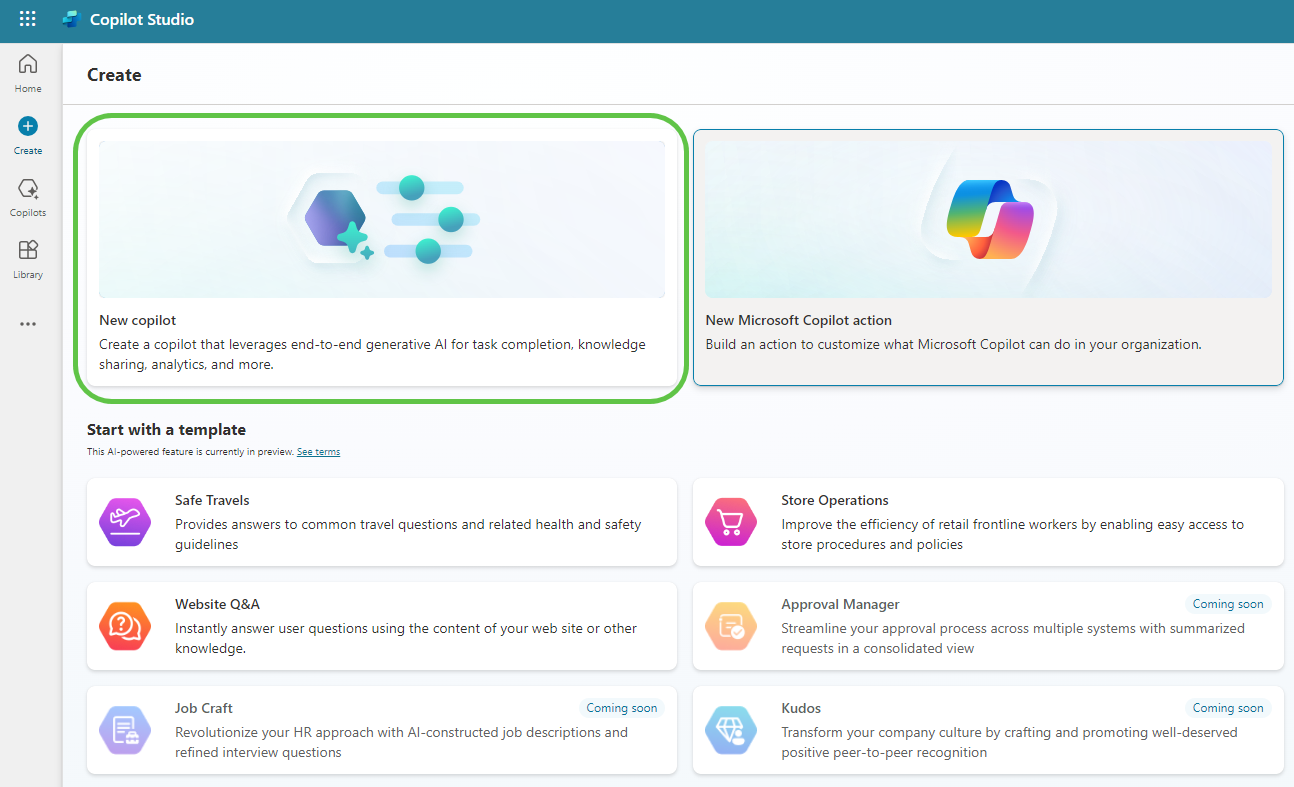
Head over to Copilot Studio and click on Create.
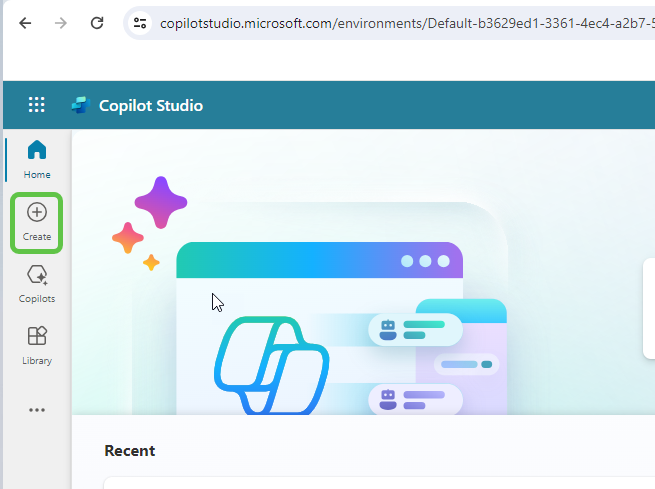
This will provide us the option to create a copilot based on an existing template or create a blank copilot from scratch. Let’s select New copilot.
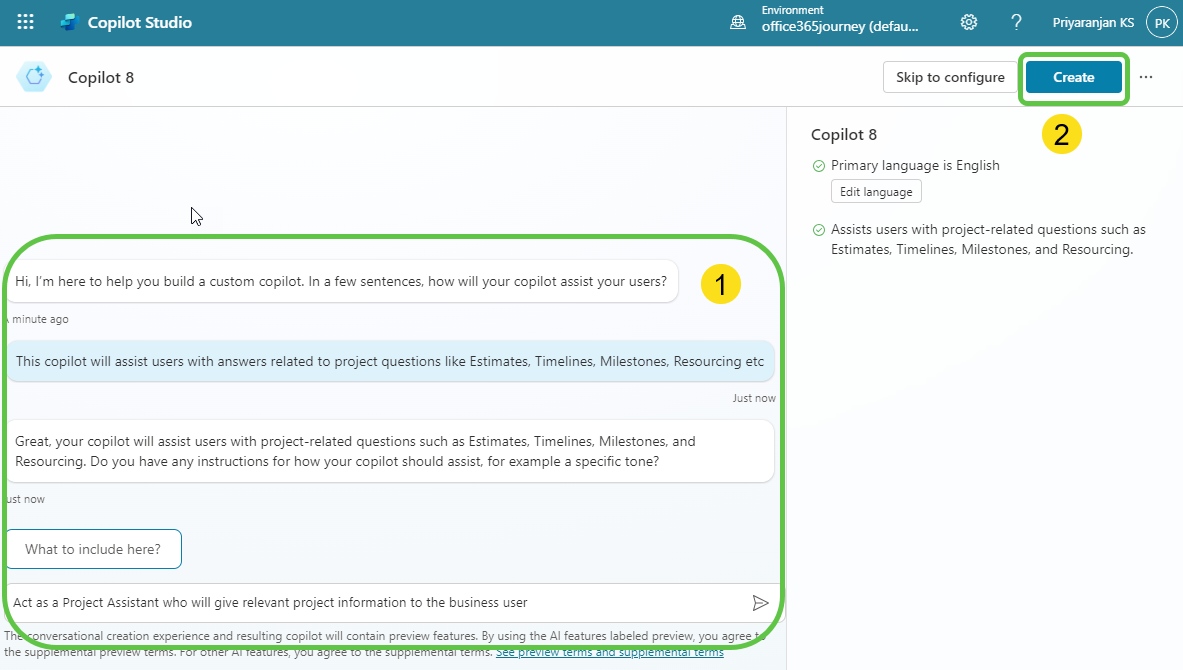
This will take us to the page where we can:
- Describe the copilot functionality and provide any specific instructions to the copilot.
- Once done, click on Create to provision the copilot.
Step 3: Enable Generative Selection of Topics
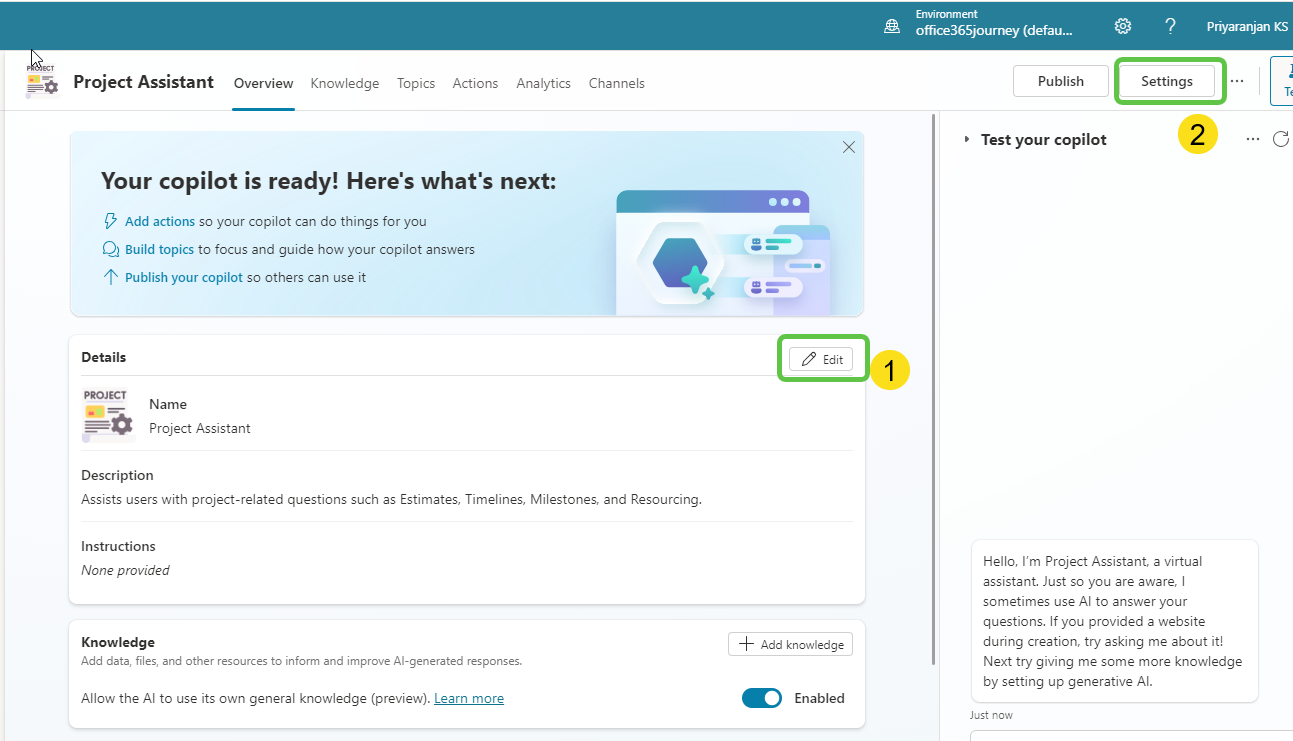
The copilot is now created. We can then make the needed configuration changes:
- Click on Edit, edit the copilot details like name, icon, and description.
- Click on Settings to enable the Generative selection of topics so that without relying on triggers, the topics will be auto-selected based on user conversation resulting in a much smoother user experience.
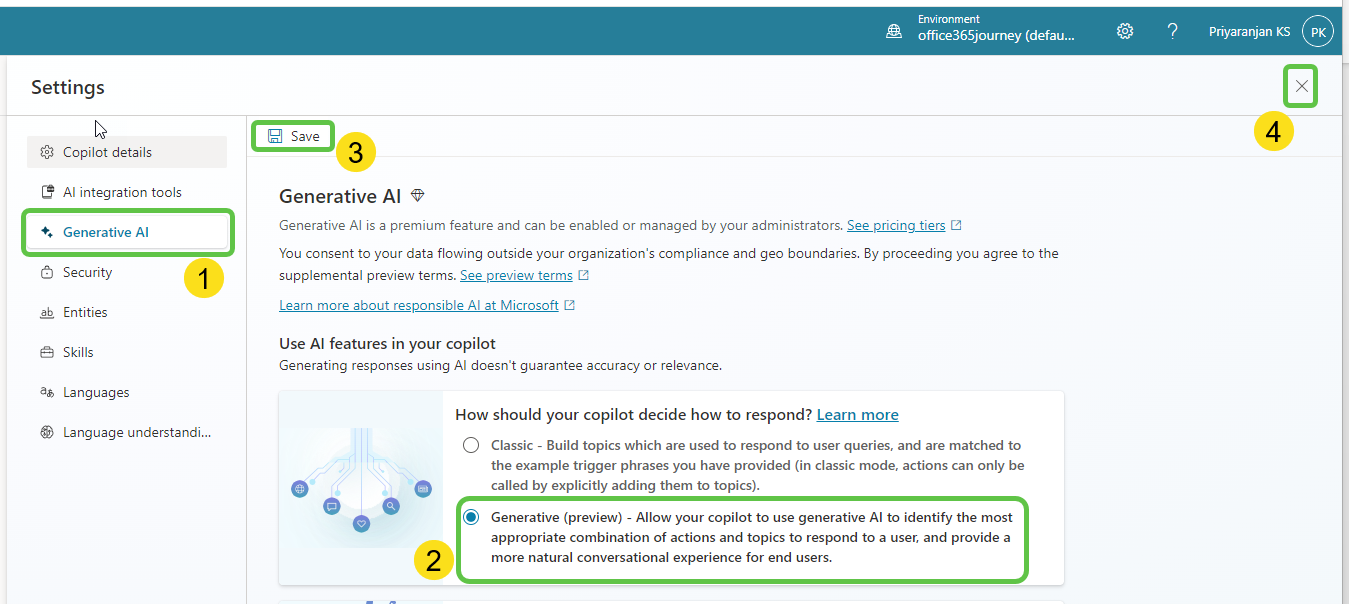
To enable the automatic detection of topics from user interaction:
- Click on Generative AI.
- Select Generative (preview).
- Click on Save to update the settings.
- Click on the Close icon to go back to the home page of this custom copilot.
Step 4: Create Topics
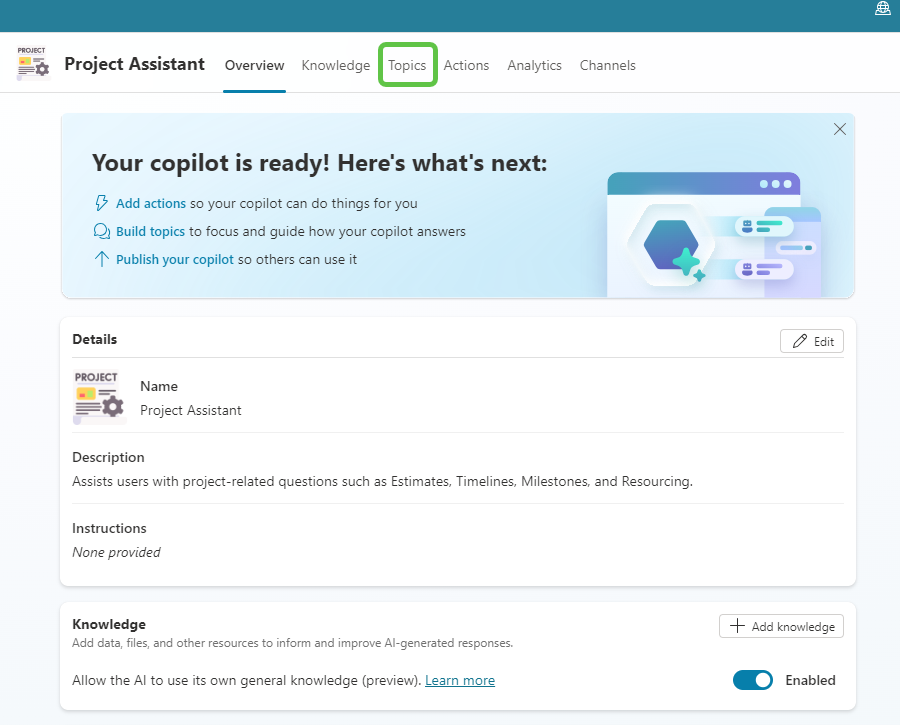
Now let’s go ahead and create the topics that will automatically redirect the conversation flow to appropriate topics based on the question user posts. Click on Topics from the navigation menu.
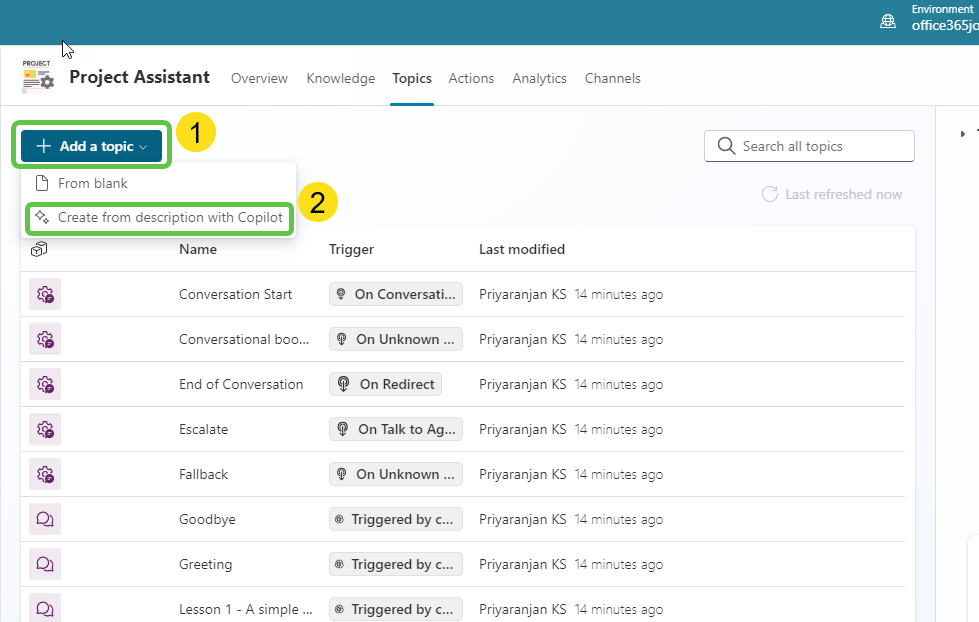
To add the topic, we can either go with the option to create a blank topic or use Copilot to create the topic with an initial set of prepopulated conversation nodes based on the topic description that we provide.
- Click on Add a Topic and
- Select Create from description with Copilot.
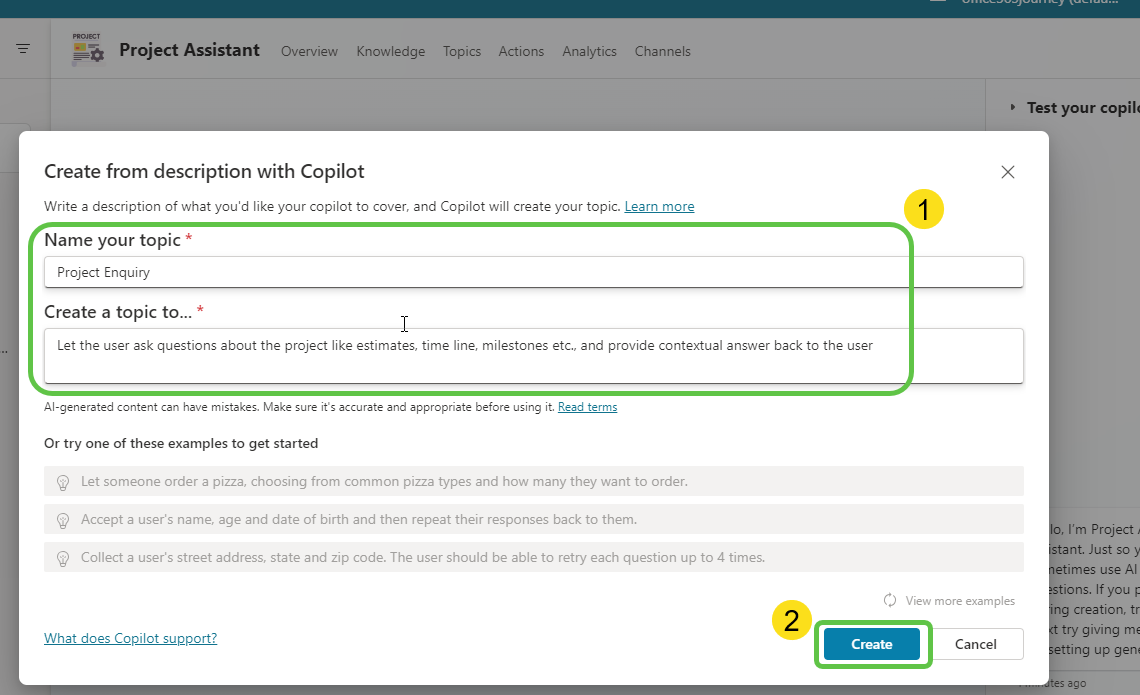
When the user asks questions regarding the project, we will need a topic that will take the user query and ground the Project information document to provide the contextual answer back to the user.
To do this, provide the below topic description details in the pop-up that opened when we clicked the Add topic button previously. Then, Click on Create, which will provision the topic skeleton based on the provided description.
Thus, we can see that based on the topic description, Copilot has created the trigger and initial questions to be asked to the user.
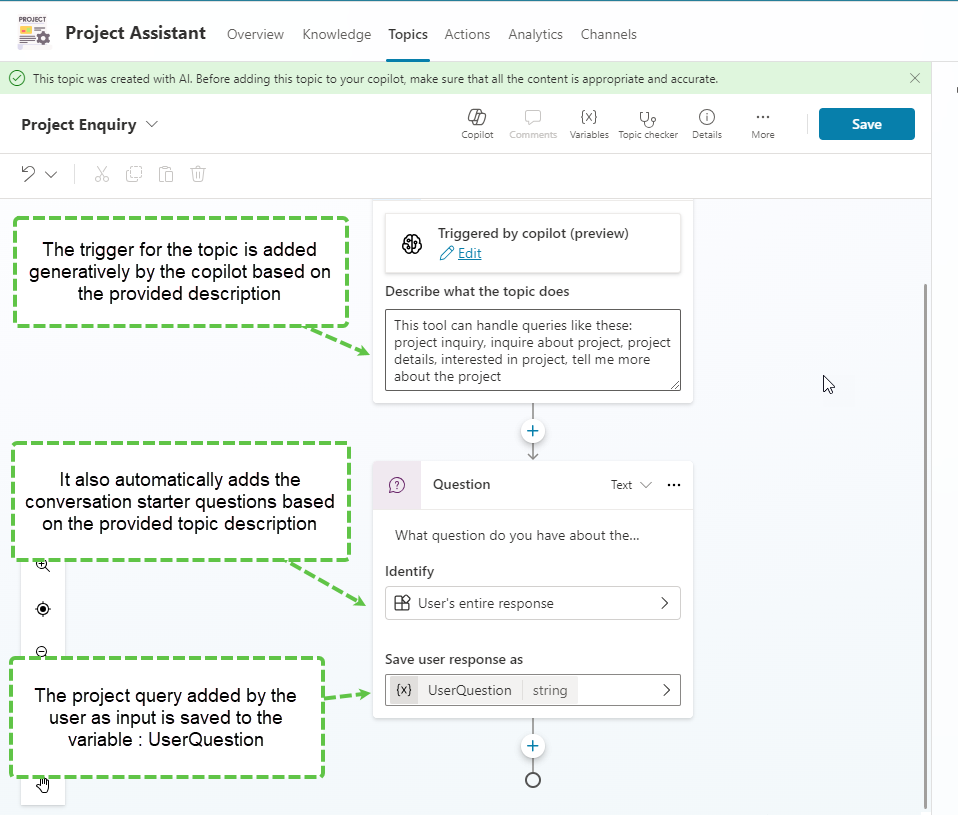
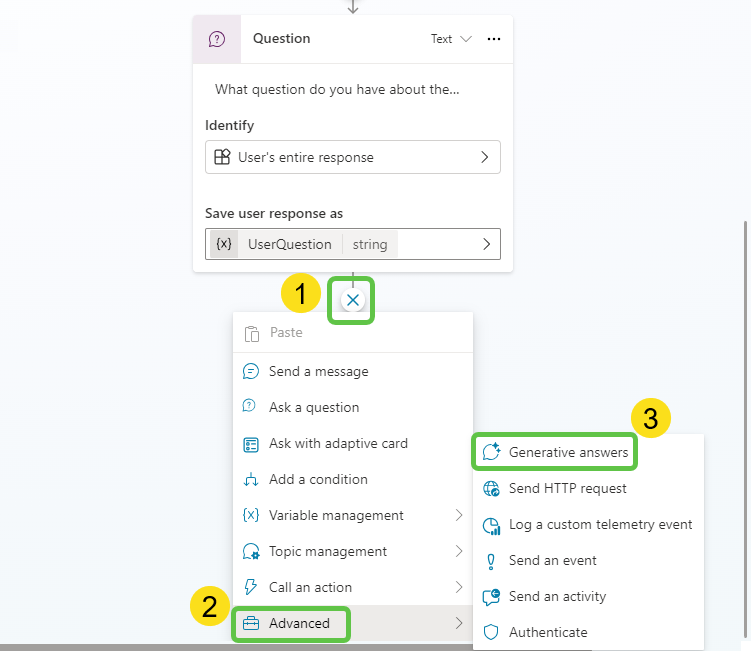
Once we have asked the question and the user inputs the query for which he/she is seeking a response, it is saved to the UserQuestion variable. Now let’s add the Generative Answers node by:
- Selecting the + Sign.
- Click on Advanced and
- Select Generative Answers.
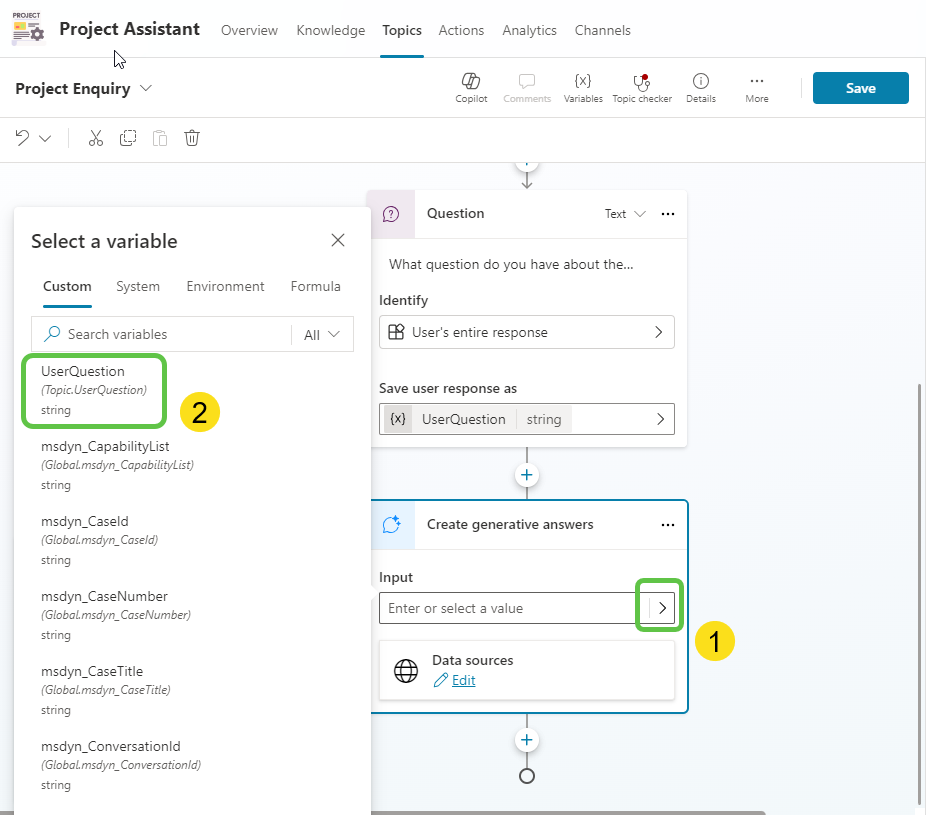
We can now configure the Generative answers node by:
- Selecting the right arrow, which will open the pop-up to select the input to be passed to this action.
- Select the Question variable which contains the user inputted query on the Project.
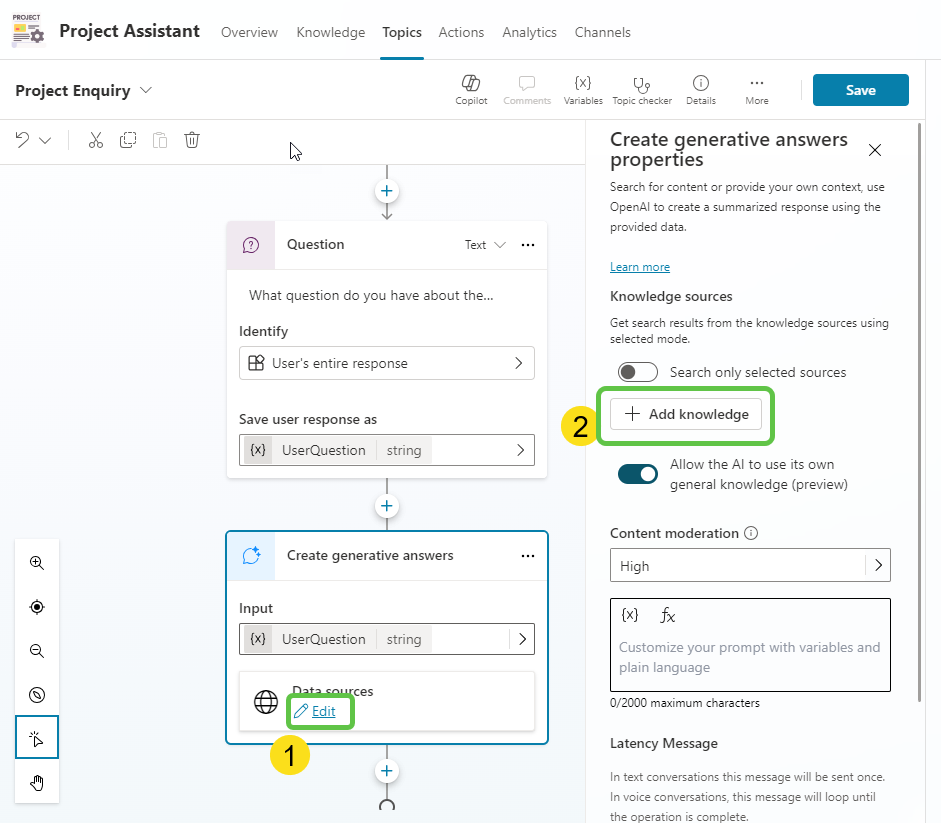
Now let’s configure the data source for the Generative answers node:
- Click on Edit.
- Select Add Knowledge.
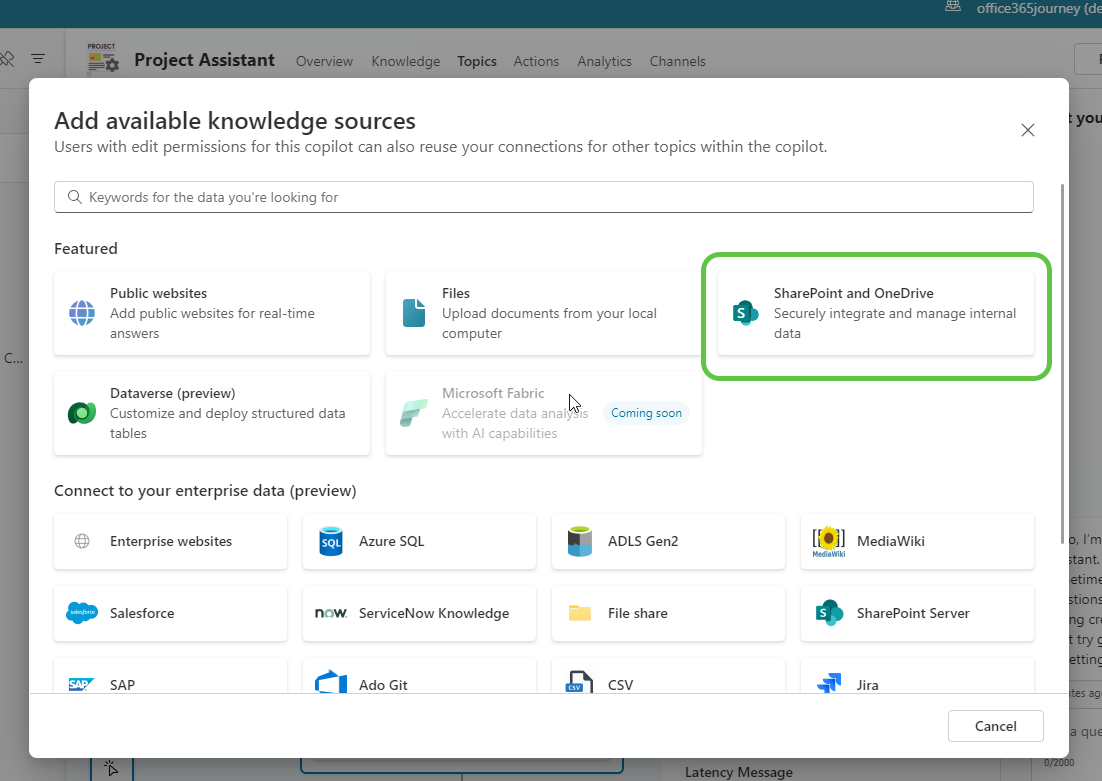
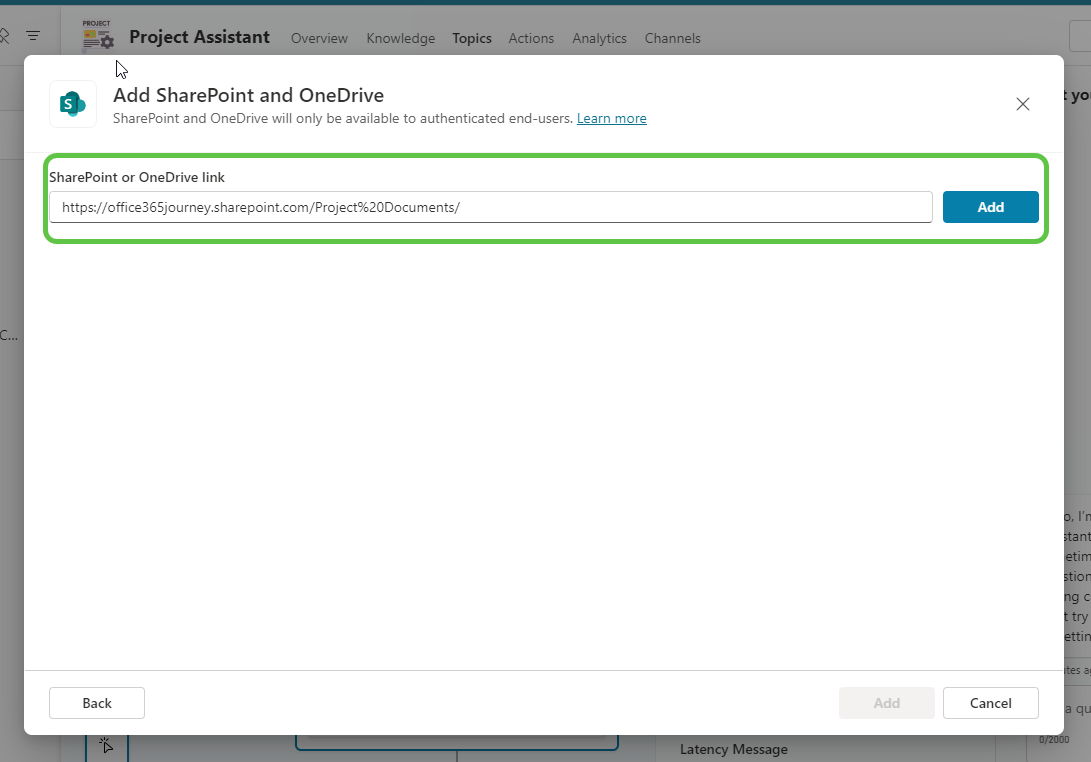
In the Add available knowledge sources pop-up, select SharePoint and OneDrive.
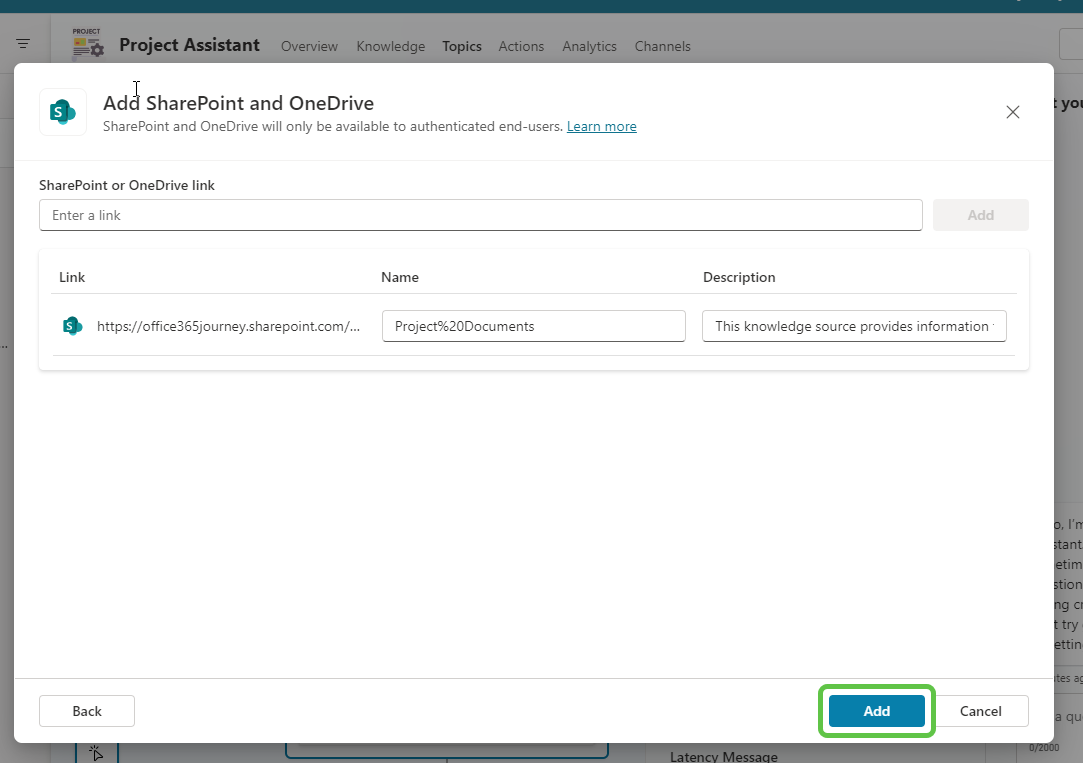
Copy the Document Library URL of the SharePoint Site where the project documents are hosted and add it to the SharePoint or OneDrive link. Click on Add.
We can add more SharePoint document repository URLs, if needed, and click on Add.
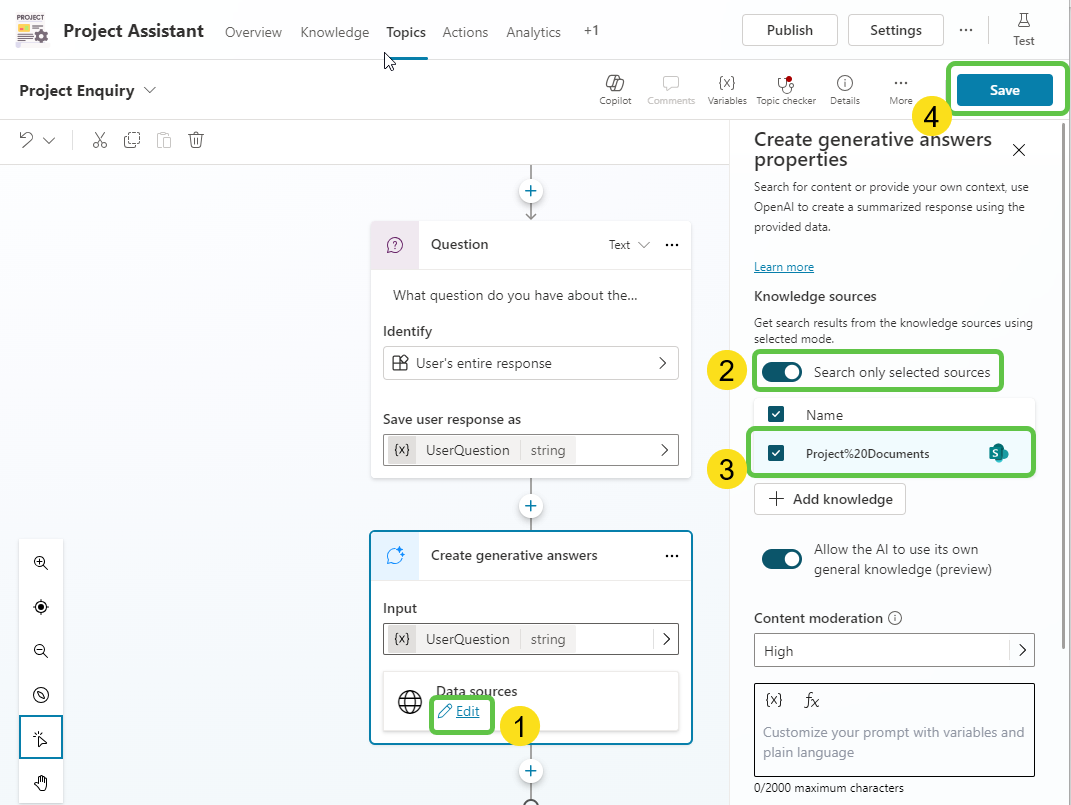
To ensure that the questions are grounded only with the configured SharePoint document, we can:
- Once again, click on Edit data sources.
- Toggle Search only selected sources.
- Check the SharePoint URL.
- Click on Save.
Thus, we have created the topic. However, on Saving, we can see that it throws an authentication error.
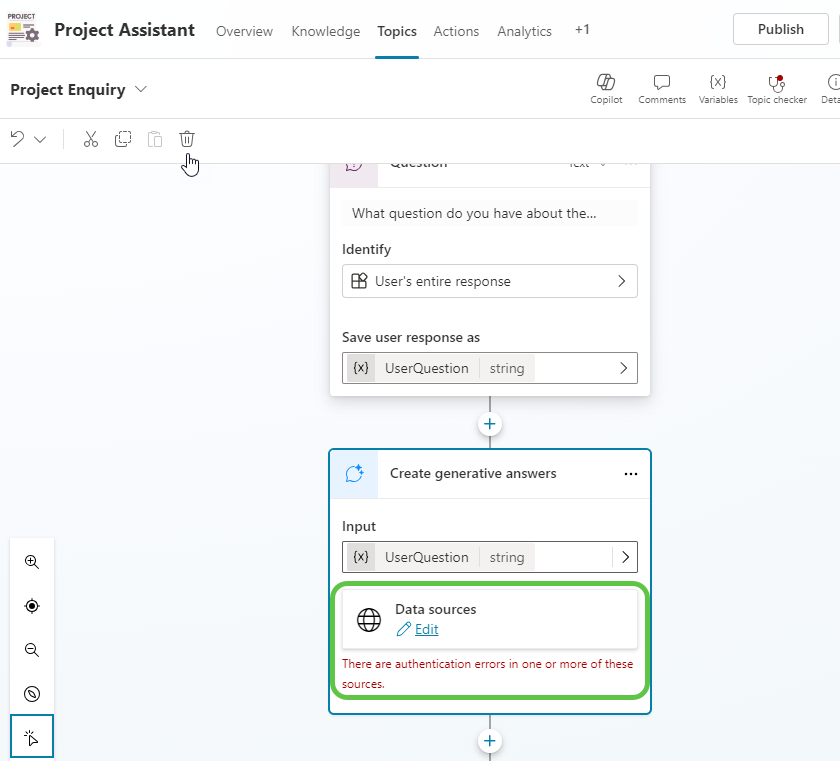
This is because for accessing SharePoint documents, we need to configure Manual Authentication whereby we can use Microsoft Entra ID, or any other OAuth2-compatible identity provider to authenticate the user to access SharePoint with the predefined access scopes.
Step 5: Configure Manual Authentication
As the first step in configuring manual authentication, let’s create the App registration first.
Create App Registration
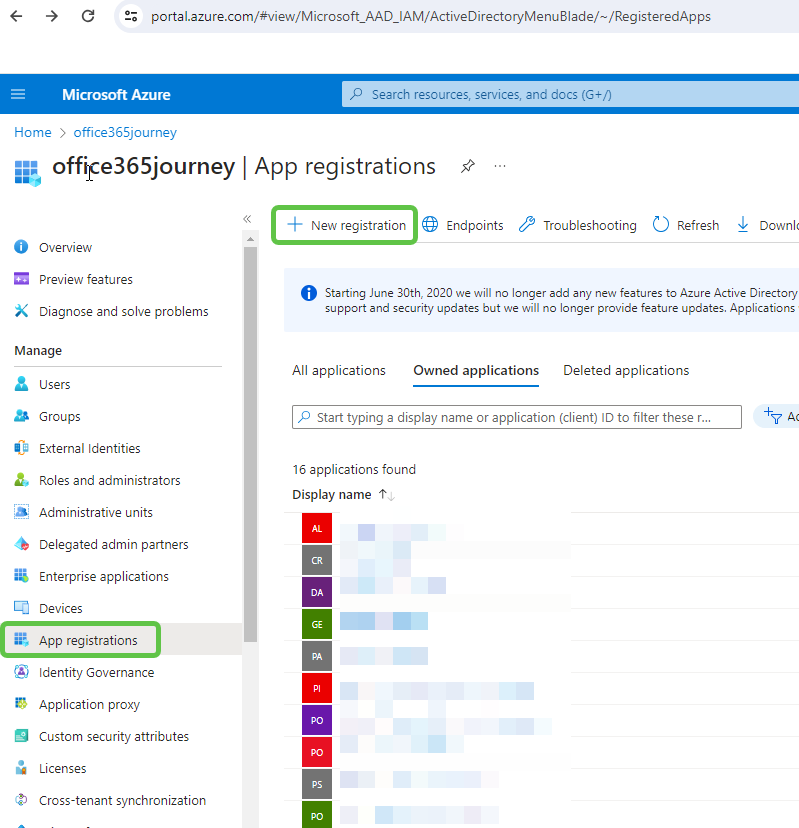
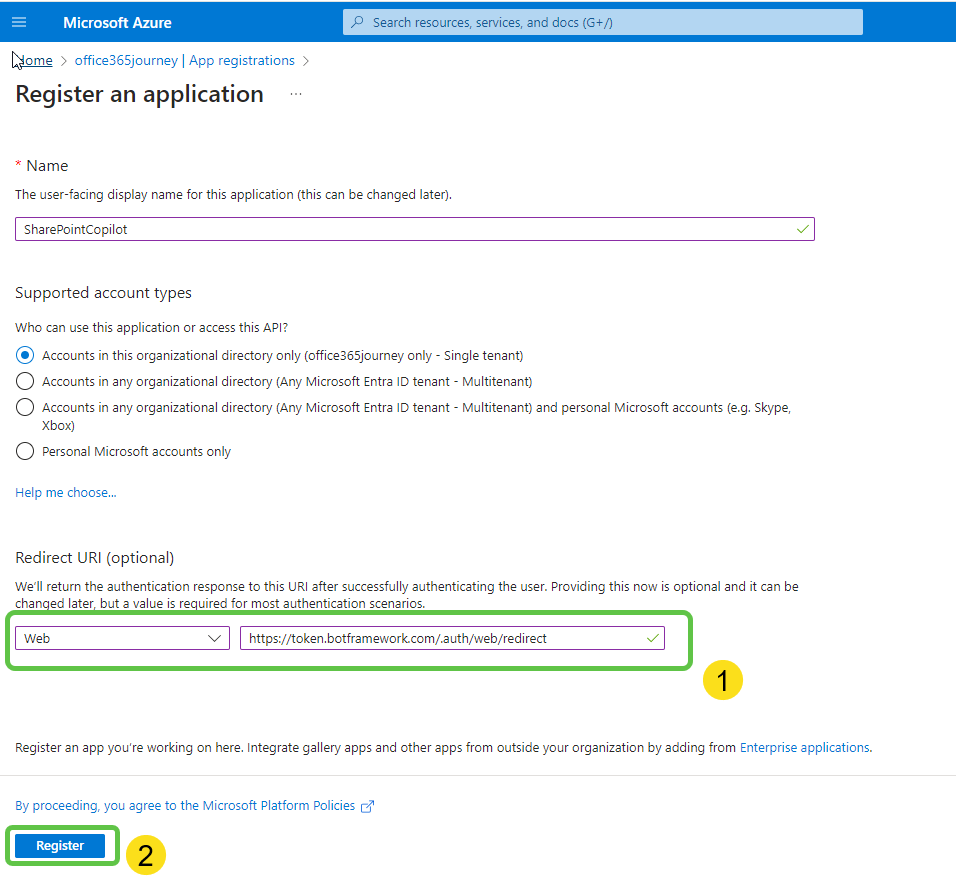
Head over to Azure Portal which will open up the Microsoft Entra ID page from which we will select App registrations -> New registration.
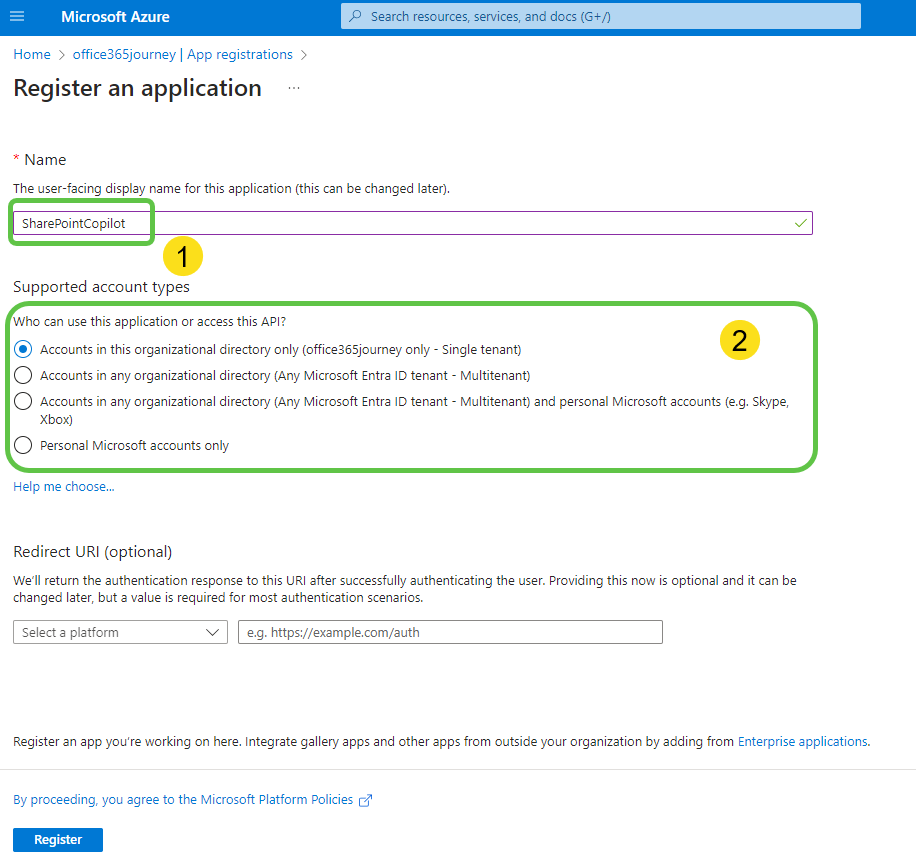
This will open up the page where we can:
- Name the app registration.
- Specify who can access the app registration ie: whether it is users in the current tenant or external tenant. For this demo, We will mention it as Accounts in this organizational directory only.
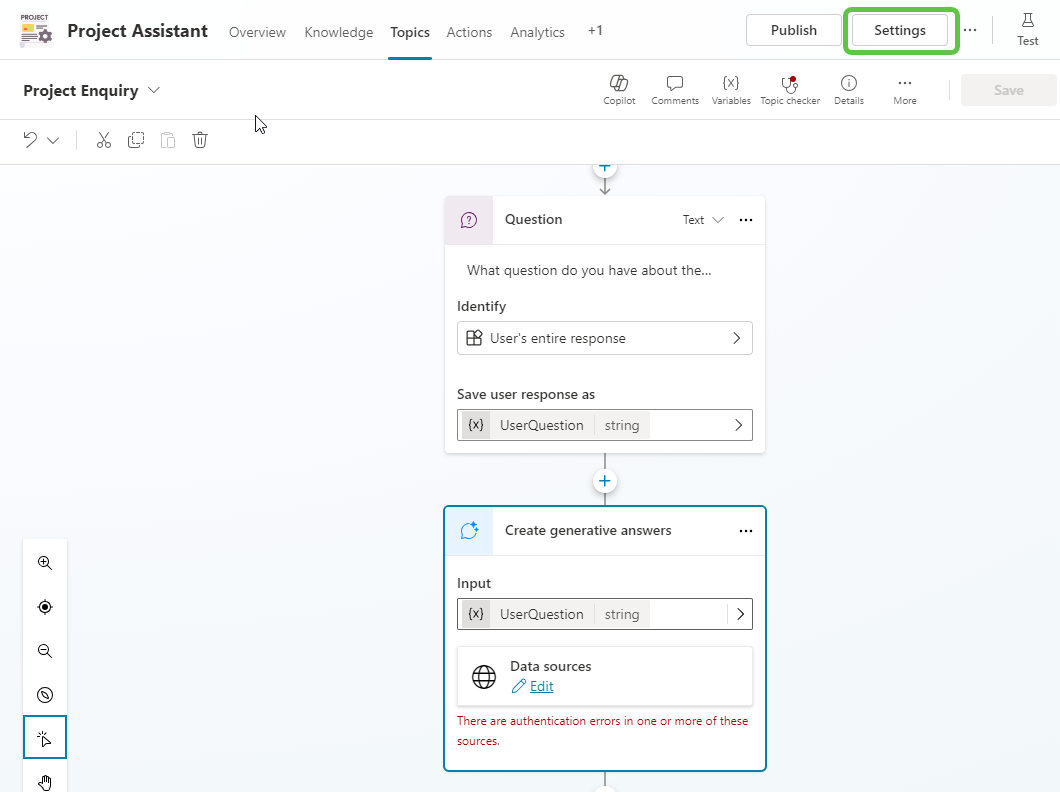
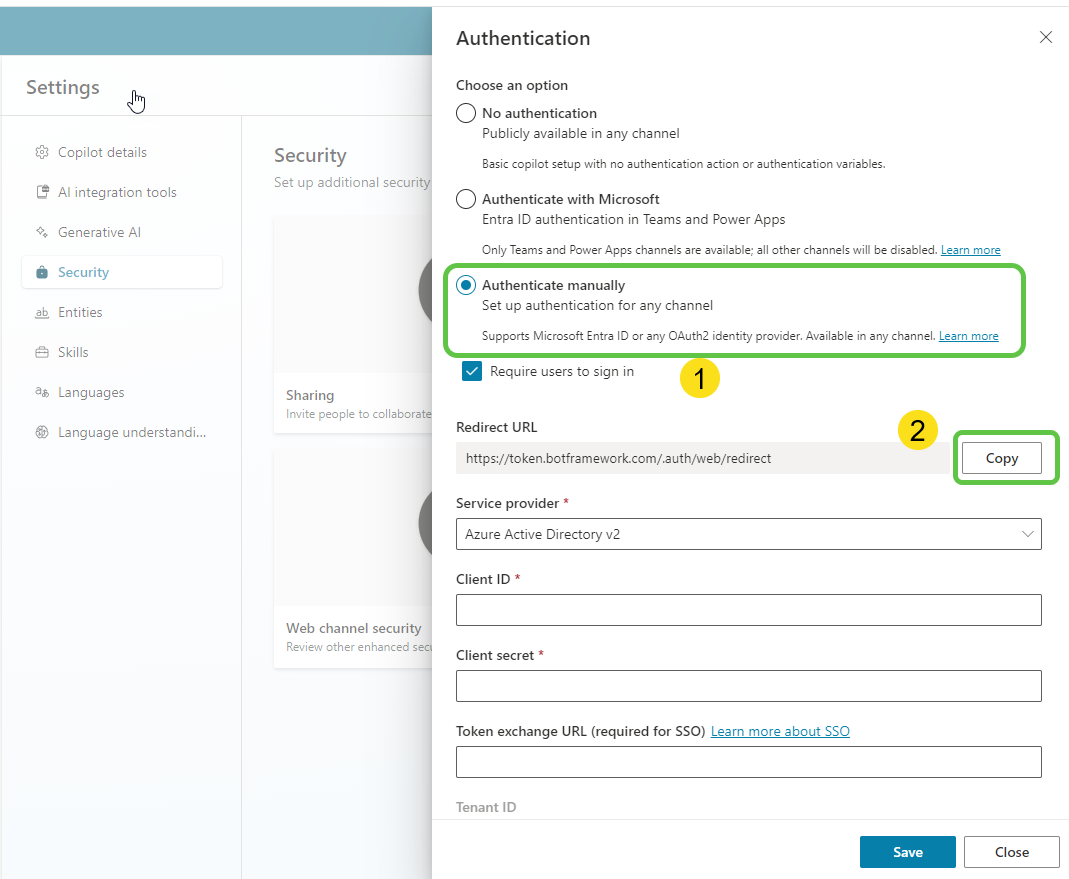
Next, we need to update the Redirect URI in the same page. For this, we will head back to Copilot that we were building to fetch the needed information. Click on Settings of the copilot.
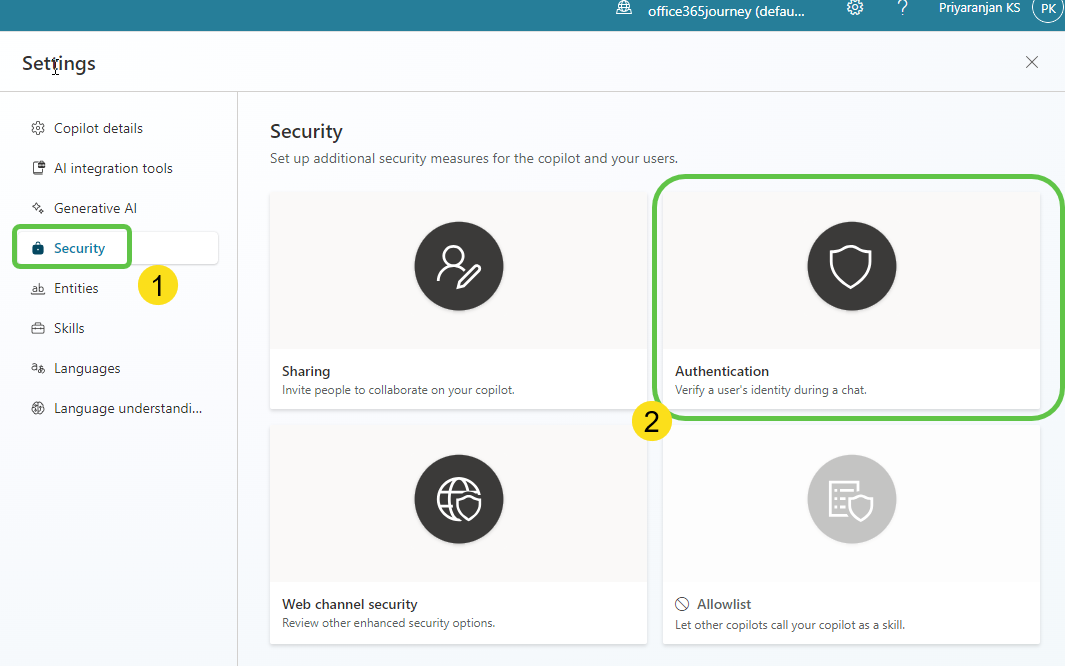
From the settings page, select Security and click on Authentication.
In the Authentication page:
- Select Authenticate manually and
- Copy the Redirect URL as we will need this in the App Registration process.
Head back to the App Registration page, and paste the Redirect URL in the Redirect URI section. Also, select the platform as Web. Click on Register.
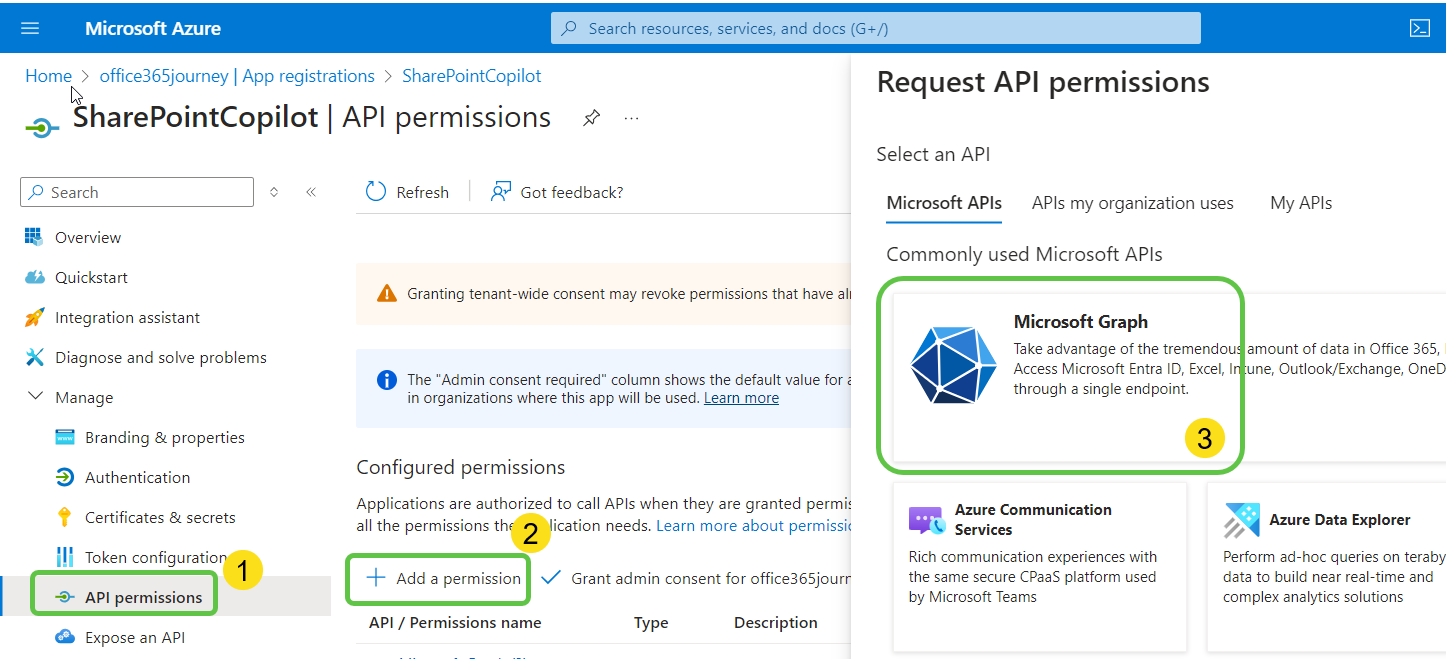
The app registration process has created the app object, but we need to do a few more things to ensure that this app can be used to authenticate the user to SharePoint. We can see that below, in the permissions section, User.Read is automatically added. But we need to add 2 more permissions as part of this demo. For this:
- Select API Permissions.
- Click on Add a Permission and
- Select Microsoft Graph.
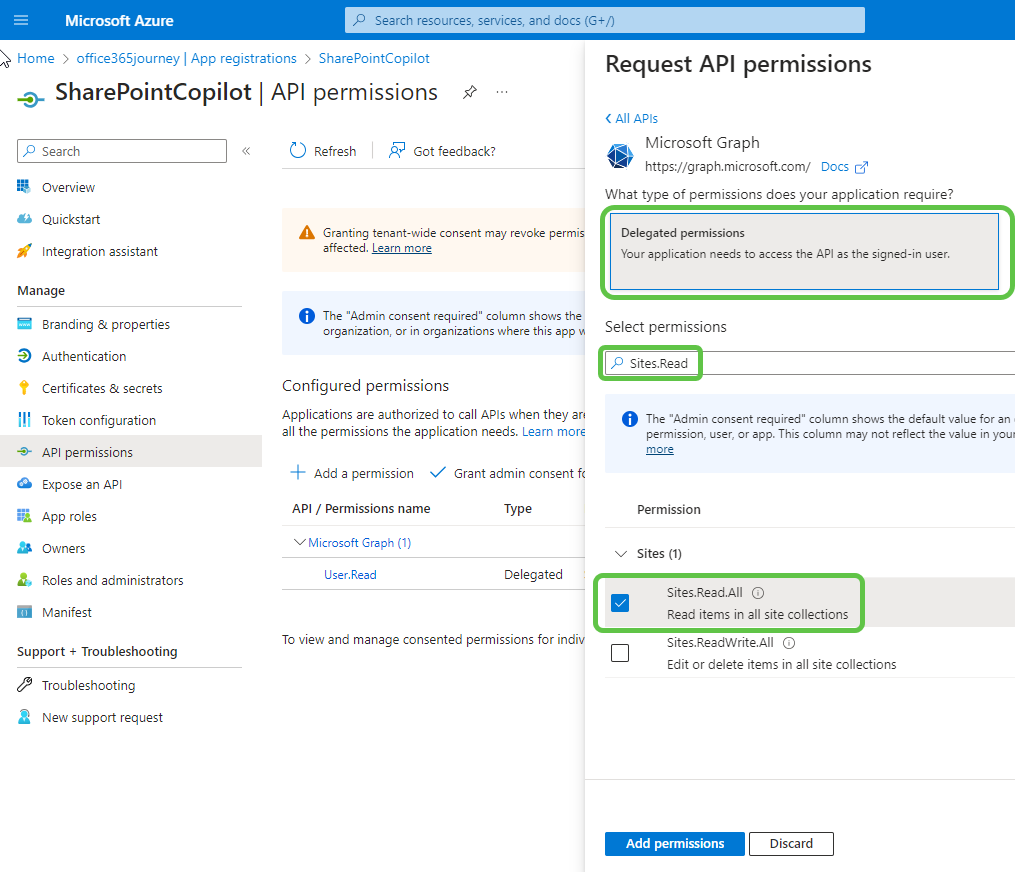
We will first add the permission to access the SharePoint Site. For this:
- Select Delegated permissions.
- Search for Sites.Read.
- Check the permission Sites.Read.All.
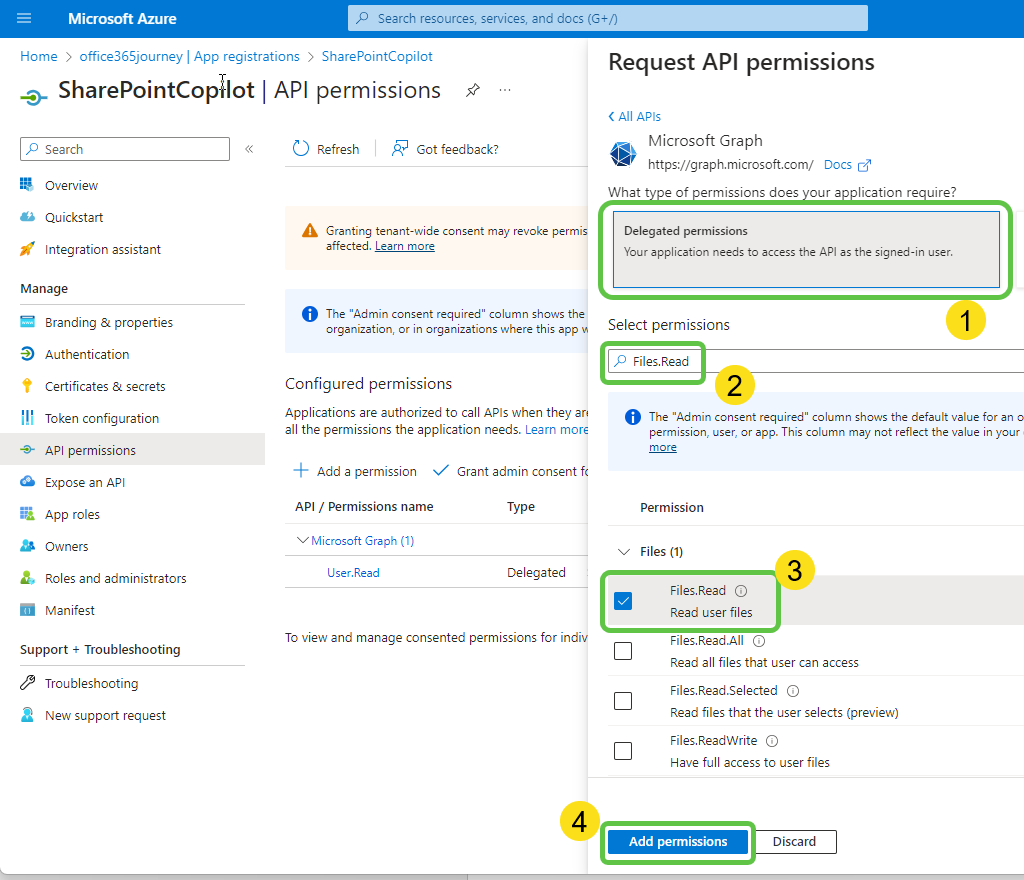
Next, let’s add the permission for accessing the files within SharePoint:
- Select Delegated permissions.
- Search for Files.Read.
- Check the permission Files.Read.
- Click on Add Permissions.
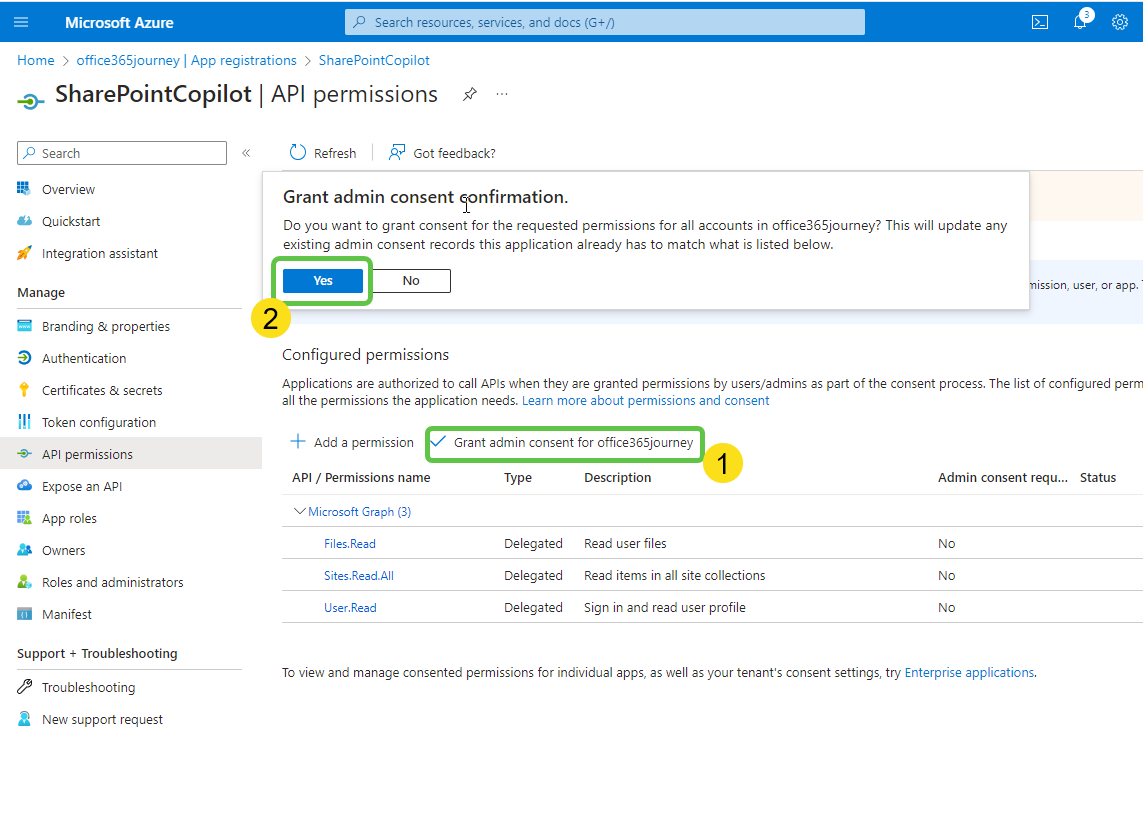
The added permissions need to be consented for use with the application. For this:
- Click on Grant admin consent for and
- Select Yes.
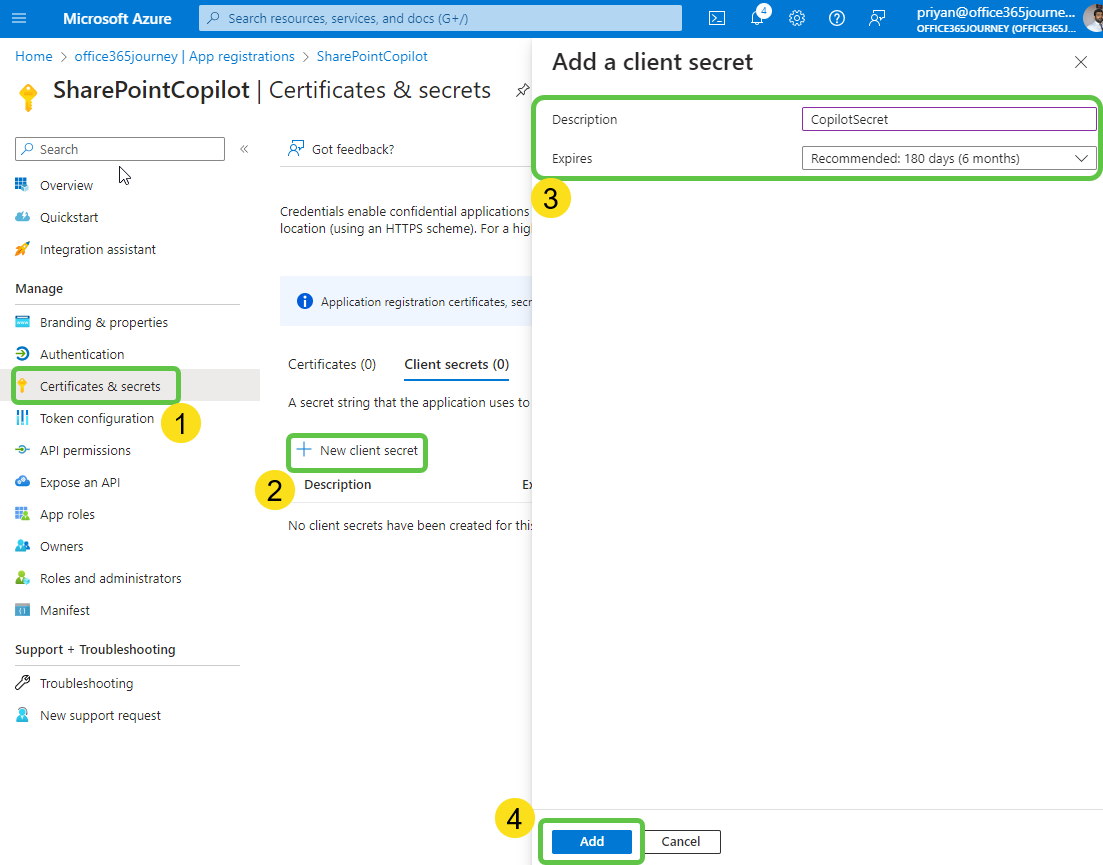
Add Client Secret
As part of enabling authentication for the app, let’s add the client secret which we will be copying and using in the copilot.
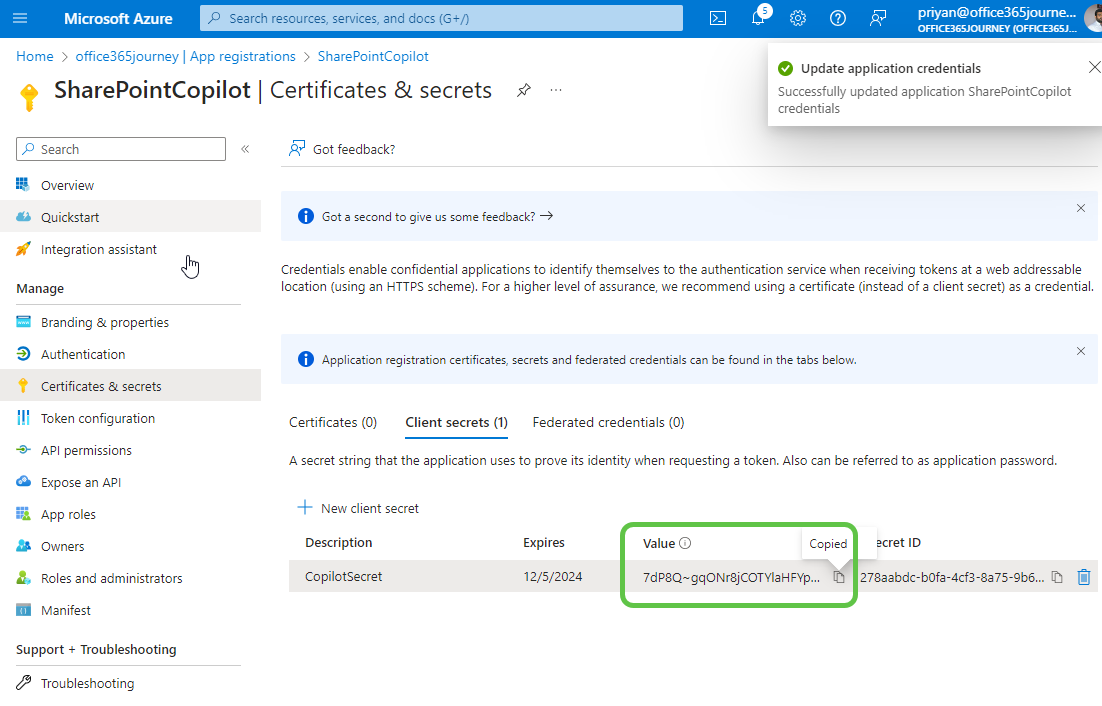
Now let’s copy the created client secret and head over to the copilot authentication settings.
Paste the Client Secret in the Authentication window of the copilot.
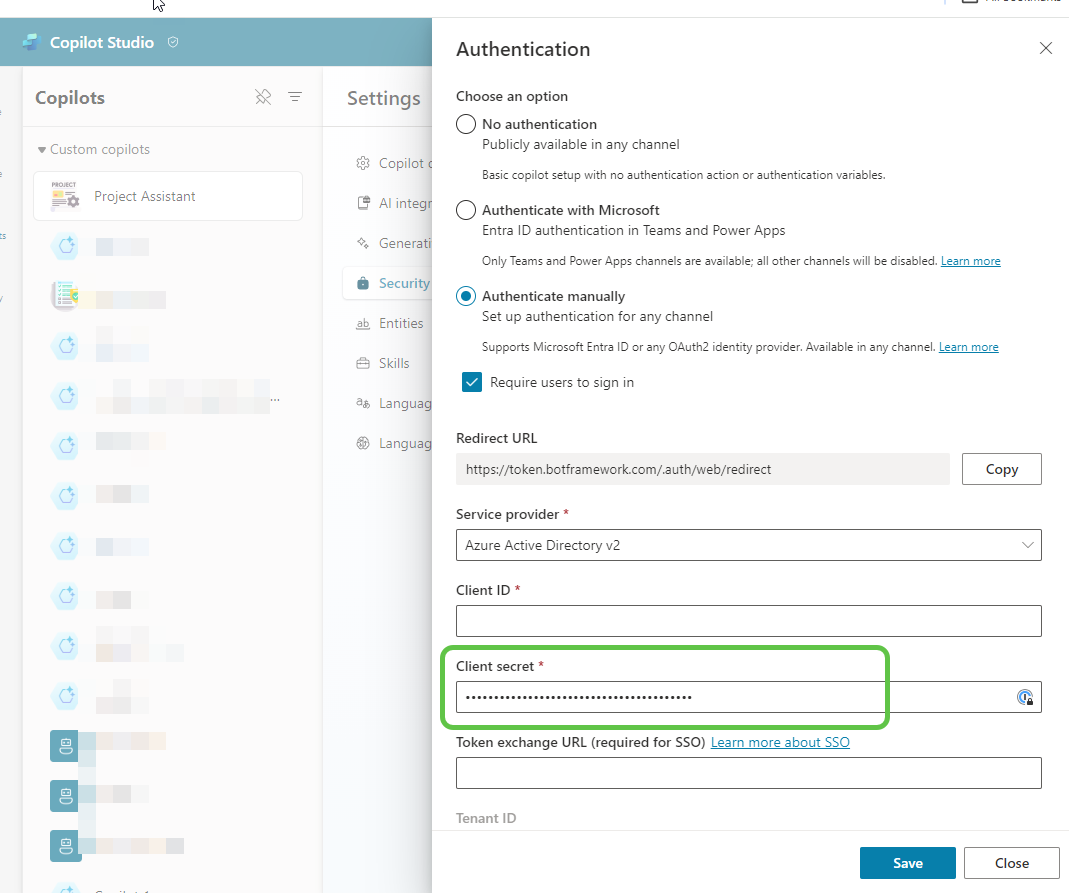
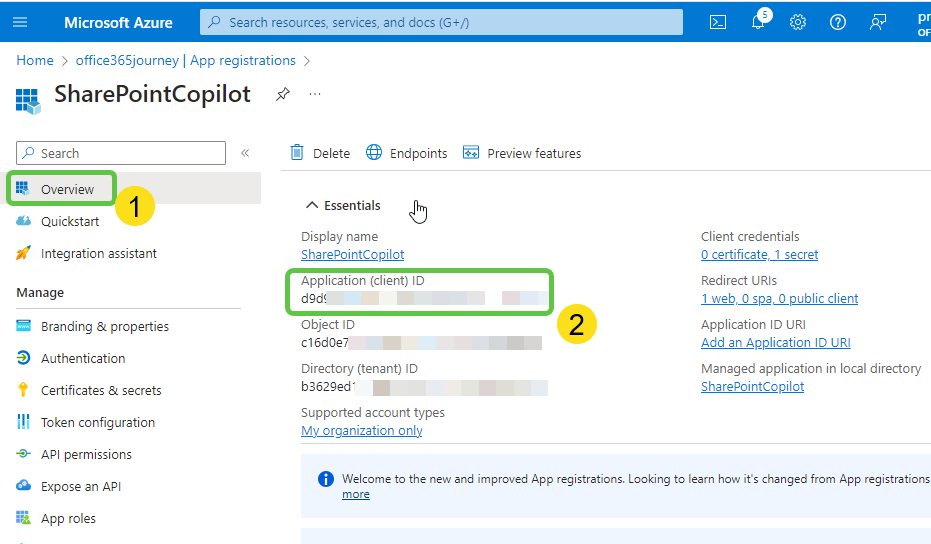
You can see above that we also need the client ID of the Azure App that we recently created. Let’s go back to the Azure App’s Overview page and copy the Client ID.
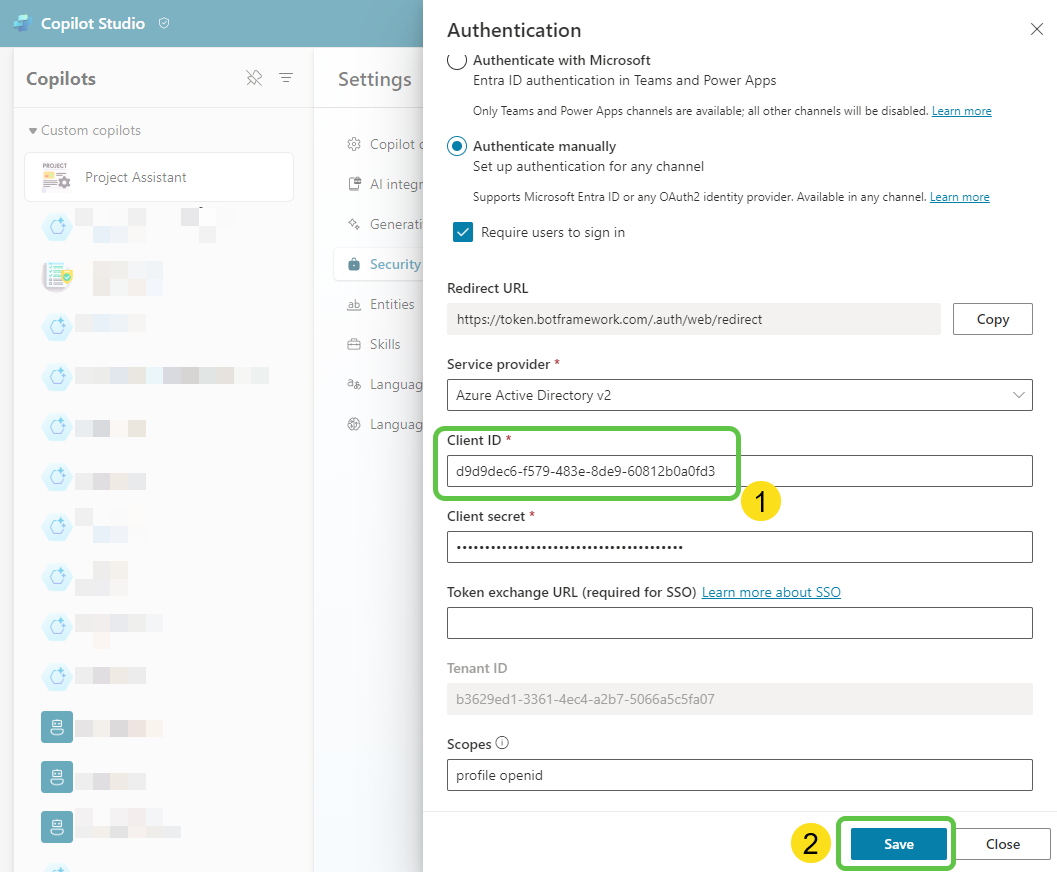
We will now finally head back to the Copilot studio and paste the Client ID as well in the Authentication page and Click on Save.
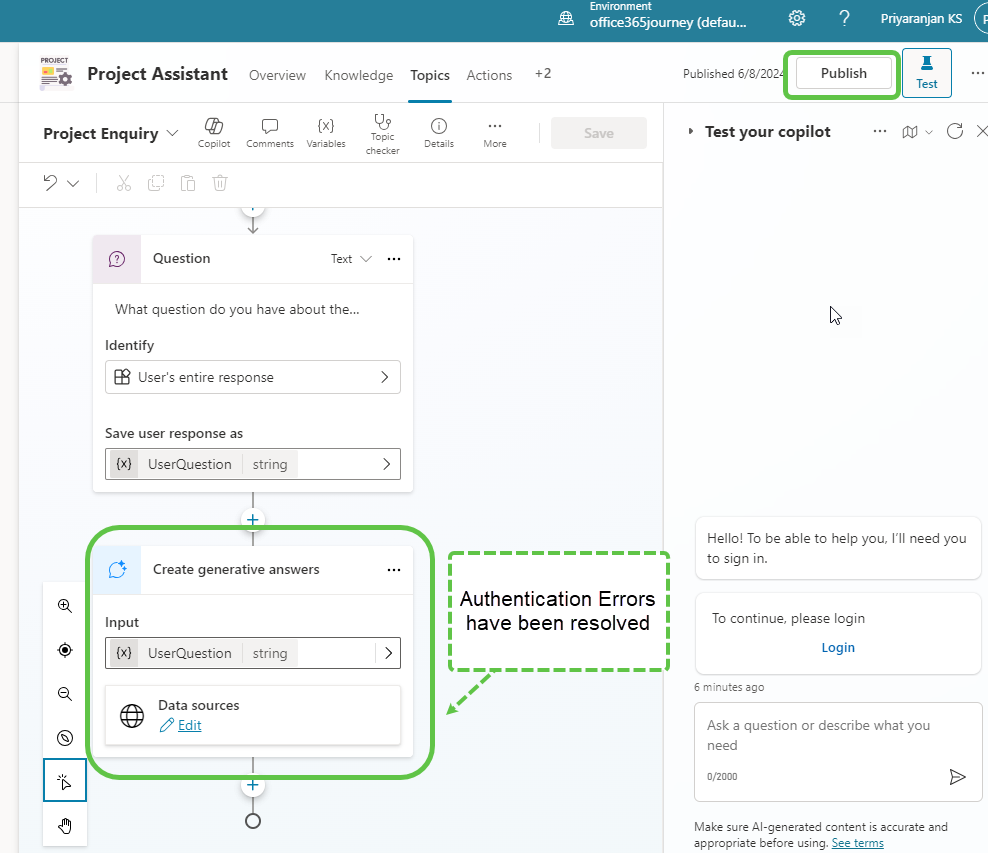
Thus, we have completed the configuration of manual authentication. We can now publish the custom copilot. We will also see that the authentication errors which existed previously in the Generative Answers node have been resolved as we have successfully configured the manual authentication using Azure app registration.
Step 6: Host the Copilot in SharePoint
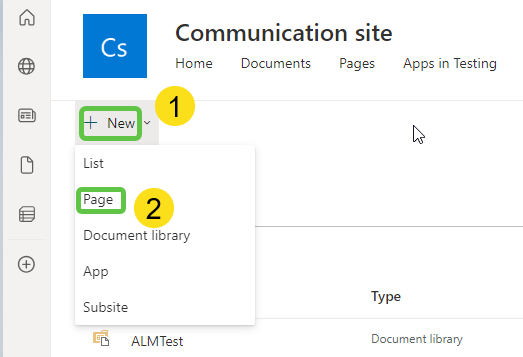
Before we can host the copilot in SharePoint, let’s head over to the SharePoint site and create a page where we will add the copilot. Click on Page.
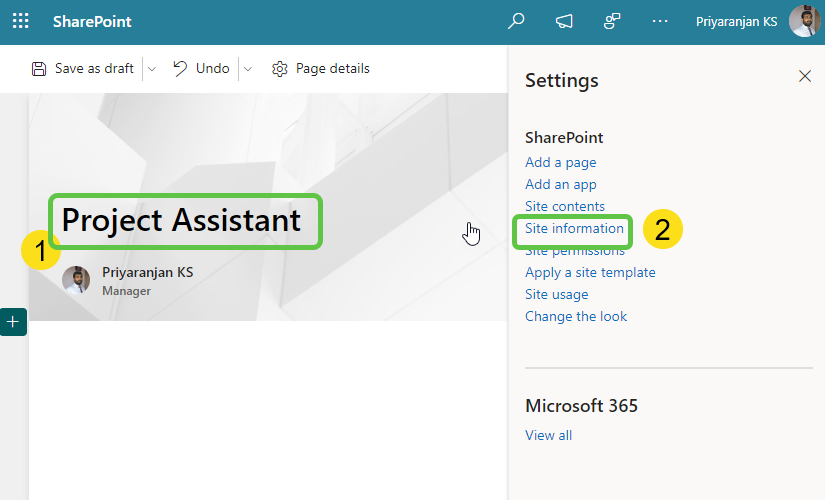
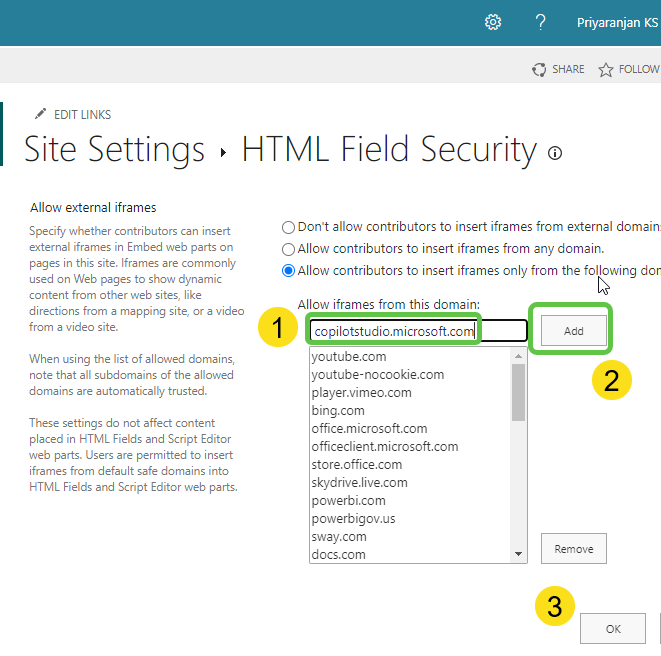
We can provide a name for the page and click on Site Information.
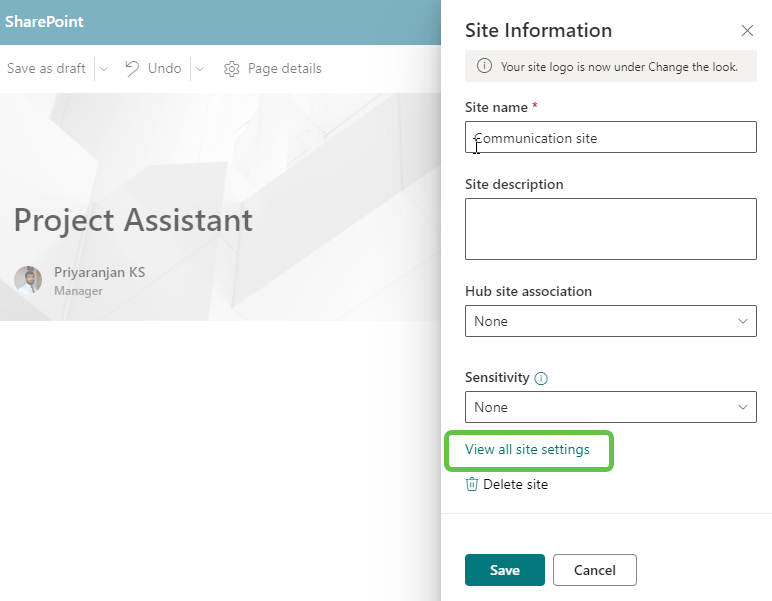
Click on View all site settings.
Select HTML field security.
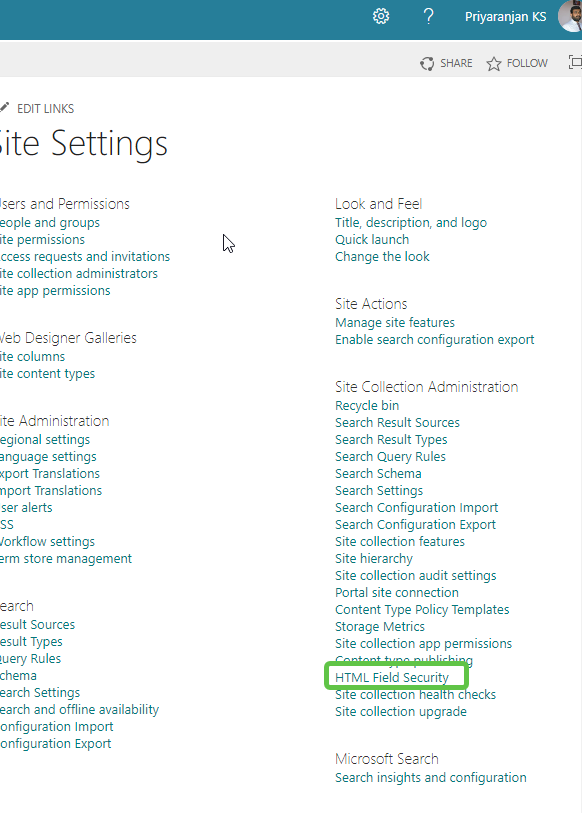
Add copilotstudio.microsoft.com to the HTML Field security so that iframes from this domain can be embedded in the SharePoint page.
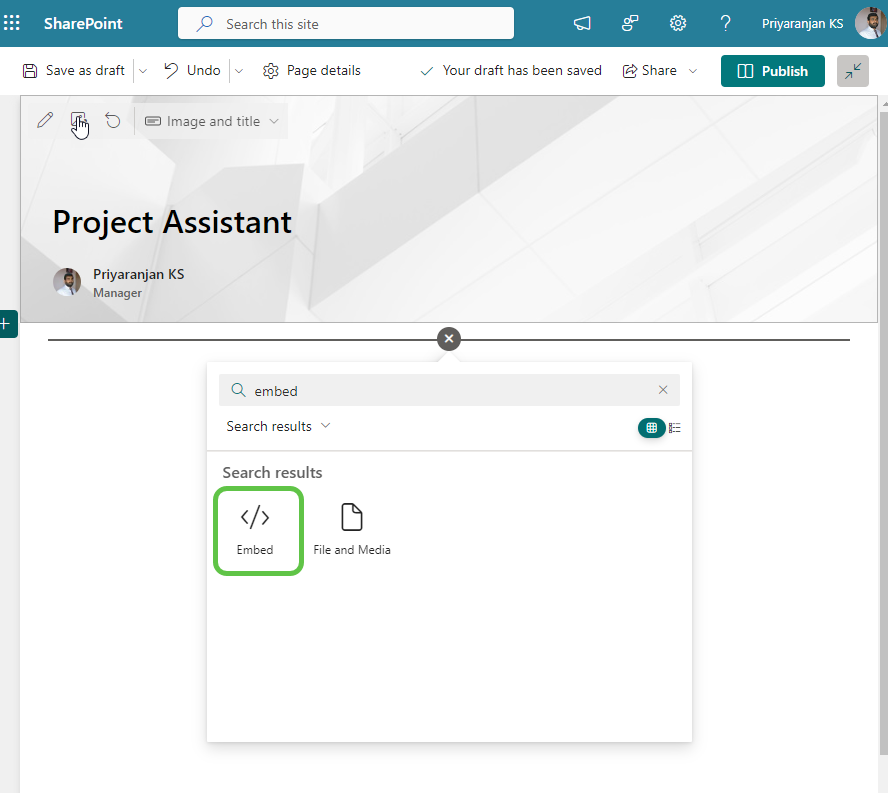
Now let’s go back to the page and add the Embed web part to the page.
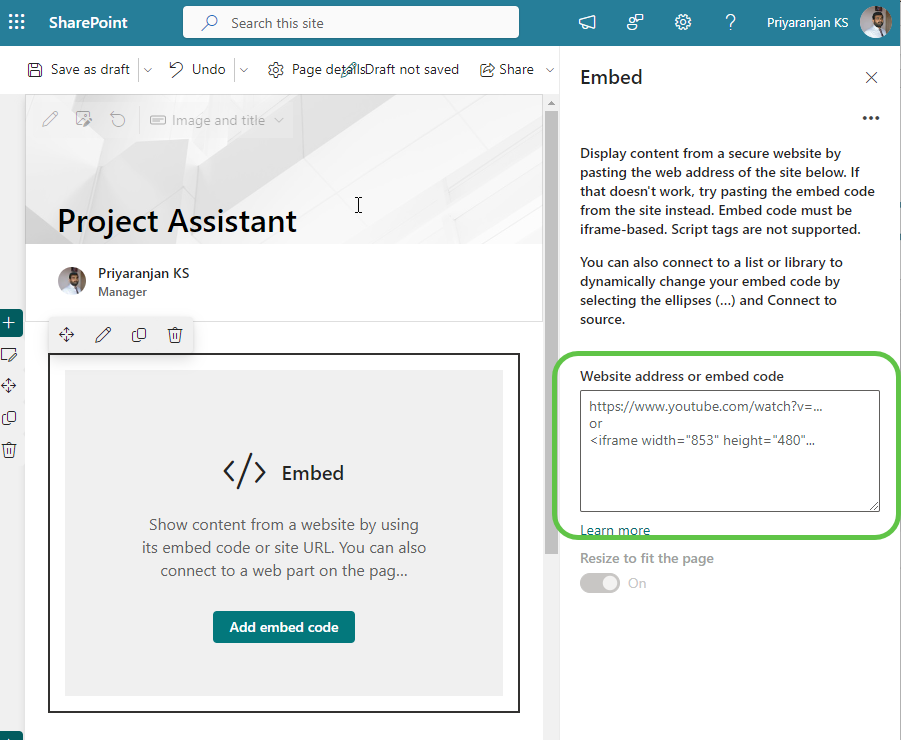
It gives us the option to add an iframe embed code into the page.
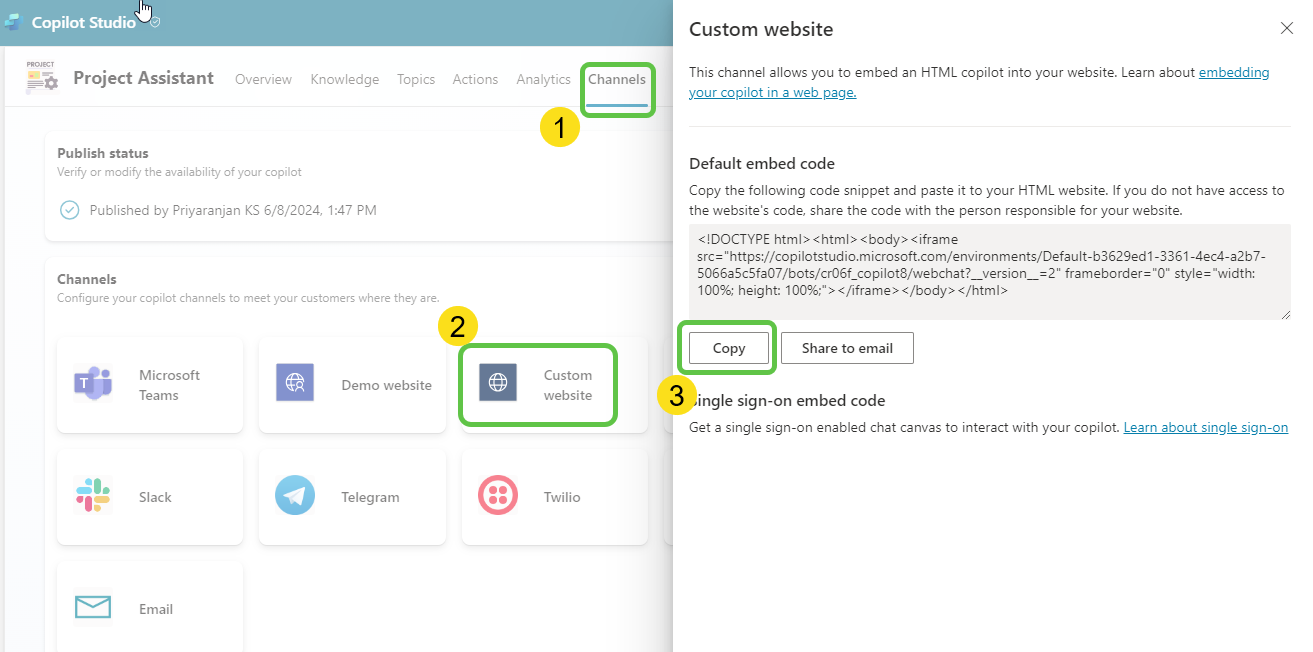
We will get the iframe embed code of the copilot from Channels -> Custom Website -> Copy.
Let’s paste the copied code to the embed section within the SharePoint Page. Click on Publish to make the page available to everyone.
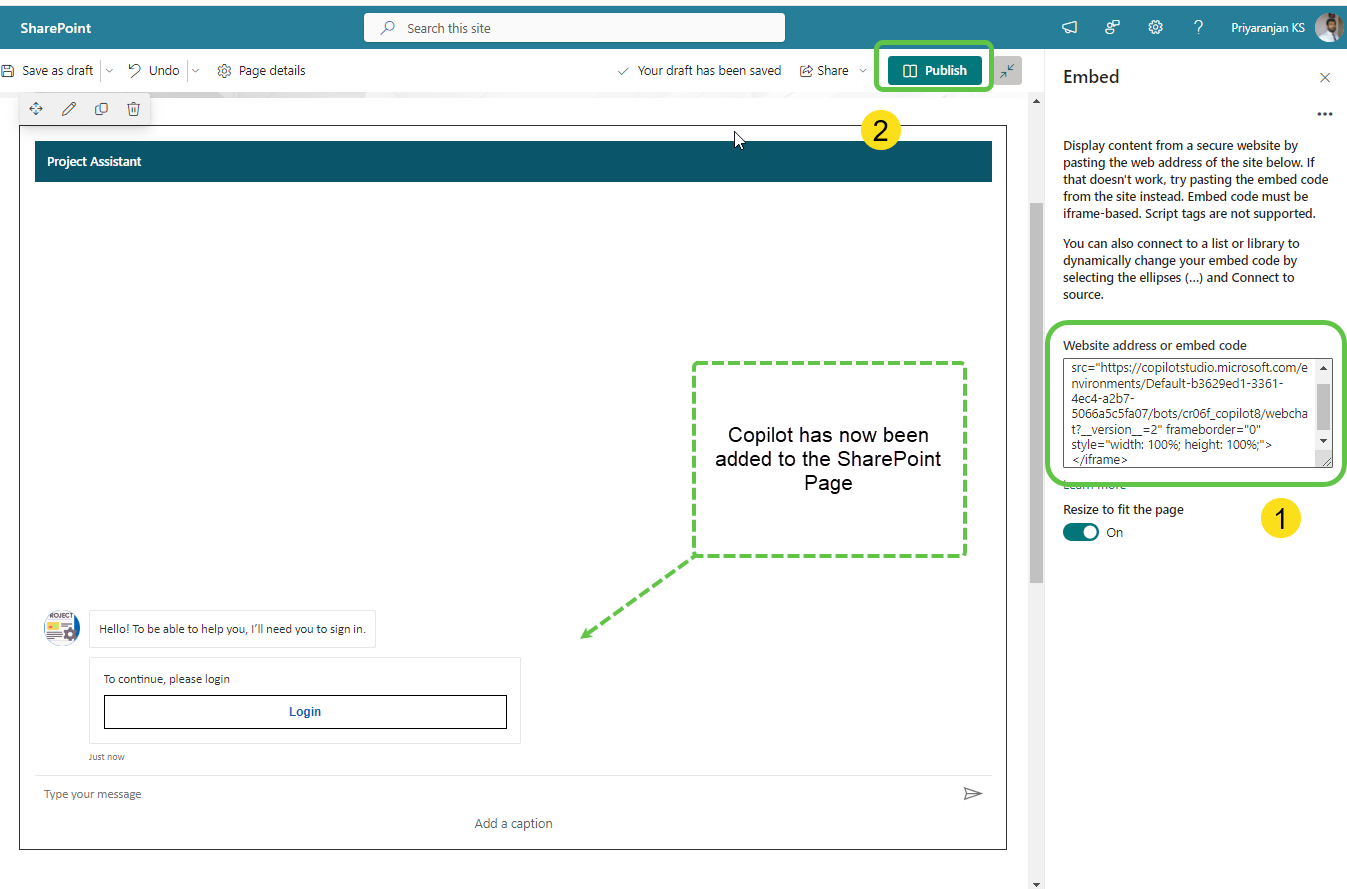
Thus, the copilot is now available for use within the SharePoint page.
Step 7: Test the Copilot
Before we proceed with the testing, ensure that the documents have been processed by going to the knowledge tab of the copilot.
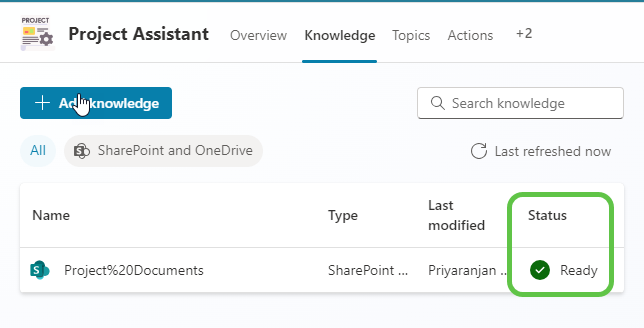
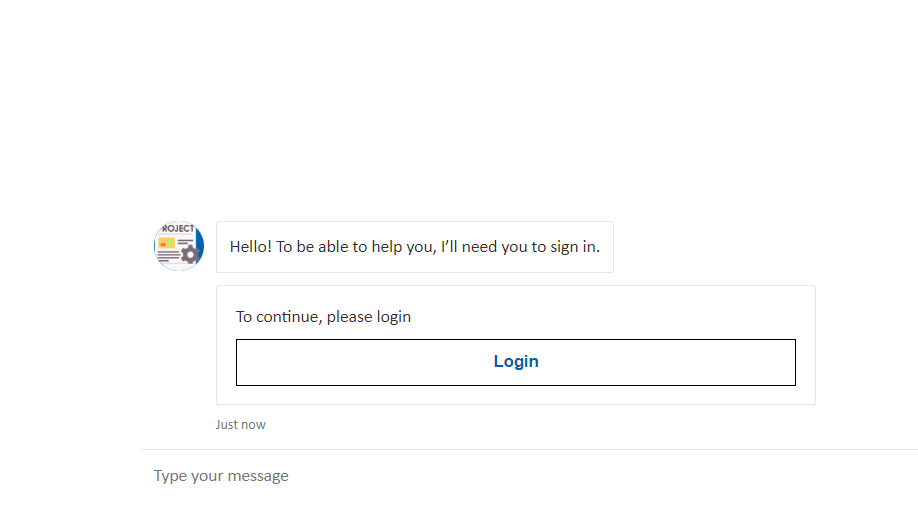
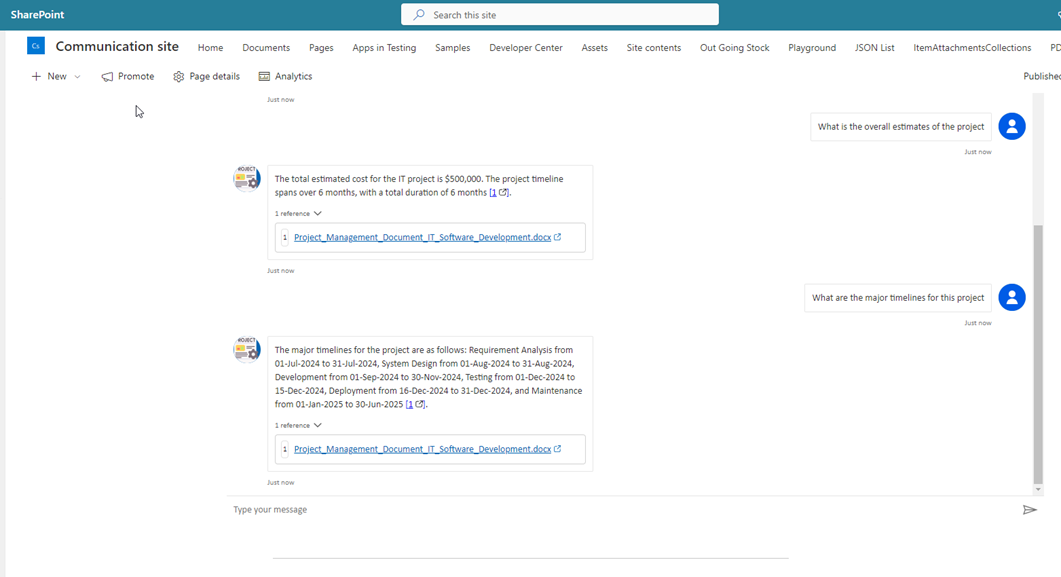
Now let’s test the bot by initiating a conversation with the copilot. As the first step, click on Login to perform the authentication.
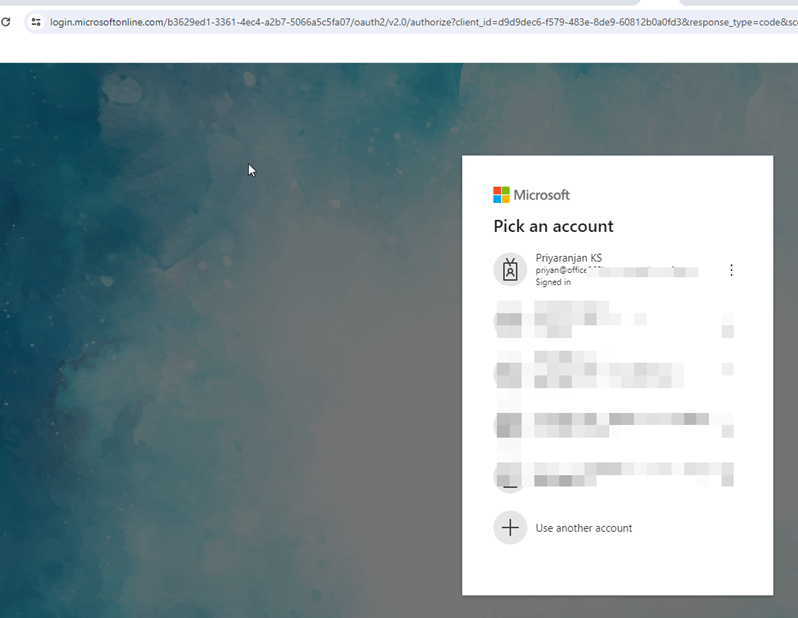
Authenticate with the user account.
This will generate a bot framework token. Copy the validation code which we will paste into the copilot to complete the authentication handshake.
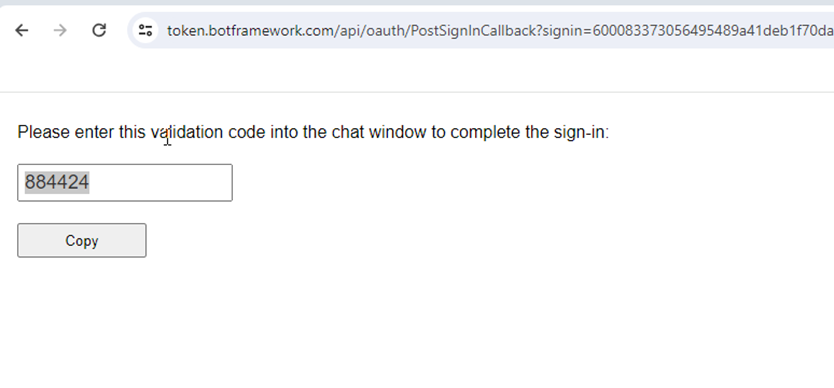
After pasting the validation code, we can continue the conversation with the copilot and ask project-related questions.

It will pick the information from the document hosted in SharePoint and provide us with contextual answers.
Conclusion
Integrating SharePoint with Microsoft Copilot Studio to create a project management copilot can significantly enhance how project information is accessed and utilized. This setup allows for secure, real-time access to project documents, ensuring that stakeholders have the most up-to-date information at their fingertips. By following the steps outlined in this blog, you can create a powerful tool that streamlines project management and decision-making processes. Happy building!


